

My roommate, Ice Nine, wanted me to call this gun the Marvelous Mussolini in appreciation of "hornet hitler" (now, "horny hitler") and the not-really-marvelous Salvo integration. Since the integration part was his idea, I would've let him name it, but my other, much more sensible, roommate christened it Shiva (something much more agreeable), in appreciation of the temple-esque nature of the front of the gun, and the 4 "hands" and 3 "eyes" aspect.

1 firefly, 3 big salvo chambers, 2 hornet chambers, 1 big salvo pump + trigger mech. The profuse amounts of duct tape are temporary: I will be replacing all the exterior mounting with putty and liquid nails once I've finalized alignment and such.
Keyring fires the air guns like so:

Write up will consist of two parts, the firefly internal mod, and the integration process.
========================
Part One
========================
Start with a preliminary check. My firefly stock had a weird problem where the firing barrel didn't align properly with the plunger tube on trigger depression. Pull the trigger and look at the front of the gun. It should look like this:

Note that the barrels are such that one of the barrels aligns with the split in the case. If you don't see this, you've got a turret alignment issue. Keep this in mind for later.
Now, open up the gun, and unscrew the plunger tube. Take this piece and burn it (but keep the spring that's behind it):
(pic from Renegade's basic firefly mod writeup)
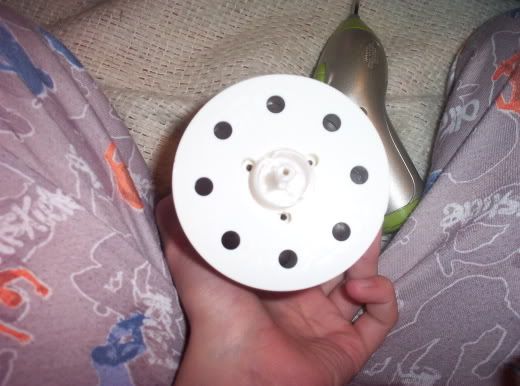
Here we have the turret mechanism:

If you don't have an alignment issue, just follow http://nerfhaven.com...?showtopic=5323 and remove ARs from the turret and rebarrel (I am actually using stock barrels).
If you do have an alignment issue, then you'll need to use some adhesive within the racheting mechanism of the turret to artificially create a new alignment between the turret and its rotation mechanism. I can't take mine apart, so I have no pictures, and thus you'll have to get the gist of it and figure out the specifics yourself.
If you don't have alignment issues, skip the next section
Turret alignment fix
----------------------------
What I did:
0) Reassemble the turret, except for the ratcheting wheel and back half of the rotation mech. Be sure to put the retention bracket (see http://nerfhaven.com...showtopic=12814 if you have no idea what I'm talking about) on.
1) Take the spring behind that blue/yellow ovalish piece I told you to burn and place that where the original spring would go in the well in the front half of the rotation mech (the one connected to the barrels):
The spring should go in that inner circle surround the peg (pic taken from writeup I linked to).
2) Hotglue the spring and while the glue is still drying, reassemble the turret, remember to put the racheting wheel (the thing with the gears that mates with the gears on the insides of the other half of the rotation mech) on top of the spring.
3) Disassemble the turret, and the spring should now be hot glued into a solid shape that roughly takes up the space behind the racheting wheel.
4) Bond the wheel to the hotglued spring. Add more hot glue if you want.
5) Add a sizeable amount of hot glue to the face of the wheel and slap on the back half of the rotation mech, screw it in, and then slap it into the firefly shell.
6) Your trigger mech should still be in, so depress the trigger to rotate the barrels, and with the trigger still depressed, rotate the barrels so that they align properly (see the first pic of alignment).
The following steps are optional, but will ensure the alignment is properly done and will hold.
7) Pull out the turret, unscrew the back half of the rotation mech, and pry that thing apart. The hot glue should still be drying, and if it isn't, hotglue isn't that strong anyways.
8) Fill the space where you initially added hot glue with liquid nails, and then reassemble the turret fully, and screw it in place.
9) Screw in the plunger tube. Depress the trigger, look down the plunger tube from the back, and make sure the hole to go to the barrel is smack dab in the center of the exit hole of the plunger tube. If it isn't, adjust by turning the turret, remembering to keep the trigger depressed so that you're changing the alignment within the ratcheting system in the rotation mech.
10) Put the plunger in. Look at it from the front. You should see this:

The picture isn't the greatest, and "up" is actually the lower right-hand corner, but essentially you should see that the holes are "centered"
Let that mess cure overnight.
Plunger tube seal improval
------------------------------
Here's what you want to get:


I took the tubing that the SMDTG pump is in, cut a section of it, and then glued it in to the front of the plunger tube, where that blue piece I had you throw out earlier is supposed to go. Hot glue around that to eliminate dead space, and then slap on an o-ring to improve seal.
The tubing should be cut to a length such that with the o-ring on and everything screwed into place, the plunger tube presses slightly against the turret. Too short, and you'll have zero seal. Too long, and you'll be a) placing undue stress on the internals and B) preventing turret rotation.
If you don't have a SMDTG pump to cut up, use any scrap tubing you can find lying around, or use 3/8(?) brass. A fat straw will probably work too. Anything that's slightly wider than the holes in the turret, should work.
Here's a view from the back:

That black ring is the stock o-ring on the plunger that I put in there for some (although probably pathetically little) cushioning.
My plunger looks like this:

New o-ring and a slightly-cut-down NF spring nested over the stock spring. Because the springs don't nest as well as I'd like, I cut down the NF spring to allow horizontal expansion, and thus reduce outward spring expansion, which could wear down the insides of the plunger tube.
Take a look at your turret again:
(of course, the rotation mech should be fully reassembled)
Compare that to the improved plunger tube, and if you have room to do it, dremel out the holes in the back to increase airflow.
Finally, I used silicone grease to lube the front of the plunger tube and the plunger head. Then reassemble the gun. Depress the trigger to rotate the turret and blow into the top barrel. If you can feel the pressure build up, then you've got a good seal. If you hear air escaping, open her back up and try again.
Ranges, shot flat from shoulder level:
Batch 1 - 54, 62, 67, 68, 73, 73, 74, 86
Batch 2 - 47, 68, 68, 70, 71, 73, 75, 75
We don't have uniform stefans yet, so I shot a mix of stefans, stock whistlers, cut streamlines, and CDTS. Measuring was done with 20-foot and 5-foot sections of vinyl tubing, laid out along the wall of the hallway. Anything not a multiple of 5 was eyeballed.
Part 2 on Page 2
Edited by Zorn's Lemma, 11 February 2009 - 12:54 AM.


