You're right, there is a little gap between the plungers but its never a concern when priming or firing. Only when you're moving the rod slowly (like while its out of the gun) do you notice the jump.Did you have any problems with there being a bump between the two plunger tubes? I thought about giving this mod a shot a while back, but thought that the fact the plunger has to make the jump between the two PT's might impede power or pop off the second PT.

The Access Bow
#26

Posted 27 September 2008 - 04:52 PM
I beat my wife."
#27

Posted 27 September 2008 - 05:08 PM
Edited by analogkid, 27 September 2008 - 05:09 PM.
#28

Posted 27 September 2008 - 05:18 PM
I beat my wife."
#29

Posted 27 September 2008 - 05:56 PM
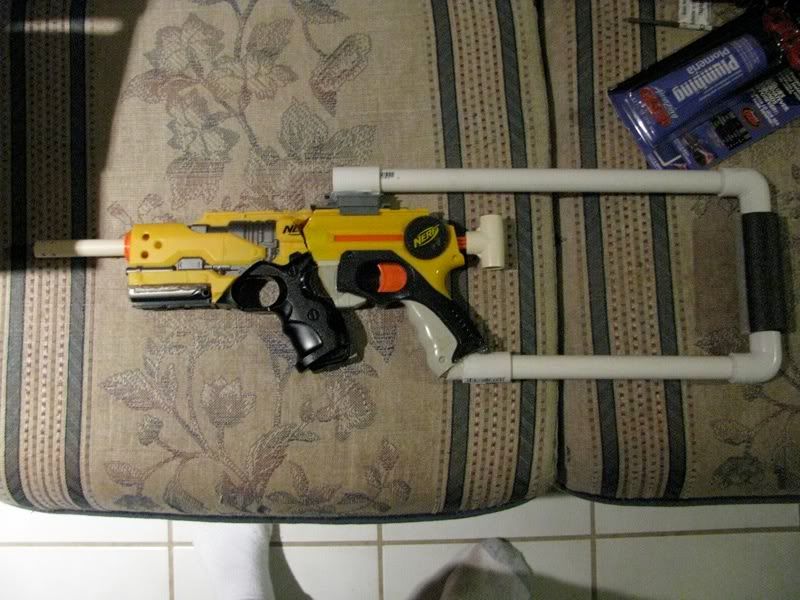
It uses a tactical rail as you could guess.
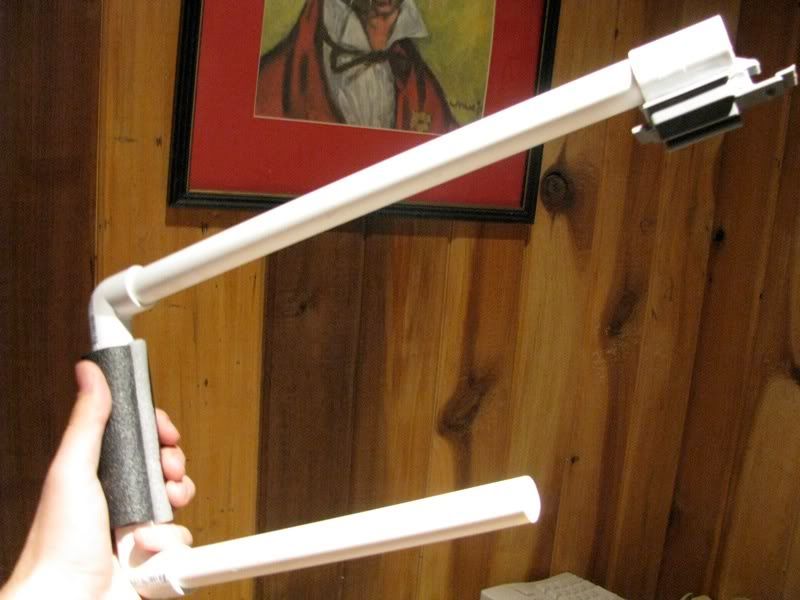
I first took a 1/2" PVC coupler and 2-ton epoxied it to the handle of the NF, to one side so i could still open up the gun.


Once dried i put on goop for some unknown reason.
Then taking:
1x tactical rail connector
1x 1/2" PVC coupler
2x 1/2" PVC right angle'd connectors
1/2" PVC pipe (both regular and thin walled)
1/2" PVC pipe insulation wrap
..I put together a stock that would be comfortable. Put the coupler on the rail connector and epoxy and goop and whatever else adhesive you want it so that it will NOT move. Fit the pipe into the coupler and make sure it's meant to stay in there.
Then.you can guess how to put the rest together. Just make sure that the length of the pipe on top is far enough so that the rail connector will lock in place securely when its pushed forward, while the lower pipe (thin walled) will slide into the coupler on the handle.
I put the insulation wrap on the stock for comfort, but it for some reason didn't reach all the way around so i filled the rest of the empty space with backer rod. VERY COMFORTABLE in case your wondering.
Finished Stock:

How it's attached:
Off:

*Slide on the rail and put the pipe into the coupler snugly*
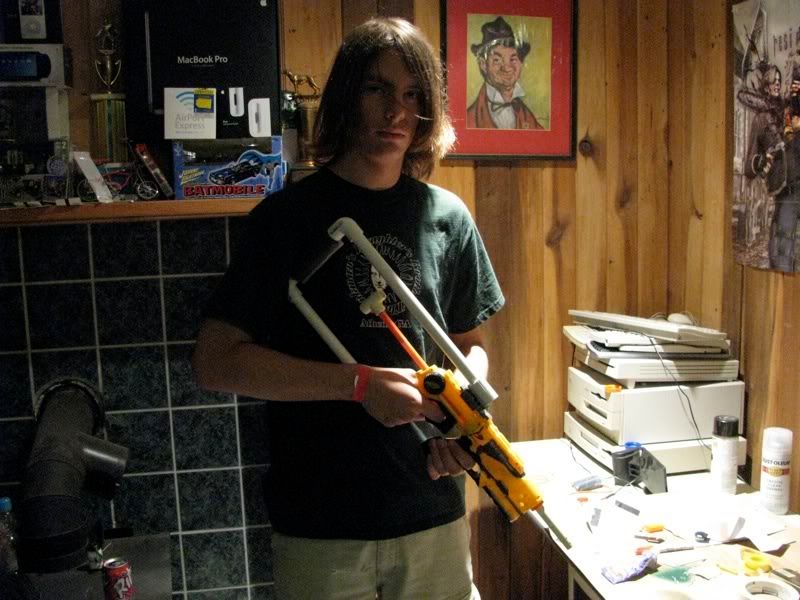
In place:


Works great, and is removable. I'm happy.
I beat my wife."
#30

Posted 27 September 2008 - 07:42 PM
I put in the tube in the NF shell to get a feel of how i'd mold the DS shell to fit it.

Removed all internal parts of the DS and hacksawed off the back just enough to get the main back wall off. Then sanded all the internal parts that hold the catch plate & anywhere around it.

Did it enough to where it slid onto the tube at least.

I made cuts with the hacksaw up the back of the DS until it let the tube slide forward just enough so it could rest where the DS's plunger tube would've been.

Once the two shells fit together well enough, i put a long thin strip of plexiglass where the two tactical rails meet to keep the two together and epoxied. I also put a piece (look at picture for the shape) where the back of the DS handle is so it connects to the NF shell. Also epoxied.


This next part was tricky. Getting the plunger tube's "caps" to fit a 1/2" CPVC coupler. Had to do alot of sanding and filing, but eventually got it to fit snugly without breaking.

I put it on the end of the tube and epoxied the hell out of it so it was sure not to get pushed into the tube.
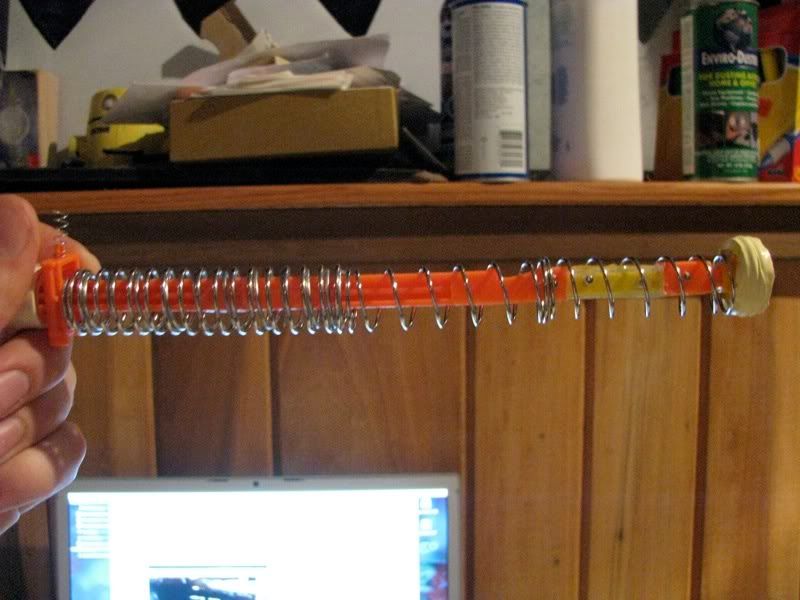
The finished Internals:

Then to add another tactical rail onto the gun, i took a spare Mavrick cocking handle and cut the rail off so it'd be flush with the trigger guard of the DS. I hot glued it onto the space where the ammo holders would've been.

And you are finished!

The reason why i call it the ACCESS Bow is because of all the rail accessories that can be put on it. It works great with the tactical shot i made because i can put it on the front of the top rail on the DS and cock it while its still attached. Like so:

And the bottom rail is perfect for a tactial light.

Various shots:


Incase your wondering, the handle of the DS is extremely comfortable when holding.

Ranges are from 85'-95'. I'm very satisfied.
Video:
Q's? C's? F's?
I beat my wife."
#32

Posted 27 September 2008 - 09:06 PM
Looks mighty comfy. Enjoy!
On a side note, if you don't mind, I'd like to link the post involving your stock to the Accessories directory, seeing how it's something that could be done to a number of the newer rail-equipped guns in some fashion or another.
#33

Posted 27 September 2008 - 10:21 PM
I thought you'd never ask.I like it. It's not what I was expecting; I pictured the stock running evenly close to the plunger on both top and bottom, as though the NF/DS guns were scaled up to the size of a crossbow, but now that I consider the size of the gun, I think I should agree with your version. A stock that ran closer to the bottom of the plunger would've probably connected at a place that would get in the way of your thumb.
Looks mighty comfy. Enjoy!
On a side note, if you don't mind, I'd like to link the post involving your stock to the Accessories directory, seeing how it's something that could be done to a number of the newer rail-equipped guns in some fashion or another.
It really is comfortable, I liked Dayko's mod where it was closer to looking like a Crossbow, but i guess with mine i'm more going for the performance of one with a different feel. And the stock is pretty easy to get off, but it stays on even when you're pushing on it pretty hard, so i really did accomplish what i wanted to do with it.
Thanks alot.
I beat my wife."
#34

Posted 29 September 2008 - 03:17 PM
Edit: Never mind That last question.
Why Did you use a ds and nf? And How loud is it? Have you put bungees on it? If so what are the ranges with bungees?
Edited by TheNerfLoki, 29 September 2008 - 03:24 PM.
TNL,
#35

Posted 29 September 2008 - 05:20 PM
Very nice work. Is it hard to cock with all those springs in there?
#36

Posted 29 September 2008 - 05:28 PM
I've tried putting bungees on it but they always start to bend the rod whenever it gets primed, so i keep them off. Ranges are good enough without them.
As i said before, not at all. Watch the video and you'll see.Must...resist...buying 2 more NFs!! *twitch twitch*
Very nice work. Is it hard to cock with all those springs in there?
I beat my wife."
#37

Posted 29 September 2008 - 07:53 PM
#38

Posted 29 September 2008 - 10:32 PM
I beat my wife."
#39

Posted 30 September 2008 - 11:36 PM
I went back inside the guns internals to make them more durable. I first dealt with the problem of the gap in the plunger tube. As someone pointed out, the gap did become a problem over time, usually making the plunger head snag on it keeping me from priming the gun.
I took off the e-tape and plumbers goop i had put on there and straightened the tubes up as best i could. Then, taking some clear packing tape i wrapped a few even layers around where the tubes met. Then epoxy was put over the tape.

Then, the rod needed to be reinforced. It broke several times after i first constructed it, and i found a way to keep it all in line.
I drilled small holes in the rod where i made room for more springs and put small lengths of a wire coat hanger and epoxied them in. This kept the rod physically together, rather than just by epoxy. Also, re-epoxied everything.

And i wrapped the plunger head with new layers of thread seal tape.

To make switching out barrels easier, i took some of that 1/2" PVC insulation wrap and wrapped it around a 1/2" CPVC pipe. Then, taking some of the plastic wire ties that come with the nerf guns to secure them in their boxes, i tied them around the insulation so I could get the tightest fit. I slid one side onto the coupler to make it even easier.
And finally, just for looks right now, i put the Disc Shot's trigger back in. I will definitly make some use of this once i get another AT2K.
Finished Internals:

New Video (with stock demo):
EDIT: Also, i made a speed loader out of 1/2" CPVC, e-tape, and epoxy. The gun also feels heavier than before, which is good, it feels even better to hold now.
I beat my wife."
1 user(s) are reading this topic
0 members, 1 guests, 0 anonymous users


