Use teflon tape. Not only will it seal better, it will also allow you to disassemble/maintain the gun.

174 replies to this topic
#151

rork
-
- Members
- 1,008 posts
Member
Posted 24 October 2008 - 12:05 AM
<a href="http://nerfhaven.com...howtopic=20296" target="_blank">SNAPbow Mk. V</a>
<a href="http://nerfhaven.com...howtopic=20409" target="_blank">Make it pump-action</a>
<a href="http://nerfhaven.com...howtopic=20409" target="_blank">Make it pump-action</a>


#152
Foam Shooter
-

- Members
- 212 posts
Member
Posted 24 October 2008 - 05:56 AM
1. I'm using the +Bow Spring
2. A normal one
Definately use the e-tape teflon tape method.
I am liking the perfomance... a lot.
2. A normal one
Definately use the e-tape teflon tape method.
I am liking the perfomance... a lot.
Edited by Foam_Shooter, 24 October 2008 - 05:57 AM.
#153
MercenaryXero
-

- Members
- 143 posts
Member
Posted 25 October 2008 - 11:51 AM
Functionally finished. I've been thinking about putting airgun internals, sheathed in PVC, on the bottom as a grip/grenade launcher style thing. The airgun itself would have some tubing running up to the top, into a petg barrel inside 3/4" PVC. Anyway, the picture:
#154
TheNerfLoki
-

- Members
- 312 posts
Member
Posted 25 October 2008 - 12:02 PM
Sorry to derail the thread, but I am making a variant of this, and need a detailed explanation of how the trigger/catch works, I have searched but have not found anything in depth. Pictures would be preferable.
Am I the only one who uses the sig function for a sig?
TNL,
TNL,
#155
rork
-
- Members
- 1,008 posts
Member
Posted 25 October 2008 - 12:50 PM
TNL: Are you fucking kidding? It's on the first page of the PINNED topic on trigger designs. And there's an in-depth explanation of the evolution of the design here...and yet another detailed explanation here. I just use different materials, specifically an industrial-strength clothespin, which is easier to work with. However, it is obvious that a normal one will work, given the posts above yours. Incidentally, if anyone looks on the second page of the second link, they will see the SNAPbow in embrio, as it were.
MercenaryXero: looking good! And integrations are cool...
MercenaryXero: looking good! And integrations are cool...
<a href="http://nerfhaven.com...howtopic=20296" target="_blank">SNAPbow Mk. V</a>
<a href="http://nerfhaven.com...howtopic=20409" target="_blank">Make it pump-action</a>
<a href="http://nerfhaven.com...howtopic=20409" target="_blank">Make it pump-action</a>
#156
BustaNinja
-

- Members
- 1,916 posts
Member
Posted 25 October 2008 - 01:22 PM
Nice. I like how you took my charging rod idea. Probably improved on it too. It was kinda a weird design. What did you use for the charging rod and what spring do you have in it?Functionally finished. I've been thinking about putting airgun internals, sheathed in PVC, on the bottom as a grip/grenade launcher style thing. The airgun itself would have some tubing running up to the top, into a petg barrel inside 3/4" PVC. Anyway, the picture:
I expect fully to see it in person at the next war. Otherwise... I know what school you go to.
Me: Yeah. he beat a hooker
Venom: Haven't we all?
Venom: Haven't we all?
#157
MercenaryXero
-
- Members
- 143 posts
Member
Posted 25 October 2008 - 02:44 PM
Its a cpvc rod with a +bow spring. The charging handle is a threaded rod with washers and a nut on either side, currently wrapped in tape for padding.
#158
nerfboi
-

- Members
- 858 posts
Member
Posted 25 October 2008 - 03:06 PM
Here is mine.


Sorry if I'm jacking your thread rork. Now that I have some left over materials left to make 1 more snap. I'm going to do it your way this time rork. Again, Great job on the Rev. 3
Sorry if I'm jacking your thread rork. Now that I have some left over materials left to make 1 more snap. I'm going to do it your way this time rork. Again, Great job on the Rev. 3
Edited by nerfboi, 25 October 2008 - 04:14 PM.
We Ride together, we die together, Bad boys for life.
#159
BustaNinja
-
- Members
- 1,916 posts
Member
Posted 26 October 2008 - 12:41 PM
Wow. I love how many people are making SNAPs with the charging rod in the stock. Its a fun design, and I wish i would have perfected mine more.
How to work harder to get the CrossSNAP up and running. I had to redesign the charging handle because otherwise it would be too big, so i went from an aluminum rectangle, so a more triangular design. Its much stronger, and it still has the bungee holders, kinda like Carrtoon's Xbow Plunger rod. I hope to showcase it soon, but its been a tarded week. No weekend, and we had to put our dog down.
Kudos to the SNAP builders out there. its alot more fun then modding isnt it?
Me: Yeah. he beat a hooker
Venom: Haven't we all?
Venom: Haven't we all?
#160
rork
-
- Members
- 1,008 posts
Member
Posted 26 October 2008 - 04:02 PM
Nerfboi: No hijacking there--just impressive work. I designed the SNAPbow with the stated objective of avoiding the kind of fine work your design requires, but it looks nice. I'm really loving how much enthusiasm this has stirred up for Carbon's design. Lots of creative building going on. And Bustaninja: Yes, yes it is 
<a href="http://nerfhaven.com...howtopic=20296" target="_blank">SNAPbow Mk. V</a>
<a href="http://nerfhaven.com...howtopic=20409" target="_blank">Make it pump-action</a>
<a href="http://nerfhaven.com...howtopic=20409" target="_blank">Make it pump-action</a>
#161
Foam Shooter
-
- Members
- 212 posts
Member
Posted 26 October 2008 - 05:05 PM
Just a suggestion nerfboi, but when you make your next one I would suggest making the handle out of 3/4" PVC. Your handle looks huge.
#162
Galaxy613
-

- Members
- 999 posts
Member
Posted 26 October 2008 - 08:55 PM
How can you guys get your cuts through PVC straight enough to make a cocking bar like that? Do you use a table saw or what? Whenever I drill through PVC it's never on the direct opposite side...
[Former Caretaker of the Guru Mk2]
#163
rork
-
- Members
- 1,008 posts
Member
Posted 26 October 2008 - 08:57 PM
There's a reason the SNAPbow doesn't feature that particular setup, part from the comfort of the offset stock. It takes quite the steady hand on the dremel to cut those slots. All I can say is: more power to ya.
<a href="http://nerfhaven.com...howtopic=20296" target="_blank">SNAPbow Mk. V</a>
<a href="http://nerfhaven.com...howtopic=20409" target="_blank">Make it pump-action</a>
<a href="http://nerfhaven.com...howtopic=20409" target="_blank">Make it pump-action</a>
#164
nerfboi
-
- Members
- 858 posts
Member
Posted 26 October 2008 - 09:54 PM
Yeah. Just patients. I got it from Carbon's Snap 1.5. Actually, since my rotary tool crapped out on me, I had to did those cuts by hand with a hacksaw blade, power drill, and needle files.. It's not fun. I got like 3 cuts on my hand from it. As for my handle, I just followed Carbons Snap Mk.2 write up. I used 1" PVC. I also have one of CS' slide breeches. Pic's in a little bit.
We Ride together, we die together, Bad boys for life.
#165
MercenaryXero
-
- Members
- 143 posts
Member
Posted 27 October 2008 - 02:58 PM
How can you guys get your cuts through PVC straight enough to make a cocking bar like that? Do you use a table saw or what? Whenever I drill through PVC it's never on the direct opposite side...
I used a bunch of tape to make a template, then dremeled out the slots. Takes patience and eye protection.
#166
zadjii
-

- Members
- 27 posts
Member
Posted 29 October 2008 - 08:18 PM
Seeing how this has become a huge "show off you SNAPBow thread, i decided to post this.
A while back i asked if a SNAPbow could launch a Ping Pong ball. In short: the answer was yes. In long: NOOOOOOOOOOOOOOT REALLLLLLLLY!!! Turns out Ping-Pong balls are THE WORST PROJECTILE IN THE HISTORY OF EVER!!!!
I present to you: the SNAPBow-Hammer:
But, seeing how i have like 20 pictures of it, I'll just post the link to the Photobucket:
Which i will have working shortly.
Nevermind.
I didn't want to call it a SNAP, because it is so fundamentally different. for instance, the plundger sticks a good 3 inches out of the barrel when not loaded. also, seeing how the projectile was a ping-pong, no seal could be made with the inside of ANY barrel, and not a lot of pressure dislodges a ping pong ball. so only the force of the plunger hitting the ping pong ball will propel it. and by god, the SNAPBow was perfect. We hit 17' on our third try (which is a 95%).
Thank you Rork and THANK YOU NERFING!!!!!
PS One of my group members wants to have the Hammertime P-2 (dont ask) Live up to its name and have us smash it up with a sledgehamer. If there is any feedback on the nerfing community to try and stop its demise, i will save it from the fires of the great bonfire.
EDIT:: Links still dont work
Edited by zadjii, 29 October 2008 - 10:43 PM.
-Cpvc that's been under your home for 10 years can shatter. New Cpvc doesn't, unless you enjoy violently beating your gun on a tree.
-If you could figure out how to strap a Vulcan as a hand replacement, that would be sweet. I would just stop there, and run around calling myself Mega Man.
-If you could figure out how to strap a Vulcan as a hand replacement, that would be sweet. I would just stop there, and run around calling myself Mega Man.
#167
s3an967
-

- Members
- 83 posts
Member
Posted 30 October 2008 - 02:16 PM
At this point, Crossbows are a classic, reliable, powerful blaster. They are also rare, and so ludicrously expensive that they are more or less out of the question for most of us. Captain Slug gave us a great alternative with the Plusbow, but not everyone has the time, money, and tools to build one. A little while ago, I attempted to build a SNAP-based blaster that would roughly imitate the Crossbow in its performance and design, inspired by Captain Slug’s Plusbow. After introducing the prototype, I proceeded to refine the design (with help from Carbon and CS). A month of experimentation later, I confidently give you the official SNAPbow Writeup.
Here’s what you’ll need (at minimum); some things can be substituted, but not all:
-PVC piping in 2”, 1 ¼”, ¾”, and ½” sizes.
-a pack of +bow springs (mcmaster part #9637k26)
-1/2” cpvc pipe
-1/2” cpvc T
-1/2” cpvc endcap
-3/4” coupler
-3/4” curved endcap
-3/4” plug
-3/4”x1/2” reducing bushing
-1/2”x3/4” slip/thread adapter
-1/2” T
-1/2” 45 deg. elbow
-(2) 1 ¼” couplers
-1 ¼” endcap
-1 ¼”x3/4” slip/thread bushing
-1/2” #6 pan head sheet metal screws
-3/4" #6 sheet metal screws (you just need one for the plunger head, so don't buy a huge pack).
-pack of 1/8”x1” cotter pins
-pack of small angle brackets
-pack of 3/16x1 1/2x1/16 rubber washers
-pack of 3/16x1 1/4x1/16 rubber washers
-pack of 3/16x1” fender washers
-pack of #8 finishing washers
-roofing nails
-industrial-strength clothespins
-small zip ties
-large zip ties
-hot glue sticks
-super glue
Tools: a hacksaw/pipe cutters, a drill, hot glue gun, 1/8”, ¼”, 5/8” drill bits, sanding drum/cutting blade.
Here’s what you’ll end up with:
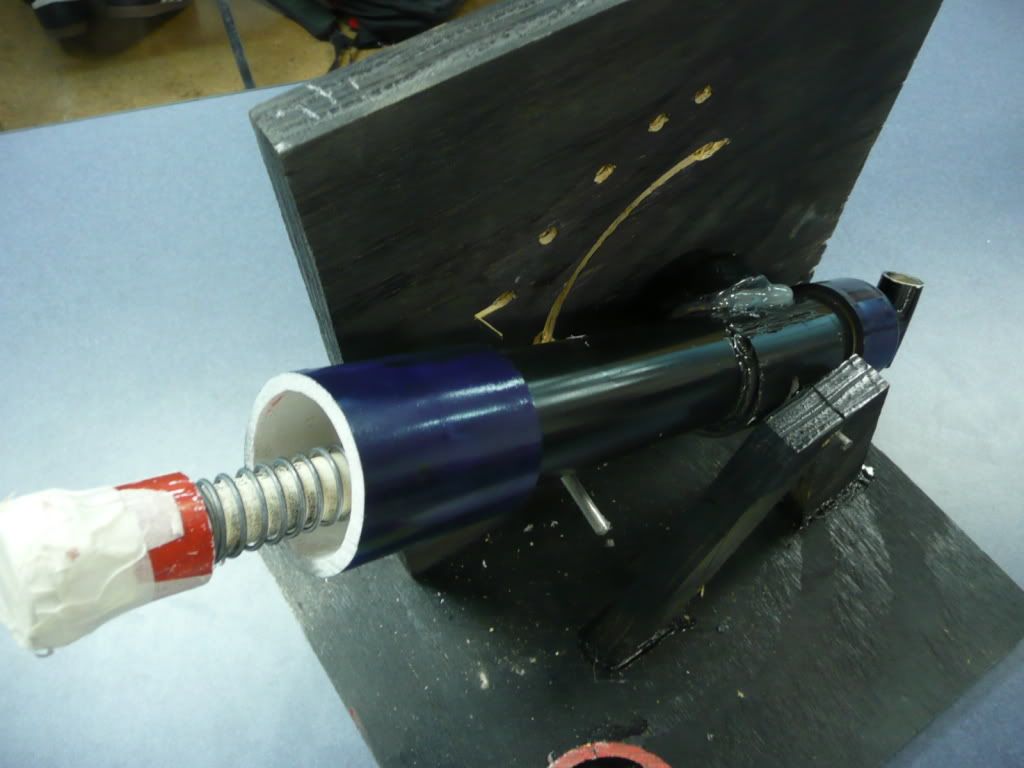
Start with a 1 1/4’’ endcap, and drill a 5/8’’ hole in the exact center. Dremel the hole until the cpvc that you’ll be using as a plunger rod slides freely. Be sure that the hole is not so large that the spring (which fits perfectly around the ½” CPVC rod) can fit through; this would, in point of fact, be bad. Just go slowly and be careful. There should be a TINY gap all around the plunger rod, as you can see here. EDIT: If you don't want to be as careful about the size of the hole, and want even less friction, go ahead and grind it out a bit larger, and simply flare out the wire at one end of the spring. A tag of about 1/4" works perfectly.
To make the plunger, drill a 5/8” hole in the center of a ¾” endcap (curved). Make sure that the hole is a bit bigger than the plunger rod, so that the plunger head can shift around separately from the plunger rod. This keeps the plunger from binding. Jam a length of ½” CPVC through the hole, drill a 1/8” hole in the end, and put a cotter pin through the hole, wrapping it around the pipe. (reference Carbon’s SNAP-1 writeup; the process is identical). EDIT: wrap a bit of e-tape around the plunger rod, to keep the spring in place. If needed, you can also add a small screw at the end coil of the spring, to make sure it's not going to slip intp the plunger head. Cut a ¼” ring from the end of the endcap. Then, jam a ¾” plug into the endcap. Stack a #8 finishing washer, a 3/16” ID x 11/4” OD x 1/16” thick rubber washer, a 3/16” ID x 11/2” OD x 1/16” thick rubber washer, and a 3/16” ID x 1” OD fender washer on a 3/4" sheet metal screw, drill a 1/8” pilot hole in the center of the ¾” plug, and screw everything down; basically, it’s Carbon’s washer setup, with an extra washer for padding.
This way, the sealing washer is subject to far less wear, and the gun is significantly quieter. The handle is a ½” cpvc T, held on with a couple of screws (a cotter pin also works). The plunger shaft is a piece of cpvc 11 1/2" long.
Now, on to the pressure chamber. First, a 10 ¾’’ length of 11/4” pipe, and drill a 1/8’’ hole 3 7/8’’ from one end. Wiggle the drill bit, so that your trigger pin slides freely. Now, glue a coupler on, but don’t use cement. Instead, run a thin line of CA (super) glue around the ring at the center of the coupler.
Then shove your pressure chamber all the way down; the glue won’t take until it’s seated, so there will be less of a gap, and the blaster will be a bit more efficient. Wipe out any excess glue, and wait for the glue to dry. Drill four holes around the end of the coupler, seat a 1 ¼”x3/4” slip/thread coupler, and screw it down. Now you can use a screw-in adapter to use various barrel systems.
The trigger is a standard clothespin trigger in construction, but not materials. I use an industrial-strength clothespin, and a roofing nail as a catch. Hot glue the trigger onto the tube, reinforce with a zip-tie, and you’re done. Cover it up with a 1 ¼” trigger cover. This pic is from a much earlier prototype, but you get the idea.
For the grip, I just do as Carbon did on the SNAP-5 and the SNAP-6; drill two holes in a ½’’ cpvc endcap, screw it onto the 1 ¼” endcap, jam a ¾” boltsniper handle on the end, drill a couple of pilot holes in each side, screw it down, and reinforce with hot glue (to get rid of any annoying wiggling). Take special not of the screw placement; this is repeated on both sides.
Now, the stock. This needs to be both solid and comfortable. First, drill two pilot holes in each side of one side of a ¾” coupler, enlarge two of them to ¼” (access holes for your screwdriver), and screw the coupler onto the 1 ¼” endcap.
Reinforce the joint with a bit of hot glue (wherever I call for hot glue, you could also use epoxy, but I like to keep everything removable).
Now, build your stock out of ½” pvc; the pictured design is the one I find most comfortable, but use whatever works.
I use a ¾”x1/2” bushing to reduce it down; alternatively, you could just build the stock from ¾”, but ½” works fine, and is lighter and cheaper. I only recently made the jump to a ¾” coupler, but it works way better: it’s sturdier, and the extra bit of height keeps the plunger rod from barking your cheek. Screw it down, and you’re ready to go.
The screws that hold the stock and grip on also secure the 1 ¼” endcap to the pressure chamber. Be sure to drill a couple of vent holes somewhere behind the trigger; otherwise, a vacuum will be created when the plunger is released, slowing it significantly.
Finally, slap a fore-end on there. SNAPs tend to be skinny and bulbous—functional, but not too attractive (more importantly, such characteristics tend to be less than comfortable, especially with those screws sticking out all over the place). To start, cut a 1 ¼” coupler in half lengthwise, then cut the halves in half crosswise. The piece you want is on the left,next to a full coupler.
Take one of the pieces, and glue it on the pressure chamber, just ahead of the trigger guard. Now, cut 6” of 2” pvc, and split it down the middle, keeping your cuts as even as possible. Smooth the edges, and mount the resulting fore-end on the front coupler and the coupler piece, using a dab of hot glue on both.
The resulting blaster is extremely comfortable, solid in its construction, and very economical. I believe it to be a great alternative for those of us who want a blaster of this type, but don’t have access to a crossbow or plusbow (or who want something sturdy and cheap enough so that breakage is not really an issue). The SNAPbow is also quite powerful (somewhere between a crossbow and a plusbow), and very reliable in my experience. I believe it to be completely war-appropriate, as well. All feedback is appreciated. ~Rork
EDIT: gun porn time. There's one with a dogbone cpvc barrel, one with a 4-shot turret, and the first completed one, with a 6-shot turret and no foregrip.
ANOTHER EDIT: more detailed pics of how the business end of the plunger is made.
Of course, this piece just plugs right into the cut-down end cap. Happy building!


I'm not asking for you to make one for me but how much would one of these cost?
Watch this- I can tip-toe while you take a piss.
#168
Echnalaid
-

- Members
- 981 posts
Member
Posted 30 October 2008 - 02:34 PM
Daminit, don't quote the entire post just for that small question. Search around, he has a sales thread. We are not here to spoon feed you information.I'm not asking for you to make one for me but how much would one of these cost?
I saw all your posts, they serve no purpose to the topic. Just because you can post doesn't mean you have to.
I know I'm a tad new, too, but I actually read the CoC.
So many new members who can't search! Read the CoC!
I found this in 10 seconds.
There was something on the bottom of the ad that said erotyka. Sounds like something spicy -Renegademilitia15
#169
rork
-
- Members
- 1,008 posts
Member
Posted 30 October 2008 - 03:41 PM
s3an967: You quoted my entire writeup. You fail. And $47 shipped. However, I suspect that anyone who would pull the highly annoying stunt would be just as annoying in person, so if you're interested: sell me.
<a href="http://nerfhaven.com...howtopic=20296" target="_blank">SNAPbow Mk. V</a>
<a href="http://nerfhaven.com...howtopic=20409" target="_blank">Make it pump-action</a>
<a href="http://nerfhaven.com...howtopic=20409" target="_blank">Make it pump-action</a>
#170
boisie
-

- Members
- 303 posts
Member
Posted 21 November 2008 - 06:56 PM
I'm slightly lazy and also not able to take pics of it, but I've finally finished my first SNAPbow (Minus Stock)
Ranges should be over 110', but when I went to test it, I had a headwind of five knots, gusting to about 15 knots, snow falling, and a temp of 20*F. It still got 60ft though. I was surprised at that.
I'll wait for some better weather to get new ranges. And a couple pictures.
Ranges should be over 110', but when I went to test it, I had a headwind of five knots, gusting to about 15 knots, snow falling, and a temp of 20*F. It still got 60ft though. I was surprised at that.
I'll wait for some better weather to get new ranges. And a couple pictures.
QUOTE(One Man Clan) 
You understand what you just did posting a picture of 4 girls on a message board chock full of nerdy virgins, right?
QUOTE(Foamfoot)
Maybe if we download Ubuntu Christian edition, God will help us install it.
#171
rork
-
- Members
- 1,008 posts
Member
Posted 23 November 2008 - 12:16 AM

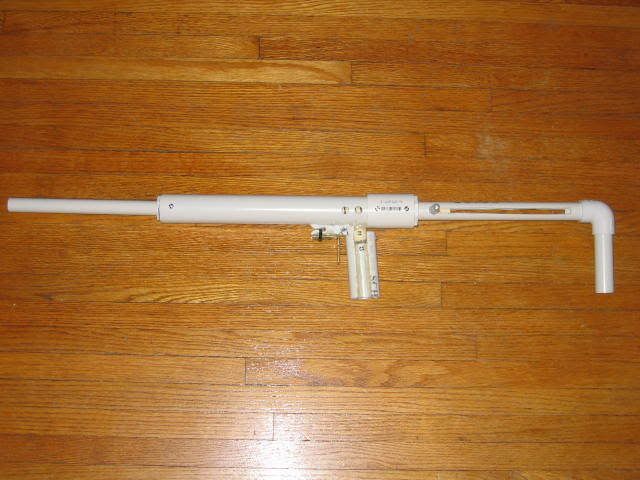
Awesome on a stick. Two of these are sold, but I felt the need to show 'em off.
<a href="http://nerfhaven.com...howtopic=20296" target="_blank">SNAPbow Mk. V</a>
<a href="http://nerfhaven.com...howtopic=20409" target="_blank">Make it pump-action</a>
<a href="http://nerfhaven.com...howtopic=20409" target="_blank">Make it pump-action</a>
#172
Rogue Warrior
-

- Members
- 320 posts
Member
Posted 24 November 2008 - 06:42 PM
Could you give me an estimate of the plunger tube's inner diameter? Got some ideas coming to my head.
My GT is Spacecowboy9951
#173
rork
-
- Members
- 1,008 posts
Member
Posted 25 November 2008 - 12:51 AM
It's, uh, 1 1/4" sched. 40, which has an internal diameter of aproximately 1 3/8".
<a href="http://nerfhaven.com...howtopic=20296" target="_blank">SNAPbow Mk. V</a>
<a href="http://nerfhaven.com...howtopic=20409" target="_blank">Make it pump-action</a>
<a href="http://nerfhaven.com...howtopic=20409" target="_blank">Make it pump-action</a>
#174
needak
-

- Members
- 45 posts
Member
Posted 25 November 2008 - 03:05 PM
im happy, I just finished making my version of the gun. [size=7]IT WORKS BRILLIANTLY[size=1] fifty feet flat without lube.
Why the fuck would you put a bullet in someones head when you can just pump the bastard full of stefans until he's got so many welts and goose-eggs he looks like blueberry with pimples?


1 user(s) are reading this topic
0 members, 1 guests, 0 anonymous users

