Jump to content


Photo

My Boomstick


26 replies to this topic

#1 Torque

Torque

    Member

  • Members
  • 12 posts

Posted 03 July 2006 - 12:34 AM

So about a week ago I started brainstorming ideas for a nerf gun to make and i decided to make a shotgun. I then decided i wanted it to use shells and be spring powered, so i got to work and this is what i came up with. Ill let the pictures explain the method I am using to load and eject the shells...

Posted Image
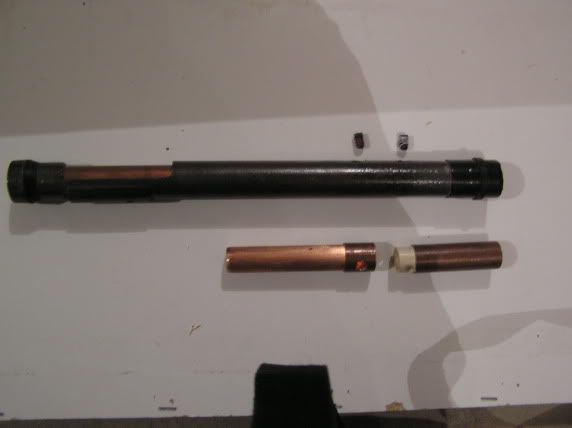
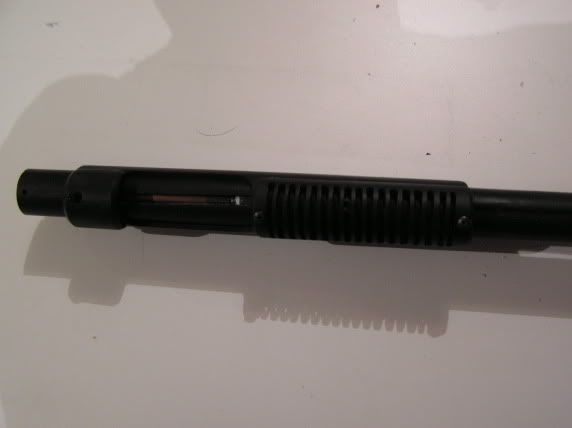
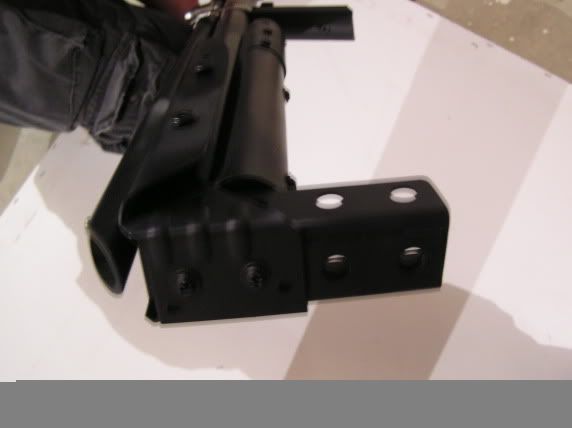
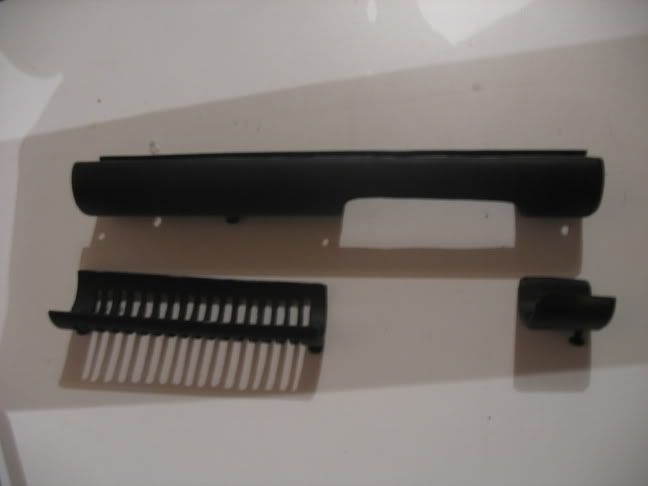
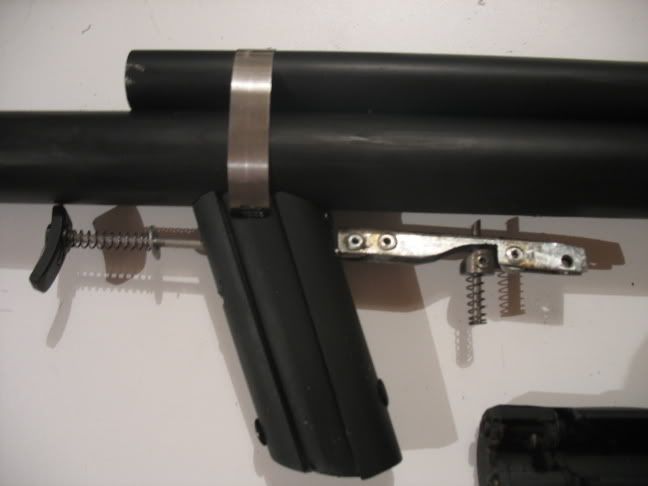
This is what breach system looks like. There would normally be a barrel in front of it and the plunger rod/spring behind it, but I excluded those parts and others for the sake of simplicity in demonstrating how it works.

The pieces below the cpvc tube (copper) when functioning are actually in the pipe held by the set screws above the cpvc pipe (grey). The charging handle would normally be attached to the cpvc pipe. Keep in mind, all of these parts are inside of a piece of 1" piece of pvc pipe when the gun is actually functioning.
________________________________________________________________________________
Posted Image
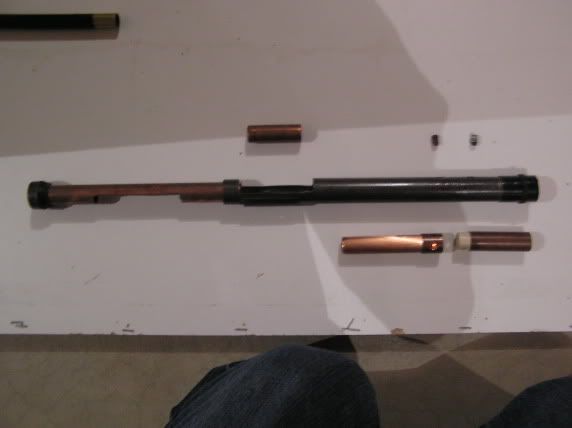
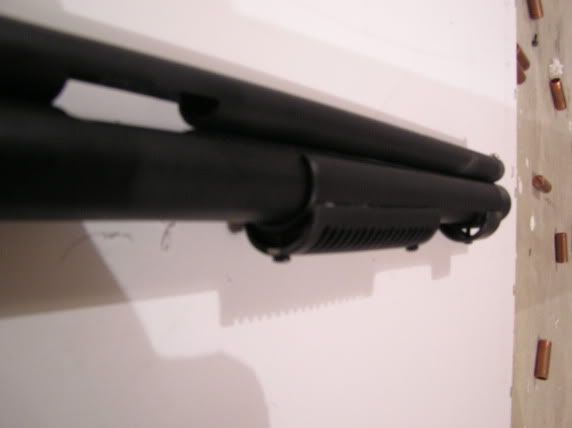
The Charging handle is pulled back and the breach looks like the above picture(the spring is compressed at the same time). A shell falls in from the feed tube (not shown) as the slot in the cpvc (grey) aligns with a corresponding slot in the main body of the gun.
________________________________________________________________________________
Posted Image
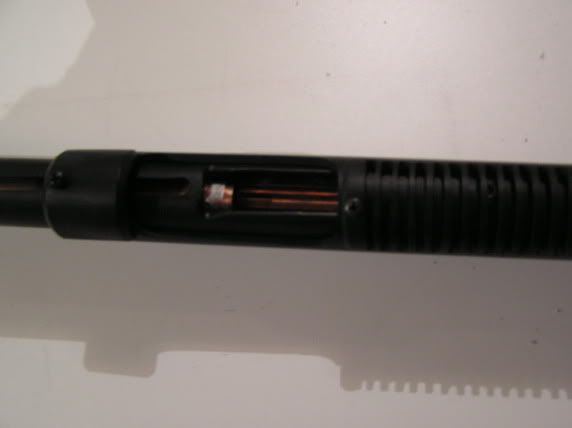
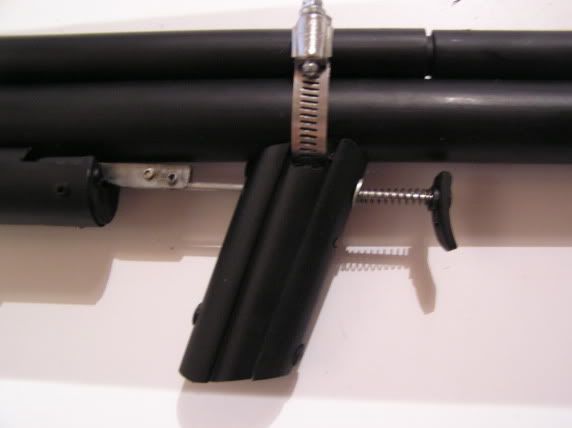
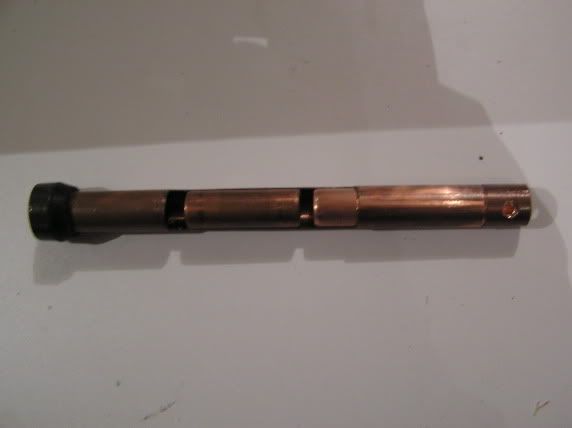
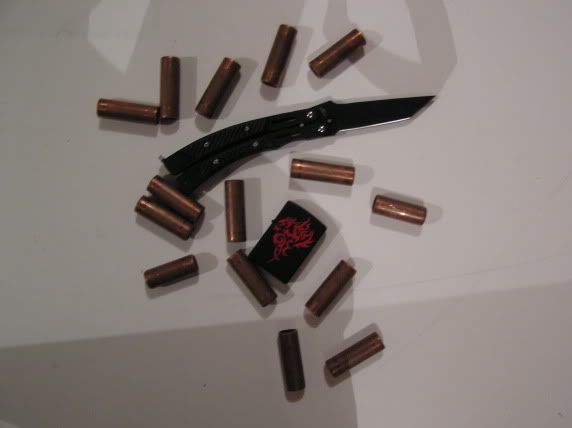
The pieces of copper will look like they are in the above image (excluding the cpvc shroud). The middle piece of copper is the shell (which would have a stefan in it).
________________________________________________________________________________
Posted Image
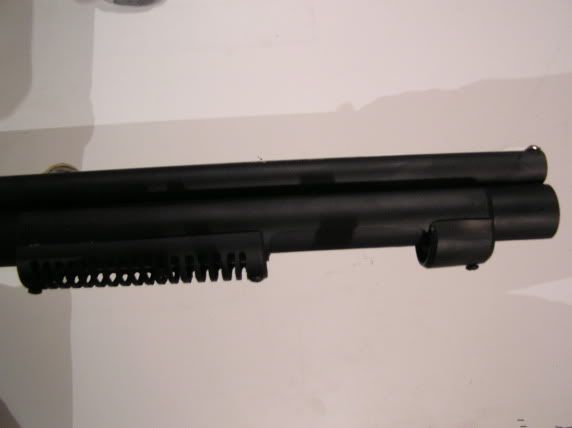
As the charging handle slams forward the piece of copper on the right will begin to push the shell into the forward breach chamber.
________________________________________________________________________________
Posted Image
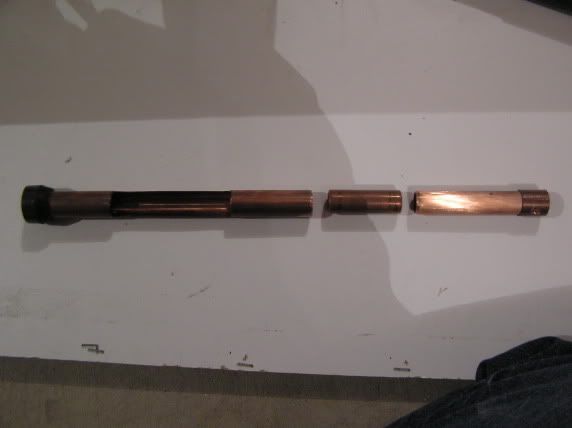
When the charging handle comes to rest in its furthest forward postion, all of the breach compnents will look like they do in the above picture.
________________________________________________________________________________
Posted Image
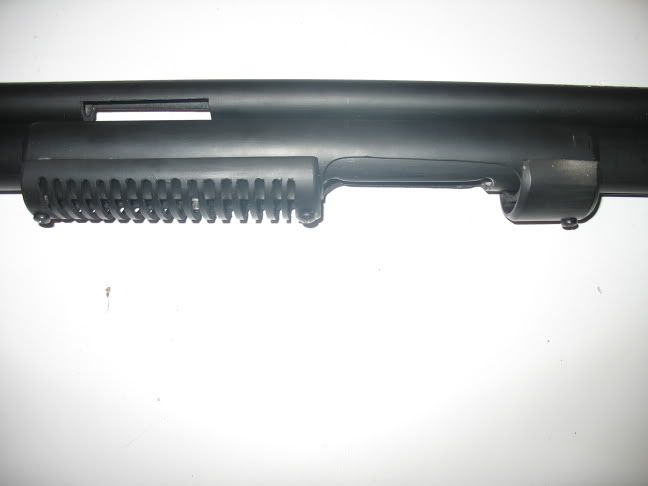
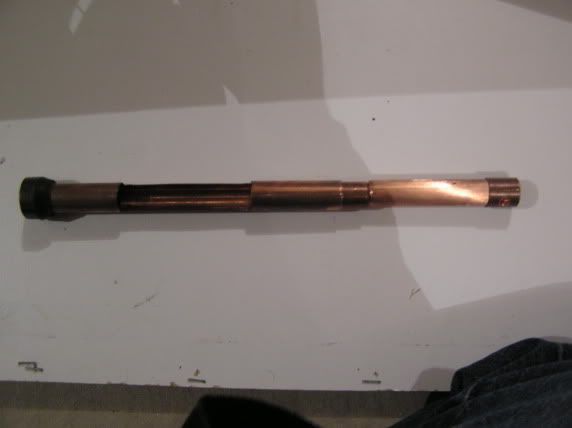
This is the same as the above picture, except the cpvc shroud is included. The charging handle is in the same position. At this point the gun is completely primed and ready to be fired. Once the gun is fired, to reprime it, the charging handle is pulled back and the shell falls out of the foward slot in the piece of copper as the piece of cpvc uncovers it.
________________________________________________________________________________
Posted Image
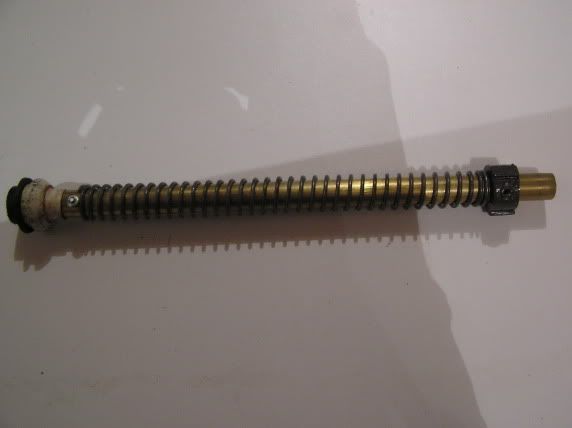
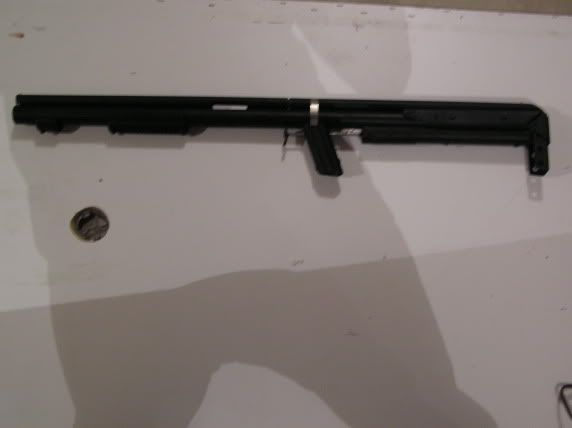
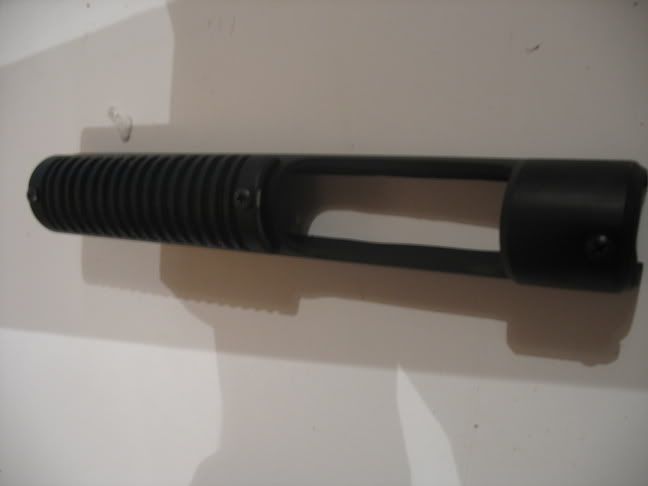
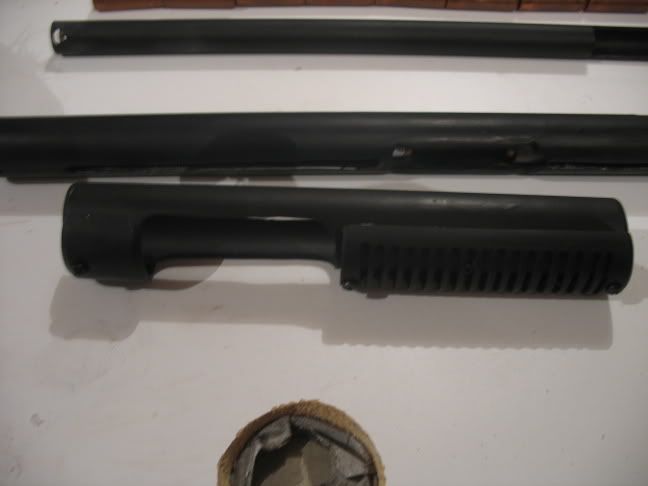
So now you hopefully understand my breach/loading system, so heres my plunger assembly. Its somewhat beaten up from lots of firing though and i need to remake it with better materials so it won't fall apart again. Other than that it works fine, it has an excellent friction to seal ratio and is somewhat light weight.
________________________________________________________________________________
Posted Image
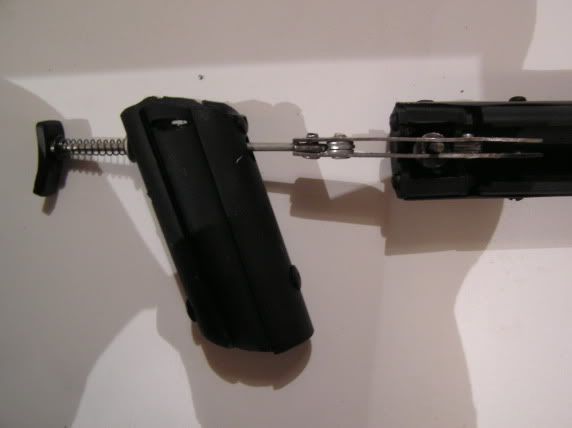
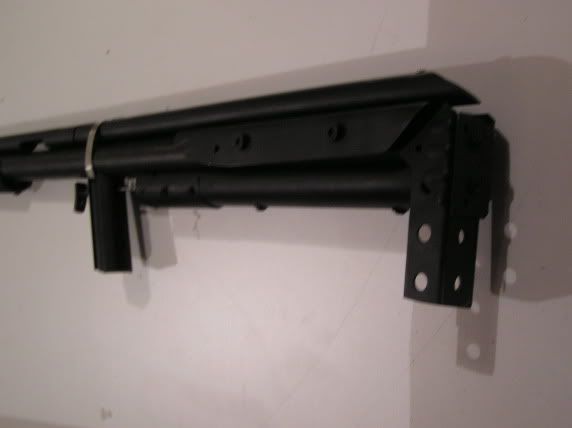
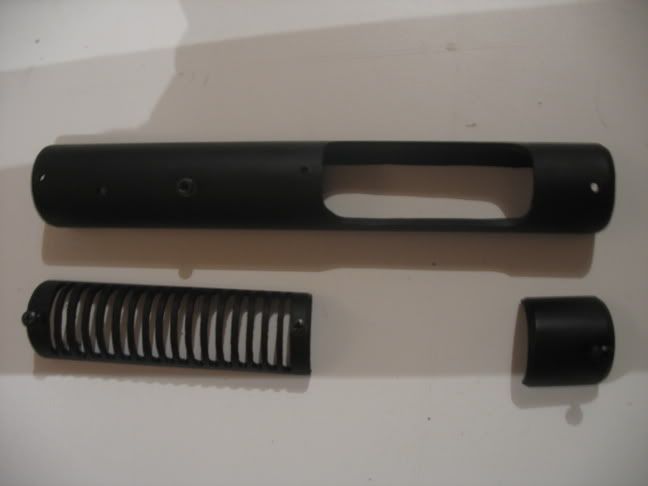
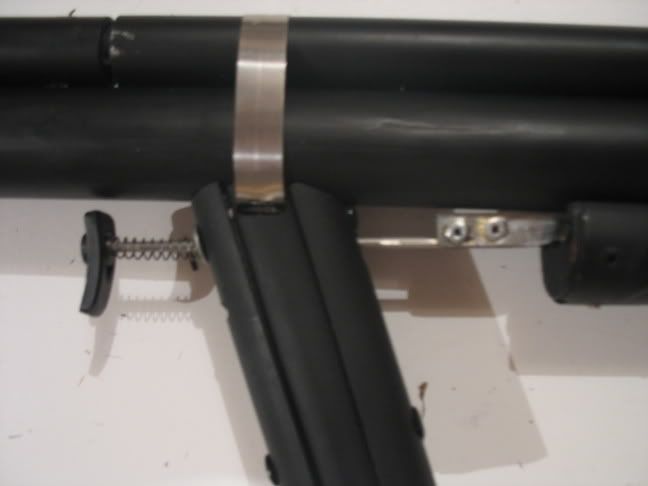
Here's a picture of my fire control group. As the trigger slides backwards the wheel collar slides down along the rails i made of sheet metal rivited together, which all together forces the firing pin down.
________________________________________________________________________________
Posted Image
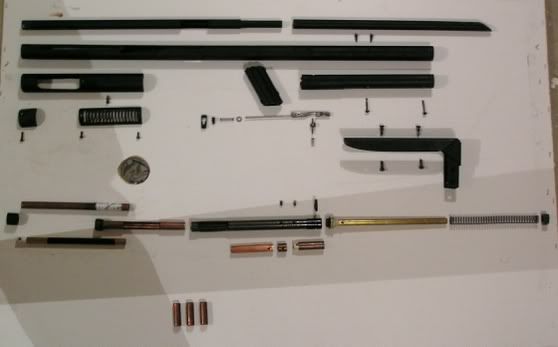
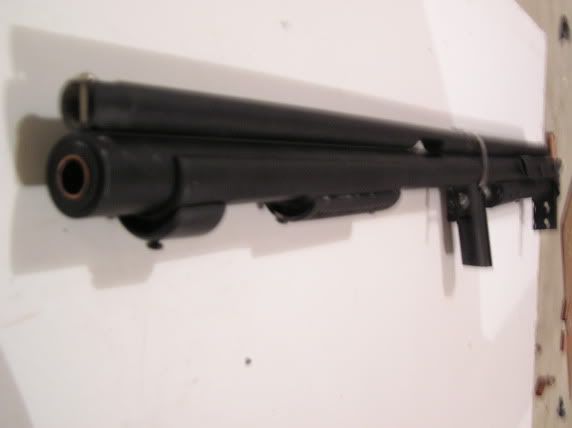
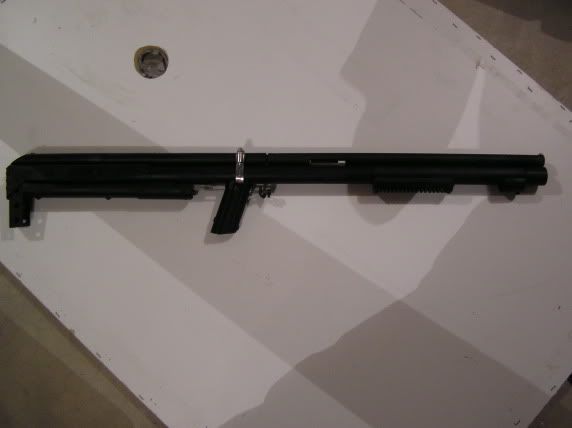
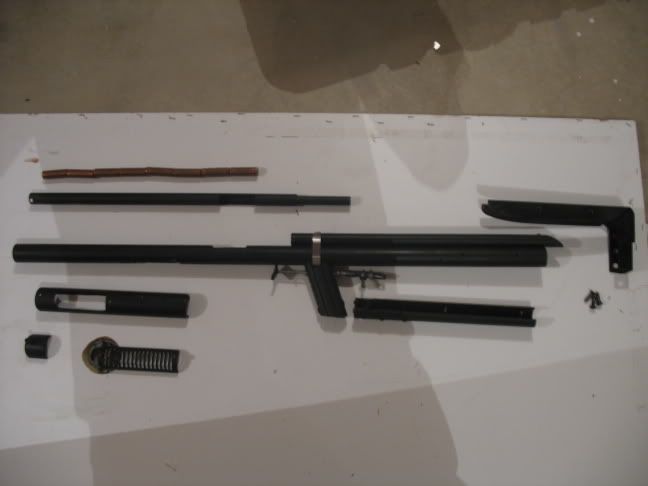
And here is a picture of all of the parts to the gun.
________________________________________________________________________________
Posted Image
One thing i like about this gun is that shells take roughly 10 seconds to make each, so it makes things convenient as i dont really have to worry about losing any.
________________________________________________________________________________________________________________________________________________________________


So at this point your probably wondering, "What the hell does this thing look like?". Well, you're just going to have to wait, as i took two pieces apart for pictures and forgot to teflon tape them together properly so they pulled apart. Tomorrow hopefully ill get around to dismantling the gun again and taping up the parts so they're airtight/ taking some pictures. Also i dremeled the clearances for the breach parts wrong, so i cant get any stats untill i remake the breach as all of the air generated from the plunger goes strait out of a 1/8" long slit in between two parts. this wouldnt be a big deal, but i dont have any spare 12"x1/2" copper repair couplers at the moment and alot of hardware stores tend to not carry them. On the bright side the gun can cycle shells perfectly and fire fine, it just cant fire anything yet.
  • 0

#2 taita cakes

taita cakes

    Member

  • Members
  • 943 posts

Posted 03 July 2006 - 02:17 AM

Yeah, I was wondering what the hell it would look like.

Can you put a video on youtube of the firing mech when you're done?
  • 0
Oh Kentucky, you are so fuggin awesome...

#3 Ronster

Ronster

    Member

  • Members
  • 528 posts

Posted 03 July 2006 - 12:13 PM

Yeah, please hurry with that pic of the whole gun assembled. I can't wait to see it.

Lookin' great. Keep it up. :D


Really like the trigger mech. Looks very reliable.

Also, what spring are you using as the main spring to propel the plunger?

Edited by Ronster, 03 July 2006 - 12:32 PM.

  • 0
-I Nerf, there for I am.

QUOTE(baghead @ Oct 25 2006, 09:55 AM) View Post
Ronster reminded me that I should have warned you all Prepare your Bladder for Imminent Release!!!!

#4 ompa

ompa

    Introductinator

  • Moderators
  • 2,368 posts

Posted 03 July 2006 - 01:46 PM

Excellent work! It looks great, and I can't really see any problems with the functioning of the gun. I will say one thing though, as I've encountered a few issues using a bolt system like yours. All that extra space from where the bolt has to slide leaves alot of dead space between where the plunger ends and where the dart is located. You could probably do away with half of the cpvc shroud you have there, and use the charging handle to both load the shell AND push back the plunger. That way, you don't need all that space between the plunger head and the beginning of the bolt for the bolt to slide around.

EDIT: Before I forget; the idea is certainly not my own, but is Boltsniper's.

~ompa
  • 0

#5 marcoman6391

marcoman6391

    Member

  • Members
  • 6 posts

Posted 03 July 2006 - 02:50 PM

Excellent work! It looks great, and I can't really see any problems with the functioning of the gun. I will say one thing though, as I've encountered a few issues using a bolt system like yours. All that extra space from where the bolt has to slide leaves alot of dead space between where the plunger ends and where the dart is located. You could probably do away with half of the cpvc shroud you have there, and use the charging handle to both load the shell AND push back the plunger. That way, you don't need all that space between the plunger head and the beginning of the bolt for the bolt to slide around.

~ompa


I definitley have to second that to ompa about what he said with the charging handle and the bolt opener to be in one motion idea.

Marcoman6391
  • 0
"Just because your on a diet, doesn't mean you still can't look at the menu"

Favorite Quote^^^^^^

#6 Torque

Torque

    Member

  • Members
  • 12 posts

Posted 03 July 2006 - 10:51 PM

what spring are you using as the main spring to propel the plunger?


The spring is just a spring I found in a drawer of springs in a hardware store. I dont have any stats on it.

You could probably do away with half of the cpvc shroud you have there, and use the charging handle to both load the shell AND push back the plunger.

The charging handle does cock the gun and cycle the shells simultaneously like on the FAR. When the piece of cpvc is pulled back to cycle a shell, the back of it pushes on the plunger head to cock the gun. take a look at the second to last picture again to see how the internals are laid out in the gun. I also realized that there would be a certain amount of dead space reducing the power of the gun but i was willing to use this somewhat flawed design as it makes up for it in ROF.

And here are some of the finished pictures...

Posted Image

Posted Image

Posted Image

Posted Image

Posted Image

Posted Image

Posted Image

Posted Image

Posted Image

Posted Image


some stats:

plunger output: 5.25 cubic inches
active barrel length: 4.5 in.
dead space: 3.2 cubic inches
ammunition capacity: 8+1
ROF: I can cycle about 2 shells per second without jamming, if I go much faster than that though, the gun becomes prone to jamming.


sorry for the double post but i maxed the image limit in my last post.

Posted Image
  • 0

#7 ompa

ompa

    Introductinator

  • Moderators
  • 2,368 posts

Posted 03 July 2006 - 11:00 PM

Ahh, I see now. However, just curious, where is the charging handle in the pictures of the assembled gun? I mean, I think know where it should be, but I just don't see it.

And my mistake; now looking at the assembled gun, I see why your cpvc shroud is longer than I expected. Sorry about the confusion, I thought it was for the bolt to move in, but now I see it's for the shells to drop in from the top.

~ompa
  • 0

#8 taita cakes

taita cakes

    Member

  • Members
  • 943 posts

Posted 04 July 2006 - 03:54 AM

I'm sorry to add the generic noob OMG HOTNESS post, but that really is a well executed design with both looks and what I could only say is functionality.

P.S. OMG HOTNESS?
  • 0
Oh Kentucky, you are so fuggin awesome...

#9 Sponge Nerfer

Sponge Nerfer

    Member

  • Members
  • 106 posts

Posted 04 July 2006 - 08:57 AM

Very good job! I just have a few questions:

1. In your pics are you showing the gun without the magazine or did I miss a very important detail?

2. Does the gun have a name?

3. What ranges can you get?
  • 0
When in doubt, make a huge nerf cannon of death.

#10 taz22

taz22

    Member

  • Members
  • 31 posts

Posted 04 July 2006 - 09:19 AM

lol, i like it.
but its a litle long dont you think?
is it posible to make it smaller?

greats
  • 0

#11 blinkycc13

blinkycc13

    Member

  • Members
  • 74 posts

Posted 04 July 2006 - 10:36 AM

Taz, you would do well to fix your spelling and grammar before a mod gets to you.

Anyway, looks nice! I'd definitely like to see some ranges. If it shoots well, I'd say this is the best combination of cosmetics and functionality since the SCAR-N. Good job.

Edited by blinkycc13, 04 July 2006 - 08:24 PM.

  • 0
QUOTE(Dark Shrimp @ Nov 10 2006, 11:06 PM) View Post

This is called a screwdriver it is used to unscrew or screw in screws.

#12 Mr Zarwid

Mr Zarwid

    Member

  • Members
  • 20 posts

Posted 04 July 2006 - 10:38 AM

Form and function, I love it, excellent work Torque.
  • 0

#13 tcorr911

tcorr911

    Member

  • Members
  • 78 posts

Posted 04 July 2006 - 10:51 AM

[quote]Taz, you would do well to fix your spelling and grammar before a mod gets to you.

He is from Holland
  • 0
Bolt, ye are truly a god among men. Ye have earned yeself a place on Enigma's list of heroes, right below Sean Connery and directly above Papa Smurf...a highly honorable slot indeed.
-Enigma1313

#14 Torque

Torque

    Member

  • Members
  • 12 posts

Posted 04 July 2006 - 11:36 AM

"Ahh, I see now. However, just curious, where is the charging handle in the pictures of the assembled gun? I mean, I think know where it should be, but I just don't see it."

I'ts a shotgun design, so the charging handle is the pumping handle as shown in these pictures:
(I took some more pictures today)

Posted Image
Posted Image
Posted Image
Posted Image
Posted Image

And here are some more pictures on the trigger mech:

Posted Image
Posted Image

And some other pictures:

Posted Image
Posted Image


"lol, i like it.
but its a litle long dont you think?
is it posible to make it smaller?
"

The metal stock actually shoulders nicely and it has a rock solid feel. It's not as long as it might seem, to me it feels perfect, its alot shorter than a real 12 gauge...

"1. In your pics are you showing the gun without the magazine or did I miss a very important detail?

2. Does the gun have a name?

3. What ranges can you get?"

1 the magazie is the feed tube along the top of the gun

2 I could go give it an acronym like everyone else, but i just started calling it my boomstick....(its from a movie...)

3 as stated in my above posts I cant record ranges yet due to bad clearances between parts of my breach that create a major leak

Here is a picture of all of the sub assemblies of the gun taken apart. You can see the feed tube above the gun, I laid some shells out above it to show how they fit in the gun.

Posted Image

I wont get the gun firing for a while, as I have a friend over from New York for the next week ( I live in Illinois)
and he probably doesn't want to watch me dremel out new breach sub assemblies...
  • 0

#15 Ronster

Ronster

    Member

  • Members
  • 528 posts

Posted 04 July 2006 - 03:25 PM

So, it's pump-action?
  • 0
-I Nerf, there for I am.

QUOTE(baghead @ Oct 25 2006, 09:55 AM) View Post
Ronster reminded me that I should have warned you all Prepare your Bladder for Imminent Release!!!!

#16 ompa

ompa

    Introductinator

  • Moderators
  • 2,368 posts

Posted 04 July 2006 - 03:42 PM

Ah. I thought those screws on the bottom of the handle screwed into the gun itself. Apparently I was wrong. Again.

Well, very nice job, and very well-put together, now that I see how the thing works.

Ronster, I can say with a decent amount of certainty, now that I think I understand it, that it is indeed pump action.

~ompa
  • 0

#17 FromAbove

FromAbove

    Member

  • Members
  • 71 posts

Posted 04 July 2006 - 04:56 PM

This thing is simply beautifully put together. I'm so glad more people are following along with revolutionary homeades.

On a sidenote you should look into a rotating linear mag...should increase your ammo capacity by loads.
The Reaper

Take your design for your magazine, copy it 6 or 7 times around a piece of pipe that rotates and voila you're set to rock some socks.


FA.

Edited by FromAbove, 04 July 2006 - 04:57 PM.

  • 0
Connor: Oh, is that right, Rambo?
Murphy: All right, get your stupid fucking rope.

Do you mean with an integration or what? Because size doesn't have anything to do with performance...-NerfMonkey

#18 Ronster

Ronster

    Member

  • Members
  • 528 posts

Posted 05 July 2006 - 10:00 AM

Can you please get a video up on youtube?!
I really want to see some shots fired.
  • 0
-I Nerf, there for I am.

QUOTE(baghead @ Oct 25 2006, 09:55 AM) View Post
Ronster reminded me that I should have warned you all Prepare your Bladder for Imminent Release!!!!

#19 Sponge Nerfer

Sponge Nerfer

    Member

  • Members
  • 106 posts

Posted 07 July 2006 - 11:12 AM

Thanks for answering my previous questions but I have a few more to ask, what size copper do you use for your breach and shells and what size pvc is the copper encased in?
  • 0
When in doubt, make a huge nerf cannon of death.

#20 Torque

Torque

    Member

  • Members
  • 12 posts

Posted 08 July 2006 - 01:19 PM

Thanks for answering my previous questions but I have a few more to ask, what size copper do you use for your breach and shells and what size pvc is the copper encased in?


For the shells I used standard 1/2" copper pipe, and for the breach that slides in and out of the cpvc i used a 1/2" repair coupling. They are around 12 inches long and 1/2" copper slides easily within it yet has a nearly airtight seal. Then I used cpvc for the repair coupling to slide in and out of, as they slide fairly easily within eachother, and are also airtight. I believe I used 3/4" cpvc, im not completely sure. For the main body of the gun I used 1" pvc, and for the charging handle I used 1 1/4" pvc.

Ah. I thought those screws on the bottom of the handle screwed into the gun itself. Apparently I was wrong. Again.

Well, very nice job, and very well-put together, now that I see how the thing works.

Ronster, I can say with a decent amount of certainty, now that I think I understand it, that it is indeed pump action.

~ompa


Yes, its pump action, the screws on the bottom of the charging handle screw into the piece of grey cpvc.

Can you please get a video up on youtube?!
I really want to see some shots fired.


The the breach still leaks, so I probably won't have a video up of it fireing for a while, but I could make a video of me loading it and chambering/ejecting shells. Would that be something any of you would want?
  • 0

#21 TT

TT

    Member

  • Members
  • 48 posts

Posted 08 July 2006 - 02:23 PM

The the breach still leaks, so I probably won't have a video up of it fireing for a while, but I could make a video of me loading it and chambering/ejecting shells. Would that be something any of you would want?


Please do, I would love to see this thing in action.
  • 0

#22 foamforce123

foamforce123

    Member

  • Members
  • 77 posts

Posted 08 July 2007 - 10:07 PM

I really feel bad about ressurecting this thread but I really want to learn more about this amazing piece of machinery. Have you gotten it firing yet? If so what are ranges? Again I feel bad about this, but I saw you were active recently. :ph34r:
  • 0
Deal wit it.

#23 ultra920

ultra920

    Member

  • Members
  • 272 posts

Posted 09 July 2007 - 02:26 PM

What i want to know is how far apart the bullets are going to be. Like, from the most left bullet to the most right bullet? Other than that, i hope to see it working.
  • 0
There is no Ultra, only a 920.

PSN: ultra920 MGO:ultra920 shoot me an MGO invite if you play

#24 Torque

Torque

    Member

  • Members
  • 12 posts

Posted 09 July 2007 - 04:30 PM

I really feel bad about ressurecting this thread but I really want to learn more about this amazing piece of machinery. Have you gotten it firing yet? If so what are ranges? Again I feel bad about this, but I saw you were active recently. :D


I appreciate your interest in my homemades, but unfortunately i have not worked on it recently at all for various reasons. One of which is becoming disinterested in the overall design and the spring/plunger method of firing darts seemed to me boring. The way I designed this gun is also very finicky and complicated to work on, as everything must be lined up perfectly or else part A doesn't seal properly or part B jams and keeps part C from functioning properly etc.

If I do work on it and make any significant improvements then I'll definitely post in this thread to inform you all. The gun essentially does work, it cocks, loads a shell, "fires", ejects the shell and recharges the plunger spring while loading a new shell however it doesn't fire darts because i screwed up some of the tolerances on the breach parts so they leak the air instead of using it to push the dart out of the shell/barrel. As of right now if i decide to work on it i will have to fabricate a new spring retainer, plunger head, and breach. The plunger head broke because there is so much pressure behind the spring forcing it into the pin that retains it when cocked and the spring retainer broke simple because i made it too thin for the pressure it has to handle. Both of those parts wont be had to make its just the breach that would be difficult to fix.

What i want to know is how far apart the bullets are going to be. Like, from the most left bullet to the most right bullet? Other than that, i hope to see it working.


I'm not quite sure i know exactly what you're talking about. If you mean what is the spread as in how the pellets from a real shotgun spread apart at a distance, then the answer is that they don't. This isn't a shotgun in that kind of sense, it just fires 1 dart at a time. If you wanted you could split the dart into thirds, quarters, halves, etc and then load them into the shells and that would create a spread as others have done but unmodified its just like any other spring gun like a SNAP etc. Also even if it did spread, that number will vary with the range you are firing at. At close range the spread will be vary limited and at a farther range the spread will generally be greater.
  • 0

#25 gotnerf

gotnerf

    Member

  • Members
  • 12 posts

Posted 26 April 2009 - 07:44 PM

what spring are you using as the main spring to propel the plunger?


The spring is just a spring I found in a drawer of springs in a hardware store. I dont have any stats on it.

You could probably do away with half of the cpvc shroud you have there, and use the charging handle to both load the shell AND push back the plunger.

The charging handle does cock the gun and cycle the shells simultaneously like on the FAR. When the piece of cpvc is pulled back to cycle a shell, the back of it pushes on the plunger head to cock the gun. take a look at the second to last picture again to see how the internals are laid out in the gun. I also realized that there would be a certain amount of dead space reducing the power of the gun but i was willing to use this somewhat flawed design as it makes up for it in ROF.

And here are some of the finished pictures...

Posted Image

Posted Image

Posted Image

Posted Image

Posted Image

Posted Image

Posted Image

Posted Image

Posted Image

Posted Image


some stats:

plunger output: 5.25 cubic inches
active barrel length: 4.5 in.
dead space: 3.2 cubic inches
ammunition capacity: 8+1
ROF: I can cycle about 2 shells per second without jamming, if I go much faster than that though, the gun becomes prone to jamming.


sorry for the double post but i maxed the image limit in my last post.

Posted Image

how much would i have to pay you to make me one? and can it use cpvc shells?

Edited by gotnerf, 26 April 2009 - 07:44 PM.

  • 0
nerf is all that exisists in this material world


1 user(s) are reading this topic

0 members, 1 guests, 0 anonymous users