Jump to content


Photo

The PullSCRT

3D printed +bow variant
homemade writeup 3D printing purple

15 replies to this topic

#1 Ryan201821

Ryan201821

    Prince Edward

  • Contributors
  • 1,892 posts

Posted 09 February 2015 - 05:57 PM

*
POPULAR

The PullSCRT

[video needed]

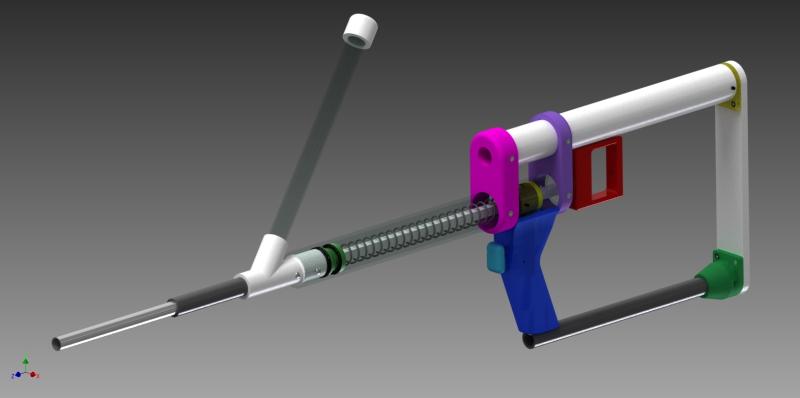
1423544927-344901-1-_FinalAssemblyMaster

Background:

+bow: http://nerfhaven.com...showtopic=10521
Purple Catch: http://nerfhaven.com...showtopic=24114

The idea behind this blaster was to replace the +bow by using 3D printed parts. It's much quicker to built, has no face diddle, built in check-valve, and costs much less to build in terms of materials and labor. This guide will also show you how to build The Purple Catch, which can be installed on any blaster with 1 1/4" PVC.

Blaster is designed to have 6" of draw.

Downloadable Files

Click Here
51 MB

Contains everything you need, stl's for printing, stp's for modeling, and a parts/cost sheet.

.ipt files are compatible with Autodesk Inventor 2014 or newer.

Essential Tools
-3D Printer w/ no less than 7x7x7" print area
-Scrollsaw or Hacksaw
-Drill press and/or power drill
-Dremel w/ cutting wheel or Mill/Scrollsaw
-7/64”, 5/32", 3/8" drill bits
-#6-32 tapping bit
-Scissors and/or file
-Screwdriver
-#6 Countersink
-Hot glue and super glue
-Silicone lube
-Safety glasses
-Vise and/or wrench
-Tape measure, ruler

Printing your Components
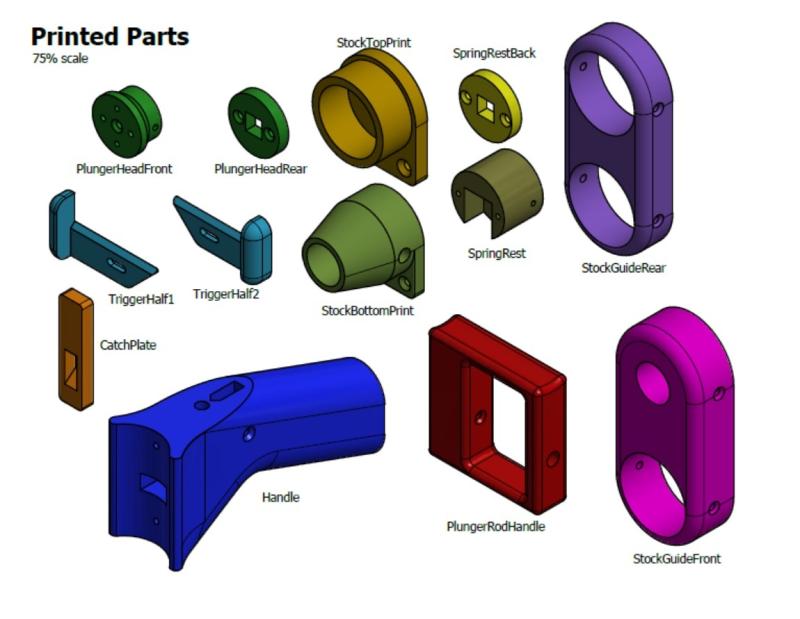
1423544927-344901-2-P-SCRT_PrintedParts.

Handle - We usually do a couple extra perimeters for the Handle. If you are using newer versions of Slic3r (1.2 and higher), you can add modifiers to the object you're printing, which will allow you to alter settings for a specific section. For example, in this case we want just the top section to be solid infill, where the screws attach. The rest of the handle can be printed normally. If you need help with this, let me know. Post print, you need to drill out the hole (#6 pilot) for the trigger, and tap it. You also need to drill and tap the two holes on the bottom that attach the stock rod.

PlungerRodHandle - This part is designed to have 6mm walls at the thinnest point. Since we have a printer with a 0.6mm nozzle, this is five perimeters. You'll want at least those areas to be solid. Post print, drill out the hole where it attaches to the plunger rod (#6 clearance).

CatchPiece - Make sure this piece is solid. After it's printed, you'll have to file/sand each edge and surface down. Fit it inside the cavity on the handle where it's supposed to go to ensure it slides properly.

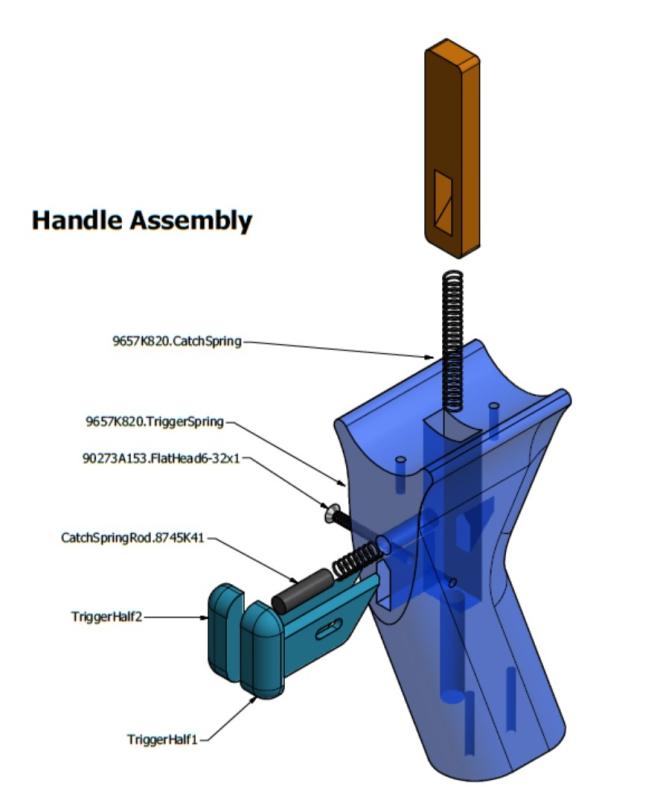
TriggerHalf1-2 - Print these normally, but you'll need to pay some special attention to these pieces afterwards. Glue each half together with super glue. After the glue is dry, sand/file the edges just like you did on the CatchPiece to make sure it fits nicely in the handle.

StockGuideFront/Rear - These can be printed normally. The hole in the front piece is an outlet for 1/2" PVC. Drill out all eight holes with a #6 clearance. On the front piece there will be some support material underneath that you'll need to remove.

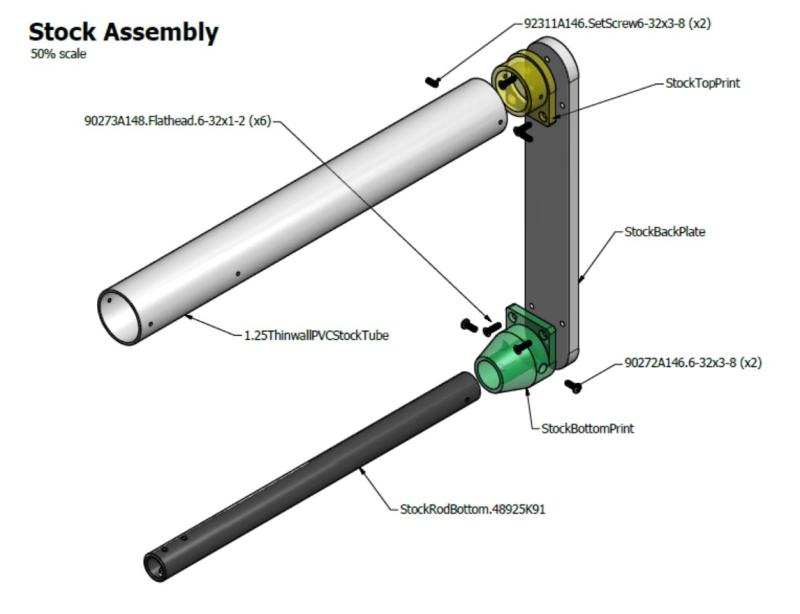
Stock-Bottom/Top-Print - Print these with normal settings and drill out the 6 holes for the stock (#6 clearance), and the two on the bottom print where you'll attach screws to the bottom rod.

SpringRest/Back - Print both of these pieces solid. Drill (#6 pilot) and tap the four holes on the larger piece, and drill out (#6 clearance) the two countersink holes on the back piece.

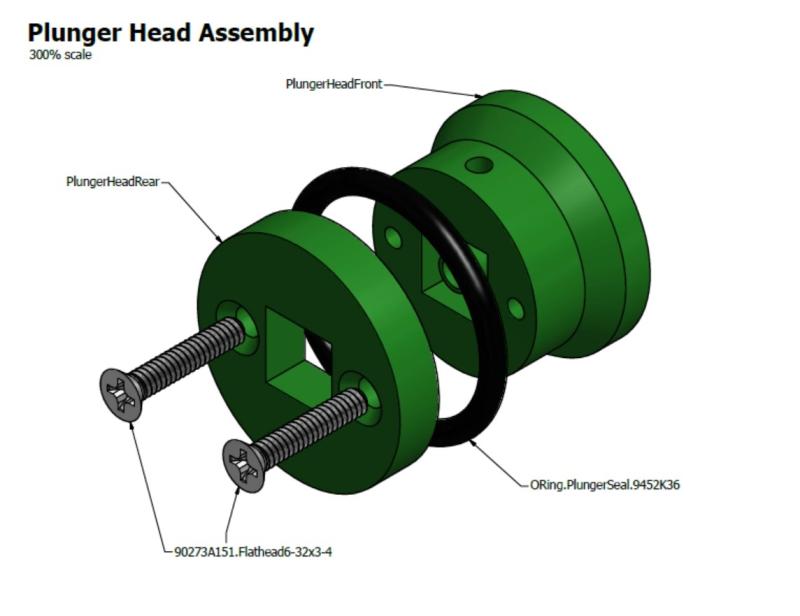
PlungerHeadFront/Back - These pieces should also be printed solid. Drill out the two countersink holes in the back piece (#6 clearance). On the front piece, drill out (#6 clearance) the countersink hole, and drill (#6 pilot) and tap the two holes that attach the two pieces to each other. You'll also have to remove a small amount of support material from the front piece.

Tube & Rod Machining
1423544927-344901-3-P-SCRT_PlungerTube.j

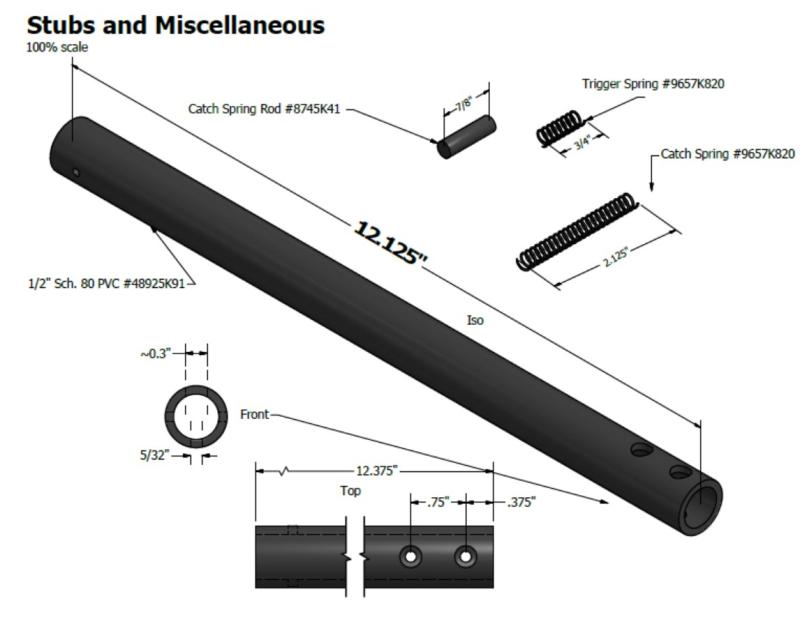
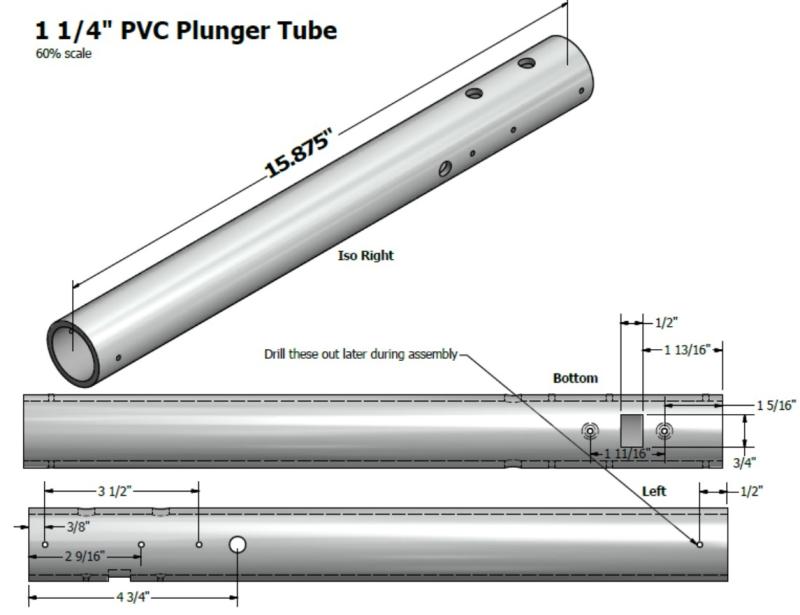
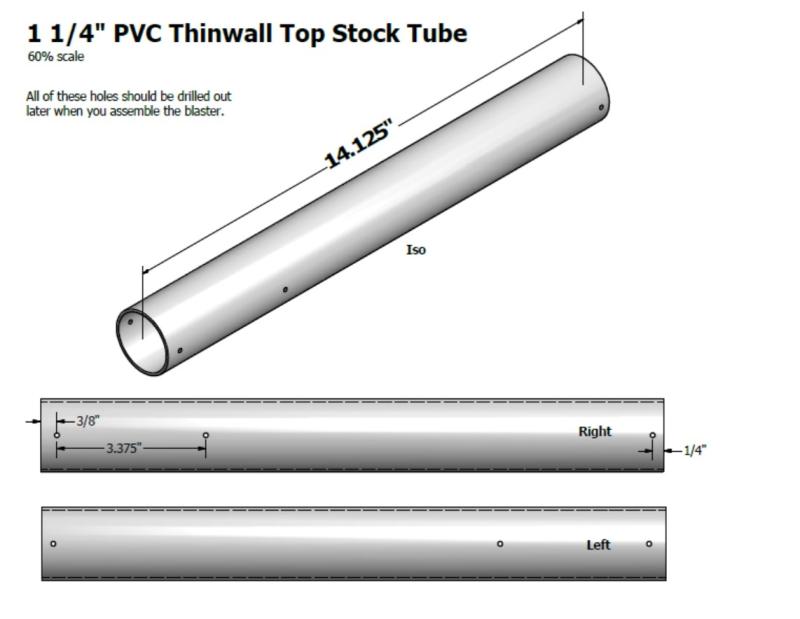
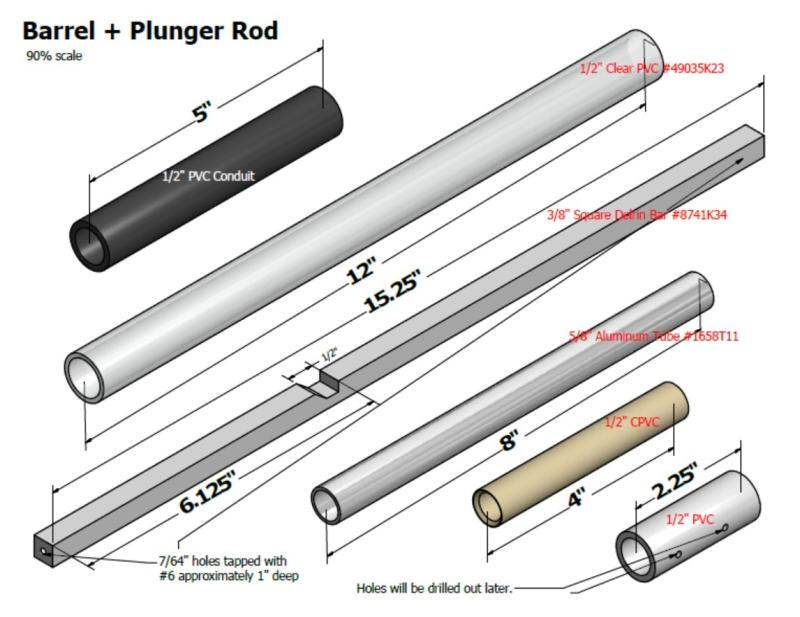
Make sure your PVC is smooth on the inside. The majority of PVC we encounter is very bumpy and awful on the inside, creating unnecessary friction and a shitty seal. The larger holes on the top and sides should be 3/8". Countersink the two holes on the bottom from the top, through the larger holes. These holes attach your handle. All the small holes should be #6 pilots. Cut a slot for the CatchPiece using a mill or dremel. You can also use a scrollsaw but you'll have to make a large hole on the top to accommodate for the scrollsaw blade.
1423544927-344901-4-ThinwallPVCStockTube

1423544927-344901-5-CRT_BarrelPlungerRod

1423544927-344901-6-P-SCRT_StubsMisc.jpg

Sub-Assemblies

1423544927-344901-7--SCRT_HandleAssembly

1423544927-344901-8-_PlungerHeadAssembly

1423544927-344901-9-P-SCRT_StockAssembly

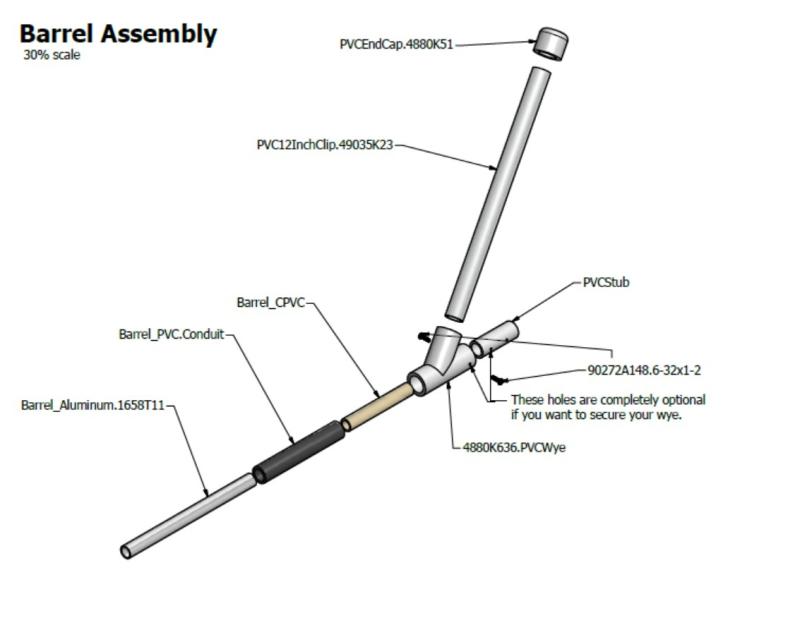
1423546055-344901-10--SCRT_BarrelAssembl

1423546055-344901-11-_PlungerTubeAssembl

Final Assembly

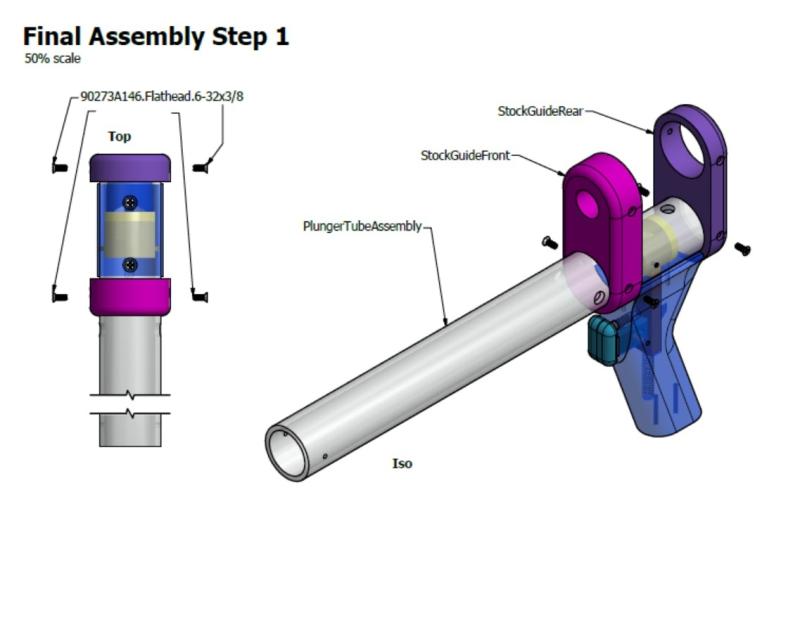
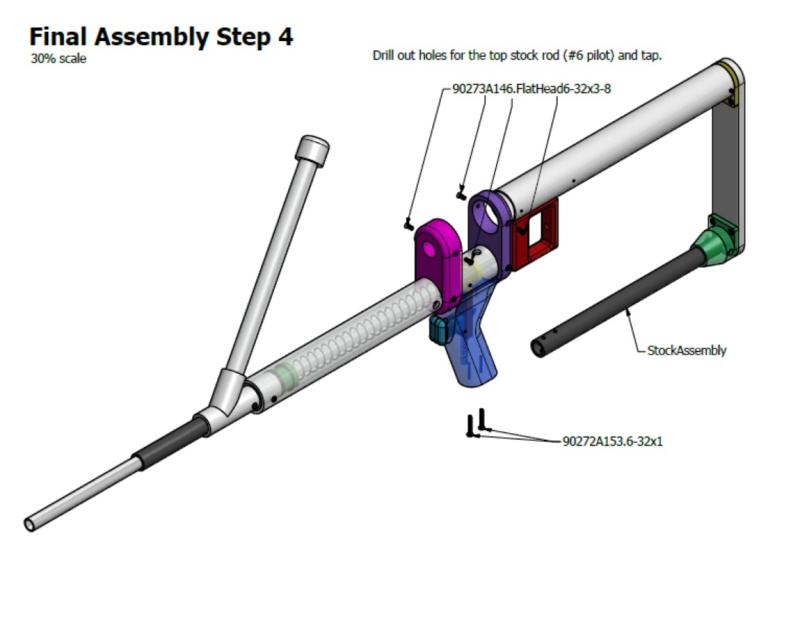
1423546055-344901-12--SCRT_FinalAssembly

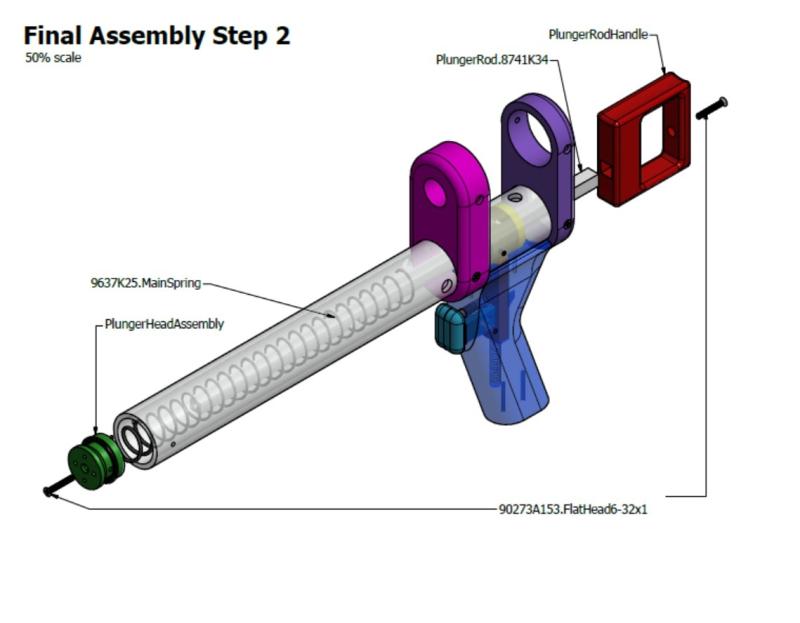
1423546055-344901-13--SCRT_FinalAssembly

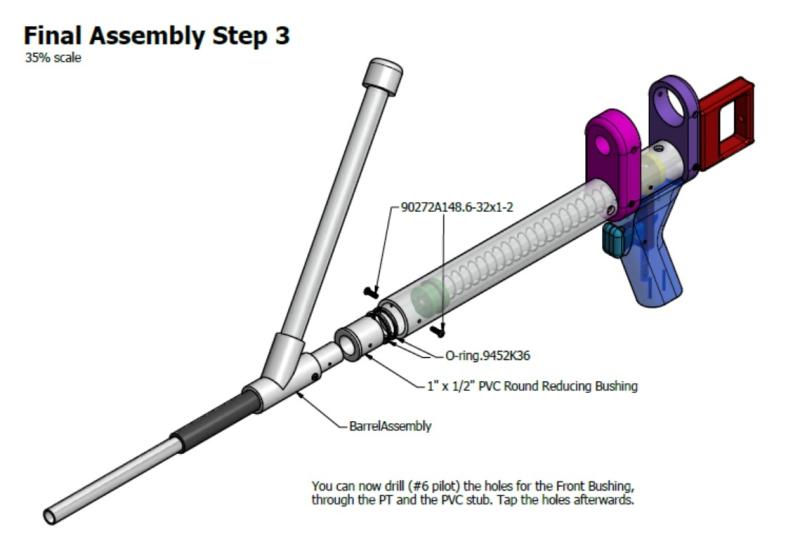
1423546055-344901-14--SCRT_FinalAssembly

1423546055-344901-15--SCRT_FinalAssembly

1423546055-344901-16-_FinalAssemblyMaste

Questions, comments, flames, please post...

Edited by CaptainSlug, 20 November 2018 - 10:22 AM.

  • 3

#2 koree

koree

    Member

  • Members
  • 311 posts

Posted 09 February 2015 - 07:36 PM

Cool
  • 0

#3 SolarFusion

SolarFusion

    Member

  • Members
  • 139 posts

Posted 10 February 2015 - 06:23 PM

Absolutely beautiful, now I just need a printer......
  • 0

#4 Meaker VI

Meaker VI

    Member

  • Moderators
  • 1,192 posts

Posted 11 February 2015 - 11:16 AM

Man, you guys are on a roll. Is there some event going on that I am unaware of, or is it just inspiration combined with motivation and free time?
  • 0

#5 orangeparkour

orangeparkour

    Mostly Harmless Darts

  • Members
  • 115 posts

Posted 11 February 2015 - 11:52 AM

Man, you guys are on a roll. Is there some event going on that I am unaware of, or is it just inspiration combined with motivation and free time?

Basically they can not find anywhere to safely nerf in Illinois, so building is better than nothing.
  • -1
I hung out with Ice Nine once, and he thought I was pretty cool.
How to make Silicone Domes

#6 Gears

Gears

    The boy who lived

  • Members
  • 848 posts

Posted 11 February 2015 - 03:10 PM

*
POPULAR

Basically they can not find anywhere to safely nerf in Illinois, so building is better than nothing.

Oh.

Looks cool Ryan. I'll probs pick one up at Plains. Been hyped about this for a while.

Edited by Gears, 11 February 2015 - 03:12 PM.

  • 1


WoW is destroying my life.

-Groove out.


LAWN GNOME LIBERATION FRONT
 

#7 Pointman9

Pointman9

    Member

  • Members
  • 131 posts

Posted 11 February 2015 - 08:31 PM

Interesting design. There are a few things that I am unclear on, however....

Does the transition in the barrel from CPVC to the aluminum not interfere with the darts? It seems like the aluminum should be beveled, but it may not need it.

Also, I see that you are using an O-ring in this design. Is it better in terms of performance to a skirt or other seal? I understand that it is definitely better in terms of cost.
  • 0
There is no such thing as overkill. There is only cost efficiency.

#8 Drev

Drev

    Member

  • Members
  • 135 posts

Posted 11 February 2015 - 08:41 PM

This looks sweet. Hopefully I can put one together before the indoor war in March. Just a quick question about the stock: I assume you are using thinwall for the top part of the stock just because it is lighter, right? I can't think of any other reasons, but I just want to make sure before I edit the files for standard PVC.
  • 0
Check out my blog: Fly Nerf

#9 Ryan201821

Ryan201821

    Prince Edward

  • Contributors
  • 1,892 posts

Posted 12 February 2015 - 03:34 PM

Interesting design. There are a few things that I am unclear on, however....

Does the transition in the barrel from CPVC to the aluminum not interfere with the darts? It seems like the aluminum should be beveled, but it may not need it.

Also, I see that you are using an O-ring in this design. Is it better in terms of performance to a skirt or other seal? I understand that it is definitely better in terms of cost.

The transition doesn't necessarily need to be beveled, since the aluminum has larger inside diameter than the CPVC. However, we usually bevel it slightly just to make sure the end that was cut doesn't have any jagged edges.

Definitely much cheaper, only four cents compared to five bucks the skirt seal costs. As far as performance, it's pretty much exactly the same from what I can tell. They're also critical for the check valve design we used for the plunger heads.

This looks sweet. Hopefully I can put one together before the indoor war in March. Just a quick question about the stock: I assume you are using thinwall for the top part of the stock just because it is lighter, right? I can't think of any other reasons, but I just want to make sure before I edit the files for standard PVC.

Pretty much. The weight difference is appreciable. You'll just have to change the StockTopPrint if you can't find thin wall.
  • 0

#10 nine

nine

    Member

  • Members
  • 132 posts

Posted 13 February 2015 - 12:54 AM

Nice work as always Ryan. Your 3D modelling and designs are quite excellent and the blaster looks great, but quite honestly I'm more interested in the reasoning behind the cpvc/aluminum barrel combination you're using. Does the larger inner diameter just allow the air from the plunger tube to be used more effectively after getting the initial pop from the cpvc?
  • 0

Everyone hates engineers because they listen to what you say and then think about it.


Check out my YouTube!


#11 jwasko

jwasko

    PowerBeard

  • Moderators
  • 1,021 posts

Posted 13 February 2015 - 08:51 AM

Nice work as always Ryan. Your 3D modelling and designs are quite excellent and the blaster looks great, but quite honestly I'm more interested in the reasoning behind the cpvc/aluminum barrel combination you're using. Does the larger inner diameter just allow the air from the plunger tube to be used more effectively after getting the initial pop from the cpvc?

It's not exactly a new concept, guys, just a new (probably cheaper)implementation of the long lost art of telescoping brass barrels: http://nerfhaven.com...?showtopic=1610 (see the last two paragraphs) and pictures here: http://nerfhaven.com...?showtopic=6766

Lacking 3D modelling software, what's the draw length on this thing? (And, if you don't mind me asking here, what's the draw length on the ESLT?)

Edited by jwasko, 13 February 2015 - 09:15 AM.

  • 0

-Jwasko, STILL Sole Surviving member of Steel City Nerf and Sober Sister of the Sex Dwarves
We NERF ON all day, and FUCK OFF all night


#12 nine

nine

    Member

  • Members
  • 132 posts

Posted 13 February 2015 - 09:27 AM

It's not exactly a new concept, guys, just a new (probably cheaper)implementation of the long lost art of telescoping brass barrels: http://nerfhaven.com...?showtopic=1610 (see the last two paragraphs) and pictures here: http://nerfhaven.com...?showtopic=6766

Thanks for pointing that out, but if there hasn't been much discussion on telescoping barrels since 2004 I feel like my question is fairly reasonable. I haven't seen anyone using aluminum as a barrel material in this way before, so I got a bit curious.
  • 0

Everyone hates engineers because they listen to what you say and then think about it.


Check out my YouTube!


#13 jwasko

jwasko

    PowerBeard

  • Moderators
  • 1,021 posts

Posted 13 February 2015 - 10:17 AM

Your question is more than reasonable. I didn't mean to be critical; sorry if I came off that way. I'm just surprised that apparently many people haven't heard of telescoping brass barrels (or, at least, didn't make the connection). That coupled with the fact that I haven't seen or even heard of anyone using such a barrel for a long time made me use the "long lost art" joke.

I really need to start adding /joke to the end of my posts.

But yeah, like I said it's a more cost effective way to accomplish the same thing.

I think most people switched to just using CPVC or whatever when we all started using homemades with maxed out [k26] springs or Big Blasts...the plunger/air chamber provides so much power that you really don't need the perfect barrel and/or perfect dart fit to get sufficient range.

Any springer would probably benefit from this type of setup, but I wonder if the SCRT and ESLT need it due to (in the SCRT's case) the use of a [k25] spring or (in the ESLT's case) the seal around the plunger rod (causing friction). Either way, the plunger would move slower but the transitioning barrel should help compensate.

Edited by jwasko, 13 February 2015 - 10:18 AM.

  • 0

-Jwasko, STILL Sole Surviving member of Steel City Nerf and Sober Sister of the Sex Dwarves
We NERF ON all day, and FUCK OFF all night


#14 Ryan201821

Ryan201821

    Prince Edward

  • Contributors
  • 1,892 posts

Posted 13 February 2015 - 04:49 PM

The reason for the staged barrels on the ESLTs is simply because the blaster cannot effectively use 14+" of CPVC with the amount of draw and force they have, so we add a section of aluminum to make the barrel long enough to reach the front. On these blasters, they probably don't need the staged barrels, in fact they could probably use a longer section of CPVC. I can't say I've done any extensive testing to support that a staged barrel does or doesn't make any noticeable difference. I do notice that it does seem to help darts from spinning out with the silicone domes we use, but again, no real testing on that.

You can also substitute the aluminum in the staged barrel for Sch 80 PVC, which is usually around the same ID as aluminum. The downside to this is you usually have to use a PVC Coupler which doesn't make the barrel straight at all. Sch 80 PVC can also vary quite a bit. I've seen ID's range from .520"-.565". The aluminum is usually always around what they say (.527").

This is also less powerful than how most people build their blasters. The Pull-SCRT has 6" of draw, compared to a +bow which according to how Slug had them modeled, somewhere between 6.375"-6.5" of draw on the last notch. The +bow also used a [k26], where this uses a [k25], which is slightly less powerful.

And also, jwasko, the ESLTs get 5.5" of draw.
  • 0

#15 Draconis

Draconis

    I am not Lord Draconical

  • Members
  • 2,712 posts

Posted 13 February 2015 - 07:39 PM

This is also less powerful than how most people build their blasters. The Pull-SCRT has 6" of draw, compared to a +bow which according to how Slug had them modeled, somewhere between 6.375"-6.5" of draw on the last notch. The +bow also used a [k26], where this uses a [k25], which is slightly less powerful.


An advantage of the [k25] in this application is reduced compression wear on the spring. By remaining more within the normal "elastic zone" of the spring 's travel, it will need less frequent replacement, and maintain normal performance for much longer.
  • 0
[15:51] <+Noodle> titties
[15:51] <+Rhadamanthys> titties
[15:51] <+jakejagan> titties
[15:51] <+Lucian> boobs
[15:51] <+Gears> titties
[15:51] <@Draconis> Titties.
[15:52] <+Noodle> why is this so hard?

#16 DX-Robert

DX-Robert

    formerly DX

  • Members
  • 679 posts

Posted 13 February 2015 - 07:51 PM

Ryan-made blasters have included such barrels since the first RBP ie at least 5 years ago, how is this such a surprise? You've all seen them before, just with Sch 80 rather than aluminum.

I think most people switched to just using CPVC or whatever when we all started using homemades with maxed out [k26] springs or Big Blasts...the plunger/air chamber provides so much power that you really don't need the perfect barrel and/or perfect dart fit to get sufficient range.


Sufficient...maybe. I don't like the results when I run any darts through CPVC with a 4B. Pure aluminum gets noticeably more range than pure CPVC in them. They don't like high friction, which is why I stopped using any kind of plastic barrel with any air blaster. Plus, when you use a low-friction barrel like aluminum, you can then use tighter fits, which get more range. Try it, a fairly tight fit dart in a 4B shot from a pure aluminum barrel. It should visually blow away the traditional loose fit darts shot from CPVC. MIght does make right, but dart/barrel optimization is still important at that power level. It's even more important to optimize when you have a homemade springer. They don't typically have much power...4B's will shoot some really tight fits that springers with a fully compressed [k26] cannot handle. Too much CPVC in a springer creates way too much friction and its power will suffer. If you're just slapping on 14" of CPVC and calling it a day, you're playing with an unnecessary handicap.
  • 0

United Nerf Ops - The premier northeast US nerf club serving the tristate area (NY, NJ, CT)
NYC Nerf Ops - Nerf in New York City itself
NJ Nerf Ops - Nerf in New Jersey
CT Nerf Ops - Nerf in Connecticut

UNO also has a Discord server, DM me on Discord to join (@vincentdrake)


-----------------------------------------------
My other groups:
Nerf Thrifters - A group for posting thrifts and other second-hand finds


Also tagged with one or more of these keywords: homemade, writeup, 3D printing, purple

0 user(s) are reading this topic

0 members, 0 guests, 0 anonymous users