Jump to content


Photo

Airtech 3000 Airflow Mod And Seal Improvable

How to make the 3K a much more competitive primary

5 replies to this topic

#1 TantumBull

TantumBull

    Member

  • Moderators
  • 1,929 posts

Posted 09 August 2009 - 09:31 PM

Alright, so here goes my crummy little intro. As of late, I haven't had much to mod, and went digging through my guns trying to find something to tinker with. I pulled out an AT3K modded cxwq-style (6" PETG barrels, stock barrel segments to keep barrels straight) that I had modded when I was but a wee nub. So I thought to myself, how can I make this blaster better? I proceeded to blow down a barrel that was aligned with the valve. The seal was absolutely terrible. Then I looked down the same barrel. The turret hole at the end of the barrel was minuscule. My mod should be obvious now. Without further adieu, onto the write-up.
/Cheesy Intro

First lets focus on getting that turret out. The 3k can be complex if you haven't dealt with it before, so I'll walk you through disassembling some of the internals so we can get our hands on that turret. Unscrew the screws circled in red. Ignore what's circled in green. I had already started the mod before I decided disassembly pictures were necessary.
Posted Image

Now remove the valve and turret assembly. Removing the pin in the orange bar and the valve pin from under the claw piece helps to get the assembly out as you jiggle it around.
Posted Image

Once you remove the assembly, unscrew the screw circled in red.
Posted Image

This is what should all fall of without any force (minus the screwdriver of course!).
Posted Image

The piece circled in red showuld remain on the turret rod. Just pull it off, you may have to apply a bit of force.
Posted Image

Tug the pin circled green out as shown.
Posted Image

Now just pull out the turret.
Posted Image

Now to widen the turret holes. The stock holes:

Posted Image

Drilled out (not sure of the size of the bit I used, but I think it was a bit smaller than the 3/8" bit I have):
Posted Image

Clean up the holes with a knife and sandpaper.
Posted Image

Now to improve the seal. Cut some 1/2" brass to the length of the valve stem.
Posted Image

Now glue it over the stem.
Posted Image

Cut some 17/32" brass to the same length.
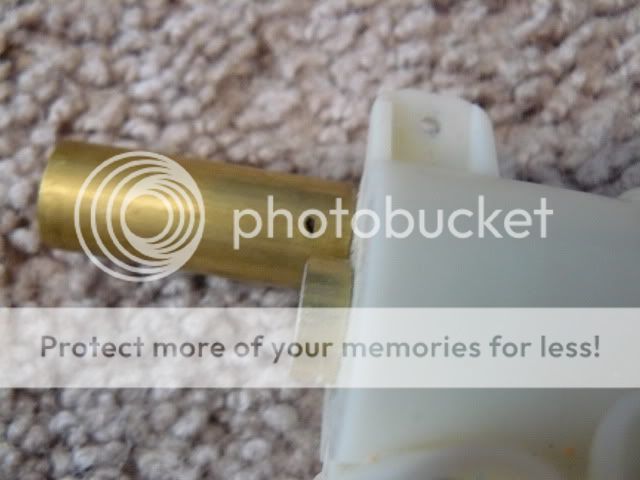
Posted Image

Now get an old credit card or someting similar and and trace a circle onto it (if using a thin tip sharpie trace 19/32" or 5/8" brass, if using thick tip sharpie then 17/32" brass will work).
Posted Image

Drill a hole in the middle of the circle with the drill bit you used to widen the turret holes. I used a nail to make a pilot hole so I could get the real hole as centered as possible.
Posted Image

Edited by TantumBull, 09 August 2009 - 09:34 PM.

  • 0

#2 TantumBull

TantumBull

    Member

  • Moderators
  • 1,929 posts

Posted 09 August 2009 - 09:34 PM

Superglue this to the 17/32" brass. Make the hole as centered as possible with the brass. Then put a bit of hotglue around the lip.
Posted Image

Now just to show you want not to do, this was my first iiteration of the sealer. I used an o-ring rather than a credit card. This created a much better seal, but it pushed the turret too far out away from the valve so the auto-rotation and turret-locking mech's didn't work properly.
Posted Image

Now you're going to need a crossfire spring. Cut it like so in the picture and slide it over the brass.
Posted Image

Force the sealer over the valve stem with the spring in between. Put the turret back on and slide the small pin through the turret rod. Then attach the first part of the rotation mech. Now cut a very small segment of your crossfire spring (I used a spring from a broken airsoft gun because it was a bit thinner and fit a bit better) and put it int the shown place. The reason we need a stronger spring here then the old one is because the rotation mech will skip underneath the force of the crossfire spring pushing the sealer aggainst the turret..
Posted Image

Finish assembling the valve-turret assembly and screw it into the shell. Add a rubber band as shown in the picture. This is necessary because the torsion spring isn't enough to reset the rotation mech with the stronger springs in the valve-turret assembly.
Posted Image

Now we need to extend the amount that claw-like piece is rotated by the pump because the turret won't be rotated enough to be locked into place if we don't. I reccon this is because of all the stronger springs. I just used brass, superglued it on and reinforced the back with epoxy putty. This shortened the pump storke a tiny bit, but is very necesarry.
Posted Image

And there we go, you're done. One thing to note is that this mod puts a lot more stress on the claw-like piece. Mine broke, as you can see below, after several shots. I haven't bothered fixing it yet, but I will soon. I imagine that a screw will do that piece well. I'll update the write-up when I fix it.
Posted Image

And now what everyone is wanting to know. This performs a LOT better than your average modded AT3K. My other one that is just pump-plugged and barrel replaced hit the ground at a fence about 60 feet away from where I range test. This 3K hits that fence with no drop. I love this gun now, and its a much more formidable primary than it's former self. Enjoy!
  • 0

#3 Bedhed117

Bedhed117

    Member

  • Members
  • 184 posts

Posted 09 August 2009 - 09:39 PM

Great writup and mod. I'll definately do this to my 3K when it arrives. Hope this ends up in the directory.
  • 0
QUOTE(Bedhed117 @ Aug 18 2009, 09:48 AM)

Anyone who's sig is a quote of themselves is an enormous douchebag.

Join the Revolution

#4 Coop

Coop

    #sogoodmuchtacticswowinit2winit360noscopehax0rleetbeastmodeactiv

  • Members
  • 775 posts

Posted 09 August 2009 - 09:48 PM

Great mod and nice write-up. I love the tank to turret seal solution!
  • 0

On the other hand, the guy who posted before me used the word 'fuck' a lot so he probably knows what he's talking about.


#5 atomatron

atomatron

    Member

  • Members
  • 579 posts

Posted 09 August 2009 - 09:54 PM

I only cut the turret holes larger on mine and it was hitting 90', nice job.

Are you sure that craft foam wouldn't work just as well?

It seems to me that the majority of the work is just amending the problems caused by the improved sealing mechanism.
  • 0
Perche Germolgi. [Because it shoots]

Rainbow Clan

#6 TantumBull

TantumBull

    Member

  • Moderators
  • 1,929 posts

Posted 10 August 2009 - 10:28 AM

Great writup and mod. I'll definately do this to my 3K when it arrives. Hope this ends up in the directory.

Thank you, I hope it does as well.

Great mod and nice write-up. I love the tank to turret seal solution!

Thank you, the new sealer works pretty well.

I only cut the turret holes larger on mine and it was hitting 90', nice job.

Are you sure that craft foam wouldn't work just as well?

It seems to me that the majority of the work is just amending the problems caused by the improved sealing mechanism.

Thank you, and major props if just cutting the holes larger got 90 for you. That pretty incredible considering the stock sealer doesn't seal at all because it's too wide and air leaks from the indents that that bar locks the turret with. Maybe it not having as much of an effect because your dart fit is really loose?

When you suggest craft foam, there are two things you could actually be suggesting, and I'm not sure which it is, so I'll respond to both.

Craft foam as the sealer without the brass and spring:
I suppose you could try this, but you would still face the same problems with the advancing mech, and my fixes would still be necessary. This is because there would be friction if you wanted the craft foam to seal with the turret properly. Also, I'm not sure if this would work because the stock sealer does have the ability to move back and forth, which I think is because the turret does the same thing when rotating. It wouldn't be an issue if the turret went forward then back to seal, but if it came back when rotating, you'd have problems. Then again, this is speculation. Maybe Hasbro just had that for an earlier iteration of the blaster still in the design process and never took it out or something.

Craft foam in place of the credit card, keeping the brass and spring:
This would probably be ideal, but I didn't have any of the stuff on hand. There would be a couple of problems, though. The credit card already is barely cutting it for thickness, because it almost makes the locking mech not work properly. Craft foam is generally a bit thicker than a credit card, so that would cause problems. I could also see the brass cutting through the foam over time, so it would need to be replaced, unless you backed it with something. However, backing would cause even more of a problem for the locking mech.

Edited by TantumBull, 10 August 2009 - 10:32 AM.

  • 0


1 user(s) are reading this topic

0 members, 1 guests, 0 anonymous users