Jump to content


Photo

Couplered Sharpshooter I, Updated!

Updated with ranges, bands, better plungerness

11 replies to this topic

#1 TantumBull

TantumBull

    Member

  • Moderators
  • 1,929 posts

Posted 01 October 2008 - 07:19 PM

Couplered SSI:

Begin by removing all the screws, and remove the plunger assembly from the gun. Make a cut on the tube similar to the diagram below:
Posted Image
Take the stump of the previous barrel that wasn't cut of, and rap some e-tape around it.
Posted Image
Now take some CPVC and epoxy it over the barrel stub.
Posted Image
Your going to want your coupler to go on so that there is a space between where the PT and coupler would touch. The following diagram better explains what I mean:
Posted Image
This gap is needed because there are fittings in the shell that went around the stock barrel there, and are needed so that the PT doesn't get dislodged in the shell after each shot. You could put it all the way back to eliminate dead space, cut those fittings on the shell, and epoxy the PT in, but then it won't be removable.
Now cut your CPVC so when the coupler is on that gap will exist. Then epoxy on the coupler.
Posted Image
Now you are going to need to shave that fitting on the shell I described earlier to fit the exposed CPVC. You will notice the front of the shell has been removed, this is explained later.
Posted Image
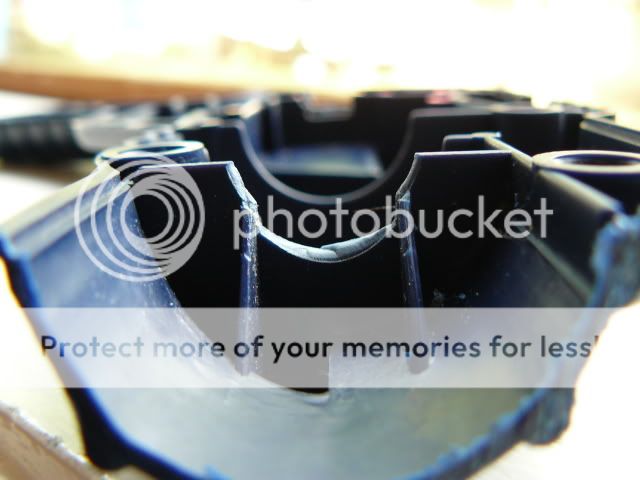
if it still won't fit in the shell (mine didn't) then shave the back of the coupler and the exposed CPVC like so:
Posted Image
Okay, onto the wimpy plunger head. It seems that the main reason the plunger head sucks so hard is because of how easy it is for it to bend and for air to get around. I fixed this by gluing a tiny sliver of FBR in there. I had to cut the FBR into 1/4's for it to fit. Also, replace the spring if you'd like.
Posted Image
The next bit is optional, but I did it so I could use a speedloader. Cut the front of the shell like so:
Posted Image
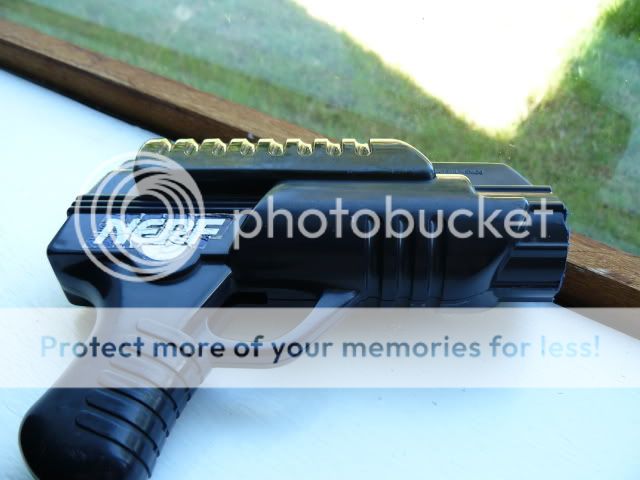
Now put everything in and close it up. The stock catch spring is incredibly strong, and is a bitch to keep from popping the catch out of place when closing the shell, just be patient. Once it's closed up, hot glue around the coupler to help reduce the amount of stress put onto the shell, this is very important if you replaced the spring or plan on banding it. Here's some pics:
Barrel off:
Posted Image
Barrel on and primed:
Posted Image
Hope you guys enjoyed this write up. Question, comments, and flames are all welcome.

Scroll down for updates.

Edited by TantumBull, 23 October 2008 - 11:29 PM.

  • 0

#2 Blue

Blue

    Member

  • Members
  • 2,222 posts

Posted 01 October 2008 - 07:21 PM

Ranges? I get about 45 ft with mine.
  • 0

#3 Soothsayer

Soothsayer

    Member

  • Members
  • 663 posts

Posted 01 October 2008 - 07:22 PM

Good stuff, like the minimization. Ranges?
  • 0

yeah I'm that guy who made that cool thing with the cool paint.


#4 TantumBull

TantumBull

    Member

  • Moderators
  • 1,929 posts

Posted 01 October 2008 - 07:28 PM

Ranges? I get about 45 ft with mine.

I haven't tested with a tape measure yet, but they appear to get similar ranges to a CPVC'd, spring replaced NF. Please note this is a guessed based on solely how much the dart drops before it hits the basement wall, so probably is wrong.
  • 0

#5 Banshee

Banshee

    Member

  • Members
  • 668 posts

Posted 01 October 2008 - 07:29 PM

God, I wish ranges were a mandatory part of a "range-increasing" mod... I'm getting sick and tired of asking for ranges.... Nice mod though!
  • 0
Like my page on Facebook! PM me, I do commissions!

#6 TantumBull

TantumBull

    Member

  • Moderators
  • 1,929 posts

Posted 01 October 2008 - 07:36 PM

Ok, I just went outside and it definitely does not go as far as a spring replaced and CPVC'd NF. However I think banding/spring replacement will improve ranges signifigantly.

Edit: I'll probably get ranges posted within the next week, because I'm going to get some bands or bungees before I test.

Edited by TantumBull, 01 October 2008 - 07:39 PM.

  • 0

#7 Norther of Heaven

Norther of Heaven

    Member

  • Members
  • 349 posts

Posted 01 October 2008 - 07:51 PM

That looks great, i like how you cut off the front like that. I remember a stock-shelled SSI and the front reminded me of a ray gun or something. Anyways. Nice mod. And if someone else hasn't already asked (had the post window up while away) what are the ranges?
  • 0
"I don't always drink beer. But when I do,
I beat my wife."

#8 Guest_Killakit_*

Guest_Killakit_*
  • Guests

Posted 01 October 2008 - 08:07 PM

Nice modification and write up. This has a serious chance of being added to my arsenal. If I can find a Sharpshooter I
  • 0

#9 TantumBull

TantumBull

    Member

  • Moderators
  • 1,929 posts

Posted 01 October 2008 - 08:11 PM

God, I wish ranges were a mandatory part of a "range-increasing" mod... I'm getting sick and tired of asking for ranges.... Nice mod though!


I will get them up soon. Do you suggest banding it or bungeeing it?
  • 0

#10 TantumBull

TantumBull

    Member

  • Moderators
  • 1,929 posts

Posted 11 October 2008 - 04:22 PM

UPDATES!
1. Plunger head improvement:
So basicly, I was shooting my SS1 in my basement, a couple of days ago, and it started getting really flippin' unreliable. I opened it up, and after some troubleshooting, found that the plunger head no longer was making a good seal. I made a thread looking for answers, and got some. Splitlip gave me the idea of wrapping the head in e-tape until it had a good seal. I did this, and after doing this, got a post in the thread from Draconis. It is as follows:
(sorry about the font size, it won't let me change it)

What works great for me (on the older style rubber heads) is the same basic idea as with the o-ring style heads, just with more material. I remove the heads from shaft, then clean and dry completely. Next, fold back the outside lip and begin winding E-tape around the inner lip until it presses out on the inside of the outer lip. Then just fold the lip back in place and reassemble. This ensures that the E-tape is not actually getting the action, and shouldn't need to be replaced ever. I find that using a section of bike inner tube wound around under the tape reduces the amount of tape that I need to use. I also cut my strips of tape in half, lengthwise. I need to do a write-up on this.


I would have done this but I didn't want to waste e-tape and I had already carried out Splitlip's idea. Here it is:

First wrap the plunger head in a shit load of e-tape. Then take a little bit off and try to put the plunger in the PT. Repeat until it fits.
Posted Image
Now stick some foam inside the plunger head. I used this foam that is used for making heart-shaped stamps (my sister's).
Posted Image
Then shave down the tip of the plunger rod at the spot where that secondary plunger head went (mine broke). Glue on some craft foam to deaden the impact.
Posted Image
Now add some bands.
Posted Image

Ranges:
I range tested with two CPVC barrels, one about 3.5" and the other about 4.5". I switched them in and out randomly. They appeared to get similar ranges from my viewpoint. Also, the stefans were weighted with one copper BB. Theses are also all done flat, and the dart skip could have been anywhere from about 0-5 feet, and I used to rubber bands.

70, 64, 61, 75, 68, 72, 61

Average: 67.3

Not too shabby.

Edited by TantumBull, 11 October 2008 - 04:24 PM.

  • 0

#11 Herpestidae

Herpestidae

    Member

  • Members
  • 100 posts

Posted 11 October 2008 - 05:54 PM

Nice job. How is the seal?
  • 0
Grimlock no bozo! Grimlock king!

#12 TantumBull

TantumBull

    Member

  • Moderators
  • 1,929 posts

Posted 11 October 2008 - 06:25 PM

Nice job. How is the seal?


I have no complaints so far, although I imagine that at some point the e-tape will wear out. That's why Draconis's method is better
  • 0


0 user(s) are reading this topic

0 members, 0 guests, 0 anonymous users