Jump to content


taerKitty's Content

There have been 718 items by taerKitty (Search limited from 06-January 97)


By content type

See this member's


Sort by                Order  

#241874 Where To Buy Modding Materials

Posted by taerKitty on 14 July 2009 - 09:12 AM in Modifications

(such as this gentleman did here: http://www.instructa...ic-loser-Rifle/ )


Ah, the filter strikes again. If you don't know how to compensate for the luser-filter, just go to the creator of said luser-rifle's link http://www.instructa...ember/irwinner/ and click on the offending link therein.


#252905 Where To Buy Modding Materials

Posted by taerKitty on 08 October 2009 - 01:00 AM in Modifications

New subject, so hopefully I won't earn a vacation for double-posting.

I just found an interesting source for springs:

Posted Image


That's an 18" spring with the following specs:

3-3/8" coil length
3/4" coil diameter
1/16" wire diameter
(so that's a 5/8" inner diameter, if I understand 'coil diameter' correctly. I know my spare piece of 17/32" brass slides snugly down the center.)

Above it is the packaging from Schuck's / Kragen's. Part number 29004, $6. It's a 4 pack of springs, but only this one is useful. The packaging says "Pedal Return Spring Assortment."

Immediately below it is a Home Depot spring that sounds a lot like a "Ace #49", but I don't have the Ace to compare it with. It's 4 coils too long for a Nitefinder but otherwise fits fine. It has about 20# working load. The Home Depot part number is 684-838.

That's not the point - the point is that it looks a lot like the bottom-most spring when you buy it. It's tension spring, not a compression spring. Wrap the long end around something sturdy (such as the handle of a boltcutter you'll be glad you have to cut the spring down to size) and pull the other end with a pair of pliers until it gets to the right length.

Yes, you can pull it longer, but this is the coil distance it restores to after you compress it back down to its original length and let it expand back.

I remember someone saying their hardware store (in Malaysia, I believe) had no stock in springs. Here's an alternate supply. Is it as good as a factory spring? Nope. If nothing else, the ends aren't 'finished' into a pair or trio of compact coils neatly stacked. I'm sure stretching a torsion spring does it no favours. However, for someone who is otherwise bereft of springs, this could be an option, and a cheaper one at that. (The HD springs come 2 to a $4 pack, so you get 2" per dollar. This gave me 18" for $6, so you get 3" per dollar.)

It seems about as strong as the HD spring. I don't have a means to measure it, otherwise I could say for sure.


#307979 Where To Buy Modding Materials

Posted by taerKitty on 02 December 2011 - 02:47 AM in Modifications

Whoa, you quoted someone from 2005? That's probably the oldest quote I've yet seen.

Back on topic - I never saw brass in HD. Brass can be found at hobby stores, ACE Hardware, and Amazon.

CPVC pipe is sometimes in different places based on the HD store. I've been to three or four, and it's usually near the PVC, but in one it's the next aisle over, so it's not visible if you're in the PVC aisle. It's always next to the copper in all the stores I've visited, though.

Have you tried asking?


#306624 Where To Buy Modding Materials

Posted by taerKitty on 28 October 2011 - 04:15 PM in Modifications

I don't think anyone has mentioned styrene sheets.

Color me stupid, but I don't see how styrene sheets will help a weak spring. Maybe Popatachi can - he is a genius with styrene.


#314790 Where To Buy Modding Materials

Posted by taerKitty on 25 April 2012 - 11:23 AM in Modifications

http://VisiPak.com


#314845 Where To Buy Modding Materials

Posted by taerKitty on 26 April 2012 - 08:39 PM in Modifications

VisiPak Medium Wall and McMaster-Carr PETG are indistinguishable. Same ID/OD as measured by calipers, and same perceived rigidity, weight (both are really too light, even in 4' lengths) and opacity. For all we know, they may even come from the same factory.


#285556 The Official Internals Directory

Posted by taerKitty on 16 September 2010 - 10:10 PM in Modifications

BattleMax Sceptor

Here's an internals shot:

Posted Image


Business end is toward the right.

Above the guts is the white tube housing the follower and spring.

Below the guts is the follower spring. I'm not sure if it's constant force or not, but it's a very light spring.

Bottom of the assembly is the pump. The sausage is the air reservoir, but so is the upper tube.

The left block is the firing pin assembly. The trigger presses the grey catch leftward until it rotates so that the trigger moves past it, at which point it snaps back into position. It pivots at the grey metal pin, visible in the lower middle of the firing pin assembly. The bottom half swings back toward the right, and the upper part of it snaps to the left.

This strikes a part attached to the lower metal bar, which is visible just above the upper tube. The actual part being struck is fully enclosed in the firing pin assembly, but it has enough mass to throw the metal rod leftward more than 1/2". The lower metal rod is usually held in place by a spring also pushing it rightward. This spring is also enclosed in the firing pin assembly.

Posted Image


The right end of the metal rod is a dump valve, in the middle of the above photo. The top is the follower rod, which pushes the ammo into place. The bottom is the pump chamber.


#276647 Guide To Barrel Material

Posted by taerKitty on 02 June 2010 - 12:26 PM in Modifications

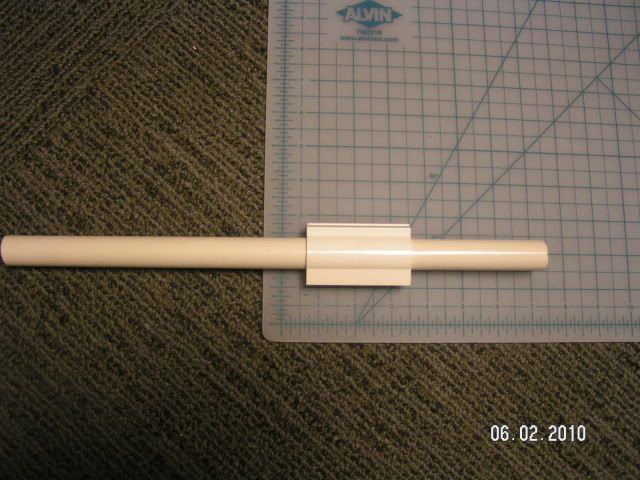
Snap-fix (UPC 11651-23520 for 1/2" PVC) is a two part sleeve that's intended to be slapped over a leak in a run of pipe.

Posted Image


It's intended to be glued on, so it slides quite well.


#279611 Diy: Hopper Clips

Posted by taerKitty on 06 July 2010 - 10:42 AM in Darts and Barrels

By the way, heating PVC like that can let off some pretty nasty fumes.


#283934 Community Snap Thread

Posted by taerKitty on 24 August 2010 - 09:49 PM in Homemades

Hm. I can see a quick-release pin in this thing's future. Now, a way to turn the screw something field-strippable... hm.

I'll just have to see when I finally get my hands on it. I can't wait!


#284069 Community Snap Thread

Posted by taerKitty on 26 August 2010 - 10:50 PM in Homemades

If you're worried about looks, how about shelling the SNAP in something else? For example, an Expand-a-Blast? This one is only using 1" thinwall, hence the bit of 1-1/4" to support the clothespin.

Posted Image


My one-after-next will likely go in an LBB shell. I like my LBB skeletonized, and, after I added a lever trigger to it, it won't go back in the shell anyhow.


#286755 Community Snap Thread

Posted by taerKitty on 10 October 2010 - 02:23 PM in Homemades

(Grabbed this from Rork's SNAP V thread)

Silicone spray evaporates much more quickly, and it seems to make the rubber expand slightly. Kinda annoying when you're using O-rings.
Has anyone used a [k25] spring in a SNAP before?


Spray lube may be rubber-safe, but often the propellant contains petroleum distillates, which could damage rubber.

Most of the lithium lube I've seen contains mineral oil, so I don't think they're safe for rubber.

As for a [k25], it's pretty large. I have one in my SNAP-a-Blast, but it catches on the nail.


#283077 Community Snap Thread

Posted by taerKitty on 13 August 2010 - 07:50 PM in Homemades

Sorry, I'm too late to get into the whole pump-action game. To make up for it, here's a SNAP-in-a-shell:

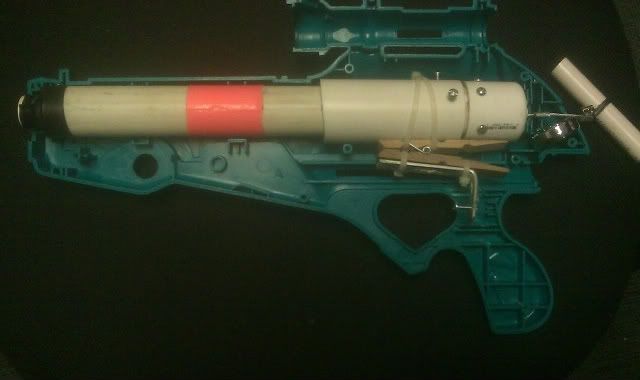
Posted Image


PT is 1" thinwall. It has a full [k25] in it. Plunger head is a finishing washer, 1-1/4" neoprene washer, a fender washer, a slice of 1/2 PVC and hot glue as a separator, a second fender washer, and a 1/2" endcap with a 1/4" screw-eye bolt holding the mess together.

Therer's a shroud of 1-1/4" thickwall PVC to give the nail some thing solid to grab to. I tried PVC cement, but there wasn't an easy way to spread it evenly, so I resorted to #6 screws.

The clothespin had some quality time with a file to add in the notches for its current location. It was originally seated back one divot, which sucked from the leverage perspective. Tne 'angle iron' is some 1/8" aluminum that I had lying around. It extends over the head of the nail to keep that thing from riding up. No amount of glue seemed to keep it in place.

The 1" PVC endcap has five 1/4" holes drilled in it - one for the 1/16" plunger cable, and four for preventing vacuum-drag on the plungerhead.

The aluminum cable ended up being a little less than 2' with allowances for the thimble and ferrules. The handle is a 1/4" bolt and four 1/4" nuts: one at the bolt head, two at the middle holding the wire and thimble in place, and one at the end of the bolt. CPVC ID will mate with 1/4" nuts, with a little tender loving percussive coercion.

There's a badge retractor to keep the handle from whipping about.

The muzzle is a 1/2" CPVC coupler nested in some 3/4" PVC, and some e-tape to make up the difference. Yes, it's airtight.

The EaB shell took very little surgery to accept the PT. 1-1/4" PVC was too thick to go the whole length, but 1" thinwall doesn't have that much a smaller ID than 1-1/4" thickwall. The piece of orange duct tape is to "show the colours" in the 'window' that the EaB has.

===

This is my first SNAP. They're fun to envision, but trying to get the nail right is maddening.

I didn't ramp the plunger head enough. I'll need to take care of that later, if I ever have need to take the thing apart.

I need to hold down the trigger when priming the blaster, otherwise the nail gets in the way of the spring. This will still be the case even if I ramp the plunger head.

The EaB still has a lot of dead space in the 'scope'. I'll integrate something into it later.

I need to get some more e-putty so I can reinforce the old spring rest. It currently holds the blaster in place when its' being primed, so it can't be very happy.

The trigger is a placeholder. Ideally, I still have the EaB original trigger around somewhere, and I'd love to have something 'stock' as the trigger.

Comments/questions/opinions?


#285967 Community Snap Thread

Posted by taerKitty on 24 September 2010 - 08:00 AM in Homemades

You've never really read the previous post, have you?

He's not saying it's costly in terms of materials. He's saying it's time consuming. And, there's no savings, even if time were equal - what are you going to do with half a clothespin w/o a spring? Use it as a Barbie-scale doorstop?


#279754 Bladder Indicator Light.

Posted by taerKitty on 08 July 2010 - 02:40 PM in Modifications

That makes sense - the tubing and connectors are probably specced out for what they think are 'normal operating pressures' + some safety margin. The stock bladder for an RF20 is pretty sturdy, and I'm guessing the MagStrike uses roughly the same material.

Back to the mods, though - any more blasters in the same PJ theme of skulls and brown gusts?


#279687 Bladder Indicator Light.

Posted by taerKitty on 07 July 2010 - 12:18 PM in Modifications

Fantastic paintjobs, too. How dangerous are bladder bursts in Magstrikes?


#279707 Bladder Indicator Light.

Posted by taerKitty on 07 July 2010 - 06:34 PM in Modifications

Can't say 'great PJ' now, but that's a very novel use of the 'scope', and effective tubing protection. What's the rubber band on the stock for?


#296487 Bs-12 Advanced Tactical Nerf Rifle

Posted by taerKitty on 23 March 2011 - 12:17 PM in Homemades

Not sure what I missed, but how are you able to launch streamlines that far without them spiraling out of control?

Black magic. Or mad skillz. Remember, sufficiently advanced tech is indistinguishable from magic

(ObConfession: I misread the original post and thought iFalcon was asking "how far". My fail.)


#286756 Snapbow Mk. V, Revised

Posted by taerKitty on 10 October 2010 - 02:30 PM in Homemades

Seel http://nerfhaven.com...55 for answers to your above questions. That's the general SNAP thread, which is a better place for that sort of discussion than threadjacking a given writeup.

Let's get this back on topic for the SNAP V, shall we?

Rork - good job. Very clean and straightforward.

A few more questions for your excellent FAQ:
  • With the right tools and supplies, how long will this take to make?

  • How hard on a scale of 1..10 is this? 1 = 'I can crayola barrel an NF,' and 10 = 'I cast my own parts'

  • How much does it cost to make the first one of these, including all parts? How much does each one cost, averaged out over parts? (This reflects the fact that certain parts, such as springs, are sold in packages more than one blaster requires.)


#286349 Snapbow Mk. V, Revised

Posted by taerKitty on 01 October 2010 - 03:59 PM in Homemades

People claim between $20 and $40. Keep in mind, some of the parts come in bulk: McMaster springs come in 5-packs, PVC comes in 10' lengths. You may end up spending over $50 to make one, but you'll have enough parts left over for the next, and the next, etc.

Also, from my attempts, the plunger head takes a chunk of change.


#301521 Nerf Irc Room

Posted by taerKitty on 14 July 2011 - 11:36 AM in Off Topic

Users are auto-voiced on joining the channel again.

Or, in lay-speak, we're golden.


#295731 Dartsmithing Tips Archive

Posted by taerKitty on 10 March 2011 - 12:16 PM in Darts and Barrels

Felt is also pretty firm. Does anyone have any ideas on how to test the 'give' of foam? Durometer testing seems inapplicable here - it talks about deformation, and both felt and foam may be too soft to be on their scale.


#295733 Dartsmithing Tips Archive

Posted by taerKitty on 10 March 2011 - 01:25 PM in Darts and Barrels

I've made some darts with rubber weatherstripping as padding. It's very soft, and very durable, but, it's also very, very easy to punch it out so it's not straight. This will give roughly 200 heads (240 assuming no loss, which really doesn't happen) for $4.60. If we round to $5, that's $0.025 per head, for the padding alone.


#296258 Dartsmithing Tips Archive

Posted by taerKitty on 19 March 2011 - 12:41 AM in Darts and Barrels

1. Loghome sells white foam that's pretty good. Give it a try.

2. Ryan's pink foam is his custom mass order direct from a manufacturer in China, if I understand properly. He and his cohorts sunk a lot into it, so you may want to just go with them for supplying foam.

3. If you don't like LogHome White or Ryan Pink, then try BestMaterial's HotRodXL Beige. DarthFreyr and I got in a 2500' roll for $200 shipped, and we're selling it for 250' for $20, or $10 for 100'.


#306678 Dartsmithing Tips Archive

Posted by taerKitty on 29 October 2011 - 04:58 PM in Darts and Barrels

Safety: If you're willing to take a shot of it out of your most powerful war-legal blaster at 10', I'm game.

Durability: Can it be fired again and again (and a few dozen more 'again's)?

Searchability: Can it be found again and again, etc. in grass, in rough, in wherever you Nerf?

Cost: Will it cost less than $0.05 each? I Nerf because AS and PB are expensive.

Size: If you size it for 1/2" PVC, it's a non-starter for most people. It won't work in hoppers, and your nucking futs if you think everyone is going to rebarrel.

Accessibility: How easy is it for everyone to find the parts to make them? Single source sucks. I should be able to, with guidance, get the parts either at a hardware store, a home improvement depot, or a collection of online merchants and make them.


#274520 Dartsmithing Tips Archive

Posted by taerKitty on 11 May 2010 - 11:12 AM in Darts and Barrels

Here are a few ideas. Some are practical, others not. YMMV.

1. Tagger Stefans

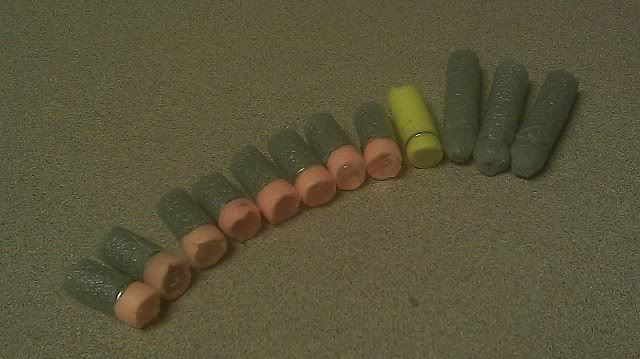
I have lots of stock foam, and still use them for indoor firing. Some of the modded blasters tend to do nasty things to the darts. Small round stickers over the hole keep them from shredding, but the impacts seem weaken the glue so the heads fall off. So, I'm left with more than a few sticks of 2.25", cored-out, neon-coloured foam.

Posted Image


This is more of an aesthetic dartsmithing idea than anything else. It does help in locating the darts, especially outside, but that latter part is more theoretical than experiential for me. I don't end up at (m)any wars, as WA-area Nerfers can attest. Still, orange (or canary yellow) does stand out more than grey against the taupe and other muted hues of American Office colouring.

At any rate, this is 3/4" of FBR, a #8 washer, then 1/4" slice of Nerf foam filled with hot glue. They're just another form of glue-dome stefans, and perform about the same. They sting about the same, too. Let's look at that in the next idea.

===

2. Indoor Stefans

Even from an amped-up NF, glue-dome and felt-tipped stefans can sting a little at close range. For serious Nerfers, that's part of the whole point, but for people just starting out, they may balk at the idea. Here's a simple way to alleviate some of the pain.

The ones on the right are FBR-tipped stefans. Ranges are comparable to my felt-tipped stefans using the same foam. Tested with a 4B, a Pistol Splat, and a modded TTG. As an experiment, I trimmed some of the top to give it a more Streamline profile, but that doesn't seem to help distances any. (This was before I got caught up on this thread, so I acknowledge they're war-illegal.)
  • Take a short length of 1/2" PVC, about 6".

  • Cut slots almost all the way through with a (foo)saw 1/4", 1", and 1.5" from one end. Keep cutting until the blade is in contact with the opposite inner wall of the pipe. Make sure this cut is square to the length of the pipe. Using a miter box is highly recommended here, as is taking your time with the (foo)saw.

    Disclaimer: This is a standard step in making stefans - I'm not saying it's anything new; I'm just including it for completeness' sake.

  • Take another run of PVC, this one about 2". Solvent-weld it against the first pipe under the cuts so the ends are flush. PVC cement and primer will run you $8 to $10, and will last forever. It's well worth it here, because hot glue alone won't cut it. Let it cure for the time stated on the can. Mine says two hours.

  • To stiffen the joint, add a fillet of hot glue on each side. Make sure not to get glue into the slots you just cut.

  • Feed the string of FBR through it, placing the end flush with the end of the PVC with the slots you just cut. Depending on your preference use the 1" or 1.5" slot to chop your FBR into chunks, then stuff them in a pillowcase, air-dry them with a hair dryer or clothes dryer, yadda, yadda.

  • When you have a bunch of foam blanks, take the back of some sort of sticker, such as a bumper sticker. Lay a half dozen washers on it, then dot a bit of hot glue in the center of each, enough for the bubble to spill over the center opening appx 1mm.

  • Press the FBR on it, holding it true for 5 seconds (alternately, devise some sort of rig to hold it true.) Doing it batches of 6 allows the glue some time to cool, but still remain tacky. This will cut down on melted foam, which will keep the ends true.

  • (Optional) If you want single-washer darts, you're done. If you want to double the weight, repeat and glue a washer on the other end of each FBR blank.

  • When you're done, you should have a bunch of FBRs with a #8 washer glued to one (or both) ends. Now drop a bit of hot glue on the washer, enough to form a dome about the diameter of the center opening, and press another FBR (or it's washer) against it. Hold for 10 seconds. Do this sitting down, so you the recent glued FBRs don't have to support the weight of a whole bunch of washers.

  • You now have a long chain of FBR again. Feed it through the aforementioned PVC pipe toward the .25" slot until the washer shows (the chain will end in a single washer, but we're going to take care of that very soon.)

  • Cut the FBR chain through the slot. You should have a chunk of FBR 1/4" longer than your desired length. Glue that one to the other end of the chain, keeping the downrange orientation the same.

  • That's pretty much it - advance the chain until the washer pair shows, then cut it. You should end up with a bunch of FBR-tipped darts with 1/4" of foam at the business end, and 3/4" or 1" of foam 'up-range'.
===

3. Wadcutters

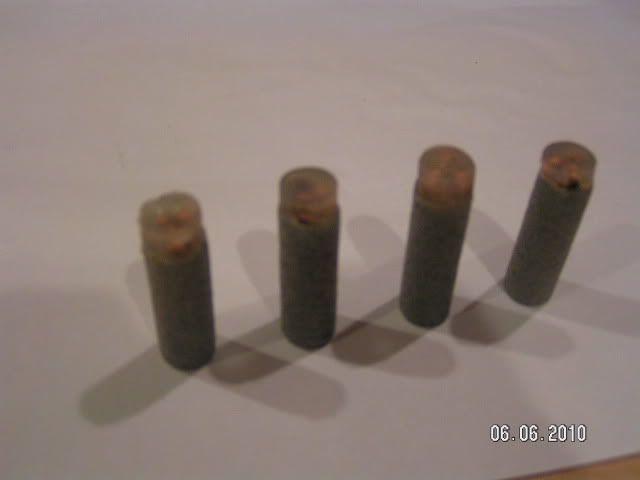
Posted Image


Sorry for the blurry picture, but it's hard to do closeups with this camera.

This is a semi-practical tip, but only if your blaster needs 3 BBs and a slug of hot glue to reach max range. (If that is the case, I don't want to be shot by it.)

Seriously, it is very slow, and probably good only as a 'novelty' stefan, somewhat similar to the tagger stefan, above.
  • Cut a 1/4" ring of CPVC.

  • Get some sticker backing paper, such as off a bumper sticker. Cut a 2" x 1/4" strip of it and hot glue it to the inside of the CPVC ring, slick side inward (otherwise you wouldn't be able to glue it.)

  • Get a flat magnet, such as these, available at Michael's Art Supply stores. Lay the rest of the sticker backing paper over it, slick side upward.

  • Drop 3 BBs on the magnet and nudge them into the triangle if needed. Place the CPVC ring around them and fill it with hot glue. On a full-sized hot glue gun, I gave each one a full trigger squeeze.

  • Wait for it to cool. This will probably take 30 seconds to a full minute. When it's utterly solid, poke it out of the ring.

  • Flip it over. Put a drop (appx 1-1/2 to 2x the size of a BB) of hot glue in the center of the three-BB-triangle.

  • Press FBR blank against it and count to 10.

  • Repeat.
Yes, incredibly slow. The results look good, but the process takes forever. It's good if you need that much mass in your dart, or you like the looks, or you think there's a market for them.


#295681 Dartsmithing Tips Archive

Posted by taerKitty on 09 March 2011 - 06:27 PM in Darts and Barrels

I've added a writeup on what I call 'Nuthead' darts, which are made completely from hot glue. They're cast from acorn nuts and use the rounded shape to be aerodynamic.


#295439 Dartsmithing Tips Archive

Posted by taerKitty on 06 March 2011 - 02:35 AM in Darts and Barrels

I've found good felt discs to be very long-wearing, but every so often someone gets a bum batch. I have some black ones that shred easily, and some white ones that seem to hold up fine. I'm not sure foam will hold up as well. What makes it desirable is that it is soft, but that also makes it more susceptible to damage.


#277979 Dartsmithing Tips Archive

Posted by taerKitty on 17 June 2010 - 10:27 PM in Darts and Barrels

Draconis' war.

It's actually Dayko's. And awesome find!

Corrected, thanks!

And to keep this on topic, rather than painting the ends of the dart, you can go all Claire's and frilly with shiny labels and all, or just go with round labels glued on - these are removable out-of-the-box, but I couldn't find any 3/8" or 1/2" diameter permanent labels, only 1/4".


#283505 Dartsmithing Tips Archive

Posted by taerKitty on 19 August 2010 - 02:34 PM in Darts and Barrels

(Edited to save screen real estate)

After that I lubed up the newly-created mold, filled it with hot glue, stuck a weight in it, and added my foam.

Pros: fly straighter than my regular stefans, require minimal skill to reproduce uniformly

Cons: use more hot glue than traditional stefan domes (more expensive)

This is only a proof-of-concept; more testing is required to determine how effective this method is compared to other types of darts.

Great minds think alike. Or at least ones frustrated by trying to make decent darts. ;) Or, to put it another way, your proof-of-concept definitely works.

A few thoughts:
  • You may want to drop the weight after filling your mold with glue, else you'll be hitting your target with almost-unpadded metal.

  • Instead of a BB, if you use a #8 washer, you will likely be able to keep it just on top of the mold.

  • If you have a flexible mold, you'll have a much easier time getting the darts out. For example, the people who make Splats also make a version that shoots hollow rubber spheres. Said spheres can be cut in half, filled with hot glue, etc.

  • I've found that these domed darts fly better than straight slugs. Once the head is cast (and trimmed, because it's nearly impossible to eyeball the right amount of glue, so there's always a bit of 'flash' around the mold) they're as easy to affix to the foam blank as a standard slug head.

  • To trim off the aforementioned 'flash', I've found that running the edge of the dart along the side of the glue gun nozzle works well. Note, this works only if you have a glue gun with an exposed metal nozzle. Cheapie mini guns seem to always encase the nozzle in a bit of plastic.

  • I've encountered some people online who doubt the safety of these darts. It's -always- up to your war organizer, whether or not you feel it safe.
Here's an example of my findings along the same avenue of investigation:

Posted Image


#277967 Dartsmithing Tips Archive

Posted by taerKitty on 17 June 2010 - 08:59 PM in Darts and Barrels

Found this on Amazon.com: http://www.amazon.co...uct/B000BQWOC0/

M-D Building Products 71480 Backer Rod for Gaps and Joints
by M-D Building Products
List Price: $4.29
Price: $0.62
You Save: $3.67 (86%)

...


Product Description
Nonabsorbent, closed cell polyethylene pre caulking material. Use before caulking to fill gaps and openings larger than 1 2" x 1 2". Prevents 3 point bonding. No. 71464: 3 8" diameter x 20' L. No. 71480: 1 2" diameter x 20' L. No. 71506: 5 8" diameter x 2

The way I'm reading this, it's 20' of closed cell foam for $0.62. But...

Shipping is $6.24. However, it appears that's for up to 1lb, and the unit weight is 2.4 oz. because I purchased 20 of them and got charged $18-and-change for shipping. Total is $30-and-change, so that's still $1.50 per 20'.

Arrives 23-28th, which may be after Dayko's war. Oh, well. I'll post about its density when it arrives.

===

Edit: Originally said it was Draconis' War. Thanks TantumBull


#294347 Dartsmithing Tips Archive

Posted by taerKitty on 10 February 2011 - 10:00 PM in Darts and Barrels

1.10 g	 Marksman 1/4" steel hunting shot
0.82 g	 3/0 fishing sinkers
0.64 g	 McMaster #8 washer
0.6~ g	 1/4" length of McMaster .452" diameter hot glue stick
0.52 g	 McMaster #6 washer
0.43 g	 Heaviest Airsoft BB
0.32 g	 Copperhead 0.177 (4.5mm) copper coated steel BB
0.20 g	 Most Common Airsoft BB
0.12 g	 Lightest Airsoft BB
0.06 g	 McMaster felt disc

You mean like that? :)


#237448 Raider Preview

Posted by taerKitty on 19 June 2009 - 03:46 PM in General Nerf

I'm not that thrilled about the blaster itself. It's long, so it has lots of room for add-ons / integrations / steampunk decorative crap. From what I hear, it's a Recon++, so it won't suck as badly. I'm not sure about Slam Fire - I'll have to try it first. Me, I just like the crisp snap of squeezing the trigger right at the catch-point. Slam Fire has me worried I'll just feel like I'm slapping paint on a wall instead of using a paintbrush.

What has me excited is the magazine. If it was $20 for the blaster, I'd gladly toss the blaster into my parts bin and just use the mag. $40 for a box for my darts, though, that's a harder sell.


#236698 Raider Preview

Posted by taerKitty on 16 June 2009 - 07:40 AM in General Nerf

does it look like there would be a way to put a bolt on it so that you could completely remove the front barrel?

Why not buy a Longshot at that rate?

Here's my take on it - at some point, someone is going to either use it to death by natural causes, or put one too many springs in it and have it experience a premature demise. At that point, said someone may offer the clip for sale (probably not here - we'd just toss it in our Longshot / Recon / Vulcan / clip-modded-BBBB.)

The Raider's firing mechanism sounds like the Recon, SP1 - an incremental fix, but nothing revolutionary. Its two key advantages are the 35 shot clip and the cocking mechanism (including 'Slam Fire'.) Stick a bolt in place of the cocking mechanism, and you have an underpowered Longshot.


#238340 Raider Preview

Posted by taerKitty on 24 June 2009 - 08:24 AM in General Nerf

Why is nobody realizing that you are probably going to be able to order the clips SEPARATELY, so you don't need to waste your money on just another recon.

For the longest time, they didn't sell Longshot / Recon clips independently in the stores - that's only a recent change. Given that this is a new product, I'm not holding my breath that they'll sell the drum magazine separately on initial rollout.

Besides, having more parts is good, right?


#238742 Raider Preview

Posted by taerKitty on 26 June 2009 - 11:59 AM in General Nerf

It's the same process that occurs with engines. Build one that works, learn from it, then build one that works better.

That's the case with cars. With Nerfs, isn't it the other way around? They learn what works, then figure out how to make it cheaper (and lamer.)

Can I fire it? Once?

I can see someone being a right bastard about it.

Me: "Can I fire it? Just once?"

Him: "Sure." (Loads one dart in the magazine, cocks weapon, hands it over.)

:cry:


#296710 The Ohio Revolution

Posted by taerKitty on 27 March 2011 - 04:59 PM in Nerf Wars

Canada has international wars, WE had an international, transcontinental war. We win.


Transcontinental is when East Coast and West Coast duke it out. That's been happening for years.

This one was trans-Atlantic. It'd be even more kick-ass if we had some Sporeans or Ozzies invade the States.


#295134 The Ohio Revolution

Posted by taerKitty on 27 February 2011 - 05:43 PM in Nerf Wars

Damn, I really wish I could drive across the country to see you guys. Maybe next time.


Same here. I'll be there in spirit.

Remember - don't fire until you see the whites of their eyes. (Given Nerfy ranges, that's pretty much a given.)


#296265 The Ohio Revolution

Posted by taerKitty on 19 March 2011 - 12:13 PM in Nerf Wars

Please post lots of pics!


#296556 The Ohio Revolution

Posted by taerKitty on 24 March 2011 - 10:10 PM in Nerf Wars

Guys, we just won "Shot of the Week" on Nerf Nation's Facebook page!


Here's the direct link

Note: You have to have an FB account, and Friend 'NerfNation' to get access.