Yeah I think so, I've heard that the OP valve on it kicks in at around 15 pumps, mine does at 22 pumps.Without a plugged pump? It seems a little unlikely to me, but who knows? Maybe you have an exceptionally powerful one.I'll try it. Thanks, I'm pretty sure you're talking about Q-tips right? Haha. I don't know much about Big Salvo's But I didn't even open it up, I just stuck 10" CPVC barrels down each existing barrel with some e-tape on each and I'm getting about 110'-120' ranges level. Is it supposed to be that awesome?
Banshee's Content
There have been 572 items by Banshee (Search limited from 14-February 97)
#206492 Big Salvo Problems
 Posted by
on 25 January 2009 - 11:40 PM
in
Modifications
Posted by
on 25 January 2009 - 11:40 PM
in
Modifications
#219946 Longshot Stock Mod
Posted by
on 26 March 2009 - 04:53 PM
in
Modifications
Haha, this reminds me of what I did to mine. I did a 12 shot mag mod and I had an extra follower (plastic part that pushes up darts) afterwords, so I shoved that in the stock. Did it work? Yes. Is it worth the time to tell everyone about these tiny pointless idea's... no not really...
#132968 How Do You Open A Ls Clip?
Posted by
on 18 December 2007 - 06:23 PM
in
Modifications
I know you all know how to get the stupid Longshot clips open. Does anyone care to give me any tips because I take the screws out, but the clips on the sides don't come undone. Yes, I have looked at the Mod Directory and the LS clip mods and I still don't understand.
Anything helps!
Thank you!
Anything helps!
Thank you!
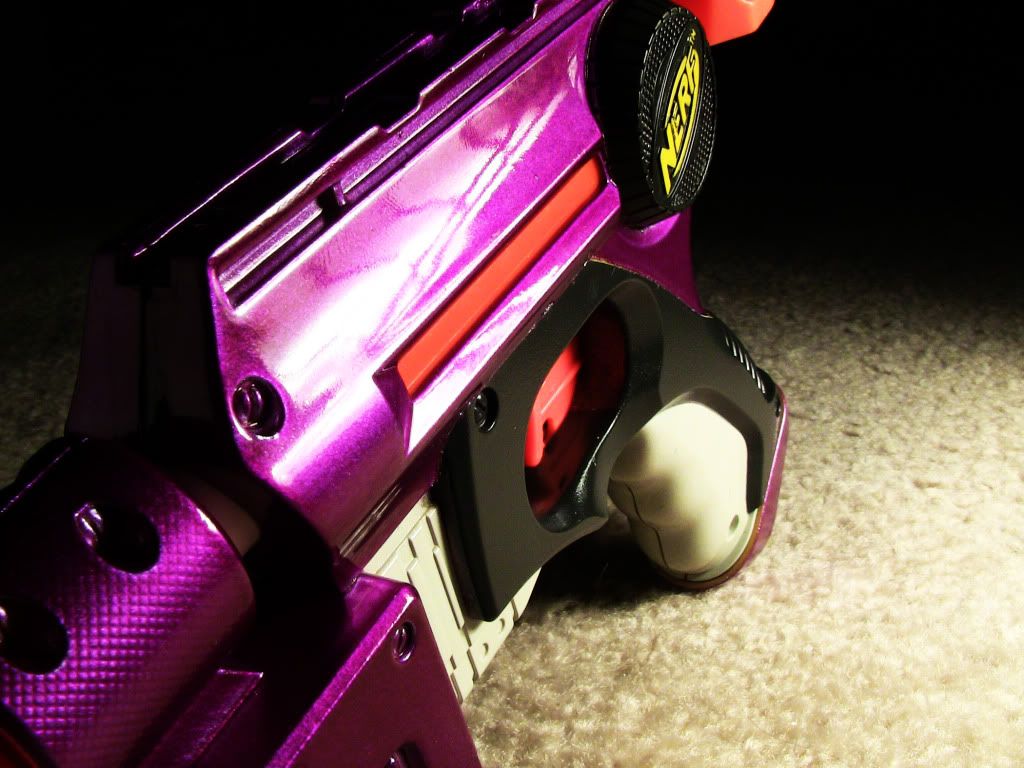
#206343 Big Salvo Problems
Posted by
on 25 January 2009 - 05:08 PM
in
Modifications
I just picked up a Big Salvo from Goodwill a couple minutes ago. It seems to work but if i pump it slow the air leaks out of all the barrels. The only way to keep air in the chambers is to pump it really hard really fast, then it works. Whats a good way to fix this?
#196362 Energy Paintball Gun Mod?
Posted by
on 15 December 2008 - 05:08 PM
in
Modifications
I'd like to see some internal pictures so I can decide if its usable.
#196508 Energy Paintball Gun Mod?
Posted by
on 16 December 2008 - 08:35 AM
in
Modifications
That spring is beastly...
#241390 Industrial Velcro
Posted by
on 11 July 2009 - 12:05 AM
in
Modifications
Never mind.
#248247 Removing Paint
Posted by
on 23 August 2009 - 01:00 AM
in
Modifications
Get a can of lacquer thinner and some heavy duty paper towels. be quick about it though cuz it might eat your plastic a bit.
#259152 Shell Shock.... Sticking Slide...
Posted by
on 16 December 2009 - 08:19 AM
in
Modifications
Where did you get that idea?What gun are you talking about. The PAS
Anyways, try taking most if not all the internals out of the gun so its just the shell and install the slide on it and try cocking it. If it moves then everyone here is right and you reassembled it wrong. If not, then we can assume the paint is holding it. In which case give it several days to completely dry and try it. If it still doesn't work then sand off the paint underneath the slide.
#282594 The Best Way To Moddify A Longstrike
Posted by
on 09 August 2010 - 05:47 PM
in
Modifications
If you're seeing what I'm seeing, I'm not even going to attempt to read this. It's just a block of text, I can't even see any words. My suggestion to you is don't "get to it" if you want to stay on this forum, fix it now.
#258936 Real/halo Looking Guns
Posted by
on 14 December 2009 - 12:02 AM
in
Modifications
Everyone noob around here needs to stop with the "look at guns that no one cares about" threads just because they want to get something pinned. For any gun that's painted, there is a thread for that. The Crossbow gets its own thread because its an infamous weapon of choice and deserves to be glorified in all its purpleness. Longshots are cool, but do not deserve a thread, Nightfinders are the most popular, but again, don't deserve their own thread. So game guns sure as hell don't, especially seeing as there is like what, three of them? Instead of having 15 pointless and small threads, we have one huge-ass thread for all of them. Doesn't that sound GREAT!? Hell yeah it does! If you want to get something pinned because you're a tool, actually contribute something, don't ask people to stuff their junk in your thread as an allusion to the buttfucking you wish you were getting...
#252072 Big Salvo: One Tank Modification
Posted by
on 29 September 2009 - 12:16 AM
in
Modifications
You should put it in the bottom hole, and then integrate a BBBB in the top or something. That'd be sick...
#250842 Bbb Value Questions
Posted by
on 19 September 2009 - 11:14 AM
in
Modifications
Well it all depends on what you're looking for. If you want rate of fire, you should get the recon but it has bad ranges. But you can modify the BBB with a clip and get a good rate of fire and good ranges, but you're going to do so, you'll spending a good deal of money to do so. The recon wont get ranges much better than 50 feet from what I've seen, we're still working on it.
I know here in Arizona, the longshots are the same price as the recons and BBB's, so about $20-25. I'd get one of those if I were you, that's your best bang for your buck.
I know here in Arizona, the longshots are the same price as the recons and BBB's, so about $20-25. I'd get one of those if I were you, that's your best bang for your buck.
#196083 Painting A Batman Symbol On An At2k
Posted by
on 14 December 2008 - 12:41 PM
in
Modifications
Also, if you use very thin coats, wait 10-15 between them, and do that you wont get any running under the paper or tape for that matter.The real question is, why would you want a batman gun? Just kidding. Anyways, I have found imaseoulmans method is better because for a stencil the paint can leak under the paper.
EDIT- Sorry, right after you posted. For the symbol you want you could connect the side of the tail or one of the wings on the bat to the black part. Then cut out all of the yellow part except for the little bridge between the yellow and black. Most people won't even notice the little "bridge", plus it will keep the batman symbol in the exact place you want it.
#206365 Big Salvo Problems
Posted by
on 25 January 2009 - 06:01 PM
in
Modifications
I'll try it. Thanks, I'm pretty sure you're talking about Q-tips right? Haha. I don't know much about Big Salvo's But I didn't even open it up, I just stuck 10" CPVC barrels down each existing barrel with some e-tape on each and I'm getting about 110'-120' ranges level. Is it supposed to be that awesome?
#158958 Magstrike Sale At Wal-mart!
Posted by
on 12 June 2008 - 03:02 PM
in
General Nerf
I was in Wally-World today and saw that they're selling the full Magstrike kit for only $10.00! They used to be $40.00! I don't know if this is just locally to Phoenix, but you guys should really check it out, cuz at that price they're gona disappear. I already cleaned out my Wal-Mart!
Just thought y'all should know!
Just thought y'all should know!
#158989 Magstrike Sale At Wal-mart!
Posted by
on 12 June 2008 - 05:41 PM
in
General Nerf
Wait... theirs a nerf product awareness thread? Where?! Shoot, I should've been posting in there! Sorry Guys.
#159675 Big Bad Maverick
Posted by
on 18 June 2008 - 10:20 PM
in
Modifications
Sweet, good job man! One thing though, the Mav needs the same black paint job!
#188701 Integration In The Works: Nitefinder/doubleshot
Posted by
on 10 November 2008 - 08:21 AM
in
Modifications
I don't mean to bash on your dreams but what's the point of this mod? Wouldn't be much more efficient just to use a regular nightfinder and better yet, double barrel it? I mean even if you have the parts lying around, you'd get much better results just sticking it in a LS scope or something.
#163134 Non-advancing Magstrike Mag
Posted by
on 17 July 2008 - 07:34 PM
in
Modifications
This probably sounds redundant, but it really sounds like you put it back together wrong. The advancer may not be in the right place so it not only doesn't force much air out, but it doesn't catch another clip notch to move if upwards. It sounds liek the assembly might be too far forward.
#132977 How Do You Open A Ls Clip?
Posted by
on 18 December 2007 - 06:39 PM
in
Modifications
Where exactly is it glued, it's not the whole thing. Is it right behind the clamps?
#182786 What's The Cheapest Place To Buy Good Spray Paint?
Posted by
on 10 October 2008 - 12:16 AM
in
Modifications
Are you serious? You couldn't have figured this out for yourself? You had to post a bulletin? And why in Modifications? Isn't there a "pointless shit" thread somewhere? Dude, you can get spray paint anywhere, and its all the same price...
#182464 Having Mod Problems
Posted by
on 08 October 2008 - 07:25 PM
in
Modifications
Take it apart and look at the O-rings. I had that problem once and one of my O-rings got pinched between the plunger and the head. From then on I always taped up my plunger.
#176348 Foam Ball Firing Crossbow
Posted by
on 10 September 2008 - 12:35 AM
in
Modifications
So... why the hell is this in modifications???
#159053 Magstrike Sale At Wal-mart!
Posted by
on 13 June 2008 - 01:34 PM
in
General Nerf
Yeah, I was afraid it'd only be local. Also, it was the single pack in red or blue. I've only seen the double pack at Toys R' Us.
#270051 Slightly Improving The Stock Nitefinder "targeter"
Posted by
on 23 March 2010 - 11:20 AM
in
Modifications
A while back for a contract I took a key chain laser pointer, a really nice one, and installed it in the spot where the light is. I hooked it up to the batteries and had a perfectly accurate laser sight that could be seen indoors over 100 feet away. I had it set up so at 40 feet the dot was exactly where the dart will hit.If you want a serious laser sight, I suggest doing that. Just don't shine it in peoples faces.
#283275 How To Re-compress Springs?
Posted by
on 16 August 2010 - 09:31 PM
in
Modifications
Oh!!! That spring, you should've said so. I thought we were talking about the main spring. That spring isn't that important, I'm sure it will fire fine. But no, you can't re compress it without a blow torch or something and its not worth it, you can get them at a hardware store.
#313546 Banshee's Guide to Painting: Part 1
Posted by
on 25 March 2012 - 08:49 PM
in
Modifications
Yeah, that would work just fine. Anything will work, it just depends on what you use to get the desired result.Amazing tutorial! Would it be possible to use a silver vinyl dye as a metallic base coat?
#313508 Banshee's Guide to Painting: Part 1
Posted by
on 24 March 2012 - 11:44 PM
in
Modifications
I'm not sure what texture you're referring to, but the texture you get from spray paint is referred to as "orange peel" for obvious reasons. You get orange peel whether the paint is flat or high gloss, but its easier to see on glossy finishes. On most things that get painted, the orange peel is wet sanded off so you have a smooth surface, and then its polished to a mirror finish. You can't do that with Nerf guns, they're too small, so the best we can do is lay a really thick, wet coat of clear on it and let it dry.Very clear, easy to read, and full of information, nice work! One question though, I've used acrylic paint (multiple coats) and then a Krylon Flat Clear Coat and it turned out fine with a nice texture, Is your's the gloss or flat? I like how flat looks better, but it could be something to do with the "shinyness" of the coat causing the strange texture.
#313500 Banshee's Guide to Painting: Part 1
Posted by
on 24 March 2012 - 09:58 PM
in
Modifications
So over the past few mod write-ups that I've done, I've been getting numerous PM's and comments about people wanting to learn how to do some of the paint jobs that I've done. So I'm going to write a detailed guide for people of any experience level. So if you know a thing or two about painting, don't be insulted by how dumbed down this tutorial will be, its meant for beginners. Most of us could've already figured out how to do simple paint jobs like this, but I plan on doing multiple painting tutorials in the future. I plan to cover everything from simple two-tone to wood-graining and marbling. I've painted cars, trucks, guitars, motorcycles, ATV's, etc. and I'm going to try and explain this in the simplest, most cost effective way I can.
The first thing you need to do is disassemble the gun. I've seen a ton of paint jobs done from various people where they painted the gun while it was still together. This is a huge NO-NO. The paint can jam up things like slides, triggers, and other moving parts, not to mention is just looks terrible when you're done! ALWAYS take apart your guns before painting them. If you're too inexperienced to remove every part from your gun and get it put back together right, consider painting something simpler.
Step 1: TAPING
Taping is generally the first step to painting if you don't have any kind of serious prep work to be done. Prep work would go first, which includes sanding, priming, body filling, etc. and we might get into that on another day. But in this tutorial, we're using some of the original colors from the factory on our test subject. Now the more perceptive of you may have noticed, our test subject is a Nite Finder.
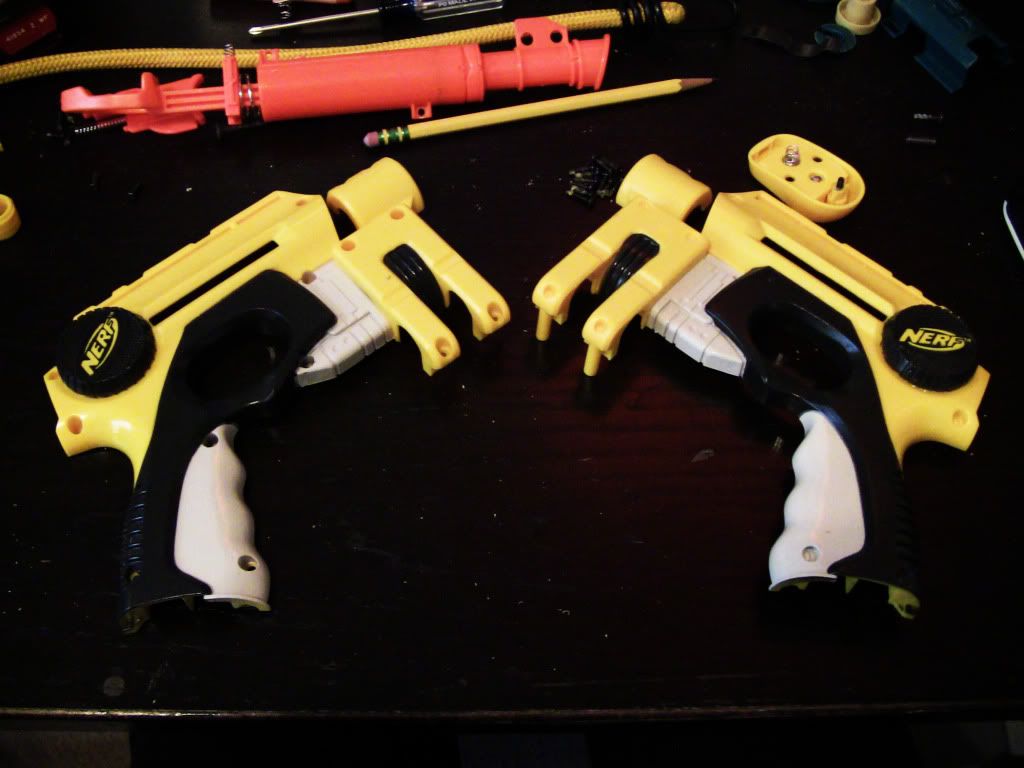
We want to keep the original handle, light, and logo colors from the factory. I do this to most of my Nite Finders to keep a more "stock" type of look, because I'm only changing the yellow color of the gun. That way it looks like it could've come from the factory that way. It's just a personal preference and its also the simplest and quickest way to paint most Nerf guns.
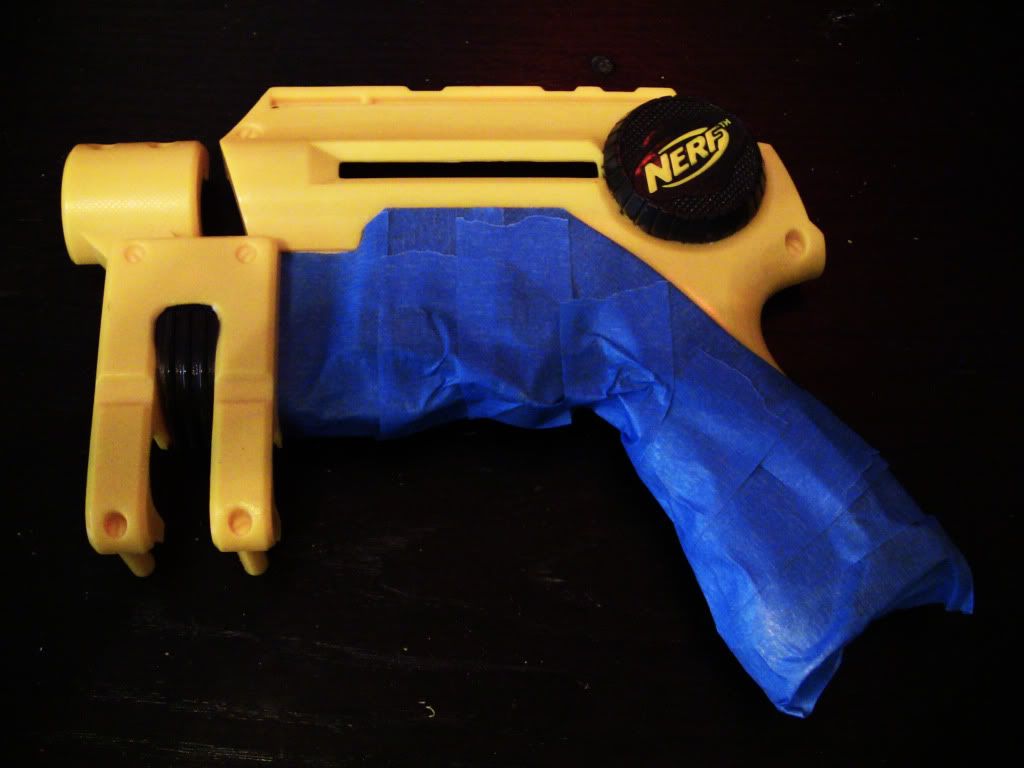
Now go ahead and begin taping off your gun. I taped off the black and grey areas. The best tape I've found for painting is Scotch 3M blue painters tape. There are a few types of 3M painters tape, the light blue is the best. The darker blue "Safe-Release" tape is absolute crap, DON'T use it. I haven't had any luck with frog tape either because both of them have very little "stick" to them and they peel up after a few minutes. Frog Tape is great for cars and such, but for small items with tight curves, you're going to want a stronger stick tape.
When taping, put tape on the area you want to cover and go over the edges of the area. Then once all the tape is covering your area, go over it with a hobby knife and trim the tape off the areas you want to paint. This takes a little practice, and if you use a sharp blade, you don't need very much pressure, so don't dig into your gun with the knife.
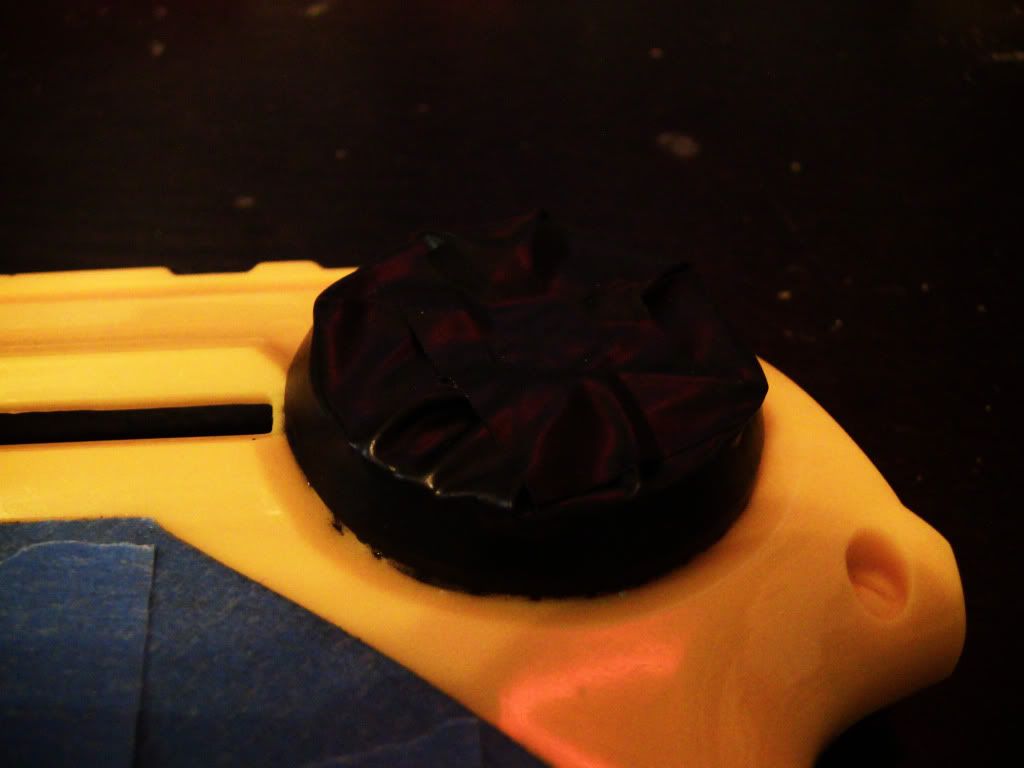
For taping the logo, you're going to want to use a tape that is flexible. Painters tape is not flexible at all, so I use electrical tape. E-Tape makes a great painters tape, it sticks well, comes off clean, and its flexible, which makes it great for certain applications. However its not as cheap and not as wide as painters tape, so I don't suggest you use it for everything.
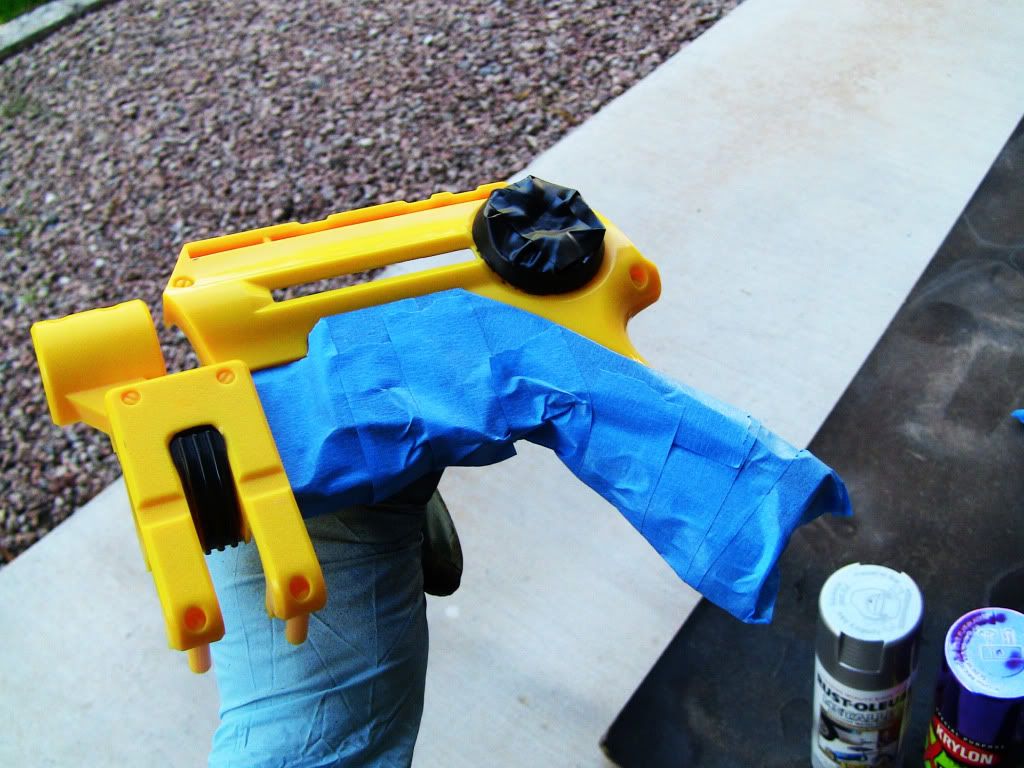
Before we move on to the next step, you need to take some rubbing alcohol or wax remover to the surface of your gun and make sure that you get all the dust and finger oils off. Acetone is generally not a good idea because it eats the plastic away. It makes for a good painting surface though, but I don't advise using it unless you really know what you're doing. If you have sticker residue or some other kind of adhesive that alcohol wont take off, I use a chemical called "Xylene". You can get it at paint shops, and maybe your local hardware store if you're lucky. It takes almost any adhesive off without hurting the surface underneath and works MUCH better than Goo-Gone in just about every situation. I use it for everything, its a must-have for any serious painter. (But I will warn you, it takes most of the Nerf ink off the guns, like the grey and black area's of the Nite Finder.)
A lot of people feel a primer, sanding, or both is necessary for the paint to adhere. This is an option, but as far as spray paint goes, some primers just don't work. Krylon primer is basically useless. It doesn't stick to any surface any better than the actual paint itself, and it leaves a much worse texture behind than the paint would which requires sanding. If you think you need a primer, shell out the extra cash for some more expensive primer like Duplicolor or some automotive primer. Plastic primer works too, but I've had plastic primer that peeled off in sheets once it was dry. I just skip the confusion and go straight to painting. If you have a good clean surface and you paint it right, the paint should stick just fine. Besides, most of the durability comes from the clear coat.
Step 2: BASE COAT

For this demonstration, we're using a metallic silver base coat, a candy color coat, and a clear top coat. This is a common procedure used my paint profession all over. The base coat can be silver or white, as long as its metallic. Try experimenting with both colors to get your desired result, but for this we're using silver. I'm using Rustoleum metallic Silver as opposed to Krylon or Duplicolor because it has a much larger metal flake in the paint which makes the gun really pop in the sunlight. Use the same metallic I did. Rustoleum sells a few kinds of metallic paint including a "chrome" paint, and the others are garbage, don't use them.
When you paint, I find the best way is to hold the part in your hand. Wear a glove or put your arm in a trash bag so you don't paint yourself. Lying the part on a flat surface makes it difficult to see all the parts of the gun while you paint it, so I advise holding it like so:
Now proceed to the painting. Start painting in the hardest to reach places to avoid paint runs. I usually put an extremely light coat on first, almost impossible to see. Its more of an overspray than a coat. This acts sort of like a primer and helps the next coat stick a little better. If you go in for a thick coat right from the beginning, it can potentially bead, and the metal flakes can sometime cluster and look really bad. After about 5 coats, it should look like this:
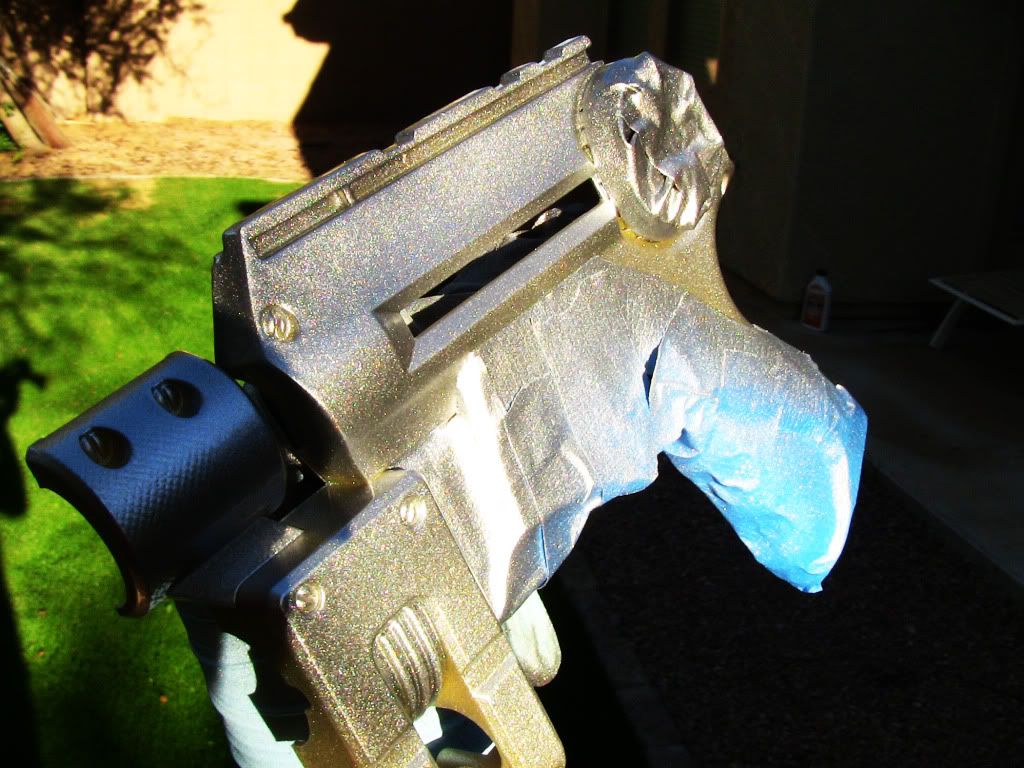
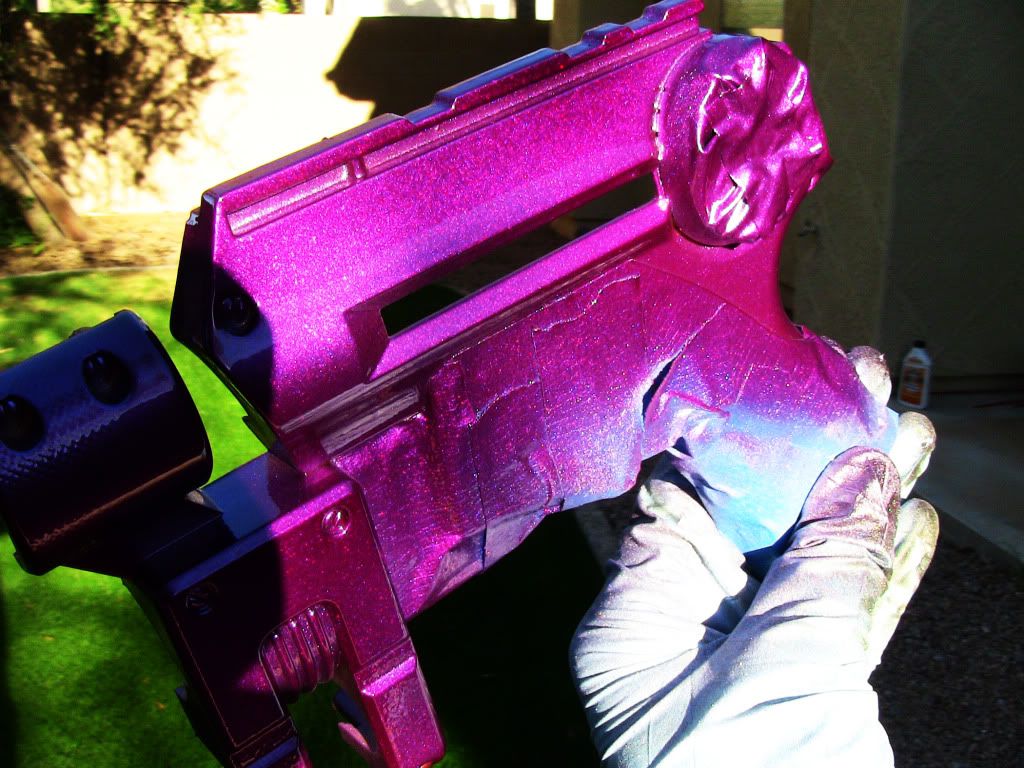
Step 3: CANDY COAT
Now the color comes from the candy coat. Candy is a transparent paint that adds color to whatever is underneath it. In this case, it's a silver base coat, and we're using a purple candy, so it will turn into a metallic purple. Which I don't know if any of you have every looked at your local Home Depot, but they don't exactly have metallic purple in spray cans (at least not where I live) so this is a great way to get the color you want. There are a few kinds of candy paints that I've used. The best is the kind you use in an airbrush, but we're using rattle can's, so your easiest to find options will be Krylon X-Metals, and Duplicolor Metalcast. The Metalcast is a much better candy. Its bright, goes on very smooth and even, strong as nails, and takes clear coat nicely. The X-metals is pretty crappy. It goes on thicker and its hard to get an even coverage. But what really gets me, is that the clear coat I use sucks the candy coat into it which reveals the base coat in places, so you have to be careful to avoid it. Make sure the candy is dry first if you use X-Metals. But it you use the Metalcast, you can recoat and clear coat at any time you want. But I will say this, the Metalcast costs twice as much. It's about $10 a can found at most auto-parts stores.
But regardless, the X-metals that I used turned out quite nice:
Step 4: CLEAR COAT
The clear I used is Deft. It's meant for furniture, but I find that it sticks really well to just about everything. Its about $5-$6 a can at Home Depot and it goes a really long ways. I used to use Kyrlon Crystal Clear which is about $3, but it never dries as hard as Deft, doesn't go on as smooth, and it's nowhere near as shiny. I recommend that you give Deft a try if your other clear coats have let you down.
The process that I use to get such a high level of shine is what I call "flooding". Which is just as it sounds, you flood the gun with so much clear so fast that it eliminates the orange peel texture that leads to a dull surface. Now you can't do flooding with all kinds of clear. Krylon Crystal Clear is thick and it runs easily, and it doesn't spray out smooth at all. Deft comes out in a very fine mist, its thinner than Krylon, and you can get a very thick coat of it on without it running. This takes some practice and your first few tries will probably have some runs in it.
This picture shows one half with clear coat, which is on the left, and the other half without clear coat on the right. So can see that added benefits of a clear coat cosmetically, aside from the fact that it makes your paint much more durable. I tried to get a good picture of the difference but the sun was behind my fence so I didn't have much light anymore.
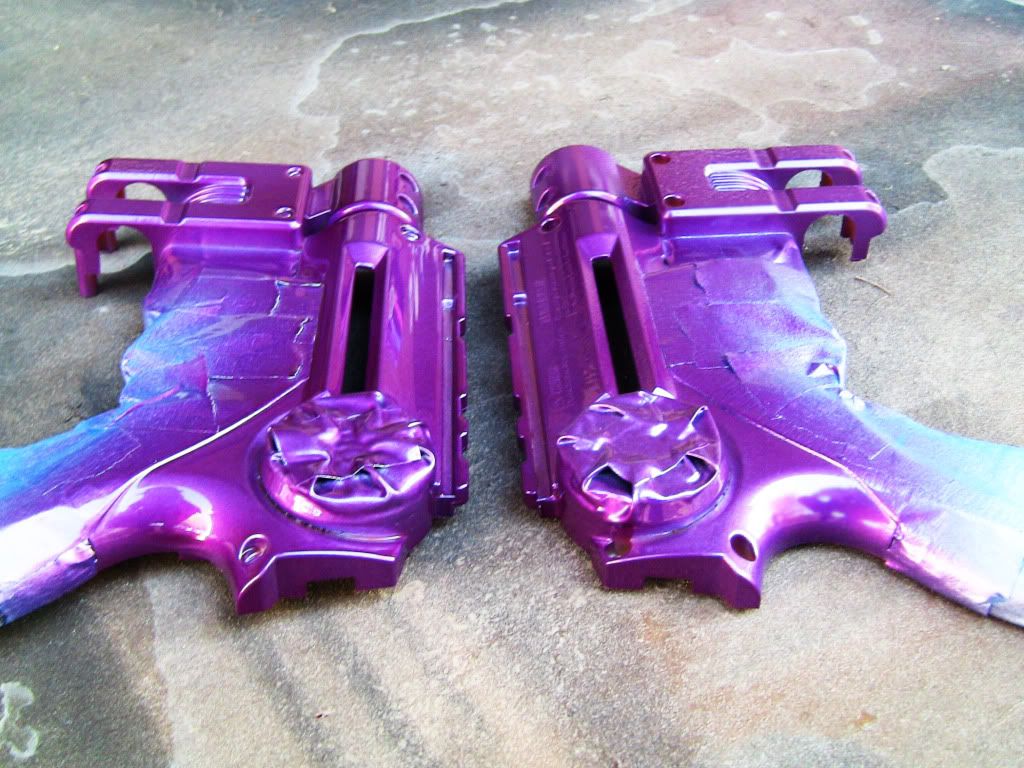
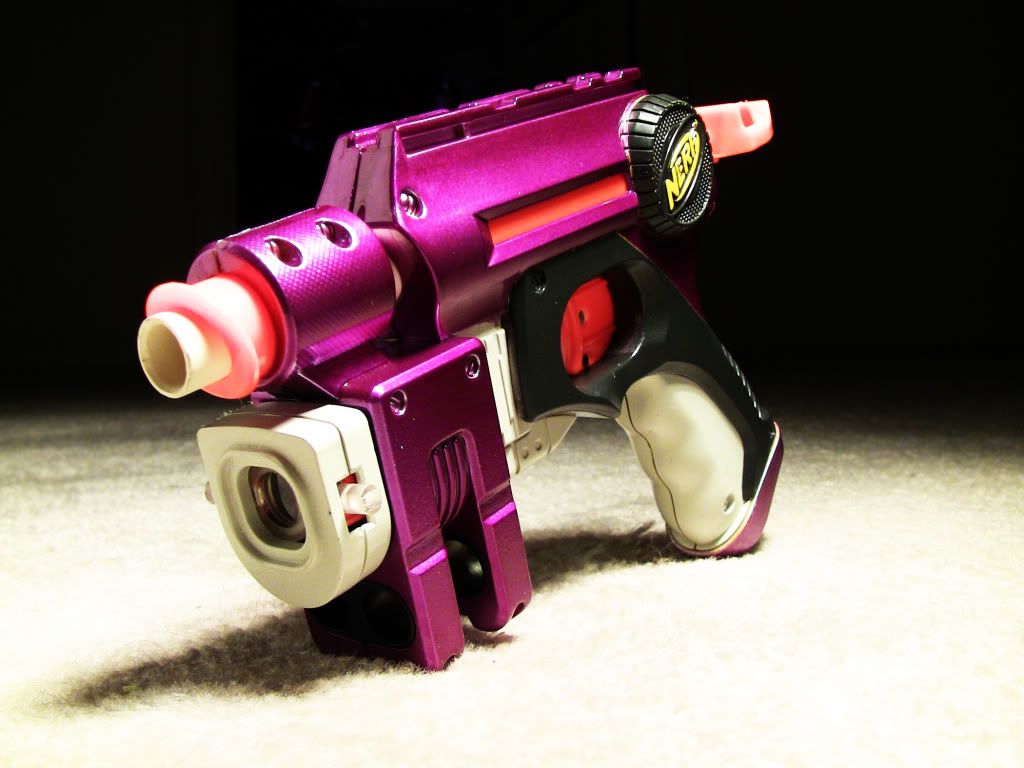
Now you can let it dry for a day or so and put it back together! Mine turned out pretty good overall. I've done better, and shinier. The shine can't be properly be represented in a photo, I promise you it's much more impressive in person, but none the less, thats how you do a candy coat paint job.
Does anyone have any questions?
The first thing you need to do is disassemble the gun. I've seen a ton of paint jobs done from various people where they painted the gun while it was still together. This is a huge NO-NO. The paint can jam up things like slides, triggers, and other moving parts, not to mention is just looks terrible when you're done! ALWAYS take apart your guns before painting them. If you're too inexperienced to remove every part from your gun and get it put back together right, consider painting something simpler.
Step 1: TAPING
Taping is generally the first step to painting if you don't have any kind of serious prep work to be done. Prep work would go first, which includes sanding, priming, body filling, etc. and we might get into that on another day. But in this tutorial, we're using some of the original colors from the factory on our test subject. Now the more perceptive of you may have noticed, our test subject is a Nite Finder.
We want to keep the original handle, light, and logo colors from the factory. I do this to most of my Nite Finders to keep a more "stock" type of look, because I'm only changing the yellow color of the gun. That way it looks like it could've come from the factory that way. It's just a personal preference and its also the simplest and quickest way to paint most Nerf guns.
Now go ahead and begin taping off your gun. I taped off the black and grey areas. The best tape I've found for painting is Scotch 3M blue painters tape. There are a few types of 3M painters tape, the light blue is the best. The darker blue "Safe-Release" tape is absolute crap, DON'T use it. I haven't had any luck with frog tape either because both of them have very little "stick" to them and they peel up after a few minutes. Frog Tape is great for cars and such, but for small items with tight curves, you're going to want a stronger stick tape.
When taping, put tape on the area you want to cover and go over the edges of the area. Then once all the tape is covering your area, go over it with a hobby knife and trim the tape off the areas you want to paint. This takes a little practice, and if you use a sharp blade, you don't need very much pressure, so don't dig into your gun with the knife.
For taping the logo, you're going to want to use a tape that is flexible. Painters tape is not flexible at all, so I use electrical tape. E-Tape makes a great painters tape, it sticks well, comes off clean, and its flexible, which makes it great for certain applications. However its not as cheap and not as wide as painters tape, so I don't suggest you use it for everything.
Before we move on to the next step, you need to take some rubbing alcohol or wax remover to the surface of your gun and make sure that you get all the dust and finger oils off. Acetone is generally not a good idea because it eats the plastic away. It makes for a good painting surface though, but I don't advise using it unless you really know what you're doing. If you have sticker residue or some other kind of adhesive that alcohol wont take off, I use a chemical called "Xylene". You can get it at paint shops, and maybe your local hardware store if you're lucky. It takes almost any adhesive off without hurting the surface underneath and works MUCH better than Goo-Gone in just about every situation. I use it for everything, its a must-have for any serious painter. (But I will warn you, it takes most of the Nerf ink off the guns, like the grey and black area's of the Nite Finder.)
A lot of people feel a primer, sanding, or both is necessary for the paint to adhere. This is an option, but as far as spray paint goes, some primers just don't work. Krylon primer is basically useless. It doesn't stick to any surface any better than the actual paint itself, and it leaves a much worse texture behind than the paint would which requires sanding. If you think you need a primer, shell out the extra cash for some more expensive primer like Duplicolor or some automotive primer. Plastic primer works too, but I've had plastic primer that peeled off in sheets once it was dry. I just skip the confusion and go straight to painting. If you have a good clean surface and you paint it right, the paint should stick just fine. Besides, most of the durability comes from the clear coat.
Step 2: BASE COAT
For this demonstration, we're using a metallic silver base coat, a candy color coat, and a clear top coat. This is a common procedure used my paint profession all over. The base coat can be silver or white, as long as its metallic. Try experimenting with both colors to get your desired result, but for this we're using silver. I'm using Rustoleum metallic Silver as opposed to Krylon or Duplicolor because it has a much larger metal flake in the paint which makes the gun really pop in the sunlight. Use the same metallic I did. Rustoleum sells a few kinds of metallic paint including a "chrome" paint, and the others are garbage, don't use them.
When you paint, I find the best way is to hold the part in your hand. Wear a glove or put your arm in a trash bag so you don't paint yourself. Lying the part on a flat surface makes it difficult to see all the parts of the gun while you paint it, so I advise holding it like so:
Now proceed to the painting. Start painting in the hardest to reach places to avoid paint runs. I usually put an extremely light coat on first, almost impossible to see. Its more of an overspray than a coat. This acts sort of like a primer and helps the next coat stick a little better. If you go in for a thick coat right from the beginning, it can potentially bead, and the metal flakes can sometime cluster and look really bad. After about 5 coats, it should look like this:
Step 3: CANDY COAT
Now the color comes from the candy coat. Candy is a transparent paint that adds color to whatever is underneath it. In this case, it's a silver base coat, and we're using a purple candy, so it will turn into a metallic purple. Which I don't know if any of you have every looked at your local Home Depot, but they don't exactly have metallic purple in spray cans (at least not where I live) so this is a great way to get the color you want. There are a few kinds of candy paints that I've used. The best is the kind you use in an airbrush, but we're using rattle can's, so your easiest to find options will be Krylon X-Metals, and Duplicolor Metalcast. The Metalcast is a much better candy. Its bright, goes on very smooth and even, strong as nails, and takes clear coat nicely. The X-metals is pretty crappy. It goes on thicker and its hard to get an even coverage. But what really gets me, is that the clear coat I use sucks the candy coat into it which reveals the base coat in places, so you have to be careful to avoid it. Make sure the candy is dry first if you use X-Metals. But it you use the Metalcast, you can recoat and clear coat at any time you want. But I will say this, the Metalcast costs twice as much. It's about $10 a can found at most auto-parts stores.
But regardless, the X-metals that I used turned out quite nice:
Step 4: CLEAR COAT
The clear I used is Deft. It's meant for furniture, but I find that it sticks really well to just about everything. Its about $5-$6 a can at Home Depot and it goes a really long ways. I used to use Kyrlon Crystal Clear which is about $3, but it never dries as hard as Deft, doesn't go on as smooth, and it's nowhere near as shiny. I recommend that you give Deft a try if your other clear coats have let you down.
The process that I use to get such a high level of shine is what I call "flooding". Which is just as it sounds, you flood the gun with so much clear so fast that it eliminates the orange peel texture that leads to a dull surface. Now you can't do flooding with all kinds of clear. Krylon Crystal Clear is thick and it runs easily, and it doesn't spray out smooth at all. Deft comes out in a very fine mist, its thinner than Krylon, and you can get a very thick coat of it on without it running. This takes some practice and your first few tries will probably have some runs in it.
This picture shows one half with clear coat, which is on the left, and the other half without clear coat on the right. So can see that added benefits of a clear coat cosmetically, aside from the fact that it makes your paint much more durable. I tried to get a good picture of the difference but the sun was behind my fence so I didn't have much light anymore.
Now you can let it dry for a day or so and put it back together! Mine turned out pretty good overall. I've done better, and shinier. The shine can't be properly be represented in a photo, I promise you it's much more impressive in person, but none the less, thats how you do a candy coat paint job.
Does anyone have any questions?
#259532 Fury Fire Not Rotating
Posted by
on 21 December 2009 - 11:11 PM
in
Modifications
Oh snap... I'm thinking of the wild fire.... haha.
#283268 How To Re-compress Springs?
Posted by
on 16 August 2010 - 09:05 PM
in
Modifications
If you use it enough it will eventually go back into shape but it might be weaker after that. Stretching springs is for children, men buy new ones.
#256757 Nerf Maverick Help
Posted by
on 19 November 2009 - 08:24 AM
in
Modifications
well it was estimated or maybe i got it mixed upokay i have this nerf maverick nad i want to mod it. So far i have the barrel modded to come out more and the ar's removed. But the ar's arent fully removed. The ar cap thingy that has the stem i just cut off the stems. i just want to have more mods for it cuz it sucks balls.
ranges:
40-50ft flat
60-80ft angled.
My modded nf does:
60-80ft flat
80-100+ft angled
First, check the modification directory. there's a whole section devoted to JUST the mav. JUST LIKE THERE IS FOR EVERY GUN.
Also, I cannot beleive those mav ranges. period. Those NF ranges seem a bit high too...
Also, don't use your feet to count unless they're exactly 12 inches like mine, but even then, I use a really long tape measure. I got a 100 footer at the Home Depot for like 8 bucks. INVEST.
#163236 Best Air Tank In A Gun?
Posted by
on 18 July 2008 - 03:00 PM
in
Modifications
Well then, I would have to agree with everyone else when we say AT2K tanks. They're cheap, easy to find, and the guns themselves are small. Not to mention its very easy to integrate the guns in other places.Yeah SM3k tanks suck. I have had 3 have the exact same problem as you. I would go with a 2k tank, or an at3k tank, as I like those too. If you really want to be classy, a SM1.5k would work really well too.
I'm glad to see that this isn't unusual, that popping noice scared the crap out of me haha.
Banchee: well ROF is not that important for my purposes, the more power i can get the better, however I have a size limit since this thing will be roughly fitting in a maverick shell, a titan tank would be too big. I have a 18inch barrel on this thing, and before the sm3k tank blew i was getting 120ft flat, so I would like a tank that would keep my ranges around that or, of course, more
#163247 Sspb Mod Gone Wrong?
Posted by
on 18 July 2008 - 03:26 PM
in
Modifications
First of all, You should really try and improve your grammar and capitalization. Its very unprofessional. I see you've been around Haven for long enough to understand the rules. I hate to be the nagging prick who tell you to follow the rules but I hate seeing good members kicked out.hmmm i think its leaking air... because when i pump it i here something that sounds like a slurping sound.
So to the SSPB, it sounds like toy cut the barrel off too much or you damaged it when you ripped the peg out. These guns are very finicky when it comes to modding. Doing what Dayko said will work, but one you find the leak, there is only so much you can do about it.
#228186 Longshot Troubles
Posted by
on 04 May 2009 - 08:55 PM
in
Modifications
I am going to have to go with you not putting it together right. I doubt that Hasbro redesigned the longshot and didn't make it look or function any differently. This happens to me all the time and I find its usually that the plunger tube is rotated in its place or something is missing.
#159709 Longshot Troubles
Posted by
on 19 June 2008 - 10:43 AM
in
Modifications
From the sounds of it you've done so much structural damage that repair isn't worth it. Anything is fixable, but it'd cost you more money than a new LS. I say, get a new one and scrap out the old one, use the clips and springs and stuff.
#259527 Fury Fire Not Rotating
Posted by
on 21 December 2009 - 10:41 PM
in
Modifications
Does it rotate manually? Does it rub against anything? Does the piston move or is it just the turret that doesn't move?
#159638 Rapid Fire Rifle
Posted by
on 18 June 2008 - 04:00 PM
in
Modifications
Yes, descriptive is good. What do you mean crossbow configuration?
#259530 Fury Fire Not Rotating
Posted by
on 21 December 2009 - 11:03 PM
in
Modifications
But with it off it rotates and fires normally. That's strange. I could help more if i actually owned one, I have a few RF20's and to my understanding they're the same gun in different plastics, but I can't think of anything that's going wrong. Perhaps just take everything out and put it back in, sometimes that helps.
Or possibly you're having the problem that happens to a good percentage of RF20's. Sometimes out of the box, they don't rotate. The slide doesn't return far enough back to catch another notch in the turret and doesn't rotate. If thats the case then there is nothing to my knowledge that can fix it.
Or possibly you're having the problem that happens to a good percentage of RF20's. Sometimes out of the box, they don't rotate. The slide doesn't return far enough back to catch another notch in the turret and doesn't rotate. If thats the case then there is nothing to my knowledge that can fix it.

