Ivan S's Content
There have been 80 items by Ivan S (Search limited from 29-January 97)
#341098 Full Auto Barricade
 Posted by
on 08 August 2014 - 08:30 PM
in
Modifications
Posted by
on 08 August 2014 - 08:30 PM
in
Modifications
#341035 Looking for a very high torque gearmotor
Posted by
on 06 August 2014 - 01:28 PM
in
Homemades
Here is a cheap hi-torque one www.rchobbiesoutlet.com/03011-hsp-rc540-engine-motor/ or you can go look for a specific one here http://hobbyhobby.co...ectric-Motors/.
Thanks for the recommends guys. I'm sure I'll find something now.Robot marketplace has a lot of geared motors, some of which look appropriate for your application. They aren't cheap by nerf standards, but they aren't industrial prices either. Geared motors generally aren't cheap, as they need to have very small, very strong parts to do their job.
http://www.robotmark...ors_geared.html
Efests can discharge up to 7A with good performance, if I use a motor that needs more current I'll switch. Do LIPOs have any other advantages?Last but not least I would power the motor with a LIPO battery (a 3s would be best). I really hope this helped you.
Thanks for the idea, but unfortunately all the brass 3-way valves I could find have a mid-point where all three pipes are connected, which makes the whole tank dump out the barrel. In order to avoid that, the axis of rotation needs to be inline with the middle pipe, which I've only found in this plastic one.Have you tried finding a lower torque valve?
Also. I'm not Captain Slug, but it would seem to me that at some point you are going to be rotating it so fast the the "firing tank" won't have enough time to prime before being closed off again. I have no idea if you are even anywhere close to this or not but it could happen.
Something like this http://www.mcmaster....4373k53/=t5lssd
Outpacing the priming speed may become an issue, but it hasn't been yet and if it does I'll increase pressure to compensate. Using a ball valve instead of more advanced valves like solenoids leads to issues like that, but I couldn't resist the idea of a fully automatic blaster this simple, so I at least wanted to try it.
#341004 Looking for a very high torque gearmotor
Posted by
on 05 August 2014 - 12:59 PM
in
Homemades
#340347 LAW airgun
Posted by
on 14 July 2014 - 01:07 AM
in
Homemades
Thanks! It works just fine with a hopper, I use an RSCB in the writeup purely to avoid requiring a wye.Nice writeup! Have you tried making a hoppered version?
Definitely, there is a lot of flexibility in layout. I prefer the tee shaped handle as opposed to the elbow because it's easier to drill a straight hole in a tee than an elbow, but either can work.You could actually shape this ergonomically with different pieces of pipe and fittings, both the air tank and air outlet can be in any configuration you'd want since it's just PVC. I'm debating making one of these but just shaping it like a Mad Ghost myself.
Good question, I hold it like this:This might be silly but how do you actually hold it with your trigger hand? It looks like it would be uncomfortable/ slightly difficult to hold.
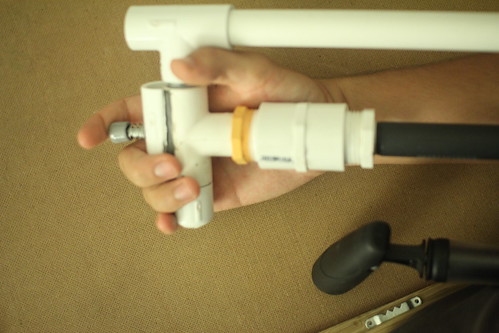
It's comfortable for me, but if you want more hand room you can make the stub between the tee and cap longer. Fill it with hot glue if you're worried about dead space.
I took some readings without the oprv and with the same number of pumps, muzzle velocity is the same.I am familiar with how to use this type of blaster, I have several WNTS's. I was asking about stuff like ranges, fps, etc being affected by the OPV because even if its a super easy build, if its still outclassed by 20 feet at every turn its going to be replaced with a loaner during competitive wars. Do you have any comparison data to this blaster's stats if you do not have an OPV at the same number of pumps? I understand that would be like building a WNTS, but with the well nut turned around it
mayprobably outclasses the WNTS capabilities due to increased airflow. And you still havent answered on the ranges- can you get them?
I haven't done range tests, but if you want to match up velocity with range, you can look here and here. The chart shows 210fps is pretty standard for competitive guns; it matches to about 80 feet when fired perfectly level, which is roughly equivalent to the 100 foot claim people give with a slight(often unintentional) angle. If you want more range, you can always make the tank and barrel bigger.
Twist fittings aren't safer, but they are better for noobs because they aren't permanent. For example, if you pvc cement your OPRV subsystem to the tank only to find out that it leaks, then the whole assembly becomes useless. But with twist fittings, you can just replace the bad subsystem with a working one.Side note, from reading through the write up a few more times- you mention not buying glue because "it requires an extra $10 dollars in chemicals that are [negated through this build]". Good job on not needing the glue, but what makes it "hard to use" for a newcomer, and what makes twist fittings any safer? I understand that if you get a bad glue joint it would leak; and with the OPV in the system, you won't reach pressures high enough to blow a joint. The only places I have ever broken my WNTS's is actually the twist in fitting, sometimes while pressurized...
#340300 Anyone have an interest in Foam
Posted by
on 13 July 2014 - 12:15 PM
in
Darts and Barrels
#339291 LAW airgun
Posted by
on 02 June 2014 - 03:01 PM
in
Homemades
I made a Mad Ghost (Similar design to this) and the trigger pull was pretty difficult since it is essentially counteracting all of the pressure in the tank. What kind of force does your require? I was planning on creating a lever to aid my trigger pull similar to the one used on air hose nozzles, but never got around to it.
Thanks for bringing this up, I've also experienced that problem with the mad ghost. But, when you use a well nut trigger instead of a check valve trigger, the trigger pull becomes unbelievably easier. To say why would be speculation, but I've built several of both and it's definitely the case.
#339290 LAW airgun
Posted by
on 02 June 2014 - 02:56 PM
in
Homemades
I covered most of this in the write-up, but I'll reiterate. This gun draws heavily from the WNTS, it is referenced and cited. Speed is 210fps as measured by a 60 frames per second video camera. Usability is simple, just tilt, pump, aim, and fire. The opv/oprv is designed to limit FPS to a safe level, but doesn't effect usability at all.Based off of the MadGhost, have you seen the american version, the WNTS?
Quick question to double check- is the second T in the trigger section just to stabilize the trigger bolt? By flipping the well nut I would think it wouldn't be necessary since it i think would seal a lot easier?
Ranges? FPS? Usability? You don't have any info on how the OPV affects these. Wondering if people that build this are going to drop it in favor of borrowing a blaster.
Great write up, good job on finding a way to get an OPV in there!
The well nut is inverted to increase air flow out of the tank. The hex bolt has less than a third of the cross section of the well nut, so this way it restricts airflow less. You are correct, the second tee then serves to stabilize/center the well nut, which can move more without being held in place by it's end inside the bushing. It's also worth noting that the original WNTS required an o-ring for seal, probably because the wellnut wasn't held flat against the bushing by anything. An o-ring the perfect size would be hard to find at Lowes, and this build eliminates that.
What specifically makes you think someone would drop this for a loaner? It shoots as far as most springers and is easy to use, so I consider it competitive.
#339278 NH Homemade Contest Submission Thread
Posted by
on 02 June 2014 - 01:57 AM
in
Homemades
http://nerfhaven.com...showtopic=25057
#339277 LAW airgun
Posted by
on 02 June 2014 - 01:53 AM
in
Homemades
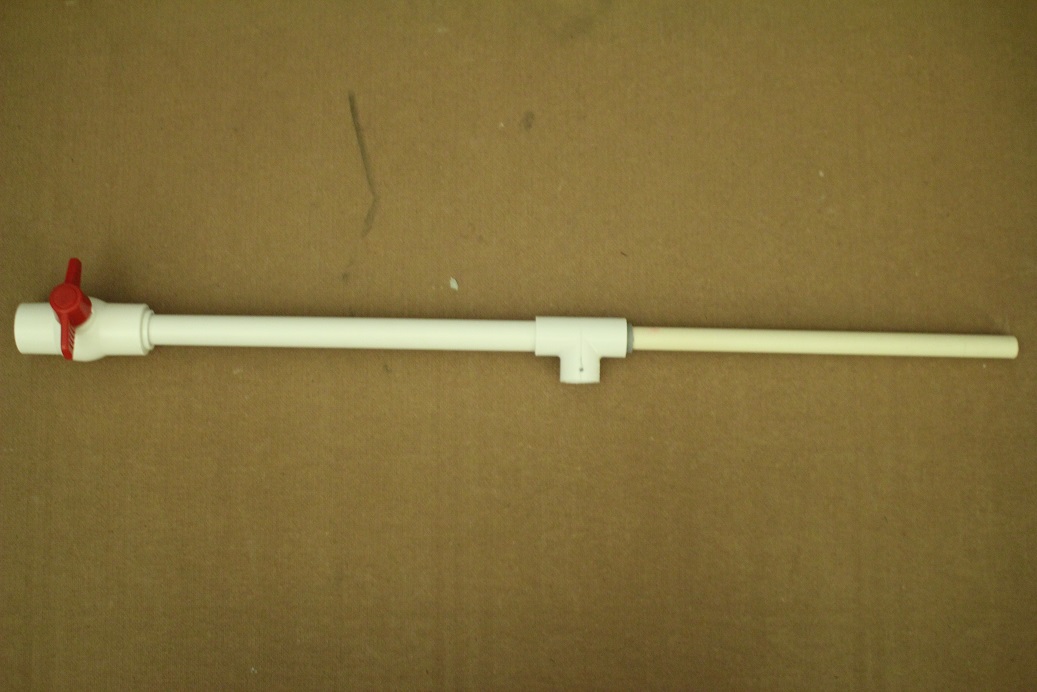
This is an easy, low-overhead, and safe airgun build. It uses entirely parts from Lowes and Walmart, and requires only a saw, drill, hammer, pliers, scissors and a screwdriver to assemble(no dremel!). Tony Stark couldn’t just build this in a cave, he could build it in a cave with his eyes closed.
Noob suitability
The ease of build comes from twist fittings and the complete lack of precise cuts. This gun uses twist fittings (technically known as national pipe taper fittings, or NPT) unlike most NIC air guns which use slip fittings and PVC cement. PVC cement is a powerful solvent weld(similar to glue), which has toxic fumes, is totally permanent, takes practice to use correctly, and requires and extra $10 in chemicals most of which a noob won’t even use in this build. Twist fittings are easy, cheaper, and (crucially) you can disconnect them if you mess up.
This gun has an IKEA philosophy, meaning you simply buy the pieces and connect them together. This doesn’t apply to every single step, there are a few times you have to cut pipe and one fitting which needs to be cut in half. But compared to the myriad of cut slots, half pipes, catches et cetera which are common in other builds, this is particularly suited for the noob who doesn’t have a lot of tools or experience slicing up plastic.
Safety
Fear, uncertainty and doubt often surround airguns with regard to safety. This gun uses an over pressure release valve(OPRV) taken from the air max one(aka panther) to ensure that it can never be over pumped to a pressure dangerous to the user or their target. It is true that pvc pipe is not approved for use with pressurized gas in building codes, because if a plastic pipe holding pressurized gas bursts, it can shatter and send pieces flying. However, this gun operates at only 35psi, less than 15% of its weakest fitting’s maximum operating pressure, and less than 3% of its burst pressure[1]. This makes the probability of bursting so remote, that for me it is an acceptable risk.
So enough talk, let’s build.
You will need:
Parts by where to find them:
Walmart
Bell airstrike dual action pump
Buzz bee air max one (formerly known as the panther)
Soft Soap(yup)
Lowes
Plumbing section:
5’ long ½” cpvc pipe
2’ long ½” pvc pipe
1/2” nipple 12” long
2x ½” nipple 3” long
2x ½” female to 1” male bushing
½” npt male x ½” npt female “street” elbow
½” npt x npt elbow
1” npt coupler
3x ½” tee
½” npt tee (all three sockets npt)
½” cap
½” x 3/4” bushing
¾” ball valve
Teflon tape aka PTFE thread seal tape
Hardware aisle:
¼”-5” hex bolt
#6 x ½” sheet metal screws, smallest pack
Specialty hardware drawers:
¼-20 well nut
Bolt cap
Elsewhere in Lowes(it varies, ask an attendant):
JB epoxy weld
Parts by subsystem
Pump:
Bell airstrike dual action pump
JB weld
¾” female to ½” npt male adapter
OPRV:
Another ¾” female to ½” npt male adapter
Buzz bee air max one (formerly known as the panther)
JB weld(the same as before)
Tank/body:
½” npt tee
½” male npt to ½” female npt elbow(aka street elbow)
½” female npt to ½” female npt elbow
½” 12” long nipple
½” 3” long nipple
Trigger:
2x ½” female npt to 1” male npt bushing
1” npt coupler
2x ½” tee
JB weld
½” dia 12” long nipple (a second one)
¼-20 well nut
¼”-5” hex bolt
Soft soap(for the miniature spring in the pump)
½” cap
Barrel/clip:
5’ cpvc pipe
2’ ½” pvc pipe
½” coupler
½” to ¾” bushing
¾” ball valve
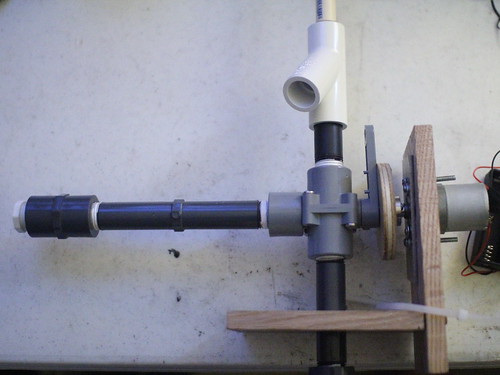
Overview
It’s a basic air gun based on 3DBBQ’s madghost[2], with modifications. The main ones are an oprv, a well nut trigger[3] and noob friendly construction. If you’re ever unclear on how everything fits together you can look at this diagram.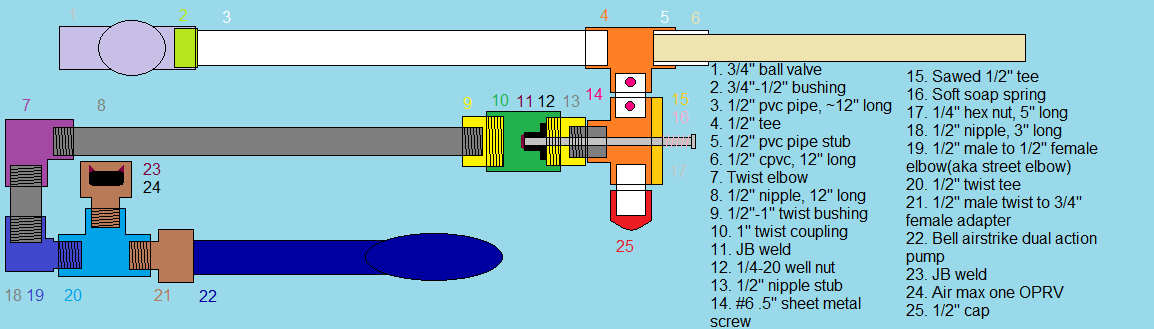
The build relies heavily on twist joints, so here’s a guide: You will need a male fitting, a female fitting, and teflon tape. Teflon tape is variously known as teflon tape, thread tape, thread seal tape, or PTFE tape. Wrap your tape around the male fitting 3-5 times. It’s important you wrap it in the right direction, so make sure the end of the tape points in the same direction as the end of the thread on the male fitting.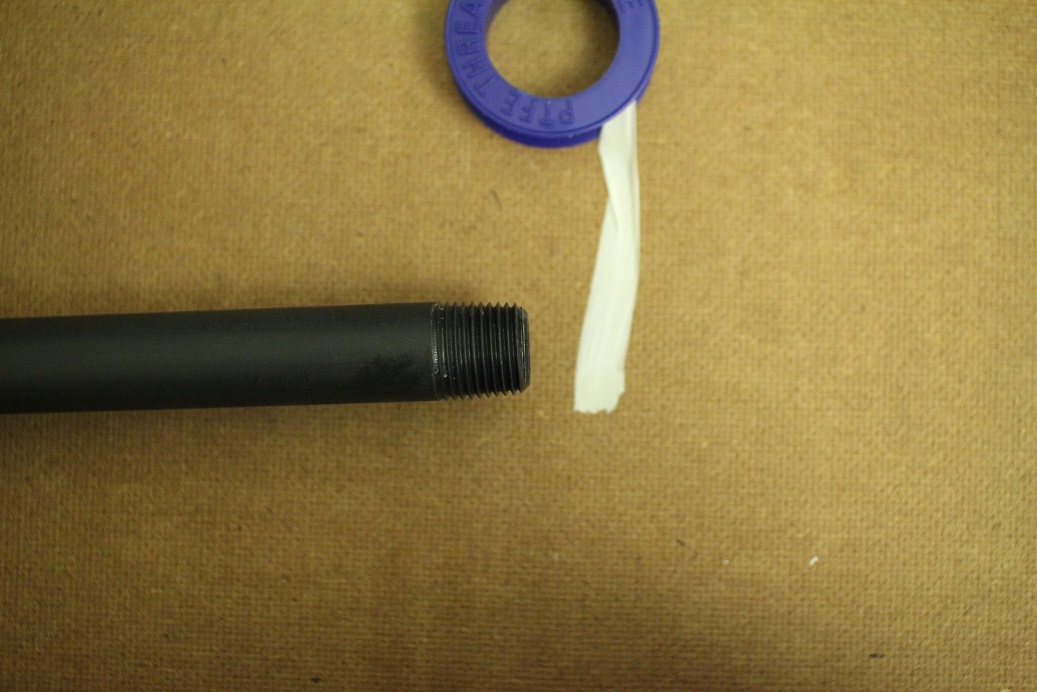
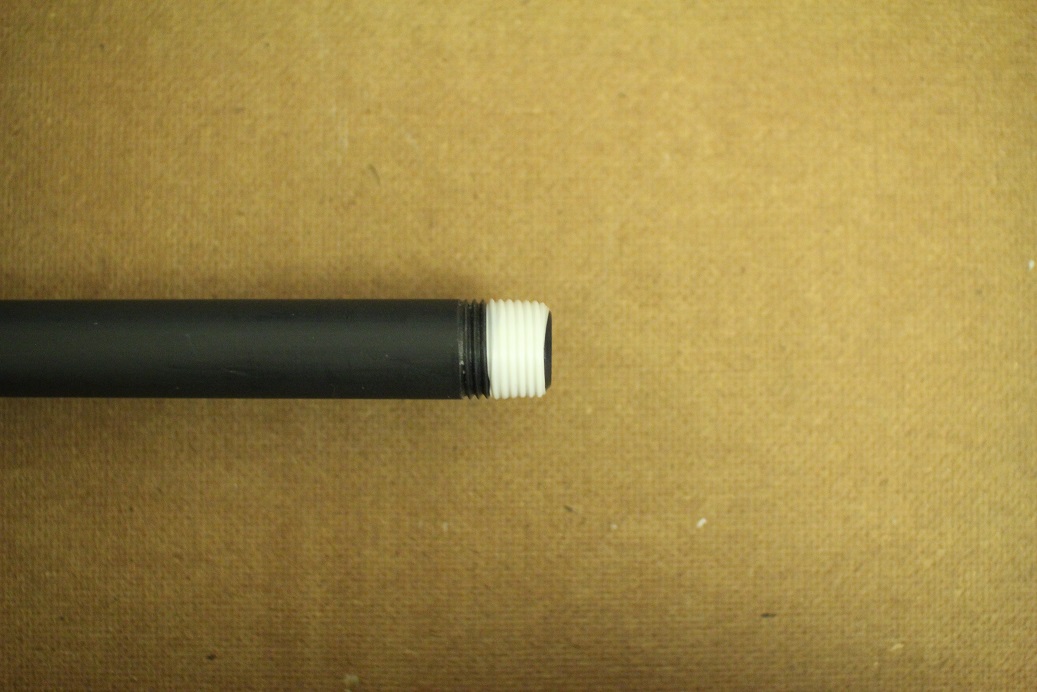
Then put your female fitting on and turn it as much as you can with your hands. Only turn it by the fitting though, because if you turn for example by the end of the pump, it will act as a lever and give you enough force to crack the fitting.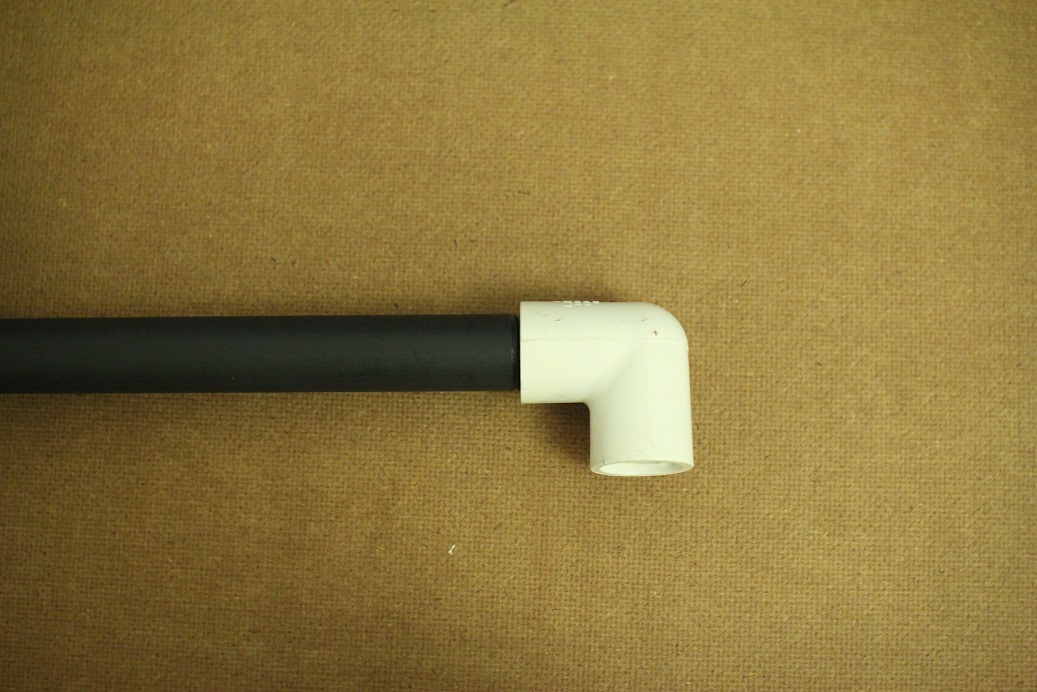
Teflon tape doesn’t actually form a seal between the fittings, rather it reduces the friction between the fittings which lets you turn them more times and make a seal that way.
Also, some plumbing vocab. Nipple: A length of pipe with male threads at both ends
Bushing: a fitting that wraps around one pipe while being wrapped around by another fitting. They’re usually circle shaped, and can be either slip or threaded.
Adapter: a fitting that connects two pieces whose sizes don’t allow for a bushing
NPT: National pipe taper, aka “twist” or “threaded”. Pipes and fittings which are connected by threads instead glue or friction.
Trigger System
This gun’s trigger is based on thedom21’s WNTS(well nut trigger system), but the well nut is inverted to increase air flow and the bolt is stabilized by a second tee.
First, remove the spring from your soft soap pump with scissors. You can get little springs like that in packs at Home Depot, but this build is limited strictly to Lowes and Walmart, so a creative solution is necessary.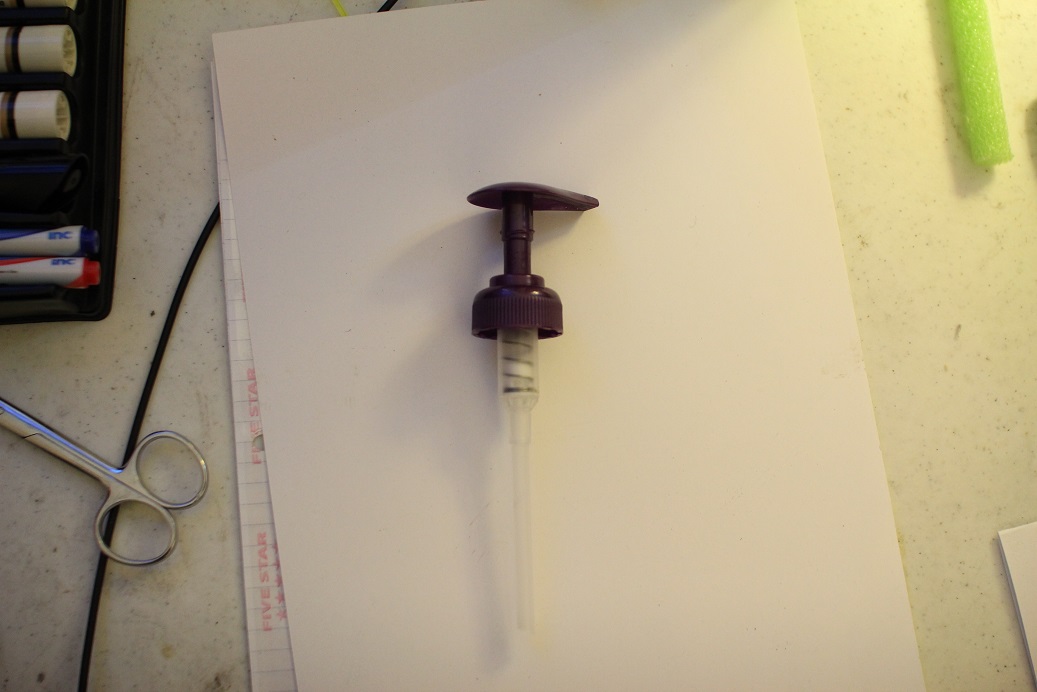
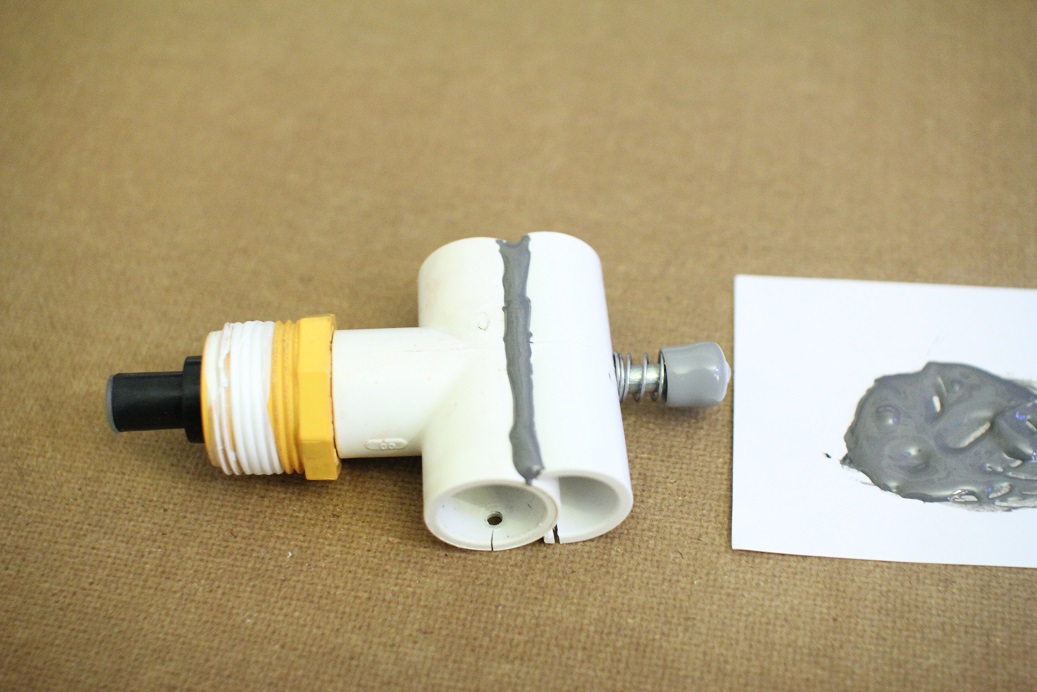
Drill ¼” holes in the center of two of your tees. Always use eye protection with power tools!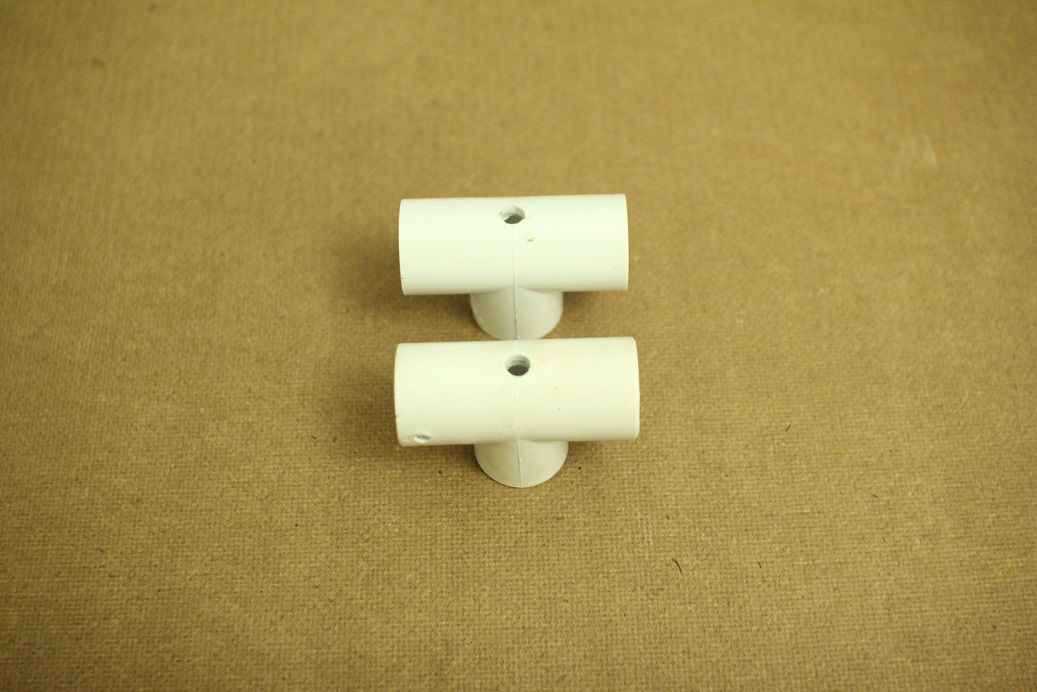
Then cut both sides of a tee along the red line. If you’re using a hand saw, hold the fitting with pliers, because a saw can easily slip on a round fitting like this one.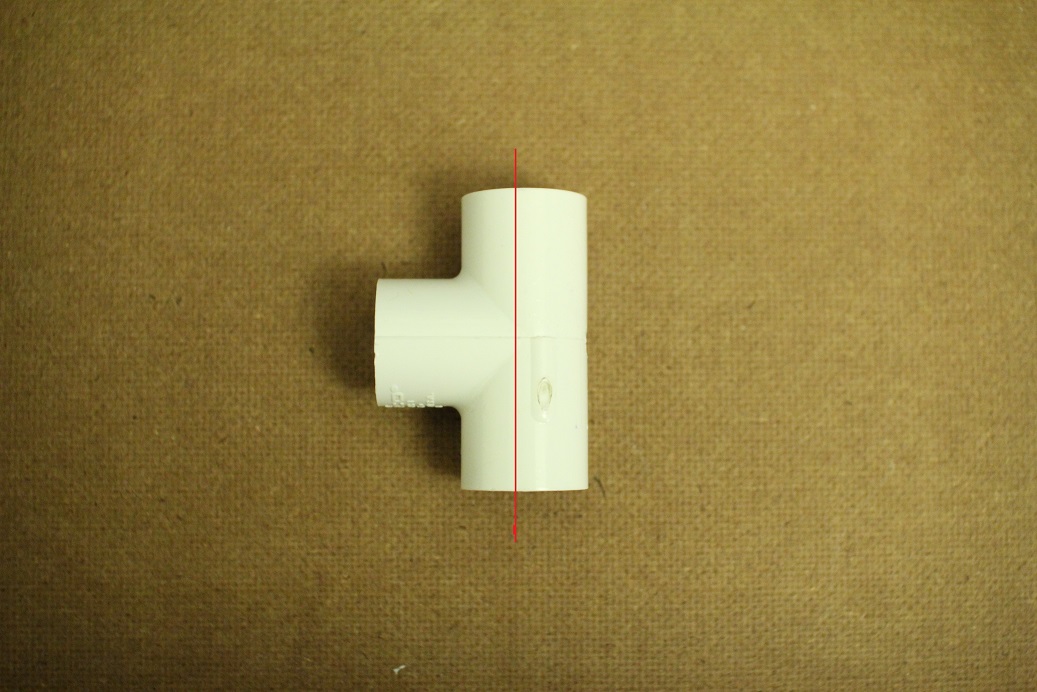
Cut a roughly 1-1/8” stub off a 3” nipple, then assemble the hex bolt, the soap spring, the sawed tee, the whole tee, the nipple stub, a ½”-1” npt bushing(mine is orange, yours will be white), and the well nut as shown. You can also add a screw cap to make the hex bolt more comfortable on your trigger finger.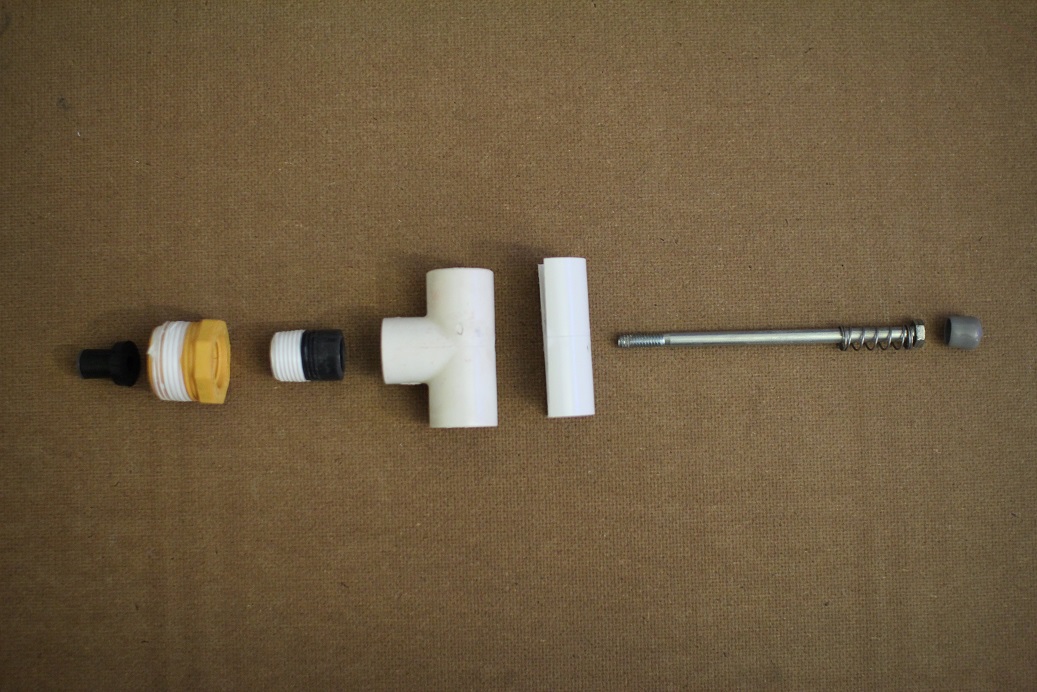
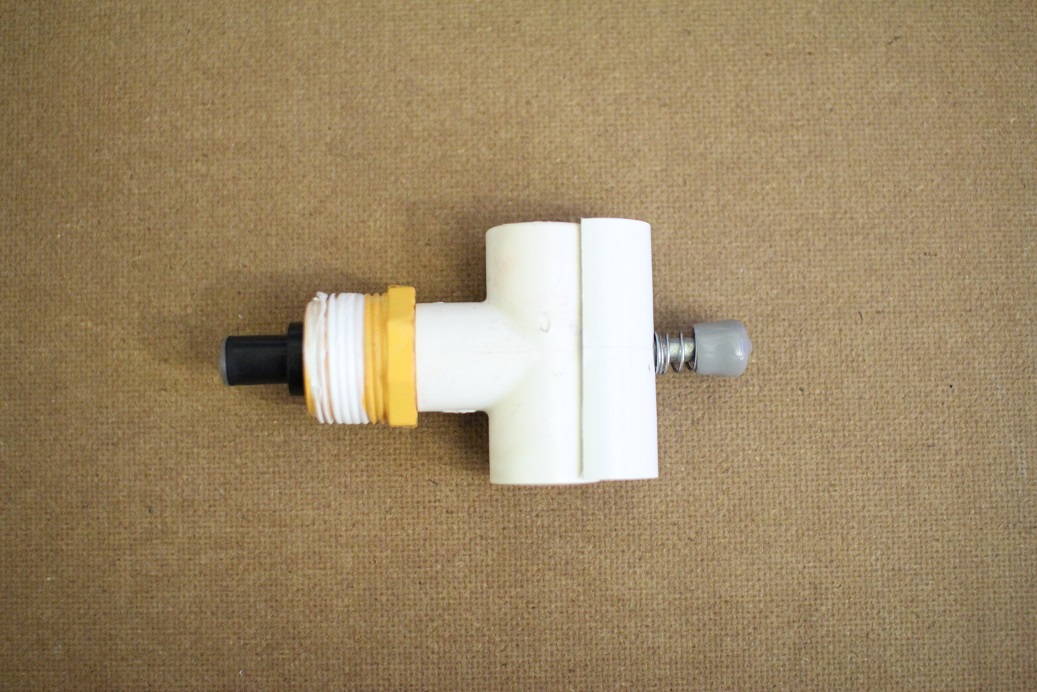
Mix equal parts of JB epoxy weld goo with a paper clip for at least a minute. Center the well nut with the hole in the bushing. Apply JB weld between the tees, you can wipe off any excess with your finger(jb weld is non-toxic).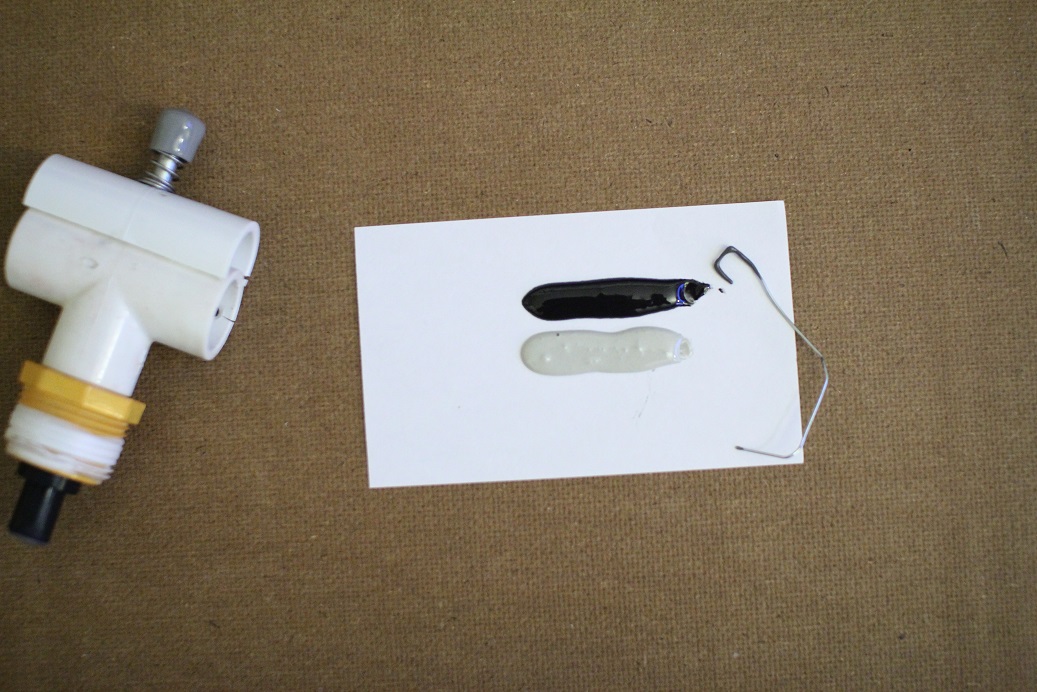
Double check that the well nut is centered on the bushing. Once the epoxy cures(12 hours), the well nut will be held centered and keep a good seal. I left mine in a piece of pvc pipe, but you can use a cup or anything that will hold it upright.
Add a dab of epoxy on the end of the well nut to seal the threads.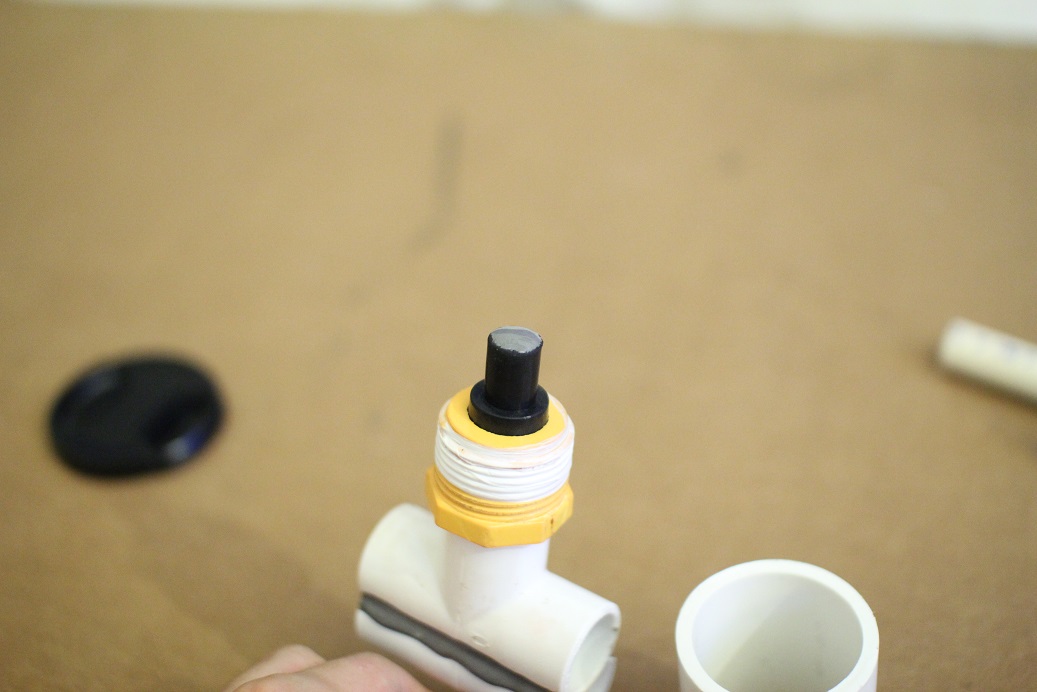
Over pressure release valve
The OPRV is a device that vents air from the tank to prevent it from going above a given pressure. It prevents your gun from being a shit cannon or a pipe bomb. For noobs unfamiliar with the concept, a shit cannon is an exercise in dick-waving where a gun shoots as far as possible, which is usually dangerous, encourages boring play, and isn’t even useful. Ariguns are famous for being used as shit cannons, but this gun is an exception. I chose a common and cheap gun to salvage an oprv from, and adjusted the tank size so that this gun shoots on the same level as a standard spring powered homemade.(210fps, as measured by 60 frame per second camera)
Unscrew and open up your air max one/ panther. Yours probably won’t have a mediocre paintjob.
Cut along the red lines to remove the oprv. Be careful not to cut into the cylinder itself!
Place the oprv in the socket of a ½”npt x ¾” adapter like shown and slather the edges in JB weld. Be careful not to put it in backwards or cover up the hole.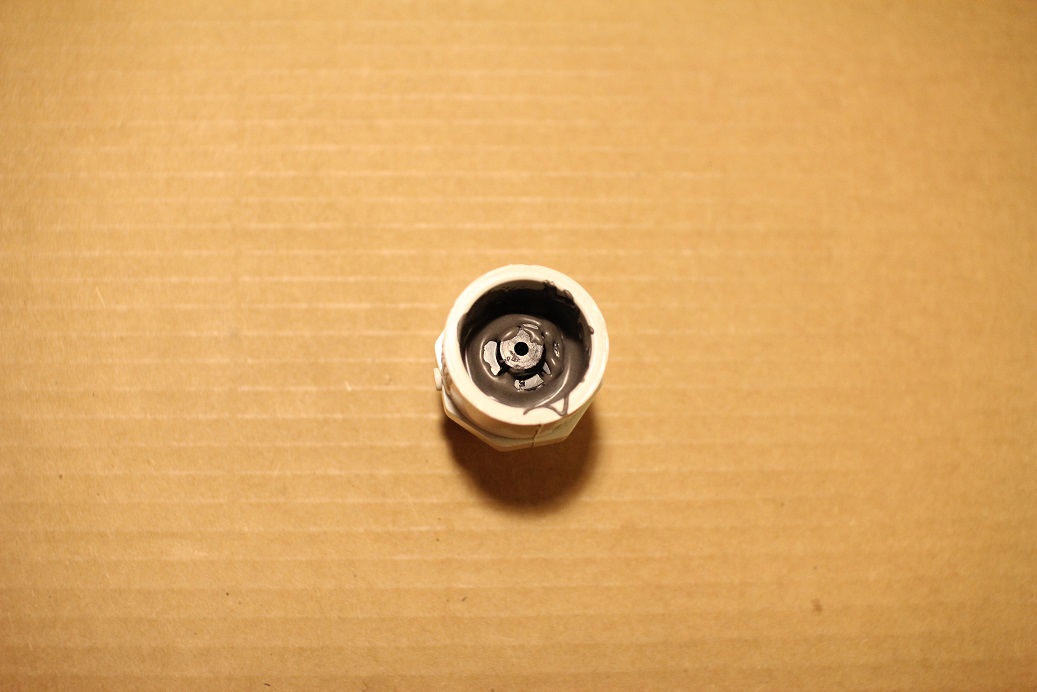
Pump
Unscrew the nozzle bit from your pump. Sometimes the threads are glued, so you may need to saw at the black part it a bit to get it off.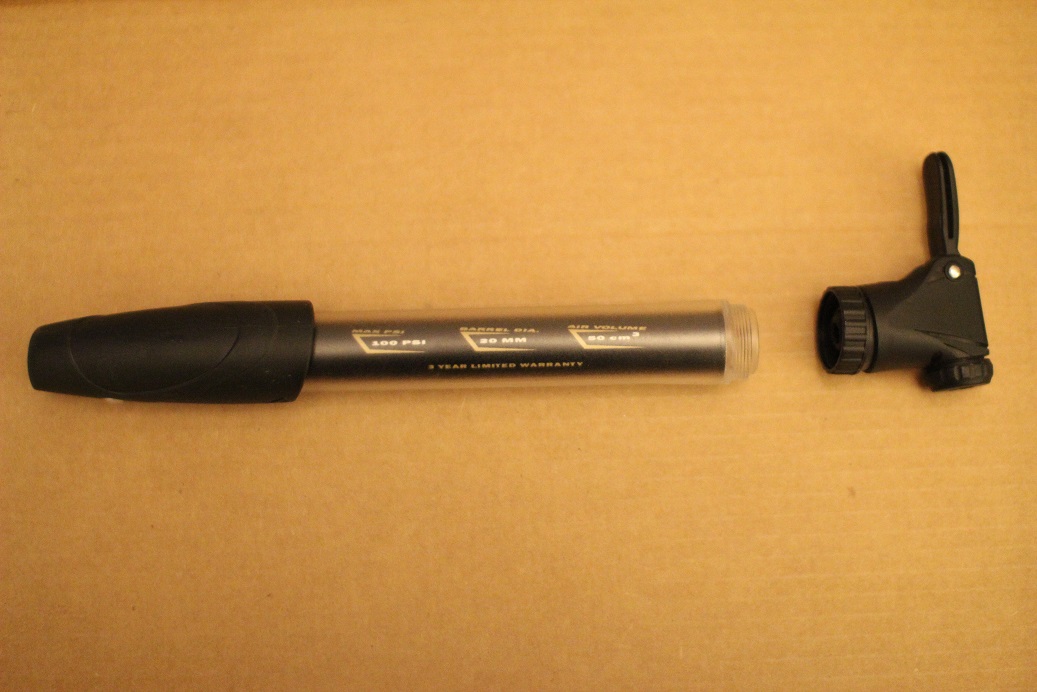
Apply JB weld around the edges of the socket of your other ½”-3/4” adapter, and around the edges of your pump base.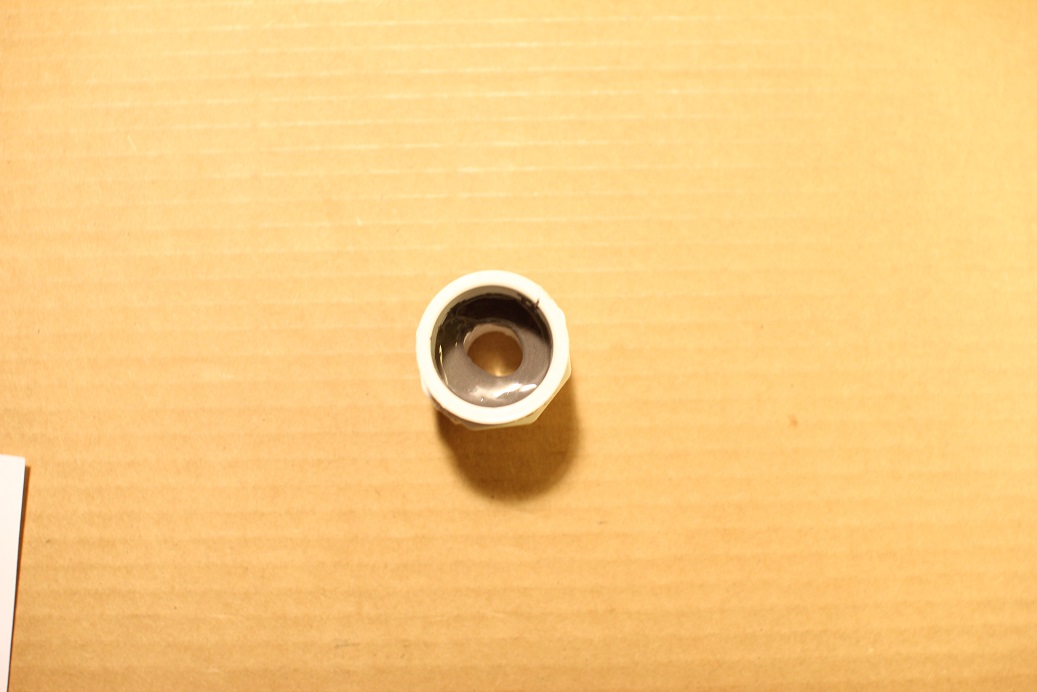
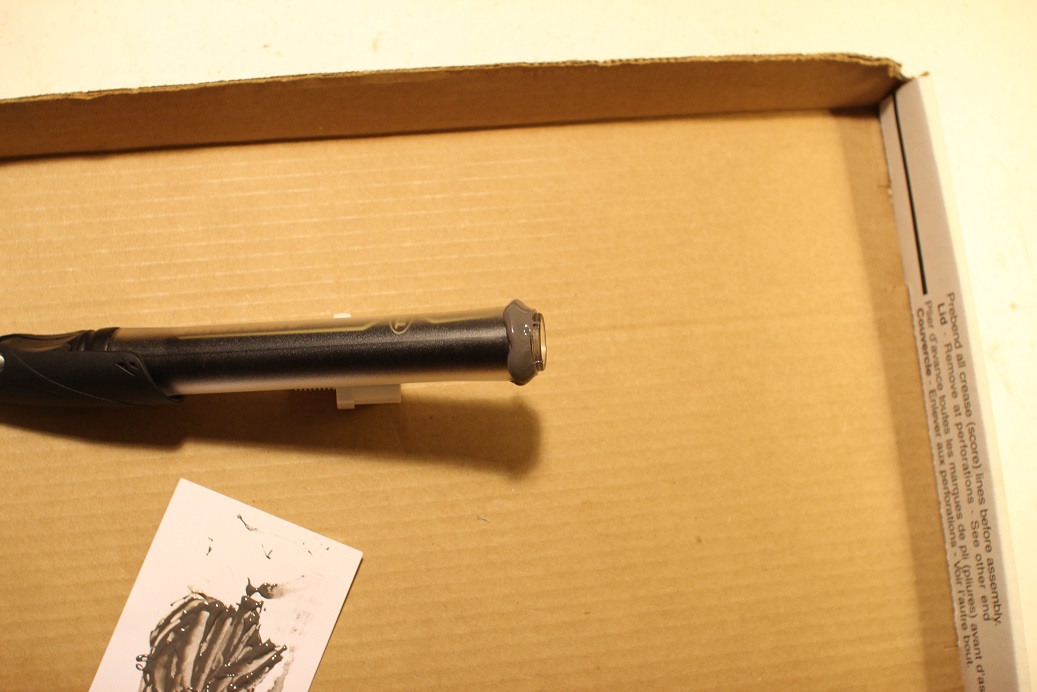
Insert the pump into the adapter with a twist motion, wipe off excess epoxy, and leave it upright to cure.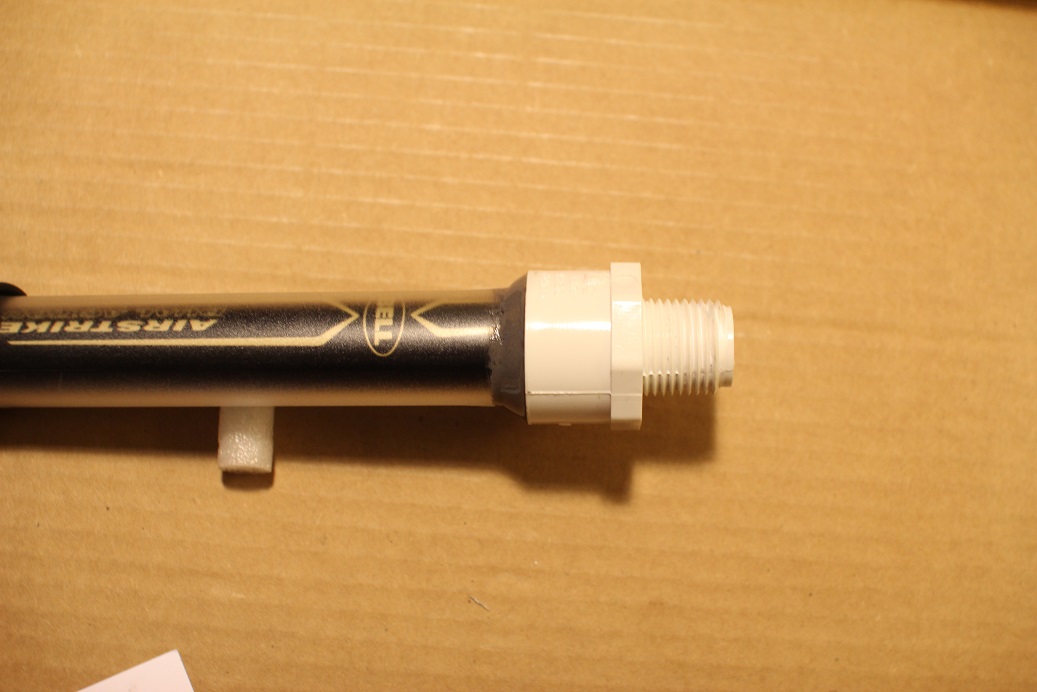
Barrel and clip
This is a basic RSCB clip and cpvc barrel, that you'll find on most guns without internet parts these days.
Cut a 1” stub of pvc pipe and a 12” length of cpvc pipe.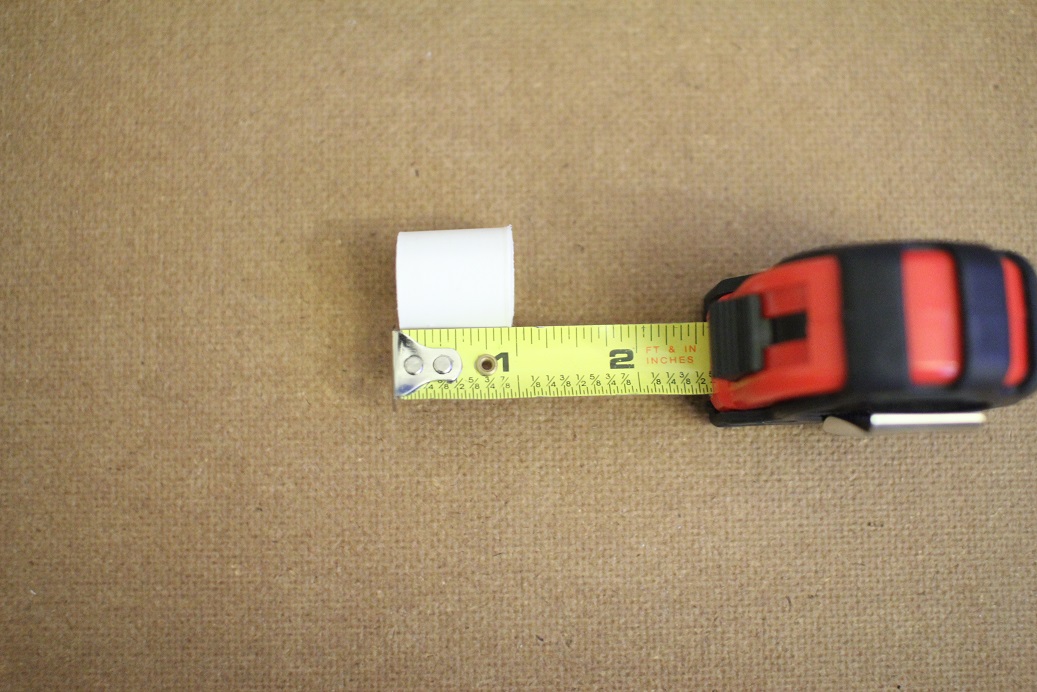
Ream(increase the inner diameter of) the pvc stub with scissors until the edge of the cpvc fits into the edge of the pvc.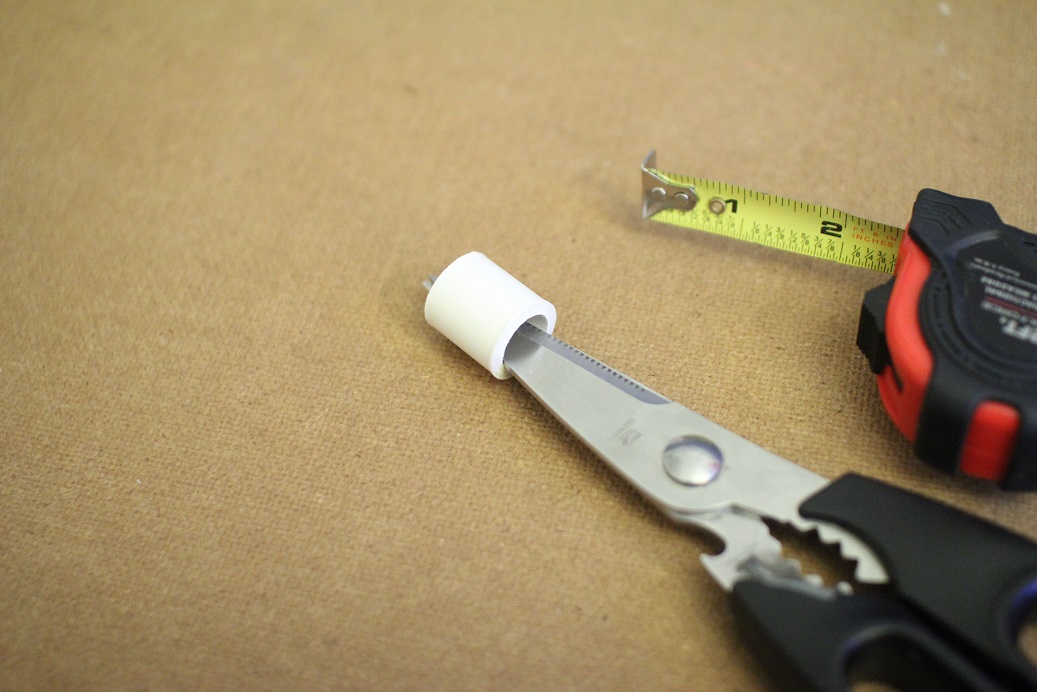
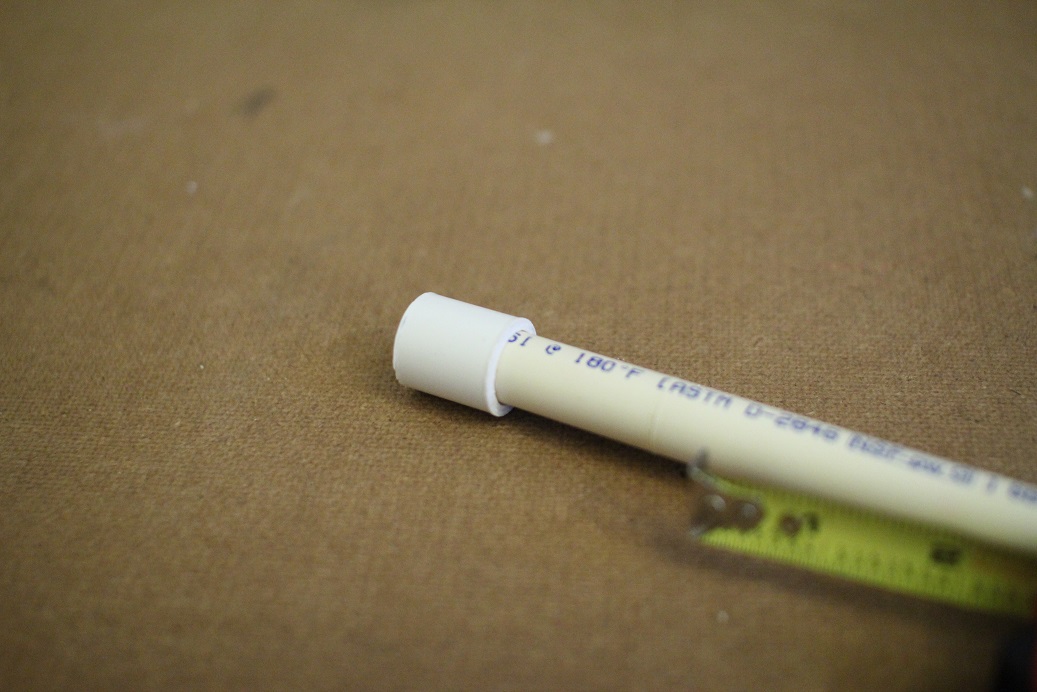
Use a hammer to force the cpvc the rest of the way down the pvc stub. Once you do this, ream the open end of the pvc so darts can slide into the barrel. Whoops, my pvc stub changed color. Ignore that please.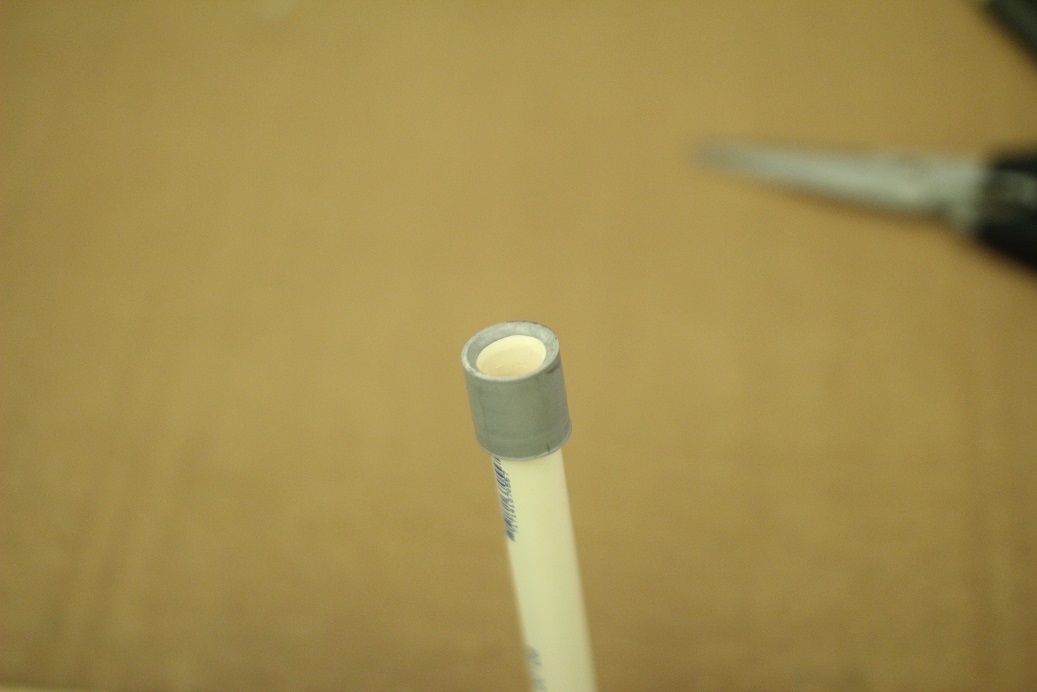
Connect your newly made barrel, a tee, a 12” length of pvc pipe, the ½”-3/4” bushing and ball valve together like this.
Cut two 1.5” stubs of pvc pipe and use one of them to connect the barrel assembly to the trigger assembly. While you’re at it, use the other stub to connect a cap to the other side of the trigger. Drill 1/8” holes in these two places and screw your sheet metal screws into them. This will keep your barrel from swinging around while running.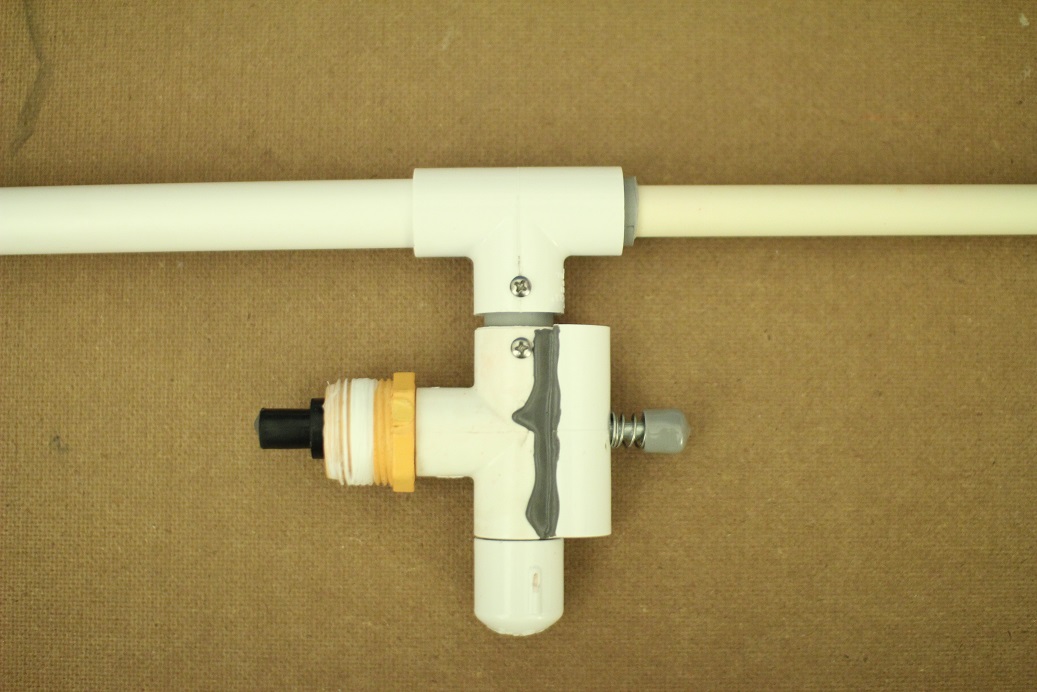
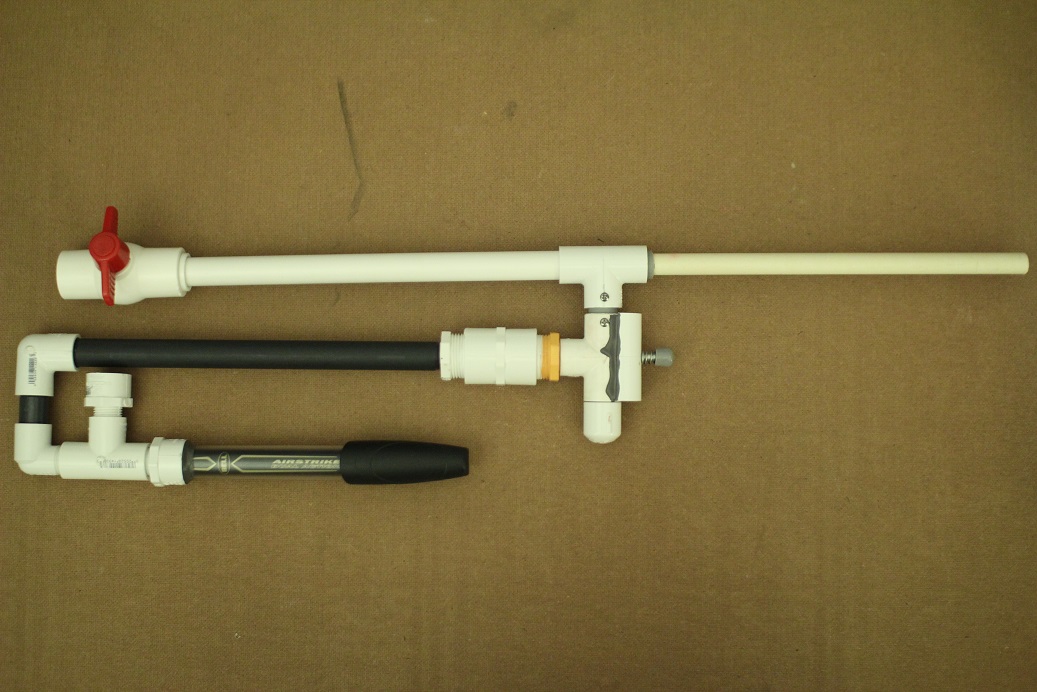
Final assembly
Now that you’ve got all your subsystems together, all that’s left is to use the remaining fittings to connect your subsystems. In case the diagram isn’t clear, from the trigger it goes: 1” coupler, 1/2”-1” bushing, 12” nipple, twist elbow, 3” nipple, street elbow, twist tee, pump and oprv.
Use
Use is pretty straightforward. Open the ball valve and drop in darts until the pvc pipe is full then close it, that’s your clip. Put the butt against your dominant shoulder with your non-dominant hand on the pump and your dominant on the trigger. Tilt the gun down slightly and pump six times. At the end of the sixth pump you’ll hear a slight hiss, that’s the oprv signaling the tank is at max capacity. Then just aim down the barrel and press the hex bolt to fire.
Any questions, please ask. If its past the statute of necro limitations shoot me a pm.
Sources:
1.http://www.engineeri...ures-d_796.html
2.http://nerfhaven.com...showtopic=21427
3.http://nerfhaven.com...showtopic=21530
#338858 Coloring/Painting Darts?
Posted by
on 10 May 2014 - 06:37 PM
in
Darts and Barrels
I have tried this, but it turns out really dark for me, can you post a picture of this? What color, and brand marker did you use?
I use red generic marker on white darts. Back when I used gray foam, I used and orange sharpie oil-based paint marker, but white marker might be more visible for gray.
Ultimately I'd recommend just getting some colored/white foam though. It costs more yeah, but that's mostly made up for by the fact that you lose way fewer darts.
#338622 Coloring/Painting Darts?
Posted by
on 02 May 2014 - 01:39 PM
in
Darts and Barrels
#337997 The Rayven Dual-stage mod
Posted by
on 02 April 2014 - 04:41 PM
in
Modifications
#337975 Reliably Hoppering Silicone Darts
Posted by
on 01 April 2014 - 08:18 PM
in
Darts and Barrels
#337778 Question about airgun fittings
Posted by
on 28 March 2014 - 12:25 AM
in
General Nerf
#337308 Welcome to Nerf Engineering
Posted by
on 26 February 2014 - 05:25 PM
in
Darts and Barrels
#336407 Has anyone ever tried these?
Posted by
on 10 January 2014 - 12:58 AM
in
Darts and Barrels
What did you try them in? The plastic instead of rubber tips might make them work in hoppers.Yes. I have cut a few down to 1.5 in and they work ok
#336327 Measuring Accuracy
Posted by
on 05 January 2014 - 12:28 AM
in
General Nerf
#336053 Has anyone ever tried these?
Posted by
on 25 December 2013 - 11:05 PM
in
Darts and Barrels
Edit: I read through some comments and apparently despite their solid tips, they are just as inaccurate as normal streamlines.
#335697 Scroll saw
Posted by
on 28 November 2013 - 10:11 PM
in
Homemades
#335527 Questions about replacement motors.
Posted by
on 18 November 2013 - 01:55 AM
in
Modifications
I see, thanks for the answer. Looking into it I don't think my idea is so great though, because I was looking at Panasonic IMRs. Efest IMRs are both cheaper($8 ea) and much higher discharge(30A). The OP won't need current that high if he has stock motors, but for high current applications efests sound much better than trustfiresHmmm...that only talks about current supply. We are talking about discharge rate. The discharge rate remains the same.
But I thought about the math, and I was wrong, it does increase max discharge (not discharge rate).
For example, if both cells have 1000mAH, and 10C discharge rate, that means they have 10A max discharge, because 10C * 1AH = 10A. So if you connect them in parallel, you have a 2000mAH supply, but still 10C discharge rate. But 10C * 2AH = 20A max discharge.
So yes, that would work, but most people want overvolting, so you would have a pretty large pack to put 3 paralleled 18650s in series with 3 more paralleled in series with 3 more paralleled lol.
#335508 Questions about replacement motors.
Posted by
on 17 November 2013 - 12:54 PM
in
Modifications
Sorry, I don't quite understand? Doesn't connecting batteries in parallel compound their current discharge? http://electronics.h...ch/battery6.htm (first paragraph).Their current discharge rate will not increase, FYI, but their mAH will add up.
#335501 Questions about replacement motors.
Posted by
on 17 November 2013 - 04:33 AM
in
Modifications
Since you can get three 18650 trustfires(3-4A max discharge) for the price of an 18650 IMR(10A max), would it be reasonable to use three trustfires in parallel for the same current as an IMR but three times the capacity?A Trustfire charger will work just fine, I use one with my eFests. One great thing about IMRs is that they can't be overcharged.
Trustfires are just common because it was what people were initially doing. Plus, they're cheap. But because of their construction, there are many problems with trying to use them with a high current demand.
There are many alternatives which will provide the current motors demand when overvolted, IMRs, LiFEPO4, LiPo, NiCd, etc...
It would probably be impractical in a stryfe since you'd end up with 6 or 9 batteries, but I'm thinking of a homemade.
#335075 Nerf haven bracelets
Posted by
on 29 October 2013 - 08:11 PM
in
General Nerf
Phree is correct. And I don't know if it'll affect your "lame" appraisal, but here's an explanatory video. http://www.youtube.com/watch?v=2dXRsnWGkUsIt is actually an iconic Nerf brand slogan that dates back to the 90's.
#335064 Nerf haven bracelets
Posted by
on 29 October 2013 - 03:10 PM
in
General Nerf
#335053 Nerf haven bracelets
Posted by
on 29 October 2013 - 12:51 AM
in
General Nerf
#334737 Any one intrested in 3D printed parts
Posted by
on 13 October 2013 - 12:26 AM
in
Homemades
#334308 Inexpensive Chronograph
Posted by
on 28 September 2013 - 03:44 PM
in
General Nerf

The readings are much more consistent than any range test I've done. Muzzle velocity is almost intrinsically more consistent than range, because range depends on muzzle velocity, as well as many other variables like angle, wind, and dart skip.
It doesn't make sense to use the beaver/0914 data to demonstrate inconsistency in muzzle velocity, because Beaver took his data at a range of different pressures/velocities intentionally, and the war data was taken from several different blasters. If you want to get an idea of how precisely a chrony measures the power of a blaster, you need to use just one blaster.
It is true that variation in dart mass leads to variation in muzzle velocity, but it also causes variation in range so I don't really see how that makes a difference when comparing the two methods. As long as you're using consistently weighted darts like slugs it shouldn't be an issue either way.
Do you need a chronograph to collect good data? Of course not. But it makes it much easier. And like Koree says, the rest of your set-up needs to be scientifically controlled as well.
Even if chronographs don't give better data, I think they're worth it because of their convenience. Waiting for daylight and good weather, going outside, setting up a tape measure, walking along and recording your shots every time you want to see what barrel length is best, or test how much a tank expansion helped, or see which of many motors works best is too much for my impatient soul. Having instant feedback right there in the shop is just way easier.
*breath*
Arguments aside, If you're looking for a cheap chronograph I recommend you either build one (not hard, I've done it). Or fire your blaster along a tape measure while video taping it and compare the frames. I usually use the later method and it works great.
#334183 Mark 8
Posted by
on 21 September 2013 - 01:17 AM
in
Homemades
#334004 W.W.A.C. (War Worthy Air Cannon)
Posted by
on 14 September 2013 - 02:53 PM
in
Homemades
But would you say that when turning the valve for competitive power, you can place the shot as accurately as a springer? Sorry for my skepticism, but in my experience with ball valve triggers, turning them fast enough for a good shot always results in too much shake for acceptable accuracy.The faster you turn the valve the better the shot. If it gets opened slowly it can misfire. It takes a little getting used to, but id feel comfortable loaning it out.
#334002 W.W.A.C. (War Worthy Air Cannon)
Posted by
on 14 September 2013 - 02:31 PM
in
Homemades
#333885 new style RainbowPump Writeup
Posted by
on 09 September 2013 - 01:17 AM
in
Homemades
I don't mean to criticize, just trying to understand.
#333814 What would be a good replacement motor for Nerf Stampede
Posted by
on 06 September 2013 - 09:50 PM
in
General Nerf
#333557 A New Style Pumpaction Snap Writeup for New Members
Posted by
on 29 August 2013 - 03:13 PM
in
Homemades
I probably did something wrong, but I've had two putty ramps break on me and had to replace them.
I also had several catch ramps break on me, until I realized that Oatey brand putty(which is the kind in hardware stores I've been to) is much softer than Loctite. I think that's a problem a lot of people run into but never work out. Once I started using Loctite I never had a problem.
And while I was using Oatey putty I came up with a method that can make ramps harder, which is to coat them in a thin layer of JB Weld. The very first snapbow used a pvc ramp, but the community moved away from that because steel wears down plastic over time. Maybe a layer of JB Weld would prevent that problem.
Edit: This is kind of off topic, but I wonder if using a thin polycarbonate rod instead of a nail would work and keep a plastic ramp from wearing down? It's certainly not something for a beginner write-up, and might not be worth doing at all, but maybe.
#331473 possible balls for a homeade
Posted by
on 01 July 2013 - 09:23 PM
in
Darts and Barrels
Edit: As far as firing devices go, high volume air guns are good, as well as TheSilentRebel's mantasnap: http://nerfhaven.com...ndpost&p=320504
#330889 Magstrike Air Tank Harness (3.0)
Posted by
on 14 June 2013 - 11:13 PM
in
Modifications
#329386 Dart-related Nerf war accidents and dart safety tests
Posted by
on 05 May 2013 - 04:19 PM
in
Darts and Barrels
#329098 The Final Iteration of the 3D printed wye!
Posted by
on 27 April 2013 - 02:59 PM
in
Darts and Barrels
#328581 3D printed Wye with a Gentler Slope and a Dart Ramp
Posted by
on 05 April 2013 - 05:30 PM
in
Darts and Barrels
So long as the area of the passageway doesn't decrease too much below the area of the back of a dart I don't see how it will have an impact. I made the passageway larger between the first drawing I posted and the most recent image.
Makes sense. KaneTheMediocre made a 3D printed wye in two parts like that. It fires silicone head darts, but I'm not sure on the details since he only made the one post about it. Maybe you could contact him.
#328567 3D printed Wye with a Gentler Slope and a Dart Ramp
Posted by
on 05 April 2013 - 10:37 AM
in
Darts and Barrels
#328364 Portable electric air cannon
Posted by
on 28 March 2013 - 12:56 AM
in
Homemades
There are bigger solenoid valves than that at reasonable prices, but they're usually sold as "sprinkler valves" which is maybe why you had trouble finding them. Here and here are examples. Keep in mind that most solenoid valves aren't full flow, so in a 3/4" system for example, a 3/4" solenoid valve may still be a bottleneck.The big bottleneck in the airflow works is the solenoid, largest opening I could find for a 12V solenoid was 1/2" threaded connectors unless I want to buy something bigger (rated for industrial use and about five times more expensive), so the largest inside diameter of the works is kind of fixed for now. The only unknown variables right now are the specs of a Draconis missile and the required volume for the tank to achieve the firing pressure long enough for the projectile to leave the barrel entirely.
And if you're going to use a valve like this, you should really consider modding it to work without the electric component. It gets rid of the hassle of batteries and wires, but more importantly drastically increases performance.

