- NerfHaven
- → Viewing Profile: Posts: dapperrogue
dapperrogue
Member Since 04 Feb 2012Offline Last Active Jun 04 2012 11:43 PM
Community Stats
- Group Members
- Active Posts 13
- Profile Views 4,800
- Member Title Member
- Age Age Unknown
- Birthday Birthday Unknown
User Tools
Posts I've Made
In Topic: First timer in need of help with N-strike clips
01 June 2012 - 09:49 AM
L-Shot Thread
The thread has a ton of photos, a complete writeup, plus printable templates.
In Topic: Homemade Rifle (Longshot-esque)
06 March 2012 - 01:59 AM
This pdf is 12" x 12" sheets:
http://dl.dropbox.co...4889/LAMBDA.pdf
This pdf is split onto 8 1/2" x 11" sheets, so you'll have to align what you print, but it will work with a letter-sized printer:
http://dl.dropbox.co...LAMBDA_8511.pdf
Here's the Google Sketchup model:
http://dl.dropbox.co...64889/HMLS3.skp
Thank you so much for making these! I really dig the decorative Lambda on the side of the stock.
One thing about the templates he asked me to share is that the surface holes are indicated, but not the edge holes. The positioning of holes drilled in edges should be apparent from how the pieces line up. You should use the other pieces as guides when marking your edges.
For the holes in the edges of 1/4" polycarbonate, they should ideally be drilled 7/64" and tapped with a 6-32 tapping bit (like in Captain Slug's +Bow writeup). If you are lazy, like me, you can drill with a 1/8" bit and not tap, just force the screws in. However, I expect all of you to drill and tap everything properly.
The larger hole diameters are as follows:
Barrel Guide: 9/16"
Mag Well: 5/8"
Plunger Tube (PT) Reducer: 9/16"
Spring Stop: 1/2"
Both of the holes in the Catch are 9/64" -- they act as hinges, and this diameter is large enough to pivot freely on a 6-32 machine screw.
To make the Plunger Tube Reducers and the Spring Stop, I suggest you drill half-way through your 1/4" piece of polycarbonate with a 1 1/2" hole saw, then bore out the correct center diameter with a spade bit, then resume drilling the rest of the way through with the hole saw. Your outer diameter will be less than 1 3/8", but the rubber washers will compensate. This will leave you with a 1 1/2" hole in both handles, which is what you want for it to fit over your plunger tube.
Parts List Time:
Stuff I got from McMaster:
8574K26 2 Each Impact-resistant Polycarbonate Sheet, 1/8" Thick, 12" X 12", Clear
8574K28 1 Each Impact-resistant Polycarbonate Sheet, 1/4" Thick, 12" X 12", Clear
8585K431 1 Ft. Impact-resistant Polycarbonate Round Tube, 1-1/2" Od, 1-3/8" Id, 1' Length, Clear
8585K631 1 Ft. Impact-resistant Polycarbonate Round Tube, 1-1/4" Od, 1-1/8" Id, Clear, 1' Length
91780A337 10 Each Aluminum Female Threaded Hex Standoff, 1/4" Hex, 1-1/2" Length, 6-32 Screw Size
90272A146 1 Pack Zinc-pltd Stl Pan Head Phillips Machine Screw, 6-32 Thread, 3/8" Length
90272A148 1 Pack Zinc-pltd Stl Pan Head Phillips Machine Screw, 6-32 Thread, 1/2" Length
6435K54 2 Each One-piece Clamp-on Shaft Collar, Black-oxide Steel, 9/16" Bore, 1-5/16" Od, 7/16"w
90131A104 1 Pack Abrasion-resistant Reinforced Rubber Washer, 1/2" Screw Size, 1-3/8" Od, 1/8" Thick
9637K26 5 Pack Continuous-Length Compression Spring Spring-Tempered Steel, 11" L, .844" OD, .08" Wire
8538K18 5 Ft. Nylon 6/6 Rod 1/2" Diameter
9562K46 1 Each Stretch-fit Rotary-shaft Ring Seal, 1" Shaft Diameter, 0.95" To 1.07" Shaft Diameter
Stuff you can get from your hardware store in smaller quantities:
90272A151 1 Pack Zinc-pltd Stl Pan Head Phillips Machine Screw, 6-32 Thread, 3/4" Length (I used 5 of these).
91090A109 100 Pack Zinc-Plated Steel Large-Diameter Flat Washer 1/4" Screw Size, 1-1/4" OD, .04"-.06" Thick(I used 2, for my plunger head)
90126A509 100 Pack Zinc-Plated Steel Type A SAE Flat Washer NO. 6 Screw Size, 3/8" OD, .03"-.07" Thick (I used 1 or 2, for my plunger rod)
90295A080 100 Pack Nylon 6/6 General Purpose Flat Washer Off-White, NO. 6 Screw Sz, .32" OD, .02"-.04" Thk (I used 2, for the catch)
Stuff I got from my local hardware store (didn't find 17/32 brass on McMaster, only 9/16" and 1/2" -- probably there somewhere though):
9/16" Brass tube, 1 foot - Dart pusher, plus misc. brass
17/32" Brass tube, 1 foot - Barrel
1/2" Brass tube, 1 foot - Breech
Stuff I don't know where you would find, but probably have in your house already:
2 small springs, one for the trigger, and one for the catch. These fall out of nerf blasters if you take them apart. Pretty sure mine were from various Longshot locks.
Coarse Threaded screw, 1 1/4" (wood screw?) - I had these lying around my house. Used for plunger rod ends, because 6/32 thread ripped out of the holes.
Note that I didn't include the 3/4" washer I mentioned I was using for the rod catch. I switched to a 1 1/8" diameter plate out of spare 1/8" polycarbonate, but I might switch back to a metal washer of the same diameter if I can find one at the hardware store:

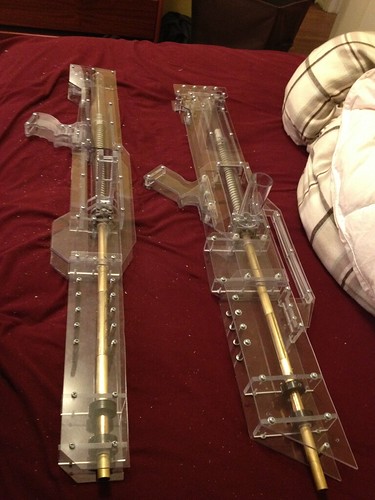
Since I mentioned it last time, here are the 1-piece handles. Here's the plunger tube, priming handle, and 9/16" breech all by itself, out of the blaster.
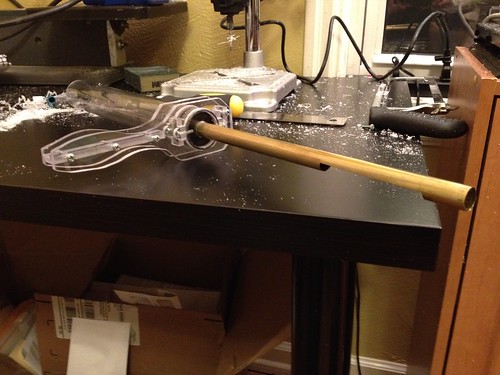
And here it is in the blaster. Note that I switched to 1 1/8" metal washers for the plunger head. I included these in the parts list above.

Lastly, that means the blaster is no longer broken! Range test coming soon!
In Topic: Homemade Rifle (Longshot-esque)
01 March 2012 - 10:33 PM
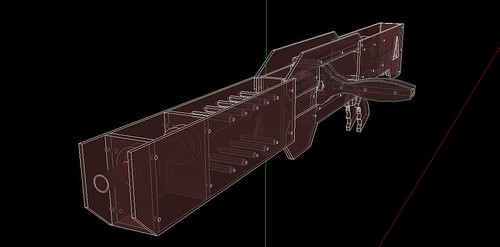
Great news:
Meaker VI has made an awesome 3d model of the blaster, and is working on actual, printable templates for you guys. He's built the whole thing off of my cell-phone photo of a graph paper sketch (aka, no small feat). I've had a chance to review it, and I'm really impressed. This is a screenshot from Sketchup.
Sad news: While making a firing test video (not a range test), I snapped the priming handle off.
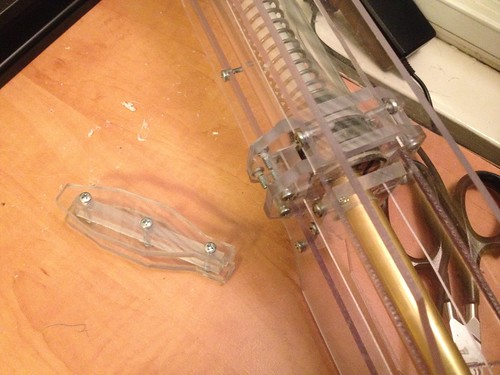

Bad news:
I'm pretty sure the handle design I posted is flawed. The piece(s) failed at the screw-holes that attach the handle to the plates on the plunger tube.
Good news:
I designed a better handle, and have sent it to Meaker IV (also shown in the first photo):
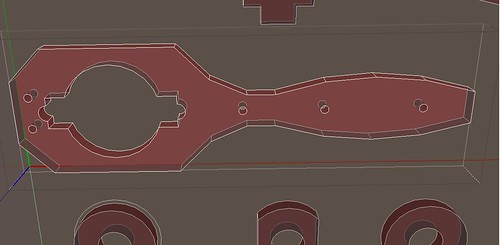
Rather than have separate pieces for the handle and for the plates, I've made them one and the same. There are no longer screw holes that will weaken the part.
In Topic: Homemades Picture Thread
27 February 2012 - 05:13 PM
Prototype Video:
Rev 1 Video: http://www.youtube.com/watch?v=9wovA97NgBY
And here's the thread (detailed build of Rev 1 starts on page 2): http://nerfhaven.com...showtopic=22165
In Topic: Homemade Rifle (Longshot-esque)
25 February 2012 - 02:20 PM
EDIT: Don't use these as plans. Templates coming soon. Also, design flaw corrected. See two posts down for what I'm talking about.
Scale is one square = half an inch.
Here are the 1/8" pieces:
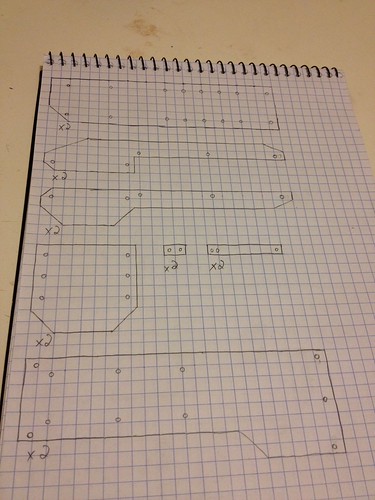
The two smallest pieces here are used in the firing mechanism. The very small ones are used to keep the trigger in line. The slightly longer ones are used to connect the trigger to the catch hook.
Here are the 1/4" pieces:
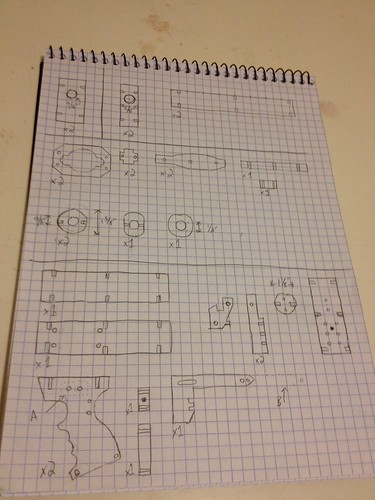
I divided the page into four parts. Top left is for the front of the gun. Top right is for the center of the gun. Middle is for the air chamber/priming handle/reducer assembly. Bottom is for the rear of the gun.
The blacked in holes (around the grip) represent screws that are used to hold a small spring in place. One for the trigger, one for the catch.
- NerfHaven
- → Viewing Profile: Posts: dapperrogue
- Terms of Service and Privacy Policy
- Code of Conduct ·


 Find content
