Jump to content


TheAbused

Member Since 28 Sep 2007
Offline Last Active Jun 26 2012 07:52 PM

Topics I've Started

Ballzooka Mp150 V2.0

24 March 2010 - 09:46 PM

I've been working on this version off and on since I posted the last one, keeping suggestions and comments from the community in mind. I thought I could have knocked this one out in about 2 weeks, but winter temperatures and uninsulated working environments are not conducive to working with plastic.

The big new feature? Variable Speed Control Trigger.

Posted Image

BAM!

Posted Image

I managed to find a couple matched drills closer to an 18V rating. I'm a little paranoid about driving too much power through stuff. I've seen a lot of things get too hot and burst into flame at work. Also pictured: DeWALT drill shell and trigger.

Posted Image

This trigger is pretty important. It plugs directly to the battery, whereas many other cordless drills have two separate pieces for battery connector and trigger. LIFE LESSON: If you dig a power drill trigger out of a dumpster, check with a voltmeter for electrical shorts before you connect your $90 battery to it. I managed to burn one of mine up in less than 10 seconds, complete with smoke, red-hot glow, melting plastic, and probably a few toxic fumes. Luckily, I didn't burn out the motors.

Speaking of motors, if you're lucky enough to find some that come with a plastic mount on them, save the plastic mounts as templates for later.

Motor size comparison.:
Posted Image

On the other blaster, I had an awful lot of ball spin. My strongest suspicion was angle of contact on my fly wheels. The original setup had parallel surfaces. When I mounted my flywheels to my motors, I had flipped one flywheel over. I made sure not to repeat that mistake.

Posted Image

Some details on removing the puny motor and making way for the manly motor.

Posted Image

The gaps between the housing and the flywheels are important if you don't want anything to rub. Note the lack of gap in the red circle (Boooo!). Later I'll put a 1/8" disc of Lexan on the top of my flywheel so I can epoxy everything directly to the gear mounted on my motor. (If I want to get really fancy, next time I'll get a gear puller and order a couple shaft collars.

Posted Image

Here I've used some 1/8" Lexan between my drill motor and flywheel housing to get the spacing I need for my flywheels.

Posted Image

Using the plastic motor mount as a template...

Posted Image

To preserve the proper orientation of my flywheels while keeping both motors on one side, I needed to build a standoff in one flywheel. And to make sure both flywheels would spin at the same speed, I needed to keep them the same weight. So I built standoffs in both.

For some reason I felt the need to use as much of the original parts as possible in this mod, so I Frankensteined some unnecessary plastic in my flywheels. The mounted motors with no flywheels, running at full 18V speed, were whisper quiet. The mounted motors with one properly balanced flywheel, at full speed, were whisper quiet. The mounted motors with one properly balanced flywheel and one almost properly balanced flywheel, were about as loud as a regular drill.

Posted Image

It's entirely possible to make this a virtually silent ball blaster, but I would need to rebuild that flywheel. I've already rebuilt one 3 times, and any rebuilding at this point will destroy the flywheels. So what I really need to do is either turn some new flywheels from scratch, or find a donor Ballzooka. My advice would be to use 1-1/2" or 2" PVC as a standoff, and cap the end with Lexan.

Once again I coated my flywheels with Plasti Dip to guarantee decent grip on my balls. NOTE: I used a disposable BRUSH to apply the Plasti Dip.

Some pictures of the drill handle attached and reinforced:

Posted Image

I was going to mount a small spring blaster in the drill handle for extra Nerf Community Points, but I'll save that for the next version. Actually, I really want to mount a Blast Bazooka chamber in there, so I can fire balls, darts, and arrows, thereby creating a near ultimate Nerf blaster. (The ultimate Nerf blaster would also grant you sexual favors.)

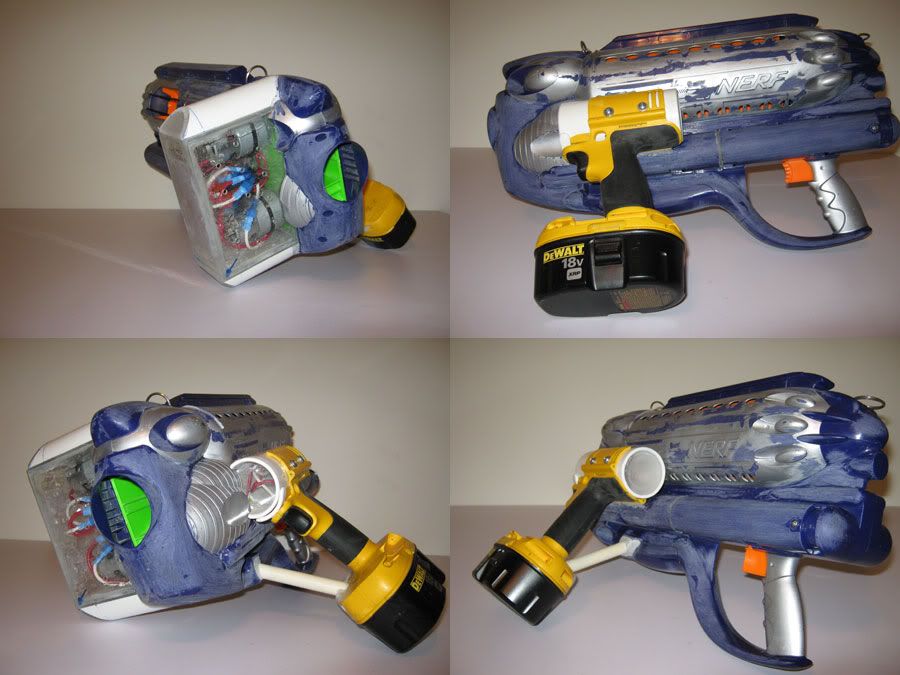
A few angles of the unpainted finished product.

Posted Image

Ranges: up to 60 feet
Weight: 6.75 pounds without battery, 9.125 pounds with battery
Length: 20 inches
Width: 18 inches
Ammo Capacity: 16 balls

I haven't done a whole lot of test firing with this one yet, but it appears my ball spin is under control. Instead of veering off to one side, the ball does this cool spiral through the air.

Added Feature #1: Variable speed trigger gives greater control on ball speed/distance
Added Feature #2: Fore-grip handle redistributes weight better, making a shoulder strap less necessary

Planned Fix #1: Properly balanced flywheels for whisper quiet operation

Future Feature #1: Additional spring blaster mounted on side
Future Feature #2: Cool lights?
Future Feature #3: Fog machine?

Videos:

Previous Version (Christine)


Version 2 (Carrie)
http://www.youtube.com/watch?v=ng-f48C6EGU

I'm off to sleep for now, though I might wake up in the middle of the night to answer questions and read comments.

Final Paint:
Posted Image

Ballzooka Mp150

22 November 2009 - 08:52 PM

For as long as I have been modifying Nerf blasters and attending Nerf Wars, I've heard: "Ball blasters are worthless. They get crap range and the balls are extremely easy to dodge. If you get killed with a ball, you are a terrible player."

And I thought: "That sounds like a challenge."

I took a motorized Ballzooka...

Posted Image

...and added two cordless drill motors...

Posted Image

...and an 18V battery.

Posted Image

Suddenly, I had a ball gun that could fling a ball over 40 feet.

Posted Image

I call her "Christine."

The original blaster "weighed in at 5 pounds with a full ammo complement and batteries, it was extremely bulky and noisy and it took a few seconds before the wheels were up to speed for firing, giving up your position." Mine weighs in at 8.75 pounds, features a comfortable shoulder strap, is noisier and bulkier than ever, and comes up to speed immediately. Damn revealing my position. By the time you hear it, you're already dead. Additionally, it comes with two speeds: Normal (with motors in series at 9V each) and Crap Your Pants (with motors in parallel at 18V each).

Internal Comparison

Posted Image

After tearing out the tiny, tiny motors (which only sent my balls about 10 feet... and I needed my balls to go much further), I added some Lexan to cover strengthen up the housing and to attach the larger drill batteries. I removed the original posts from the flywheels, added Lexan disks, and drilled holes 1/32" smaller than the diameter of the drill shaft (I preferred a tight fit for testing). I lucked out with the spacing here, but I had enough wiggle room for shafts too long or too short. I didn't glue the flywheels to the shafts (at first) so I could make sure I could take everything apart if there was a problem. After confirming everything works, glue the flywheels on. Otherwise the new larger balls will eventually knock them off the shafts.

Posted Image

The lower 9V speed tosses my balls a pretty good distance (45-50 feet), and I figured with the full 18V I would get considerably more distance. Actually... the flywheels spin so fast at 18V, that they slip, and can't throw my balls any further at all. But the sound was impressive. I needed more friction, so I tried rubber bands around the flywheels... which get thrown off and chewed up. So I tried hockey tape... which eventually comes loose and gets jammed. Finally, inspiration: Plasti Dip.

Posted Image

With a rubber coating for the flywheels, I can shoot my balls about 55-60 feet.

I built a Lexan body to accommodate the larger motors, drilling plenty of ventilation holes (since drill motors tend to get pretty hot), and adding CPVC around the edges (since no one wants to be accidentally gouged).

Posted Image

The original blaster had a translucent fluorescent green sleeve that would slide back and forth to keep balls from falling out. Mine was loose and kept sliding open if I turned too fast. I removed it, drilled some holes in the shell, and threaded some elastic rope (specifically elastic packaged with the Big Bad Bow... you know, the ones everyone cuts off and throws out... not me, I save every part).

Posted Image

Now I can just slap my balls in there and not worry about them flying out when I run. Proper ball restraint: always a good idea.

Dramatic Photos:

Posted Image

Posted Image

Posted Image

Ranges: 45-50 feet on lower 9V setting; 55-60 feet on higher 18V setting (ranges may vary due to spin)
Preferred Effective Range: 30 feet
Weight: 8.75 pounds
Length: 20 inches
Width: 12 inches
Ammo Capacity: 16 balls

Usually I'll get a pretty straight shot with a nice arc, but my balls do tend to curve in flight. They fly straight for about 30-35 feet, then either dive, or make a sharp right. I've shot people hiding around corners, much to their irritation. I don't see a flaw... I see a bonus. I tried adding a couple of variable resistors so I could control the speed of the motors independently (and control my curve), but the series/parallel wiring I have makes this ineffective. Also, I melted the resistors.

I realize this is far from most people's idea of a preferred primary weapon, but it kicks so much ass during indoor wars. I also find it ideal for Zombie Games since I can wait for zombies to get pretty close to me, and I don't have to worry about leaving welts on anyone. I also find it useful for guarding flags or bases.

Perceived Bonus #1: I can kill people with balls, bringing shame to them and their families.
Perceived Bonus #2: Hardly anyone else uses balls as ammo, so I know what ammo is mine.
Perceived Bonus #3: Ball jokes are funny, at least at first.

Unexpected Bonus #1: The roar of twin drill motors makes people stumble and wary.
Unexpected Bonus #2: The Ballzooka accepts all foam balls, regardless of manufacturer and slight differences in diameter.
Unexpected Bonus #3: Balls are kind of hard to dodge at the speed I fire them.
Unexpected Bonus #4: Ball jokes don't actually seem to get old.

This modification was pretty cheap for me. The Ballzooka I picked up from my brother for free, but recently picked up a second one for $25. I picked up two matching Sears 16.8V cordless drills at a flea market for $10. The DeWalt 18V battery I already had, otherwise they are about $60 each. The DeWalt drill shell (which I needed for the battery to easily be switched out) I got for a song and a dance. If you can find a DeWalt distributor near you, chances are they have a whole bin full of dead drills, and you can probably ask nicely and get a shell with battery contacts for free. This ended up costing me about $20, raw materials and bonding agents included. You could easily spend over $100 making one for yourself, though. Ah, the price one must pay to hit people in the face with one's balls.

Final Paint:
Posted Image

Recon Cs-6 And Ertl Rapid Fire Shot Gun Mod

09 November 2009 - 07:11 PM

Those of you who were at the Cincinnati Nerf-o-ween probably saw me with this (I was dressed as Beaker, from The Muppet Show, or as the Mad Scientist, if you have no idea who Beaker is).

Posted Image

This is by far not my first mod, but its the first one I've really been bothered to half-way document. Most of my creations start with me thinking "Here is a crap gun. I wonder if I can make it not-crap." Or more likely "Here is a perfectly working gun. I wonder if I can unnecessarily mash it together with this gun?" Unsurprisingly, I don't pull out my camera until the gun is more or less finished. Sorry about that...

So here's the cool thing about this gun: the PAS grip cocks the gun and works the breech. So the load is almost entirely removed from the Recon bolt sled, and one does not have to fret or worry about flimsy plastic snapping in the middle of a Nerf Encounter.

Posted Image

So sexy.

It's a bit hard to describe in words how I trimmed the guns down to fit, and I really wish I had remembered to take pics. Hopefully pics of the finished product will show enough. The important parts of the shells to save are the grooves/tracks for the bolt sled and priming bar. I also tried to make sure the plunger tube and the Recon barrel would still line up, but they end up being a little crooked. I used some Lexan and Oatey Fix-it Stick All Purpose Bonding Putty to hold the plunger tube.

Posted Image

Combining the bolt sled and the priming bar was a bit tricky, and I wasn't sure if I was going to pull it off. Again, I should have taken pics of this process. The bottom of the bolt sled is trimmed down (which is OK, since it only moves the brass now, and not anything with a spring), and the priming bar was cut to allow the sled to nest. Fix-it stick holds it all together. Mine came out a little crooked, but it doesn't really effect performance. You'll also have to add a block underneath, so the priming bar pulls and pushes it (better pic below), instead of just pulling.

Posted Image

The bolt sled also needed to be filed down on top to fit underneath the plunger tube for nice, smooth action.

Posted Image

The brass breech is the usual standard, nothing new about that... though I think it's pretty cool that it telescopes into the plunger tube. Usual spring replacement, plunger rod reinforcement, trigger reinforcement. Its very important that the brass that slides into the plunger tube does not extend into the plunger tube when the breech is closed, or else the plunger head will strike it. Its very important that the trigger catch is nice and strong, or else you risk the plunger moving (with all that terrifying force) and striking your open breech, and probably wrecking the whole assembly.

I felt using the Recon shoulder stock would help tie the whole thing together rather nicely.
Bolt sled assembly with block for priming bar (bottom half of pic).

Posted Image

My ranges (with Stephans and stock Streamlines) are comparable to modified Big Bad Bows. I didn't use a real heavy spring in this one (just what I had lying around). My usual range (tilted between 5 or 10 degrees) is somewhere in 65-75 feet, though I could probably get more with a heavier spring.

I can come up with a better range measurement a little later...

Also, an updated picture when the new paint is done.

If I can find a Recon for dirt cheap, I'll make another one of these, and do a more in-depth write up. For now, I'll do my best to answer any questions.