Jump to content


Photo

JSPB3D

3D Print JSPB RSCB

24 replies to this topic

#1 3DBBQ

3DBBQ

    Member

  • Members
  • 214 posts

Posted 08 October 2016 - 04:07 AM

*
POPULAR

jspb-3d-astm-free_orig.jpg

Introduce:

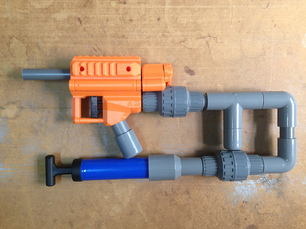
Hi! This is my new work, part of the use of 3D printing, it is very simple production,
just need to put it together , glue together, and you can change the style you want.
 
This model looks like some of the features of the past works, is not the same place? 
it has reserved some air road,using PU soft tube to connection, in addition to the RSCB Clip can be added,
the future can also connect another pump to push the clip inside darts.
 
The second pump push the darts inside the clip videos:
JSPB Pro2 does not need to muzzle down to load, JSPB Pro2 can continue shooting.
 
 
Pump air in to the Clip inside the darts to precision position is not easy, 
they must create an air escape,to prevent the continuous emission of darts.
 

3DSTL Files : 

https://drive.google...N00?usp=sharing

JSPB3D SCH40 core.STL
JSPB3D SCH40 breech ring.STL

JSPB3D trigger.STL

JSPB3D guard.STL
Breech block.STL
lock plate.STL


3D Printr settings:
I used the layer of 0.25mm and 0.6mm of the nozzle,
Basically, this model is fairly easy to print and does not require supporting materials.
 
Specification:
In Asia to get CPVC SCH40 is difficult, here are the use of CNS specifications,
Later I ordered the HERSHY CPVC4120 SCH40 on the Internet ,so I actually tested it
 
Tolerance issues:
Too tight part can use the hammer to knock into, too loose place can increase the thickness with PTFE TAPE,
Model tube through the place where most of the design groove, you can also plug O-Ring,
There is another way is to use screws to fix.


Part list:

j3d-white-up_2_orig.jpg

ABS rod  Φ5mm
SCH40 1/2"
SCH40 3/4"
PETG 1/2"
CHECK VALVE 1/2"  x2
PU-Tube 8X12mm 
OS   3/4"
1/2" Elbow   x2
3/4" Cap 
Pump
7X1.9  O-Ring
16X1.9  O-Ring
24X16X2 Rubber washer
Screws 5/32 X 1/4
Screws 5/32 X 5/8
AB Glue

Option:
1/2"  Tee 
1/2" Cap
Cable tie 
PTFE tape
Air flow direction:


j3d-white-up-air_orig.jpg

using screwdriver and a hammer to chisel a path to add more airway:


airpath_1_orig.jpg


img-1675.jpg?306


Edited by 3DBBQ, 09 October 2016 - 12:33 AM.

  • 4

#2 The2ndBluesBro

The2ndBluesBro

    Member

  • Members
  • 576 posts

Posted 08 October 2016 - 10:19 AM

Awesome job again. So it works like an AK-47 or other real steel firearms in that some excess air is used to cycle another round into the chamber?
  • 0

Nerf, Gaming, knives: https://www.youtube....FjcObRZTl2KReDQ


#3 Snoop Doggy doge

Snoop Doggy doge

    Fig you, Van

  • Members
  • 501 posts

Posted 08 October 2016 - 03:52 PM

Is this still a RSCB?
Would a wye version be adaptable?
Also very curious on what that T expansion does.

Great job btw!


  • 0

#4 CaptainSlug

CaptainSlug

    Resident Mad Scientist

  • Administrators
  • 4,763 posts

Posted 08 October 2016 - 06:29 PM

It looks like it's just a single-load as shown. Making it an RSCB would simply require sliding the barrel further forward.


  • 0
The little critters of nature, they don't know that they're ugly. That's very funny, a fly marrying a bumble bee. I told you I'd shoot, but you didn't believe me. Why didn't you believe me?

#5 Meaker VI

Meaker VI

    Member

  • Moderators
  • 1,192 posts

Posted 08 October 2016 - 09:41 PM

Really awesome work as usual 3DBBQ; thanks for sharing the files for this one!


It looks like it's just a single-load as shown. Making it an RSCB would simply require sliding the barrel further forward.


Is this still a RSCB?
Would a wye version be adaptable?
Also very curious on what that T expansion does.

Great job btw!

Looked on his website here, you've got to buy the part that allows you to use an RSCB. Or reverse engineer one...


Edited by Meaker VI, 08 October 2016 - 10:05 PM.

  • 0

#6 3DBBQ

3DBBQ

    Member

  • Members
  • 214 posts

Posted 09 October 2016 - 12:10 AM


Awesome job again. So it works like an AK-47 or other real steel firearms in that some excess air is used to cycle another round into the chamber? 

Thank you!  :)


thanks for sharing the files for this one!

You're welcome.


I have thought about a similar excess air is used to cycle another round into the chamber.
It needs to use the piston mechanism.If using the piston mechanism, I can make the power clip automatic blaster, but now I do not have to challenge the automatic.
 
This is the cutaway diagram I started drawing this morning.
 
The principle is this:
1. When pump into the air, one is to air tank, the other is to clip.
2. The pump check valve has designed the function of the leak valve, when the pressure of the assembly compression spring, and then move the check valve's body after the collision screw pressure relief.
3. Clip excess air will escape from the trigger, so it will not continue to push darts.
4. trigger has two stages, the first stage will close the air escape, the second stage will trigger the check valve.

hiw_orig.gif


JSPB Pro 2 using the air to push darts this function,
JSPB3D is the design of the module, I will design such a module.
 
By the way,3D printing speed is really slow, I currently use two ultimaker2, still difficult to produce jspb pro2 diy kits
Is it necessary to buy another one, or consider the future use of laser cutting(redesigned models), may be a good idea?

Edited by 3DBBQ, 09 October 2016 - 12:44 AM.

  • 0

#7 Meaker VI

Meaker VI

    Member

  • Moderators
  • 1,192 posts

Posted 09 October 2016 - 10:19 PM

By the way,3D printing speed is really slow, I currently use two ultimaker2, still difficult to produce jspb pro2 diy kits
Is it necessary to buy another one, or consider the future use of laser cutting(redesigned models), may be a good idea?


You either need a fleet of machines (I use a wanhao duplicator i3, it's probably cheaper than an ultimaker 2. No autoleveling if your has that though), or to use it as a prototyper to design parts for another constuction method. Captain Slug's designs would be good for either a CNC or a laser (if you found one - probably actually a waterjet, not a laser - that could do polycarbonite without gunking up or killing you with noxious gasses), but they won't work well for your air-blasters. You'd need to injection mold something, which is probably possible for you to get set up. Find a company that does it and show them your designs, see what they say. You'd probably have a minimum order in the 1,000+ range (I'd expect more like 5,000+) though.


  • 0

#8 CaptainSlug

CaptainSlug

    Resident Mad Scientist

  • Administrators
  • 4,763 posts

Posted 10 October 2016 - 02:21 PM

If you want to laser-cut any of my designs polycarbonate cannot be used due to hazardous off-gas byproducts. Delrin or aluminum should be used as a substitute. ABS is compatible with laser-cutting, but I'm not a fan of how soft it is.


3DBBQ, you could use a 3D printed master to make a two-part silicone mold for the more time-consuming parts. The only real hurdle to doing so is prepping the surface of your printed parts so that the master is smooth enough and doesn't have any pits or valleys that you don't want recreated in the cast part. Those features are also likely to make removing the mold from the master more difficult. Your airways aren't reproducible with molding though, so may have to be added by cross-drilling the cast parts.


Here is a really good article on the subject.


http://makezine.com/...-plastic-parts/


The parts you're making aren't thin anywhere so the options available for casting resins are quite wide. Even the cheapest of cheap ABS or Polyester castings should do fine. Your only post-processing may be to simply touch up all the drilled holes.


  • 0
The little critters of nature, they don't know that they're ugly. That's very funny, a fly marrying a bumble bee. I told you I'd shoot, but you didn't believe me. Why didn't you believe me?

#9 Draconis

Draconis

    I am not Lord Draconical

  • Members
  • 2,712 posts

Posted 10 October 2016 - 04:58 PM

Wow, this looks awesome!  These are definitely in the queue for the printer.


  • 0
[15:51] <+Noodle> titties
[15:51] <+Rhadamanthys> titties
[15:51] <+jakejagan> titties
[15:51] <+Lucian> boobs
[15:51] <+Gears> titties
[15:51] <@Draconis> Titties.
[15:52] <+Noodle> why is this so hard?

#10 3DBBQ

3DBBQ

    Member

  • Members
  • 214 posts

Posted 11 October 2016 - 10:25 AM

 two-part silicone mold 

 
Thank you for your advice, 
about master silicone mold,is this the number of times it is used?
I heard that only 10 to 20 times.
 
 
CNC, may be a good choice, in Japan, there are similar commercial works can refer to
The product is very delicate, but the price is high.
(This is the rubber band gun. My observation, the rubber band gun In Japan more popular)


 (I use a wanhao duplicator i3, it's probably cheaper


I am now the amount is about 100 +
I evaluated after the 3D Printing may be present for me a better choice,
I have to overcome the machine parts consumption, ultimaker 2 parts are expensive, 
perhaps the next purchase of the machine will not be um2


Wow, this looks awesome!  These are definitely in the queue for the printer.


thank you!
This is specifically designed to 3dprinter use

Edited by 3DBBQ, 11 October 2016 - 10:39 AM.

  • 0

#11 CaptainSlug

CaptainSlug

    Resident Mad Scientist

  • Administrators
  • 4,763 posts

Posted 11 October 2016 - 01:04 PM

Thank you for your advice, 
about master silicone mold,is this the number of times it is used?
I heard that only 10 to 20 times.

The number of times a silicone mold can used typically depends on the detail level you are trying to obtain. The smaller the details and the higher the precision level needed from the mold, the shorter the lifespan the mold will have since those small portions are going to eventually rip from the repeated mold removal process. But assuming you aren't trying to make molded miniatures and the majority of your features don't have a tight dimensional tolerance you should expect the mold to last for 50 pours.


It's also going to depend on the quality of the silicone used. Many resins produce a fair amount of heat when they cure and harden. That heat will reduce the lifespan of cheaper molding silicone. But more expensive mixtures can handle it easily.


Silicone is the lowest investment cost for any casting process. If you wanted to move up to the next level you would be looking at hobbyist injection molding. And the step beyond that would be spin casting. Which requires an oven or vulcanizing press to cure rubber molds, and a spinning table that you can use when pouring resin into your mold. That process allows you to pour multiple sets of parts with no bubbles or voids.


https://en.wikipedia...ki/Spin_casting


  • 0
The little critters of nature, they don't know that they're ugly. That's very funny, a fly marrying a bumble bee. I told you I'd shoot, but you didn't believe me. Why didn't you believe me?

#12 Meaker VI

Meaker VI

    Member

  • Moderators
  • 1,192 posts

Posted 11 October 2016 - 03:51 PM

*
POPULAR

Silicone is the lowest investment cost for any casting process. If you wanted to move up to the next level you would be looking at hobbyist injection molding. And the step beyond that would be spin casting. Which requires an oven or vulcanizing press to cure rubber molds, and a spinning table that you can use when pouring resin into your mold. That process allows you to pour multiple sets of parts with no bubbles or voids.
 
https://en.wikipedia...ki/Spin_casting


I'd be worried any casting method about the complexity of the molds needed. If he's got the demand for it, spin casting is a better choice for part cost per-unit. A 3d printed part might be about the same cost as a complex silicone cast.
 

CNC, may be a good choice, in Japan, there are similar commercial works can refer to
http://kazkin2120.cart.fc2.com/
The product is very delicate, but the price is high.
(This is the rubber band gun. My observation, the rubber band gun In Japan more popular)


Actually, CNC may be an even better choice when I stop to remember it can do much more 3d shapes than just flat-cut parts. Owning one that can do your parts might not be unreasonable, they've come down in price.

I've long been a fan of the rubberband guns this group is turning out, some have really interesting mechanisms!


Edit: Also, the small parts for this are on my printer right now. Looks like ~4 hours for them to cook @ 0.20 mm layer height and 1.6mm shell. The core will be ~11 hours with a trial 0.25mm layer height.

Edit 2: Printed the small parts. It's unclear from the image, but either 1/2" Sch. 40 PVC does not fit in the breech block or I downloaded the wrong file. Looking at 3dBBQ's files in sketchup and having downloaded a file I didn't notice before (breech ring), the single-breech file's output is 0.7299" diameter, the breech-ring file's is 0.8445" diameter, and 1/2" PVC (typical US RSCB output pipe and barrel sheath) is 0.8400" Diameter. I find I need 0.04" of tolerance, so a 0.8800" hole should fit 1/2" PVC well. Looks like the main hole through the core should be fine, but the imput is also 0.8450". That may work, but I'll need to test it with the new breech file.


Otherwise they went great.


Edited by Meaker VI, 11 October 2016 - 10:25 PM.

  • 1

#13 3DBBQ

3DBBQ

    Member

  • Members
  • 214 posts

Posted 12 October 2016 - 07:02 AM

*
POPULAR

Silicone is the lowest investment cost for any casting process. If you wanted to move up to the next level you would be looking at hobbyist injection molding. 

Thank you!
In your memory, more a reference to the case can see it? 
 
I will think about silicon , this is an option!


but I'll need to test it with the new breech file.


2016/10/12 update brrech ring dual airway file!


  • 1

#14 Meaker VI

Meaker VI

    Member

  • Moderators
  • 1,192 posts

Posted 13 October 2016 - 11:08 AM

Printed the core, 1/2" PVC fits fine with current tolerances. It's a bit tight, so if your printer isn't well calibrated it might have trouble, but since this thing needs to hold air it needs to be tight. I'll work on getting picts up sometime.


Ed:

s5CoEIQ.jpg


Of course, right after I took this picture, my trigger valve stopped working and I had to cut it out. Now I'm trying to build a valve from some stuff I have around (oring and ball bought to fit inside 1/2" PVC for the purpose of making a blaster just like this, only all PVC; kind of mad-ghost-ish), but the seal is iffy.


As you can see, the trigger guard broke off and I added a RSCB setup. For me, the trigger guard was way too close, I couldn't fit my finger between the extended trigger and the guard. I also couldn't get the blaster working frequently enough (prior to breaking) that I could test to make sure the breech-block was working. I used hot glue instead of metric orings to seal everything and that seems to be working well in the trigger area and between the RSCB/Body pieces.


Edited by Meaker VI, 17 October 2016 - 06:35 PM.

  • 0

#15 3DBBQ

3DBBQ

    Member

  • Members
  • 214 posts

Posted 17 October 2016 - 11:03 PM

Nice picture!
Trigger guard is a bit close, I will modify it.
Your trigger valve to stopped working,is the valve itself the problem?
 
Expect you to finish it!

  • 0

#16 Draconis

Draconis

    I am not Lord Draconical

  • Members
  • 2,712 posts

Posted 18 October 2016 - 01:24 AM

Do you guys have a suggestion for infill percentage requires to have a sturdy enough main block? I accidentally set mine to 100% on this first one, and it is over 350g.
  • 0
[15:51] <+Noodle> titties
[15:51] <+Rhadamanthys> titties
[15:51] <+jakejagan> titties
[15:51] <+Lucian> boobs
[15:51] <+Gears> titties
[15:51] <@Draconis> Titties.
[15:52] <+Noodle> why is this so hard?

#17 Meaker VI

Meaker VI

    Member

  • Moderators
  • 1,192 posts

Posted 18 October 2016 - 01:32 PM

Do you guys have a suggestion for infill percentage requires to have a sturdy enough main block? I accidentally set mine to 100% on this first one, and it is over 350g.

 
Yikes, I used 20% with .25 layers. It's a little creaky (you can see a split by the grip), but seems ok. It isn't super structural like the catches and stuff in the PSCR that I did do 100%.
 
Oh, and I made the RSCB front end myself. It wasn't hard to model, but seeing as JSPB is being kind enough to share the whole file and he's selling an RSCB front end on his site, I won't post mine unless he's ok with it.
 

Your trigger valve to stopped working,is the valve itself the problem?

Yes, the valve itself stopped up. I'll maybe try washing it now that it's a fresh day and I've thought about the problem, and try rebuilding my custom valve with glue and maybe a spring.


Where do you get valves? Online or locally? Yours look like they'd unscrew so you can examine them, which would be better than mine which are welded-together.
 

Trigger guard is a bit close, I will modify it.


While you're looking at it, the 3/4" handle is a *tad* tight and fragile. Maybe beef up the sides (especially toward the opening) and increase the opening 0.01" or so. Also, there are a *ton* of holes in the blaster, presumably for mounting stuff to the pic (NERF?) rails. If you sealed those up - maybe put a tight-fitting cylinder in there that would punch out if you drive a screw into it - it'd be easier to construct.


The trigger is also pretty fickle for me. It's grabbing the printed lines in the body and not wanting to pull or reset very well. A lever-trigger would probably work better.

Expect you to finish it!

Hopefully it'll work for me today. If not, it may remain in this state indefinitely :unsure:
 
Ed: Right, so tried washing the valve, pushing it from either direction, pumping air throught it; nothing. The valve is totally dead, but I'll take it back to see if I can swap it out for a not-dead one.
 
My homemade valve kind-of works, kind-of doesn't. It is a *much* easier trigger pull than the bought valve was, but it leaks air no matter what I do to it. Because it leaks some air, I've been hesitant to weld it in place as I should, so I'm getting residual leaks all around it. Also because it leaks, I've been hesitant to firmly attach the pump, which keeps popping off. So... Benched, for now. I might try again tomorrow if I can return the valve - those things are super expensive comparatively.
 
Which is one of the biggest reasons I had the parts to try making my own - a valve at Lowes, where I got mine, was ~$6. The oring and poly ball were like $0.10 each (or rather, a few bucks for 100), and they fit in a section of 1/2" PVC with 1/2" CPVC nested at either end to retain everything. I added a spring and a pin to hold it, but I'm not 100% convinced they're necessary (the ball should be light enough to get blown closed just by pumping). The whole thing costs like $0.75, plus minimal time to make it.


Edited by Meaker VI, 18 October 2016 - 04:10 PM.

  • 0

#18 3DBBQ

3DBBQ

    Member

  • Members
  • 214 posts

Posted 28 October 2016 - 08:04 PM

My set is 20% 0.25 layer, I saw the picture split by the grip, 
on behalf of I need to add a little meat,


 I made the RSCB front end myself.

 
You can share your 3d model! This is JSPB 3D intent.


 Where do you get valves? Online or locally? 


I am using:
This company has produced SCH40 CHECK VALVE overseas,
but the market seems to be hard to find,
I was e-mail them, asking whether the United States where to buy.


 presumably for mounting stuff to the pic (NERF?) rails.


The use of a rail with holes is:
when use a smaller size tube, strengthen the fixed barrel


 It is a *much* easier trigger pull than the bought valve was, but it leaks air no matter what I do to it. 

What does it look like?
When I designed JSPB Pro I experienced, you have to find a very round without wrinkles of the ball.
and Seal should be soft enough, such as white silicone~
Or different structural design~

Edited by 3DBBQ, 28 October 2016 - 08:06 PM.

  • 0

#19 Meaker VI

Meaker VI

    Member

  • Moderators
  • 1,192 posts

Posted 29 October 2016 - 03:01 PM

You can share your 3d model! This is JSPB 3D intent.


Well then, I've added it to this post!

Attached File  RSCB front.stl   794.57KB   289 downloads

Notes on the file: It's a bit looser on the 1/2" PEX I'm using as an airway than the JSPB core is, but I glued it on anyway so that's a bit of a mute point. You need to either be careful where you park the PVC inside it to make sure you don't block the airway or cut/drill the PVC you're using as the RSCB end. I'm not sure what size those screw holes are, I think I meant them to be #8 but they might work better with #6.
 

I am using:
Http://chiutong.com/index.php?webtype=0
This company has produced SCH40 CHECK VALVE overseas,
but the market seems to be hard to find,
I was e-mail them, asking whether the United States where to buy.


I've found a *much better* valve at a different store (Lowe's) and am using that. I've got different problems to troubleshoot now, but I think I'll get them figured out eventually.


What does it look like?
When I designed JSPB Pro I experienced, you have to find a very round without wrinkles of the ball.
and Seal should be soft enough, such as white silicone~
Or different structural design~


It's a poly ball (I *think* this one 9587K21) inside a ~1.5" length of 1/2" PVC with an oring (don't remember the size) on one end for a seal and 1/2" CPVC jammed into either end to stop the ball and join the valve to 1/2" PVC parts. IF it worked well and was easy to repeat I'd recommend using it, because it's like 1/100th the cost of buying a valve, but it doesn't so I don't.


Edited by Meaker VI, 29 October 2016 - 03:02 PM.

  • 0

#20 ENP10

ENP10

    Member

  • Members
  • 49 posts

Posted 29 October 2016 - 03:36 PM


I wish you didn't have to have a 3d printer for pretty much all the homemades I would like to make. :/
  • 0

I Found some epoxy putty hidden in the basement and freaked out.


#21 Silly

Silly

    Member

  • Members
  • 245 posts

Posted 31 October 2016 - 08:32 AM

I wish you didn't have to have a 3d printer for pretty much all the homemades I would like to make. :/

well you probably dont NEED one, its just going to be alot easier. I can make alot of things that are usually 3d printed out of wood with enough time. Like i made a wooden tac rail because someone challenged me to. It isnt as hard as you may think.
  • 0

Co-Owner of the History of Nerf Modding research project, moderator of r/Nerf, owner of BlasterWiki, maker of 3d printed blasters (GitHub/Thingi) and Nerfy art.


#22 Meaker VI

Meaker VI

    Member

  • Moderators
  • 1,192 posts

Posted 01 November 2016 - 08:31 PM

I wish you didn't have to have a 3d printer for pretty much all the homemades I would like to make. :/


well you probably dont NEED one, its just going to be alot easier. I can make alot of things that are usually 3d printed out of wood with enough time. Like i made a wooden tac rail because someone challenged me to. It isnt as hard as you may think.


You don't. It just makes some things somewhat 'easier' - in that I don't actually need to fabricate parts and can instead do something else while my machine does it for me*


*Provided the machine is working, set up properly, and files exist for the parts I want to make.


  • 0

#23 ENP10

ENP10

    Member

  • Members
  • 49 posts

Posted 01 November 2016 - 08:59 PM

You don't. It just makes some things somewhat 'easier' - in that I don't actually need to fabricate parts and can instead do something else while my machine does it for me*
 
*Provided the machine is working, set up properly, and files exist for the parts I want to make.


Thank you for that link :)

Does anyone know where you can a pump like this one in the USA?
  • 0

I Found some epoxy putty hidden in the basement and freaked out.


#24 Meaker VI

Meaker VI

    Member

  • Moderators
  • 1,192 posts

Posted 02 November 2016 - 04:03 PM

Thank you for that link :)

Does anyone know where you can a pump like this one in the USA?


It's called a ball pump. Basically any store sells something like it, I found mine at Big-5 but I've since noticed them everywhere (Saw one at Target) and they're all probably basically the same. They're more or less expensive depending where you go and what (totally unnecessary for our use) extras they have, expect ~$8 unless you get one online though.


  • 0

#25 ENP10

ENP10

    Member

  • Members
  • 49 posts

Posted 02 November 2016 - 09:02 PM

It's called a ball pump. Basically any store sells something like it, I found mine at Big-5 but I've since noticed them everywhere (Saw one at Target) and they're all probably basically the same. They're more or less expensive depending where you go and what (totally unnecessary for our use) extras they have, expect ~$8 unless you get one online though.


Thank you! :)
  • 0

I Found some epoxy putty hidden in the basement and freaked out.


Also tagged with one or more of these keywords: 3D Print, JSPB, RSCB

1 user(s) are reading this topic

0 members, 1 guests, 0 anonymous users