Jump to content


Photo

Extension Spring Lettuce & Tomato

eslt extension spring homemade Ryan Mcnumbers

20 replies to this topic

#1 CaptainSlug

CaptainSlug

    Resident Mad Scientist

  • Administrators
  • 4,763 posts

Posted 13 July 2016 - 08:00 PM

*
POPULAR

So I don't have a 3D printer. I don't plan to ever get one because unlike you shlubs I have access to a ton of machine tools at work. So Nyah Nyah.

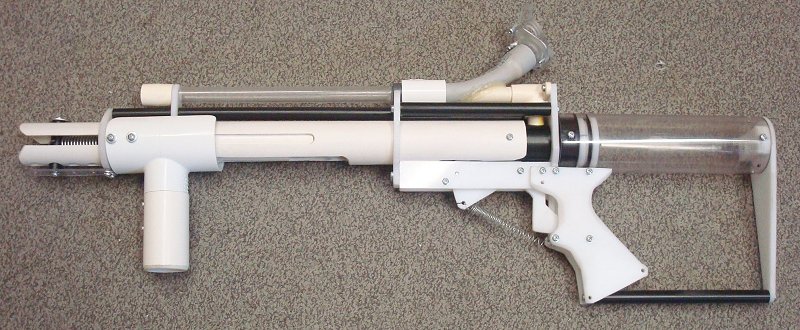
eslt_000.jpg

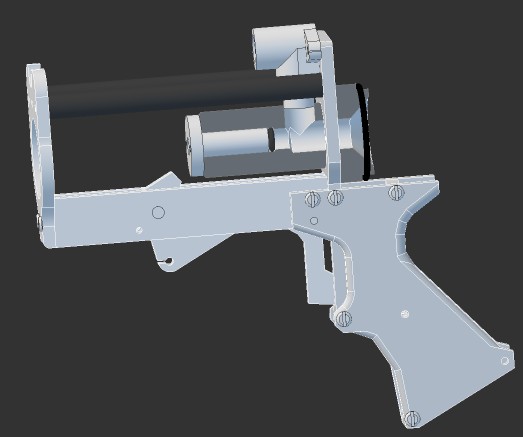
Anywho, the ESLT is an interesting doohicky. I've been putzing around with one in CAD for a few weeks and I made a ton of changes to the original design. So here are the keynote changes.


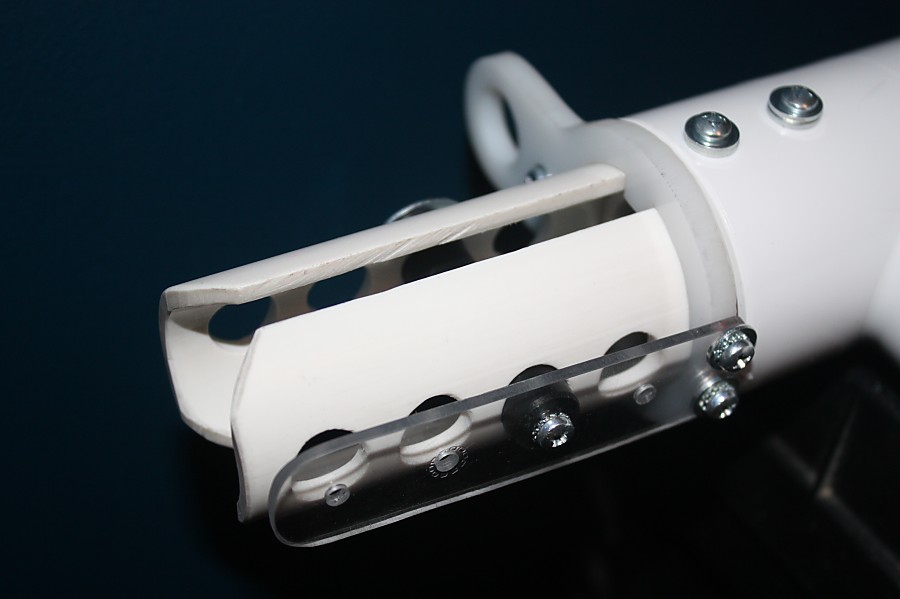
Number 1: PumpGrip slot is cut all the way out the front of the "Front Tube". The slot is kept stable by two keys added to the BarrelSpacer piece. This piece also includes a "tongue" that the Spring Post attaches to. This single feature makes disassembly much easier because the PumpGrip never has to be taken apart. You just undo two screws, slide the BarrelSpacer and Spring Post out then the PumpGrip is free to slide out whole. The only remaining task that's still a pain in the dick is getting the Spring Post back through the hook in the extension spring while the extension spring is under load. I may have to make a specialty tool for that purpose.


Number 2: Multiple Extension Spring Pre-Load positions. Pretty simple and provides the option to tweak performance a little.
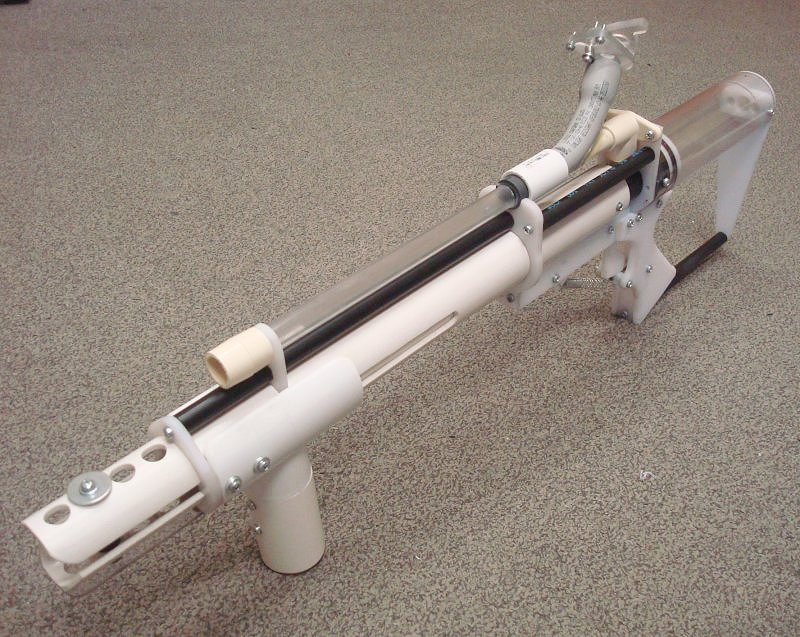
eslt_001.jpg

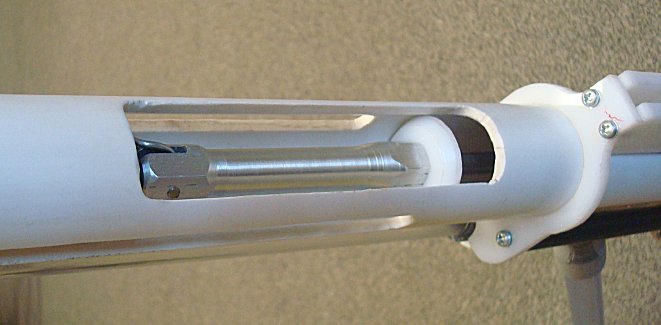
Number 3: No Eye bolt. The front end of the plunger rod is using a 4" length 5/8" Hex aluminum spacer. The spring is held by a rod clevis cut into the end of the spacer with a screw acting as the cross-pin. Rod clevis connections are common on Air Cylinders.


Number 4: Large opening in the bottom of the Front Tube to allow for expedient servicing of the plunger rod and to apply more lubricant if needed.

eslt_002.jpg

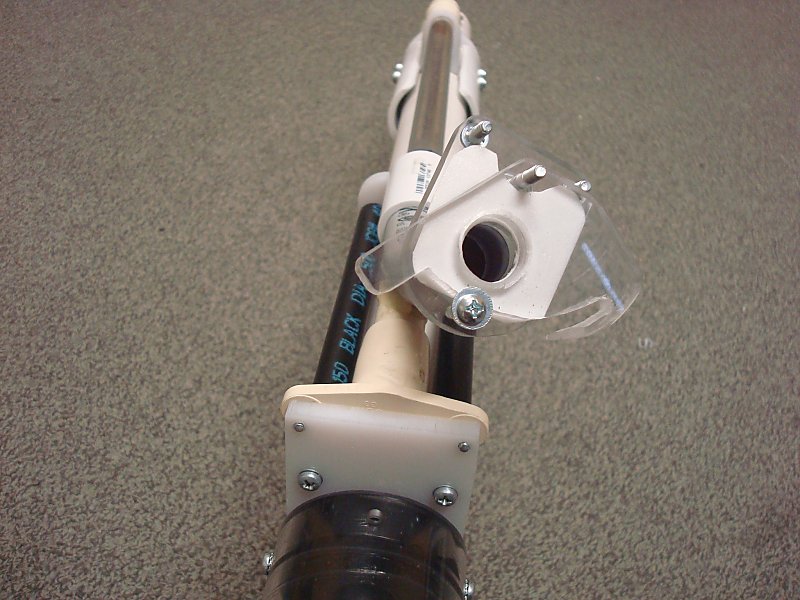
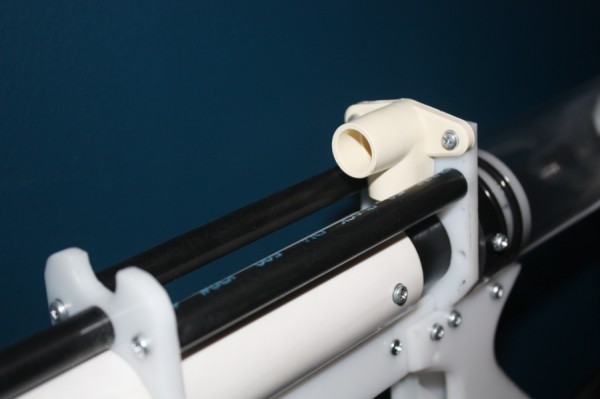
Number 5: CTS 1/2 CPVC pipe Drop-Ear Elbow. This ensures that the elbow holding the barrel stays in alignment with the rest of the blaster since it's mounted directly to the frame itself and ensures that the elbow doesn't back out either. If you need to remove the elbow you just back out the screws and pop the elbow off. Easy-Peasy. These are also offered in threaded versions with a soft gasket.
eslt_003.jpg

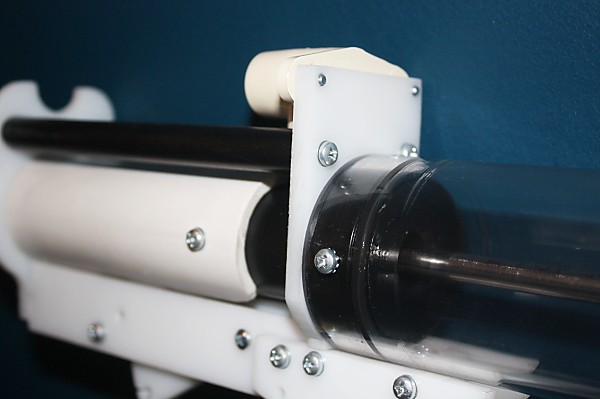
Number 6: No specialty threaded rod for the plunger. I'm using an aluminum 1/4-20 threaded rod, but I've encased it in a thin wall 5/16" OD stainless steel cover. The joint between this cover and the threaded rod is sealed at the front of the plunger head using hot glue.


Number 7: 2-inch ID Plunger Tube!
 

eslt_004.jpg

Number 8: Just taking a second to brag about my solid black delrin ReDirectPiece.


Which has a single retained O-ring for the plunger rod.
eslt_005.jpg


Still working on making a Hopper for this thing.


  • 2
The little critters of nature, they don't know that they're ugly. That's very funny, a fly marrying a bumble bee. I told you I'd shoot, but you didn't believe me. Why didn't you believe me?

#2 The2ndBluesBro

The2ndBluesBro

    Member

  • Members
  • 576 posts

Posted 13 July 2016 - 08:07 PM

So, this is an ESLT that actually seals correctly?
  • -1

Nerf, Gaming, knives: https://www.youtube....FjcObRZTl2KReDQ


#3 CaptainSlug

CaptainSlug

    Resident Mad Scientist

  • Administrators
  • 4,763 posts

Posted 13 July 2016 - 08:14 PM

Basically yes, with lots of other tweaks.


It seals just fine because the surfaces for the O-Ring to seal against are a drilled hole and a closely toleranced and smooooooth piece of stainless steel tubing. And the inside of the plunger tube is also sealed against the Delrin with a plunger O-Ring.


Any ESLT will not work well if the Plunger tube and Front Tube fall out of concentricity or alignment so I made my ReDirectPiece very long to keep the Front Tube squared up.


  • 0
The little critters of nature, they don't know that they're ugly. That's very funny, a fly marrying a bumble bee. I told you I'd shoot, but you didn't believe me. Why didn't you believe me?

#4 Snoop Doggy doge

Snoop Doggy doge

    Fig you, Van

  • Members
  • 501 posts

Posted 13 July 2016 - 08:20 PM

That looks really cool, but why not machine out a PCSR? I like the sear catch at the rear, and I think it'd be cool if there was a non printed one.

Anyway, front piece a multiple looks dope, is there any performance to report? I like stuff that's not printed and this seems really cool. However I don't really see the need for the quick service lube slot, I feel like it's easier to just get dirt and stuff in there. Also I really like that you made it a 2 in PT! 


  • 0

#5 CaptainSlug

CaptainSlug

    Resident Mad Scientist

  • Administrators
  • 4,763 posts

Posted 13 July 2016 - 08:27 PM

PCSR might come next. You can never have just one blaster right?


The service slot may or may not be important since it only take one or two extra disassembly steps. At minimum I like that I can inspect the front half of the plunger rod whenever.


Performance report will come tomorrow after I've finished making a hopper for this. The only finished hoppers I have are 1/2 SCH80 and therefore are not 1/2 CTS CPVC compatible.


  • 0
The little critters of nature, they don't know that they're ugly. That's very funny, a fly marrying a bumble bee. I told you I'd shoot, but you didn't believe me. Why didn't you believe me?

#6 Meaker VI

Meaker VI

    Member

  • Moderators
  • 1,192 posts

Posted 13 July 2016 - 10:35 PM

PCSR might come next. You can never have just one blaster right?


The service slot may or may not be important since it only take one or two extra disassembly steps. At minimum I like that I can inspect the front half of the plunger rod whenever.


Performance report will come tomorrow after I've finished making a hopper for this. The only finished hoppers I have are 1/2 SCH80 and therefore are not 1/2 CTS CPVC compatible.


PSCR should be easy now that you've done this. You planning on releasing templates?


  • 0

#7 TheNerfZilla

TheNerfZilla

    Member

  • Members
  • 99 posts

Posted 13 July 2016 - 10:54 PM

This is really, really cool. I'm glad to see you're cranking out Homemades with your old frequency. I'm super jealous of your CAD skills, but for now I'll just use your templates, since they're so great.
  • 0
I have a blog now!
How to Get Started Nerfing Pt. 1
Eat spaghetti to forgetti your regretti 

#8 Zorns Lemma

Zorns Lemma

    Sir Scrt

  • Moderators
  • 1,277 posts

Posted 14 July 2016 - 04:22 AM

I modded my ESLT to use rod seals, but my redirect piece was 3D printed so it was much easier to have the structure needed to support such a seal.


http://www.mcmaster....-seals/=139xtz1


Moving up to a 5/16" sheath would allow using one of the much higher pressure rated seals, so maybe that will improve sealing even more (but seems like most of the power loss for mine isn't at that area now anyways)


  • 0
"In short, the same knowledge that underlies the ability to produce correct judgement is also the knowledge that underlies the ability to recognize correct judgement. To lack the former is to be deficient in the latter."
Kruger and Dunning (1999)

#9 CaptainSlug

CaptainSlug

    Resident Mad Scientist

  • Administrators
  • 4,763 posts

Posted 14 July 2016 - 11:30 AM

Hopper is being really fussy, so I did a range test with an 11-inch Polyester barrel and red K darts.


Ranges at Spring post setting 2: 90-100 feet max. (About the same as a 2-11)

Ranges at Spring post setting 4: 100-120 feet max (10-20 feet short of a Plusbow Rev.3)


Priming this thing at setting 4 is frankly just as difficult as priming a Pump-Action Plusbow. I may go check the full spring load on a scale this afternoon. I also need to do a wider sample size and perhaps plot the distribution of ranges for each setting. It's pretty nifty to be able to tone this thing up or down in performance as needed.


It also appears that I don't need a specialty tool to change the spring setting. A pair of vice-grip pliers set really tight can be used to pull the spring to whatever setting so the Spring Post can be moved.


You planning on releasing templates?

Yes, as well as technical drawings and STEP files. Though maybe not a full write-up as I don't intend to make another one.


I modded my ESLT to use rod seals, but my redirect piece was 3D printed so it was much easier to have the structure needed to support such a seal.

I may simply switch to a lower durometer O-ring.


In other news: I sliced the tip of my left pointer finger while working on this gun today and  anointed it with blood. Typing this out was awkward.


  • 0
The little critters of nature, they don't know that they're ugly. That's very funny, a fly marrying a bumble bee. I told you I'd shoot, but you didn't believe me. Why didn't you believe me?

#10 Meaker VI

Meaker VI

    Member

  • Moderators
  • 1,192 posts

Posted 14 July 2016 - 02:48 PM

Yes, as well as technical drawings and STEP files. Though maybe not a full write-up as I don't intend to make another one.

 
Shoot, those are fine as long as it's a pretty comprehensive model and/or you include a parts list or cut list, that'd be enough I think. Can you export to a more readily available format as well as STEP (Sketchup, .obj, .3ds, .dwg)? I've had a hard time getting that open with my design tools, though maybe Fusion can do it. I *really* need to find time to learn that...
 

In other news: I sliced the tip of my left pointer finger while working on this gun today and  anointed it with blood. Typing this out was awkward.


I sliced my left pointer finger working on a retaliator the other week. It is taking *forever* to fully heal up.
  • 0

#11 CaptainSlug

CaptainSlug

    Resident Mad Scientist

  • Administrators
  • 4,763 posts

Posted 14 July 2016 - 03:20 PM

Can you export to a more readily available format as well as STEP (Sketchup, .obj, .3ds, .dwg)?

I can export individual parts in stl, sat, obj, dwg, dxf, or sldprt.


Assemblies I can only export in STEP or sldasm.


All the McMaster sourced parts have part numbers as file names except the O-rings where I'm just using the dash number. I will include a part list in xls format though.


I've kept all of the machining templates I've used to machine mine, including templates you can wrap around tubes or turned parts to line up all the holes and slots. The only one of those that requires a large format print is the one for the Front Tube.


And as for the cut on your finger, let it dry out. Band aids are only for keeping dirt out of the wound. If you leave Band aids on all the time they slow the scabbing process and therefore they take longer to heal.


  • 0
The little critters of nature, they don't know that they're ugly. That's very funny, a fly marrying a bumble bee. I told you I'd shoot, but you didn't believe me. Why didn't you believe me?

#12 Meaker VI

Meaker VI

    Member

  • Moderators
  • 1,192 posts

Posted 14 July 2016 - 09:01 PM

I can export individual parts in stl, sat, obj, dwg, dxf, or sldprt.


stl and dwg are probably the most readily usable.
 

I've kept all of the machining templates I've used to machine mine, including templates you can wrap around tubes or turned parts to line up all the holes and slots. The only one of those that requires a large format print is the one for the Front Tube.

 
No biggie. You can always poster large sheets, but engineering prints at Staples/etc. aren't that bad.

And as for the cut on your finger, let it dry out. Band aids are only for keeping dirt out of the wound. If you leave Band aids on all the time they slow the scabbing process and therefore they take longer to heal.


I did! I had a bandaid on it with some triple-antibiotic for a few hours, and it's been exposed since. Like, 2 weeks. It's closed up, it's just taken a long time to do it.
  • 0

#13 The2ndBluesBro

The2ndBluesBro

    Member

  • Members
  • 576 posts

Posted 14 July 2016 - 10:54 PM

Not that this is useful in the slightest, but this looks a lot cooler than the ESLT. It sort of looks like something boltsniper would make in that it seems like a fusion of homemades and real steel. 


  • 0

Nerf, Gaming, knives: https://www.youtube....FjcObRZTl2KReDQ


#14 CaptainSlug

CaptainSlug

    Resident Mad Scientist

  • Administrators
  • 4,763 posts

Posted 15 July 2016 - 09:41 AM

Here's a better photo of the rod clevis.

eslt_006.jpg

eslt_007.jpg

eslt_008.jpg

eslt_009.jpg

I'll post about the Wye in the other sub-forum. It's letting darts feed too freely and I'm getting double and triple feeds with it.


  • 0
The little critters of nature, they don't know that they're ugly. That's very funny, a fly marrying a bumble bee. I told you I'd shoot, but you didn't believe me. Why didn't you believe me?

#15 Meaker VI

Meaker VI

    Member

  • Moderators
  • 1,192 posts

Posted 15 July 2016 - 10:03 AM


Here's a better photo of the rod clevis.


I'll post about the Wye in the other sub-forum. It's letting darts feed too freely and I'm getting double and triple feeds with it.

Looking good.


Can that Y be reliably used as a burst-fire/shotgun setup?


How do you make your slots? I've been trying a router bit, but the fluted one I've got is choppy and terrifying.


  • 0

#16 CaptainSlug

CaptainSlug

    Resident Mad Scientist

  • Administrators
  • 4,763 posts

Posted 15 July 2016 - 10:13 AM

The Wye is consistently loading two or three darts, but they're not consistently firing end-to-end so usually the first one shoots 60 feet, then the second dart pops out at 30 feet behind it.


I used a Bridgeport Knee Mill with a motorized X-axis to make my slots (I'm spoiled). I have to pause every 4 inches then reinforce the slot I just cut using a 3/8" drill bit in order to keep the vice pressure from pinching the slot inward.


In the past I would just drill holes for the ends of the slots then use a jigsaw. I used to have an attachment to put on the shoe of the jigsaw that is horseshoe shaped so that you can keep the jigsaw running straight along the pipe as you cut it. This prevents the jigsaw from rocking on the pipe as you cut.


Routers do not cooperate with plastics. You might have better luck putting an endmill in your router, or a burr bit. But make sure you use either of those at lower speeds if possible and with lots of air to keep the plastic cool.


  • 0
The little critters of nature, they don't know that they're ugly. That's very funny, a fly marrying a bumble bee. I told you I'd shoot, but you didn't believe me. Why didn't you believe me?

#17 Meaker VI

Meaker VI

    Member

  • Moderators
  • 1,192 posts

Posted 15 July 2016 - 11:42 AM

In the past I would just drill holes for the ends of the slots then use a jigsaw. I used to have an attachment to put on the shoe of the jigsaw that is horseshoe shaped so that you can keep the jigsaw running straight along the pipe as you cut it. This prevents the jigsaw from rocking on the pipe as you cut.


Now there's an interesting idea. I can try to rig one of those up.
 

Routers do not cooperate with plastics. You might have better luck putting an endmill in your router, or a burr bit. But make sure you use either of those at lower speeds if possible and with lots of air to keep the plastic cool.


I'm actually using a drill to hold the router bit to keep the speed low. I'm very wary of routers, they terrify me if not kept exactly where they belong.

So, an endmill? Spiral cut presumably? Seems like that would work better, do you have any specific recommendations for one that'd fit in a 1/2" chuck size?
  • 0

#18 CaptainSlug

CaptainSlug

    Resident Mad Scientist

  • Administrators
  • 4,763 posts

Posted 15 July 2016 - 11:46 AM

*
POPULAR

Anything with a 1/2" shank will fit a 1/2" chuck. You can get end mills down to 1/8" with a 1/2" shank.


And any kind will do. Plastics really only require that the end mill is sharp, and spiral is generally better than straight. So you can buy a cheap set and they will work fine so long as you only use them to cut plastics. The milling isn't the hard part. The hard part is holding your part securely in the vice while you're machining it since it gives and will want to climb out of the vice if you're not careful. If you're cutting plastic tubes is sometimes best to just load the inside with a wood dowel or expanding rubber mandrel.


Just think through what you're trying to do before you do it and be ready to stop the feed at a moments notice should something go funky.


  • 1
The little critters of nature, they don't know that they're ugly. That's very funny, a fly marrying a bumble bee. I told you I'd shoot, but you didn't believe me. Why didn't you believe me?

#19 Snoop Doggy doge

Snoop Doggy doge

    Fig you, Van

  • Members
  • 501 posts

Posted 15 July 2016 - 01:58 PM

If you do a PCSR, I'd be tempted to ask how much, and if I can stick a K14 in there. ;) 

K14s IMO make springers prevelant against 4Bs

Would you look into puttin a bungee into your ESLT? I forgot if that's better or worse performance, but they can vary well I believe. I am currently running one in my ESLT thanks to Aeromech. Holy fuck big ass port. That begs me to ask, what's the weight of this? does the open slot negate the weight added on by the delrin guide rods? I'll put my comments about the wye in the wye thread I guess,

Also, them cut finger feels. I got a cut right on my trigger finger (left side of right index finger) and it's being a bitch to pull triggers now. Maybe I won't shitspam darts now, 


  • 0

#20 CaptainSlug

CaptainSlug

    Resident Mad Scientist

  • Administrators
  • 4,763 posts

Posted 15 July 2016 - 02:28 PM

If you do a PCSR

Would you look into puttin a bungee into your ESLT?


That begs me to ask, what's the weight of this?

Not sure if I will. I'm very happy with the pump-action grip on the Plusbow Rev.3 as-is. I have a completely different idea on how to reduce the overall length of a plusbow and it's what I will be working on next.


I don't have any plans for trying a bungee. The goal here was to try and reach the maximum draw length of this extension spring.


3 pounds 9 ounces with the hopper and barrel installed.


  • 0
The little critters of nature, they don't know that they're ugly. That's very funny, a fly marrying a bumble bee. I told you I'd shoot, but you didn't believe me. Why didn't you believe me?

#21 CaptainSlug

CaptainSlug

    Resident Mad Scientist

  • Administrators
  • 4,763 posts

Posted 18 July 2016 - 11:56 AM

Here are the CAD files in Solidworks format.

http://captainslug.c...eslt_sldasm.zip(1.7 mb)


Here are the same CAD files in STEP format, as well as DXFs for most of the parts and some templates that you can print out and tape to the outside of the round parts.

http://captainslug.c...lt_step_dxf.zip(375 kb)


If anyone wants specific parts in STL format let me know. My CAD software makes shitty ones and I typically have to export them from Mastercam instead.


Both files include a .xls partslist that may or may not be 100% complete. The one I made involved some scrap materials and extensions springs that were laying around at work. The "Core" piece that I made out of one solid piece of delrin is the only really challenging piece to make. You can try to find an alternate method to make that piece whether that is 3D printing or making it in two halves or multiple pieces.


  • 0
The little critters of nature, they don't know that they're ugly. That's very funny, a fly marrying a bumble bee. I told you I'd shoot, but you didn't believe me. Why didn't you believe me?


Also tagged with one or more of these keywords: eslt, extension, spring, homemade, Ryan Mcnumbers

0 user(s) are reading this topic

0 members, 0 guests, 0 anonymous users