Good job, that is one nice Nite finder. I dont think any gun is ever complete without a nice paintjob. The mag light does look a little loose though. Techno Dann, that override switch sounds like a great idea. The ability to conceal your position or use a light to blind/spot your opponent would be a great advantage. Putting the switch in would be a simple matter of cutting the wire and soldering it on, only taking a few minutes. I really need to get a nite finder now.

Nite Finder Ppk W/maglite
Started by Hunter, Jun 25 2004 08:07 PM
35 replies to this topic
#26

Formerly Sane
-

- Members
- 210 posts
Member
Posted 29 June 2004 - 10:33 PM
NERF: www.CYCLONENERF.netfirms.com
FLASH: www.thinkhappy.netfirms.com
BAND: www.skwalrock.com
FLASH: www.thinkhappy.netfirms.com
BAND: www.skwalrock.com


#27
not nerf monkey
-

- Members
- 13 posts
Member
Posted 05 August 2004 - 04:24 PM
hunter can u please explain exactly what u did to the gun because i tried to do that and it doest shoot that far becuse your night finder looks really good job
#28
LiKnSmAkScOmIn
-

- Members
- 292 posts
Member
Posted 05 August 2004 - 04:46 PM
You could have just PM'ed him instead of ressureting this topic.
To answer your question, the mod he did to get it to shoot that far is in the Mods section, but he used brass instead of PETG.
To answer your question, the mod he did to get it to shoot that far is in the Mods section, but he used brass instead of PETG.
Morons With Guns own you.
#29
Hunter
-
- Members
- 312 posts
Member
Posted 06 August 2004 - 05:03 PM
Approx. 70% Complete
Alright, may as well update you all since it's been so long.
I will be gone from the 7th to the 20th and I wanted to show you my progress, although it's taken a long time.
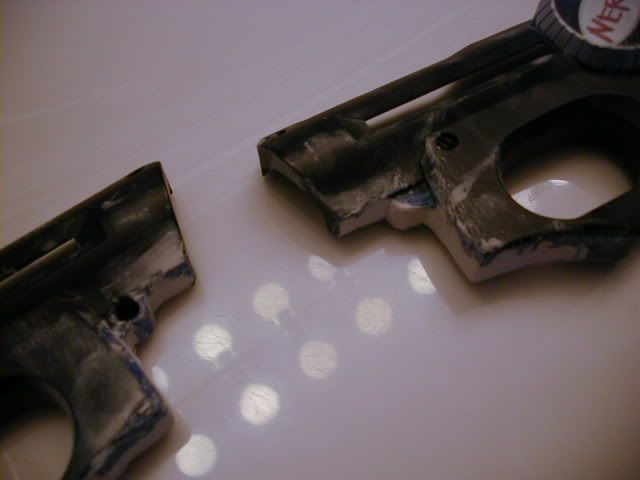
My first attempt at Bondo-ing anything proved to be very difficult. Bondo is meant for filling holes, not adding corners like I am doing. This meant it took many different applications, and I am still not finished with it. Hopefully I will be able to make a very clean seam, but for now it's messy. It also really messes up your paintjob. Don't paint before you Bondo. I will (obviously) have to redo my paintjob. I should also tell you this. I am currently Bondo-ing the whole hole closed. This will allow me to get an exact fit for the maglite and the switch by sanding down instead of attempting to leave spaces open, ect.


I borrowed Techno Dan's idea for a killswitch (when I don't want the maglite to go on from trigger pressure) and picked one up at a local Radio Shack. 2 for $6 Canadian. I simply cut the blue wire and saudered it (first time saudering).

I will continue to work on it post 20th. I hope to have it done for VANS3. If you have any questions/comments, post them and I'll get back to you at a later date.
Hunter
Alright, may as well update you all since it's been so long.
I will be gone from the 7th to the 20th and I wanted to show you my progress, although it's taken a long time.
My first attempt at Bondo-ing anything proved to be very difficult. Bondo is meant for filling holes, not adding corners like I am doing. This meant it took many different applications, and I am still not finished with it. Hopefully I will be able to make a very clean seam, but for now it's messy. It also really messes up your paintjob. Don't paint before you Bondo. I will (obviously) have to redo my paintjob. I should also tell you this. I am currently Bondo-ing the whole hole closed. This will allow me to get an exact fit for the maglite and the switch by sanding down instead of attempting to leave spaces open, ect.
I borrowed Techno Dan's idea for a killswitch (when I don't want the maglite to go on from trigger pressure) and picked one up at a local Radio Shack. 2 for $6 Canadian. I simply cut the blue wire and saudered it (first time saudering).
I will continue to work on it post 20th. I hope to have it done for VANS3. If you have any questions/comments, post them and I'll get back to you at a later date.
Hunter
Edited by Hunter, 06 August 2004 - 05:09 PM.
Hunter
Organizer Vancouver Area Nerf Series
Organizer Vancouver Area Nerf Series
#30
jpshyboi9
-

- Banned
- 126 posts
Member
Posted 07 August 2004 - 05:05 PM
I think that it looked like a glock in the first picture.
Edit: I found an easy way to make a "completed cercuit when pressed together."
You will need:
hot glue and gun of course
a small metal plate
a paperclip
Hotglue the paper clip and plate somewhere in the gun so that when you pull the trigger some, it completes a curcuit. Important: try to make the 2 of these items fairly close to each other for the trigger may be gentle (you may want to put a little cardbourd or layers of tin fowl to hold the paperclip and plate apart).
After that, take a wire and connect one peace of it with the clip and the other on the plate. Then with the same wire, connect it to the light with the wire from the clip or plate. Lastly, take some more wire and connect it to a battery and the light.
Connect the wire on the plate of metal with another battery and there you go.
Another way to do it is to use the same battery box and wires in the nightfinder. Get a little light and place it in the nightfinder. Then, connect the wires from the batteries to the light.
Tadaaaaaaa. 2 EASY...VERY EASY ways to put a light in the nightfinder or other nerf gun.
Edited by jpshyboi9, 07 August 2004 - 05:19 PM.
#31
Techno-Dann
-

- Members
- 120 posts
Member
Posted 10 August 2004 - 07:38 PM
Erm... That's exactly what the NF already has, jpshyboi9. The switches that Hunter and I added are set up so we can have the light not come on when we pull the trigger.
Do not mess with CXWQ, for he has Admin powers and will bann your flaming little a**.
Techno-Dann of the Seattle Tactical Nerf Team
Techno-Dann of the Seattle Tactical Nerf Team
#32
Hunter
-
- Members
- 312 posts
Member
Posted 18 August 2004 - 05:30 PM
Bingo, Techno.
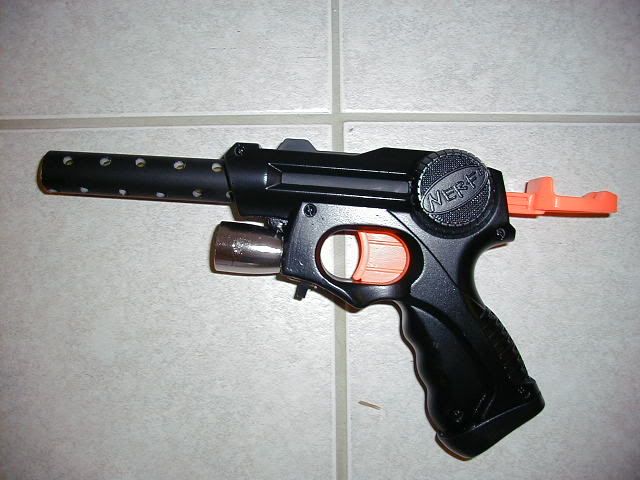
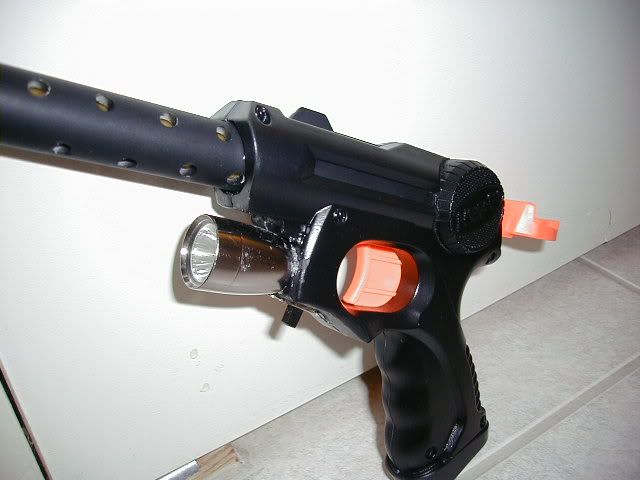
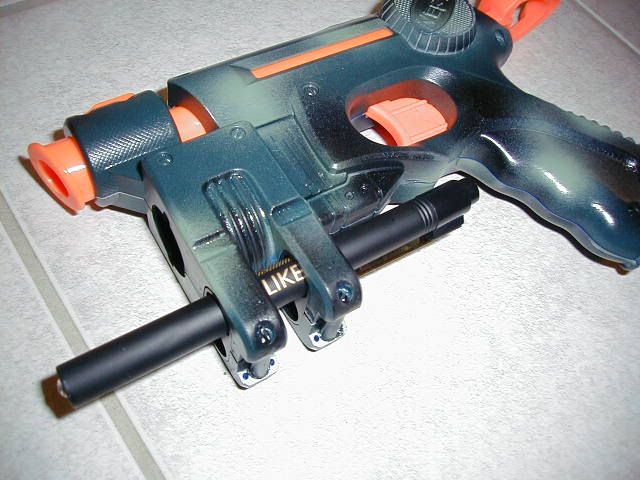
Here we go. All finished. I am experiencing some wiring difficulties, sometime the light doesn't come on. I am currently in the process of opening it up and double checking all connections. Other than that, here it is. That is a kill-switch I saudered onto the circut, and you notice no big holes, all of which were filled with Bondo. I do not recommend Bondo for projects like this, it is meant for filling holes, not creating corners and shapes. Extremely difficult to work with. Other than that, I lubed the plunger tube, and I'm now getting ranges of approx. 50 or more feet. I'll have exact messurements up soon. I had to repaint it, the Bondo killed my paintjob. I painted over the knob due to lack of time/patience/caring, I just wanted to finish this.

Over all, I don't think this mod was that great. I increased range alot, but the wiring and the Bondo was a nightmare... at best. It's nice... my favourite NF mod, but it takes alot of time and patience. Just look at my first post way back when. I've worked on it... maybe 3 hours a week average... Some weeks not even touching it, some days going 5 hours straight. Gah, finally done.
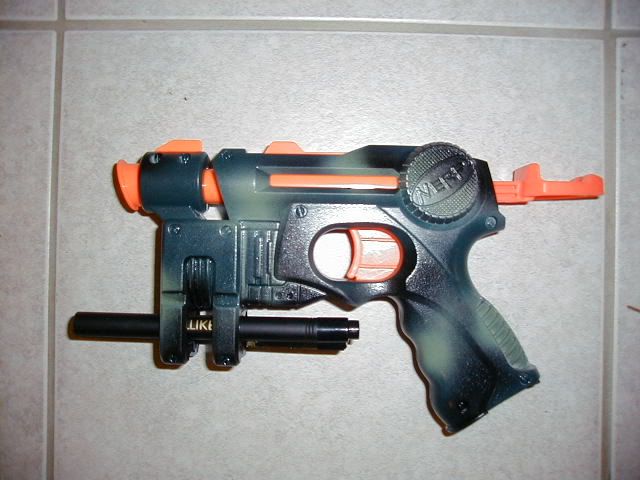
Here is a preview of another of my NFs. It is spray painted with Hunter Green, Spring Green, and Flat Black. I still need to paint the plunger tube and barrel, it's ugly. If you notice, that little "pen" is actually a flashlight. It has a button in the back of it. Once I have it secured (it fits inside the ammo holder, but I will glue it in) all I have to do is extend my finger from the grip and hit the switch. I have ammo holders in the handle, also. I don't know what I will do with the lighthousing unit yet...
Hunter
Here we go. All finished. I am experiencing some wiring difficulties, sometime the light doesn't come on. I am currently in the process of opening it up and double checking all connections. Other than that, here it is. That is a kill-switch I saudered onto the circut, and you notice no big holes, all of which were filled with Bondo. I do not recommend Bondo for projects like this, it is meant for filling holes, not creating corners and shapes. Extremely difficult to work with. Other than that, I lubed the plunger tube, and I'm now getting ranges of approx. 50 or more feet. I'll have exact messurements up soon. I had to repaint it, the Bondo killed my paintjob. I painted over the knob due to lack of time/patience/caring, I just wanted to finish this.
Over all, I don't think this mod was that great. I increased range alot, but the wiring and the Bondo was a nightmare... at best. It's nice... my favourite NF mod, but it takes alot of time and patience. Just look at my first post way back when. I've worked on it... maybe 3 hours a week average... Some weeks not even touching it, some days going 5 hours straight. Gah, finally done.
Here is a preview of another of my NFs. It is spray painted with Hunter Green, Spring Green, and Flat Black. I still need to paint the plunger tube and barrel, it's ugly. If you notice, that little "pen" is actually a flashlight. It has a button in the back of it. Once I have it secured (it fits inside the ammo holder, but I will glue it in) all I have to do is extend my finger from the grip and hit the switch. I have ammo holders in the handle, also. I don't know what I will do with the lighthousing unit yet...
Hunter
Edited by Hunter, 18 August 2004 - 05:31 PM.
Hunter
Organizer Vancouver Area Nerf Series
Organizer Vancouver Area Nerf Series
#33
blink 182
-

- Members
- 421 posts
Member
Posted 18 August 2004 - 05:53 PM
Well I’m not sure if it could work but you might be able to drop in a secret shot pocket blaster into the empty light house. The size I’m not 100% but it could work?
<Blink>
<Blink>
New Price On Freedom, Buy Into It While Supplies Last...
#34
THIRST
-

- Members
- 1,099 posts
Member
Posted 18 August 2004 - 05:56 PM
Its a cool project and all, but nerf guns dont need lights...
THIRST
THIRST
ko
#35
okto
-

- Members
- 590 posts
Member
Posted 18 August 2004 - 06:11 PM
why not? you never shoot in the dark?
nice, hunter. it's much nicer with the light pointing straight and the switch there.
nice, hunter. it's much nicer with the light pointing straight and the switch there.
#36
Half Newb Half Nerfer
-

- Members
- 737 posts
Member
Posted 18 August 2004 - 10:10 PM
This looks like a thread that will surely be hijacked. Anywho nice work hunter. Thats one of if not the nicest looking Nite Finder I've ever seen.
~Halfling
~Halfling
0 user(s) are reading this topic
0 members, 0 guests, 0 anonymous users

