Jump to content


Photo

The SNAP/Revolution

Plunger variations: for science!

44 replies to this topic

#1 Carbon

Carbon

    Contriberator

  • Moderators
  • 1,894 posts

Posted 19 June 2011 - 10:01 PM

After thinking on this design for the past year, I finally decided to do something about it, especially since it meant I could war test it at SPANO. Here's the tuned prototype:

Posted Image

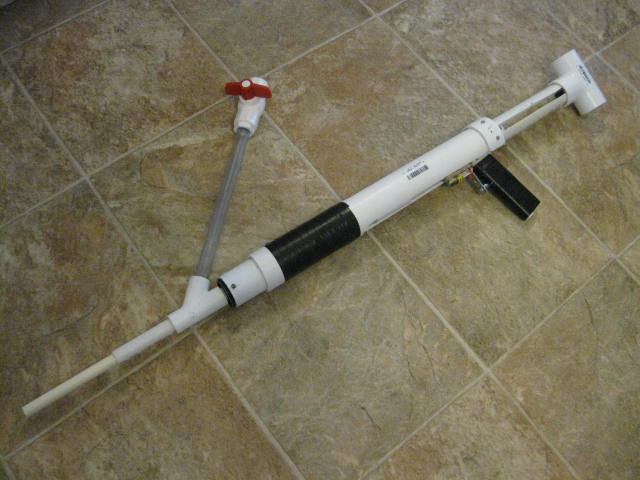
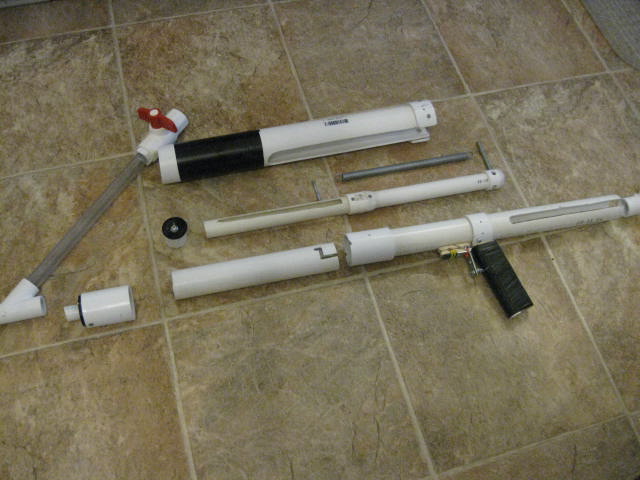
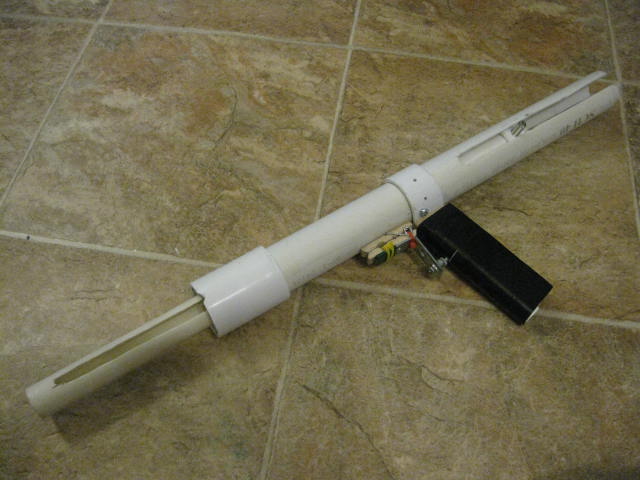
As I said in the photo thread, this is a SNAP, but with very different internals. Let's explode that sumbitch:
Posted Image

And now: the ridiculously photo-heavy writeup.

Design Process:
The idea for this blaster came about after MANO last September. I had just finished the SNAP-8, my take on an internally sprung PAC-style blaster. Aside from mechanical issues, I just ended up not liking it. What keeps drawing me back to the PAC is how smooth the priming action is, with almost no friction. Compression spring systems have far more friction points, so the priming action isn't as smooth. So I decided that I needed to build a blaster using extension springs. (For those keeping track, yeah, I never posted the SNAP-8. There's a reason for that.)

Rather than run the spring external to the plunger tube, I decided to run the spring down the middle, with a coupler sanded to the traditional ramp and catchface. This was mostly due to the length of an extension spring system. It didn't take me much figuring before the benefits became pretty clear:

• Greatly reduced plunger friction means a weaker spring can be used. Easier to prime, equal performance.
• Safety: when the system is primed, the spring is trying to pull the blaster together, rather than blow it apart.
• Making a dry-fireable system would be trivial, as the spring itself limits the range of travel.
• Having the spring inside the plunger tube means no more snagging the nail on the spring.
• The nail rests on the plunger tube for the entire action of priming. Because of this, it doesn't matter how long the nail is. Goodbye, fussy nail trimming.

The design of this blaster ended up with another benefit: it can be almost completely torn down without tools. Future updates to this design will be able to be completely taken apart without tools. It should also be pretty simple to make this dry-fireable, as the spring itself limits travel. It pretty much is dry-firable right now, as the plunger head doesn't impact the front bushing.

So, let's look at the parts a little closer:
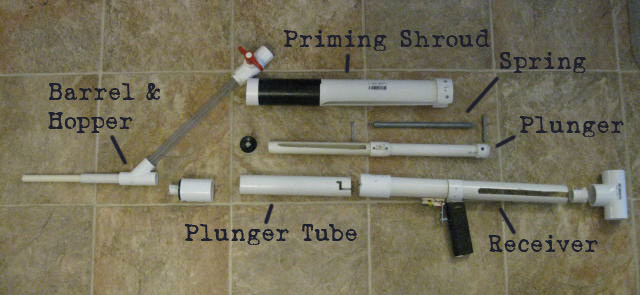
Posted Image

Materials used:

This is a general list, as this isn't a step-by-step writeup. Your mileage may vary.

Blaster Body:
1.25" Sched 40 PVC
1.25" couplers
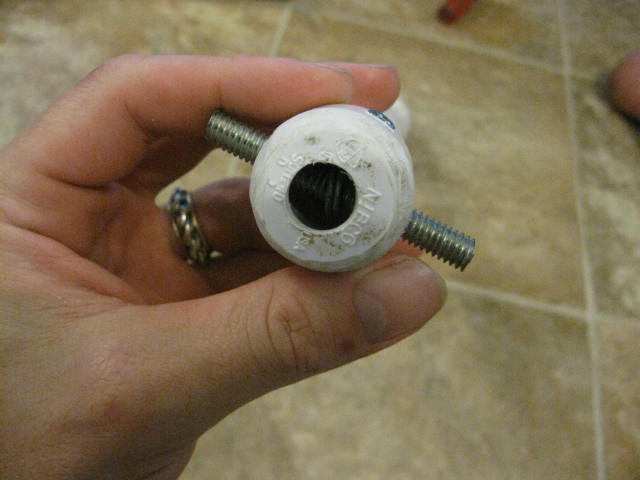
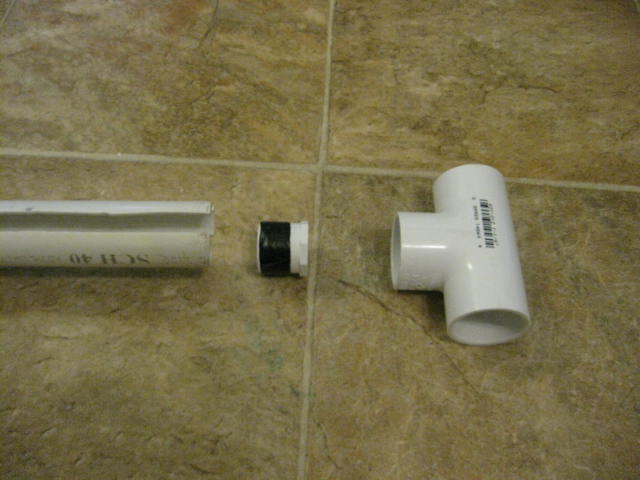
1.25" -> 1.5" bushing
1" -> .5" bushing
1.25" Tee
2" Sched 40 PVC

Plunger:
.75" thinwall PVC
.75" Sched 40 PVC
.75" coupler
.75" endcaps
Threaded rod, or any manner of sturdy metal
9.75" x .5", .062 extension spring (available at Menards)

Basic SNAP parts:
Clothespin trigger
Handle (this handle is my basic firring strip/PVC clip method)
Endcap plunger seal

Receiver:
Posted Image

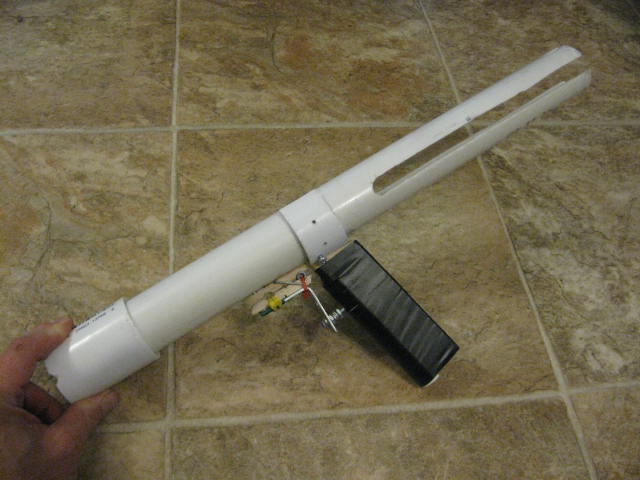
This is pretty much standard SNAP: basic CPT, usual handle. I cut the slot all the way through the back for ease of assembly (decided upon during the build process). We'll get into how this is put together later on. I chose an arbitrary draw length of around 6" (which is reasonable for my ~10" extension spring).
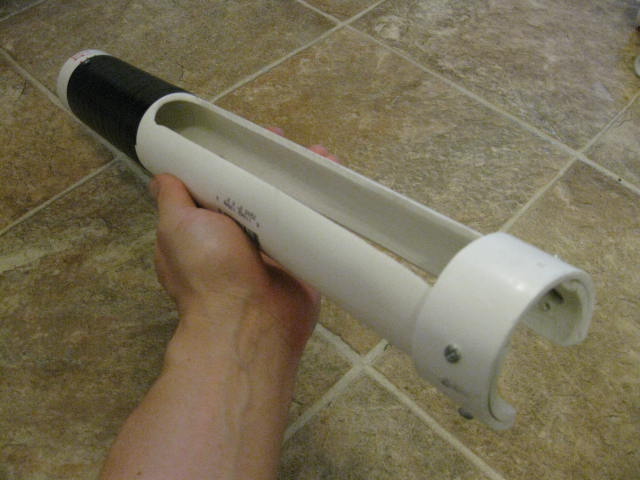
Plunger:
Posted Image

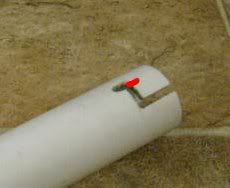
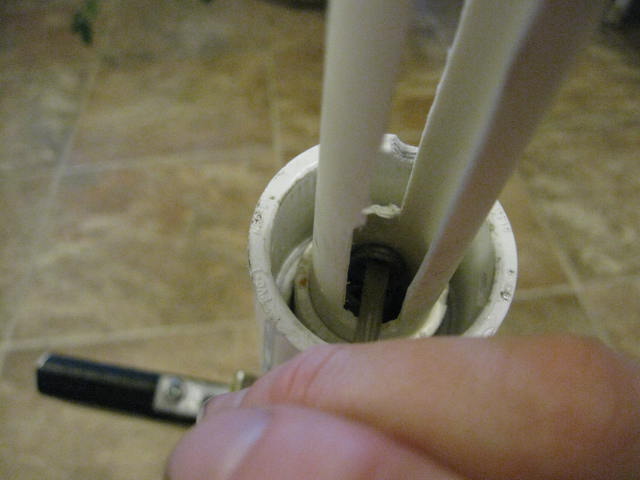
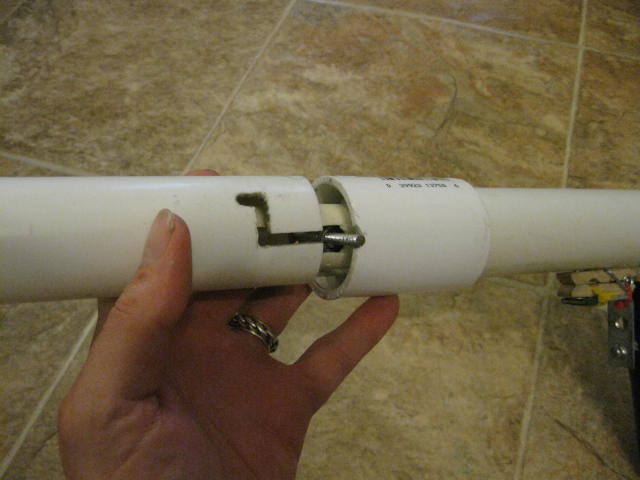
Here's what makes it different. The catchface, instead of being right by the plunger head or at the end of the rod, is situated in the middle. Instead of an endcap, it's a standard 3/4" coupler. I took a few minutes to slope the rear of it to create the ramp for the nail. Benefit of this design: the ramp can be very gradual, making for smooth priming action. Also, the nail itself is limited in its travel by the rear of the plunger tube. In other words, there is no nail "tuning" needed for this style of SNAP. A too long nail which wouldn't work in a standard SNAP will just rest on the rear of the plunger tube, and glide until the catch.

The rear of the plunger is .75" sched 40 PVC. The front is .75" thinwall, for easy slot cutting and light weight. The plunger head doesn't impact a bushing, so structural integrity is't really needed. The slot os also not for any accuracy, it's more for "get the hell out of the way of the spring".

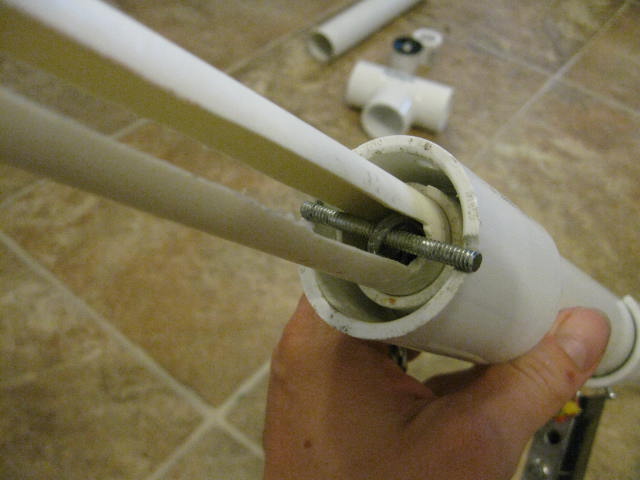
The plunger needs some manner of securing, to keep it from pulling apart during priming (thinwall doesn't hold in a coupler that securely, and grinding off the end of the coupler means the sched 40 PVC doesn't hold that well, either. I'm currently using two small screws. The hole in the coupler is wide enough to let the head all the way through, and it screws into the tube. It's enough to pin the tube together. I'm going to use adhesive on later builds.

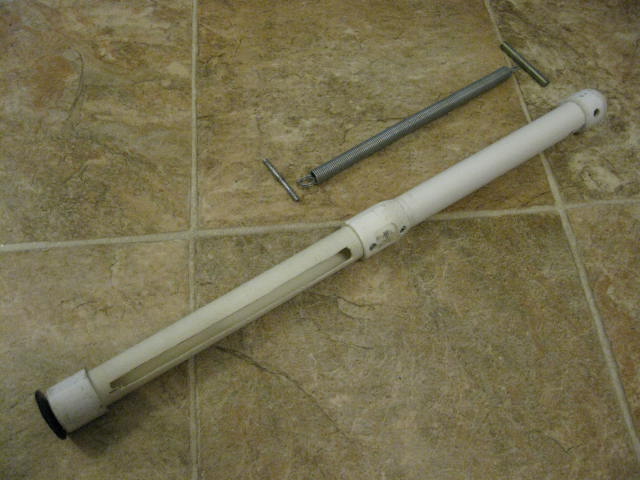
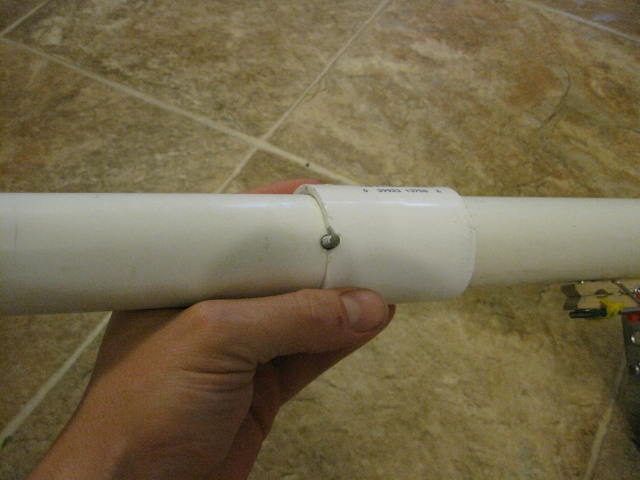
The spring is from Menards. 9.75"x.5", .062 wire. The spring at rest sits in the solid tubing on the right, pinned by the thicker bolt through the endcap. The thinner bolt holds the loop at the other end. The slotted length allows the plunger to move back while the spring increases in length.

I did a post-war disassembly to check on the durability of this design. As it stands right now, it seems that reinforcement won't be necessary. This follows, as the spring in this blaster is a little weaker than the springs I used for a basic SNAP-1, which never needed reinforcement.
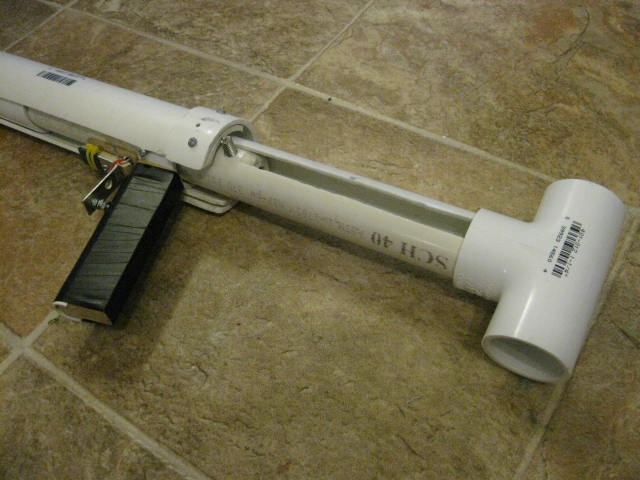
Plunger tube:
Posted Image

Yeah, it's a tube. The cuts allow it to be snapped on to the front spring rest (the thinner bolt). I need to work on this section a little, as it can occasionally wiggle its way off. Ideally, this part should also be under spring tension, so the pull of the spring itself can hold the entire blaster together.

Priming shroud:
Posted Image

What you'd expect. It's actually a couple pieces taped together, because I built this gun out of scraps. The top slot doesn't need to be as long as it is, but it helps keep weight down a little. The bottom slot is a little wide, so it's being guided by the screws that hold the handle on (screws will be replaced by epoxy, and strips of PVC for guides.) There's a sanded out ring of 1.25" coupler in front to keep the thing from wobbling. It just pushes the bolt in the rear, pushing back the plunger.

Putting it together:
1. Drop the spring into the plunger tube and pin it with the large bolt. When all is said and done, you'll want to keep the spring centered on the bolt.
Posted Image

2. Slide the plunger into the receiver.
Posted Image

3. The spring is under a bit of preload, so reach in with a screwdriver and lift it up. Hold it in place with the screwdriver. Then, slide the bolt under it and slide out the screwdriver.
Posted Image
Posted Image
Posted Image

4. Pop on the plunger tube.
Posted Image
Posted Image
And stick the rubber washer endcap on the end. The seal style I'm using is identical to the SNAP-1.
Posted Image

5. To allow the Tee for the stock to slide on, I used a 1"->.5" bushing wrapped in tape, then shoved on the tee.
Posted Image
Posted Image

Final thoughts:
I'm very pleased with how this blaster turned out. I used it the entire day on Saturday, and had no failures. The spring popped loose once when someone else dry fired it repeatedly, but restringing it was easy to do in the field. Ranges were comparable to any pump action SNAP on the field, with an easy priming action. Refinements are needed, but I have my new go-to primary.

Things to do:
• Reinforce the plunger catch
Yeah, I said it didn't need it, but I want to make this thing bombroof. I'll test out JSB's suggestion, as well.
• Attach the handle with epoxy
Currently, there are screws holding it on that have to be backed out a bit to remove the plunger. I'm going to trim those off and use epoxy to permanently attach the handle (and possible add a better, slightly more shapely handle).
• Fix the plunger tube attachment method.
It has a bad habit of wiggling off. I want to find a method that will hold it securely, but not use screws.

Edited by Carbon, 23 February 2015 - 09:39 AM.

  • 0
Hello. I am Indigo of the Rainbow Clan. You Nerfed my father. Prepare to die.

#2 SgNerf

SgNerf

    Member

  • Members
  • 204 posts

Posted 19 June 2011 - 11:35 PM

Awesome! I really like the tool-less take apart feature and the use of extension springs for the plunger.

Your writeup is also very easy to understand.

Great builds from the creator of SNAPs as always! :)
  • 0
Nerf News & Reviews! >> http://www.sgnerf.blogspot.com
Nerf Mod Guides! >> http://www.modworks.blogspot.com

#3 Guest_Just Some Bob_*

Guest_Just Some Bob_*
  • Guests

Posted 20 June 2011 - 12:10 AM

When buying lengths of PVC, it's usually fairly easy to get one "belled end" as seen in these conduit fittings:
Posted Image
One end of the pipe has been mechanically stretched to have the ID of a coupling.

It seems to me that might be an improvement to the back half of the plunger rod. My local HD carries gray sch40 conduit in 3/4" size, too, leading me to think many locations probably do. What do you think? It certainly would reduce the labor, but since I haven't tried it, and you may already have, I'd appreciate your insight on the suggestion.


EDIT: I forgot to express my appreciation, which shouldn't need another post. This is really cool, and has got me seriously considering making one, just as much for the excitement of discovery (maybe I can find new refinements) as for the fun it should be in use.

Edited by Just Some Bob, 20 June 2011 - 01:17 PM.

  • 0

#4 Ozymandias

Ozymandias

    Member

  • Members
  • 201 posts

Posted 20 June 2011 - 01:33 AM

To anybody who didn't get the reference: The Beatles - Revolution 9

Anyway, how does this spring compare to a [k26] in terms of priming difficulty?
  • 0
If you wish to post anything HvZ related, here ya go.

"...if you've ever suffered the effects of a fucking faggot retard overpopulation, you'll understand what devistaiting effects it can have on one's psyche." - Talio

#5 Carbon

Carbon

    Contriberator

  • Moderators
  • 1,894 posts

Posted 20 June 2011 - 06:41 AM

SGNerf: Thanks!

Bob: Didn't think of that, I was just working in terms of what was similar to a regular SNAP and what I had on hand. Thanks, I'll check into that and see how smoothly that works.

Ozymandias: Right on the reference. I also chose it because it's revolutionary as far as SNAP internals (at least, compared to the previous eight).

As far as the spring, it's easier. Way easier. The pull is probably a little lighter than the SNAP-1 (which uses an Ace #62).

Edited by Carbon, 20 June 2011 - 11:15 AM.

  • 0
Hello. I am Indigo of the Rainbow Clan. You Nerfed my father. Prepare to die.

#6 ChaosPropel

ChaosPropel

    Member

  • Members
  • 586 posts

Posted 20 June 2011 - 07:17 AM

This is really neat! After seeing it in the pics thread a few weeks ago, I was wondering, "so...what's so 'revolutionary' about it?" Now i totally understand! I don't know if you mentioned it in the writeup, but does this have an easier prime than traditional compression spring PumpSNAPs?
  • 0
Preheat oven to 350 degrees F (175 degrees C).

#7 Boot

Boot

    Member

  • Members
  • 90 posts

Posted 20 June 2011 - 08:53 AM

The use of the extension spring I feel is pure genius! An easy priming action would already warrant the minor amounts of extra machining, however the structural strengths you mentioned I wouldn't have realized. The fact that the blasters power source actually is holding the blaster together means that the traditional copious use of bolts and adhesives would be unnecessary.

Another HUGE possibility I see is one that is on par with the advent of bow arms. The nature of this blaster itself means that the extension spring could be replaced with a bungee, surgical tubing, or even rubber bands, for a blaster that would require literally NO Mcmaster materials (or, for overseas nerfers like me, no heartache over trying to find suitable power plants for our blasters), and blasters that could be set to a large range of different strengths (simply by adding and subtracting extra rubber bands). I absolutely love the concept, and will definitely be working on a spinoff that uses latex as a power plant.

Absolutely revolutionary work!

Also,

@ChaosPropel: "does this have an easier prime than traditional compression spring PumpSNAP" ...... seriously? I hope this was simply a forum error where you began your post before carbon posted :lol:

Edited by Boot, 20 June 2011 - 08:55 AM.

  • 0
QUOTE
If you try to shoot over 45 feet with a magstrike accurately you fail

I beg to differ

#8 EletricFatality

EletricFatality

    Member

  • Members
  • 5 posts

Posted 20 June 2011 - 09:16 AM

All i can say is this is amazing i have been watching nerfhaven for a while and i love this i am going to make it only thing wrong with the write-up is for someone who has never built a snap (such as my self)there is not materials list and you never say what size pvc the plunger TUBE is since im going to make this could you pm me or just reply to this with a materials list i found your other snap write ups on nerfhaven but i dont know if the sizes are still the same. Thanks alot and your awesome!
  • 0
Worth my weight in c4

#9 Y-Brik

Y-Brik

    Member

  • Members
  • 199 posts

Posted 20 June 2011 - 10:19 AM

All i can say is this is amazing i have been watching nerfhaven for a while and i love this i am going to make it only thing wrong with the write-up is for someone who has never built a snap (such as my self)there is not materials list and you never say what size pvc the plunger TUBE is since im going to make this could you pm me or just reply to this with a materials list i found your other snap write ups on nerfhaven but i dont know if the sizes are still the same. Thanks alot and your awesome!


!.,..'
I caught most of your punctuation; it seems to have escaped your post. As with any SNAP the plunger tube is 1.25" PVC. I would suggest you build a basic SNAP before taking this one on.
  • 0

As I said I have not not alot of testes yet but I will be once I finish the mod.

Why I am boycotting Hasbro

#10 EletricFatality

EletricFatality

    Member

  • Members
  • 5 posts

Posted 20 June 2011 - 10:47 AM

!.,..'
I caught most of your punctuation; it seems to have escaped your post. As with any SNAP the plunger tube is 1.25" PVC. I would suggest you build a basic SNAP before taking this one on.

No I will be fine I'm an experienced nerf modder just a new member to nerfhaven. But I just wanted to make sure the supplies were the same as say the snap one I should be able to make this in around an hour and a half anyway thanks for the help. Once again nice job carbon
  • 0
Worth my weight in c4

#11 Carbon

Carbon

    Contriberator

  • Moderators
  • 1,894 posts

Posted 20 June 2011 - 11:12 AM

ChaosPropel: I don't have much experience with SNAPs set up with other springs, aside from the one I built with a [k25]. The spring itself is much easier to pull, but I currently have a bit of friction between the priming sheath and the blaster body (specifically, where the handle attaches..one of the areas I want to fix). Still, I'd venture that it's easier.

Boot: Exactly right. During the design phase, I toyed with using surgical tubing, but I had a proper sized extension in my parts drawers, so I went with that. The setup allows for a lot of flexibility in size, so long as it fits inside the plunger tube. the initial weak spring I used was a half inch shorter, but the stronger one swapped in perfectly...just had a bit more preload on it. Finding the proper size spring has always been annoying (and is why I stayed with the #62 for so long: I couldn't find a suitable local replacement, so hopefully this will open things up a bit. Looking forward to seeing how you rig it with surgical tubing.

ElectricFatality: Good point. I left out most of the size descriptions for the parts, and didn't link to where I had used the parts before. I'll make you a deal: I'll add a parts list if you add caps and punctuation to your posts. Otherwise, your stay here is going to be short.
  • 0
Hello. I am Indigo of the Rainbow Clan. You Nerfed my father. Prepare to die.

#12 diamondbacknf1626

diamondbacknf1626

    Member

  • Members
  • 835 posts

Posted 20 June 2011 - 11:13 AM

No I will be fine I'm an experienced nerf modder just a new member to nerfhaven. But I just wanted to make sure the supplies were the same as say the snap one I should be able to make this in around an hour and a half anyway thanks for the help. Once again nice job carbon


I'm very anxious to see pictures once you've completed your build.

Also, Carbon, this is very, very cool. When I saw the initial pictures I was very confused as to the "Revolution" of it all. I'm glad this is what it turned out to be, though. The over-all design is very interesting, and looks to be rather sound in every way. The only two potential points of irritation that I see are acquiring 3/4" thin-walled PVC, and cutting slots. Of course though, they're really not all that much of a nuisance. Great work, I'll certainly building one once the contest is over (I won't have the time until then)...
  • 0
QUOTE(TxNerfer @ Nov 13 2010, 12:42 PM) View Post

Hey...I got a crazy idea: how about you stop all that sigging stuff? It's not even my thread and it annoys me.

#13 Carbon

Carbon

    Contriberator

  • Moderators
  • 1,894 posts

Posted 20 June 2011 - 11:22 AM

The only two potential points of irritation that I see are acquiring 3/4" thin-walled PVC, and cutting slots.


To clarify, you don't have to use thinwall for the front part of the plunger. I used thinwall because 1. I had it, 2. it's easier to cut slots in thinwall with the bit I have, and 3. for the weight advantage. Schedule 40 would work just fine.

As far as the slots, I was trying to keep them as non-annoying as possible. The front slots don't need to be very accurate, just big so as to keep the spring rest clear. The back slots could be cut with a saw, since they're open to the end of the tube.
  • 0
Hello. I am Indigo of the Rainbow Clan. You Nerfed my father. Prepare to die.

#14 diamondbacknf1626

diamondbacknf1626

    Member

  • Members
  • 835 posts

Posted 20 June 2011 - 11:42 AM

To clarify, you don't have to use thinwall for the front part of the plunger. I used thinwall because 1. I had it, 2. it's easier to cut slots in thinwall with the bit I have, and 3. for the weight advantage. Schedule 40 would work just fine.

As far as the slots, I was trying to keep them as non-annoying as possible. The front slots don't need to be very accurate, just big so as to keep the spring rest clear. The back slots could be cut with a saw, since they're open to the end of the tube.


Gotcha. Yeah, slots aren't to bad, particularly if you drill a series of holes and then just connect the dots.
  • 0
QUOTE(TxNerfer @ Nov 13 2010, 12:42 PM) View Post

Hey...I got a crazy idea: how about you stop all that sigging stuff? It's not even my thread and it annoys me.

#15 EletricFatality

EletricFatality

    Member

  • Members
  • 5 posts

Posted 20 June 2011 - 11:47 AM

Ok if you want pictures when I am done I will pm them to you.

Carbon: Deal. I will try harder with punctuation and can you please put the parts list up now if possible because I am going by my local hardware store in 5-30 minutes.
  • 0
Worth my weight in c4

#16 SlightlySane813

SlightlySane813

    Member

  • Members
  • 213 posts

Posted 20 June 2011 - 11:50 AM

Do you think it would be possible to even add a second extention spring on the opposite side of the plunger rod to add more power, or wold that be too much?

On another note, great job on creating a use for longer extention springs.
  • 0
Also known as the French Canadian eh!

#17 Carbon

Carbon

    Contriberator

  • Moderators
  • 1,894 posts

Posted 20 June 2011 - 12:12 PM

Do you think it would be possible to even add a second extention spring on the opposite side of the plunger rod to add more power, or wold that be too much?

There isn't an "opposite side", because the spring is inside the plunger rod. You could go with a stronger extension spring, first. Even then, I don't see a need for more power. Stronger springs cause more wear, needing more reinforcement, and are harder to prime.
  • 0
Hello. I am Indigo of the Rainbow Clan. You Nerfed my father. Prepare to die.

#18 Zorns Lemma

Zorns Lemma

    Sir Scrt

  • Moderators
  • 1,277 posts

Posted 20 June 2011 - 03:30 PM

Do you think it would be possible to even add a second extention spring on the opposite side of the plunger rod to add more power, or wold that be too much?


Most of the materials we use (especially in cylindrical form) have much higher compressive than tensile strengths. Carbon's SNAP greatly abuses this fact as the only stress points of the entire blaster are the catch (traditionally already made to be invincible) and the structural housing between the coupler and the catch (which from my first sentence, we know to be invincible).

If you wanted to add more power, just make the first extension spring stronger. Any additional springs would mean a massive headache of screws and thick parts.

Also Carbon, this is pretty awesome.
  • 0
"In short, the same knowledge that underlies the ability to produce correct judgement is also the knowledge that underlies the ability to recognize correct judgement. To lack the former is to be deficient in the latter."
Kruger and Dunning (1999)

#19 Ryan201821

Ryan201821

    Prince Edward

  • Contributors
  • 1,892 posts

Posted 20 June 2011 - 03:55 PM

Very cool. The advantages over this style blaster are endless. I'll have to try something like this some time.

As far as people questioning performance, Carbon was pwning fools all day on Saturday.
  • 0

#20 Ozymandias

Ozymandias

    Member

  • Members
  • 201 posts

Posted 20 June 2011 - 04:28 PM

To add to Zorn's comment, I attempted to make my +bow work with surgical (slingshot) tubing, and my 3/8 Nylon square rod bent at the notch. Of course, it is entirely plausible I just fucked up when cutting the notch in the first place. I probably made the cut too deep.
  • 0
If you wish to post anything HvZ related, here ya go.

"...if you've ever suffered the effects of a fucking faggot retard overpopulation, you'll understand what devistaiting effects it can have on one's psyche." - Talio

#21 Daniel Beaver

Daniel Beaver

    HQRSE CQCK

  • Moderators
  • 2,096 posts

Posted 20 June 2011 - 06:39 PM

Highly excellent. I am very excited by this design; compression springer technology has sort of stagnated, and it's good to see something wildly different.
  • 0

#22 jwasko

jwasko

    PowerBeard

  • Moderators
  • 1,021 posts

Posted 20 June 2011 - 10:08 PM

SlightlySane may (or may not) have meant attaching an extension spring between the front of the plunger and the front bushing, similar to a Maximizer and (I think) Ultimator. THis still isn't a good idea, because it necessitates the same deadspace seen in those blasters.

The Revolution here takes the power plant/ideology of the Maximizer and removes all of the dead space inherent in that design.

Impressive, sir.
  • 0

-Jwasko, STILL Sole Surviving member of Steel City Nerf and Sober Sister of the Sex Dwarves
We NERF ON all day, and FUCK OFF all night


#23 Buffdaddy

Buffdaddy

    Do not buy from this member

  • DO NOT TRADE
  • 824 posts

Posted 20 June 2011 - 10:37 PM

This concept had been in my head for some time, though for a different reason. The Toypedo Launcher pool toys launch with an extension spring based system, and I wondered the viability of converting it. Bow that I've seen this, I'm gonna have to try that for sure.

Props on an awesome development!
  • 0

#24 Darksircam

Darksircam

    Member

  • Members
  • 117 posts

Posted 21 June 2011 - 11:27 AM

This... is super exciting. Less friction, more win.
You can remove the pump and priming shroud to make it prime pistol-style, and it can be done without tools. I like.
I'm planning to make a pistol length version. With optional pump action.

If I understand the way the plunger tube attaches correctly, you could cut a notch on the other end like so
Posted Image
So if the plunger tube actually comes loose, it'll just rattle instead of falling off completely.
  • 0
Travel Cost to TRU = $2. Eliminator pack = $15. Momentum testing = 2 lost darts. Outranging Recons with your mini pistol = priceless.

#25 Carbon

Carbon

    Contriberator

  • Moderators
  • 1,894 posts

Posted 21 June 2011 - 11:34 AM

If I understand the way the plunger tube attaches correctly, you could cut a notch on the other end like so
Posted Image
So if the plunger tube actually comes loose, it'll just rattle instead of falling off completely.

Duh, of course. That way, when it moves forward, it'd just move into another slot that it can't rotate on, either....that'll greatly reduce the chances of it rotating off. Thanks!

The big problem with this whole method is that cutting a slot in PVC means that the friction fit in a coupler isn't nearly as tight...the end compresses too much. But this should mitigate the problem.

Edited by Carbon, 21 June 2011 - 12:34 PM.

  • 0
Hello. I am Indigo of the Rainbow Clan. You Nerfed my father. Prepare to die.


0 user(s) are reading this topic

0 members, 0 guests, 0 anonymous users