
This modification was made when the plunger tube of my raider exploded. Acquiring some AT3K's, it seemed like this was a perfect match. I didn't take any in-progress pictures, but I'll include what I can from the existing pictures. This was done without a plan other than to keep it simple. Much tinkering was done and each case will be different.
Here's my first experience tinkering with an air blaster.
MaterialsAT3K tank
AT3K pump or replacement pump
Raider
1 ft 17/32 brass tube
4" 9/16 brass tube
1/4" PVC
Spare CPVC/PVC
ToolsElectrical Tape
Glue (Zap-a-Gap and Plumber's Goop)
Dremel
Files
Sandpaper
Pliers
Step 1: Gut and Cut
Open up the raider fore grip and shell. You can remove everything except the jam door rails. The pieces you'll want to keep are: the front barrel cap, orange barrel, bolt sled, and the trigger assembly.
Determine how you want the pump to fit into the shell. If you use an AT3K pump, you will need to remove the bottom and front panels before the trigger. If you use a hornet pump, you can probably just remove some of the front area, but you will need to cut down the pump tube as it will be too long to attach to the raider's fore grip.
I added some PVC to the front of the pump that will still be inside the shell to keep it from moving out of the shell.
Cut and trim down the internals to get your pump to fit comfortably into the shell. Be aware of the outlet valve on your pump. I cut a hole through at the back for a valve opening.
Step 2: Prep the tank
Take the tank and remove all excess plastic from around the tank. You can use a Dremel to remove the majority of plastic, but switch to a file to shave off the rest. Be sure to clean the tank thoroughly of any plastic shavings.
Take the 1/4" length of PVC and glue this centered around the outlet valve. This will be used to secure the brass to the tank. For better adhesion, lightly sand both areas where the PVC and the tank will meet. Let this set and dry.
The inlet valve for the tank was too long to accommodate the vinyl tube and stay within the shell. You will need to cut the arm off after the 90 degree (the arm that points down when the assembly is seated), trim off a section and reattach the arm to the tank. I also trimmed off a couple of the barbs to shorten the length a little more. Test the tank to be sure you do not have any leaks.
There are a couple spacers and a spring on the pin. Remove the big spacer and the spring. The smaller one can stay or go.
Now take the bolt sled and cut off the top section leaving the bottom slide and some of the sides in tact and still connected. The tank will be mounted to the slide to better attach it to the shell and to make sure the outlet valve is lined up with the raider's barrel.
Attach the tank to the slide being aware that the intake value must be pointing down. You will need to trim down the slide until the tank fits snugly into the slide. Make sure that the slide touches the tank so it can be glued. I lined up the front of the tank with the front of the slide and cut the slide to fit up to the lip of the back of the tank.
Do not glue the assembly yet.
Step 3: Dry-fit
Take the slide and tank and tape them together and set it in place. Close your blaster shell and check the fit of the assembly. Also determine where you want the tank to be placed. I put the front of the tank in line with the back of the jam door opening. This seemed like a good location where the intake valve wouldn't get in the way of the trigger.
To further secure the tank, I added a back stop for the tank to rest against. This was a spare piece of CPVC that was wedged into the walls adjacent to the tank. Determine it's location when you dry fit the tank assembly, cut the walls and dry fit everything again.
Tape the assembly in place and look down the barrel to make sure that the outlet valve is fairly center in the barrel opening.
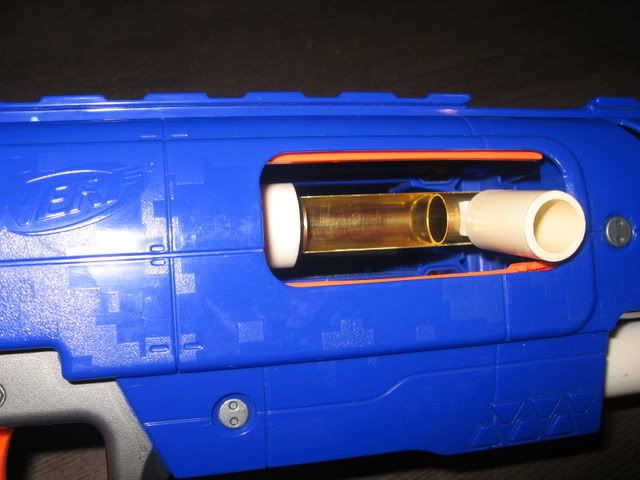
Step 4: Create the Breech
Take the 9/16" brass tube, add electrical tape and fit it into the PVC on the tank. Check that the length goes past the jam door. Center and make sure the breech is straight. Using a marker, mark the length of the breech. It should be a little past the PVC and up to the jam door. Use the maximum distance to account for whatever type of tab you will use to open and close the breech.
Cut the breech and file the edges smooth. Insert the 17/32" tube to make sure the fit is snug and that there are no leaks when the breech is closed.
Dry fit the breech into the tank assembly and determine the best position of the breech. Once that is set, remove the 17/32" tube and glue the breech to the tank and let that dry.
Step 5: Connect the pump
Open the blaster again and set in the pump. Determine the best path for the vinyl tube and cut away any walls that are in the way. Make sure there are no sharp edges or turns that could crimp the vinyl tube. Once you have the path opened, connect the pump to the tank and close the blaster.
Check the fit of the assembly too see if there are any more spots in the shell that need to be removed.
Step 6: Glue!
When everything is set, glue the tank assembly together and attach it and the back stop to the shell. Glue the vinyl tubing to the valves and let it all dry. Once it is dry, fill the tank with the pump to check for any leaks.
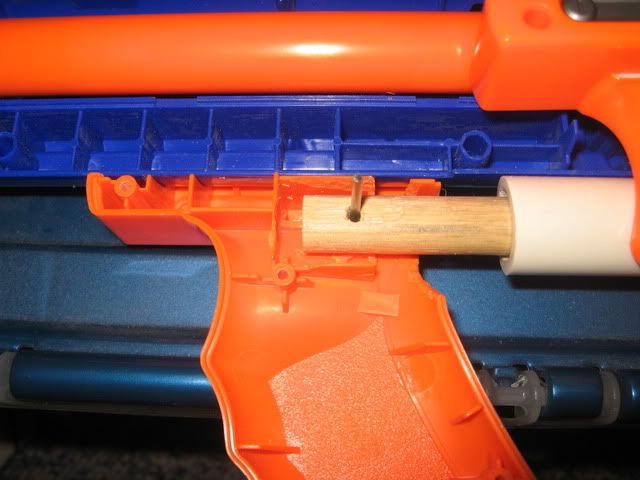
Step 7: Fore grip
Close the blaster shell with the pump. Add the fore grip and determine the stroke of the pump. You will want to try and use the entire fore grip's stroke to match the pump's stroke. I had to cut the back of the fore grip's rail to get the full range.

Make sure that the pump handle is centered with the pump tube and not angled in any way.
Cut and trim away from the fore grip to allow the pump handle to sit snugly. To attach, I drilled through the grip and pump handle and ran a thick wire through. I made a bend in one end (like an L) and made a second hole in the handle for to secure the pin. This will still allow me to remove the grip.
Test the pump and keep checking for leaks.
Step 8: Trigger
Open up the blaster and add the trigger and it's spring. You will need to make two bends in the firing pin. Get a straight edge and line it up parallel with the angle of the trigger. Where the straight edge and the pin intersect is where you will make the first bend. This bend should put the pin parallel and right next to the trigger.
Mark the spot on the pin and using some pliers, make the bend and line the two up. Make sure there is not too much tension on the pin as it could result in the outlet valve not closing all the way allowing air to escape.
Next mark the spot right on the pin after the trigger's angle. This is where you will make the second bend. This bend will allow the pin to rest inside the dart chamber in the handle. You will need to cut the wall to make sure it fits but will not come out. This is the pivot for the pin that allows the pin in the tank to be pushed by the trigger.
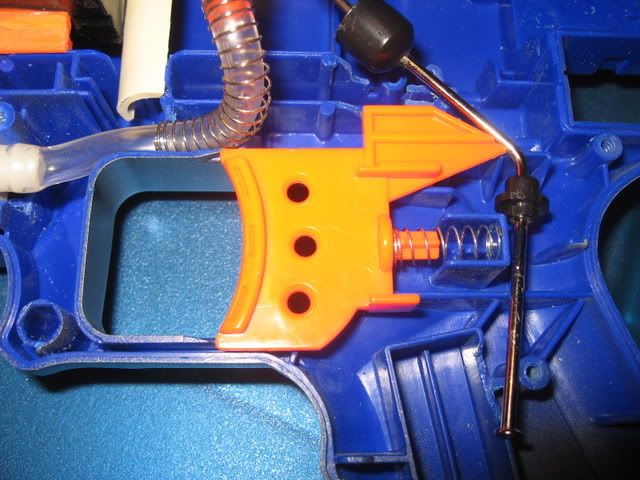
If there is too much tension on the pin, trim the trigger rather than trying to re-bend the pin.
Close the shell and test the trigger. (and leaks)
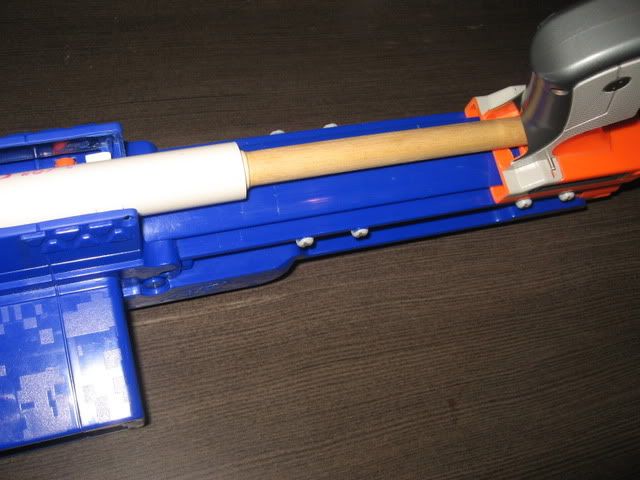
Step 9: The Barrel
For the barrel, I glued the Raider's orange barrel to the front cap so it will not move. Once this is installed, get the 17/32" barrel and add electrical tape in two areas of the length. This will help to stabilize the barrel. Make sure to not add too much tape. You will want the barrel to be able to slide smoothly and easily through the orange barrel. Too tight a fit could break the breech tab.
Set the barrel into the breech and close it. Create the tab and carefully glue it to the 17/32" barrel near the back of the breech. I used a length of CPVC that would extend past the shell and cut a small piece of PVC the length of the CPVC. I curved out the CPVC to fit onto the PVC and glued that together. Then, glued the tab onto the brass.
Let that dry and test the breech. (and leaks)
Step 10: All Done
Close up any gaps and add all the cosmetics you want. The clip slot on mine will either be removed and closed or drilled out on the top to keep darts for easier reloading.
Here is a short Firing Video
Enjoy!
UPDATE: Shell modifications all done:
Clip slot removed and covered
Breech tab closed and breech area closed
Pump area closed
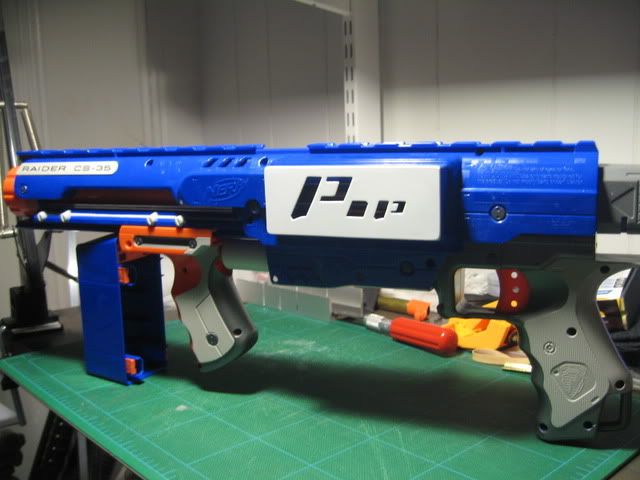
Ranges: Average 95ft with single BB stefans
Edited by popatachi, 25 July 2010 - 04:57 PM.


