popatachi's Content
There have been 158 items by popatachi (Search limited from 07-February 97)
#296218 The Ohio Revolution
 Posted by
on 18 March 2011 - 10:21 AM
in
Nerf Wars
Posted by
on 18 March 2011 - 10:21 AM
in
Nerf Wars
#296103 The Ohio Revolution
Posted by
on 16 March 2011 - 12:55 PM
in
Nerf Wars
#294057 The Ohio Revolution
Posted by
on 07 February 2011 - 10:42 AM
in
Nerf Wars
Heading down to Virgina is a bit too far out of the way.
And Brit,
I would recommend not going with the white felt pads, they unravel a bit too fast. I've heard the green and blacks ones are better.
#296327 The Ohio Revolution
Posted by
on 21 March 2011 - 08:27 AM
in
Nerf Wars
Pros:
- Meeting a lot of new people
- Nerfing with a lot of new people
- Not having chili after the war
- I now have red and pink foam (to go along with my white and grey)!
- Red Roof Inn giving me a free night when my booking got messed up
- Rest stop, triple strength, one dollar coffee!
- Fuel efficient car (400 miles per tank)
Cons:
- Brit needs to learn how to steer that tank on the right side of the road!
I've got some footage from the power ball round, though it's not very clear. I'll try to clean it up post later.
It was a great venue and people were all awesome! Thanks again!
#296123 The Ohio Revolution
Posted by
on 16 March 2011 - 05:49 PM
in
Nerf Wars
I will not be able to make the war. Sorry guys.
#296469 The Ohio Revolution
Posted by
on 22 March 2011 - 11:04 PM
in
Nerf Wars
It's not the best quality, but it is what it is.
#327544 NDA Exclusive! New 2013 Nerf Mega Centurion
Posted by
on 03 March 2013 - 02:35 PM
in
General Nerf
#281493 Raider - Replaced Internals (mega Missile) - The Mega Raider
Posted by
on 28 July 2010 - 12:33 PM
in
Modifications
#301615 Near-Semi-Auto Rifle
Posted by
on 15 July 2011 - 06:35 PM
in
Modifications
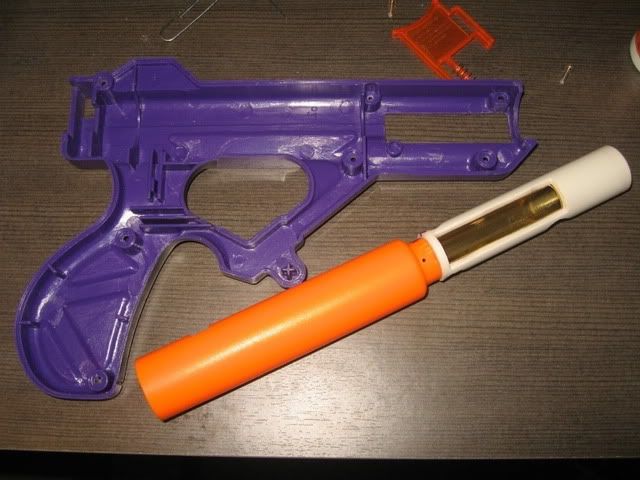
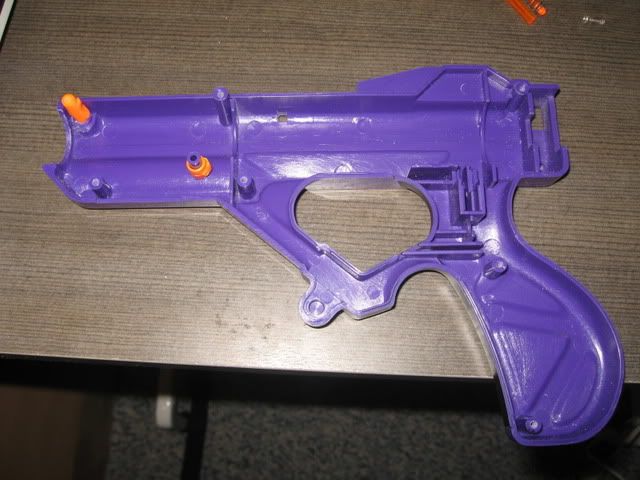
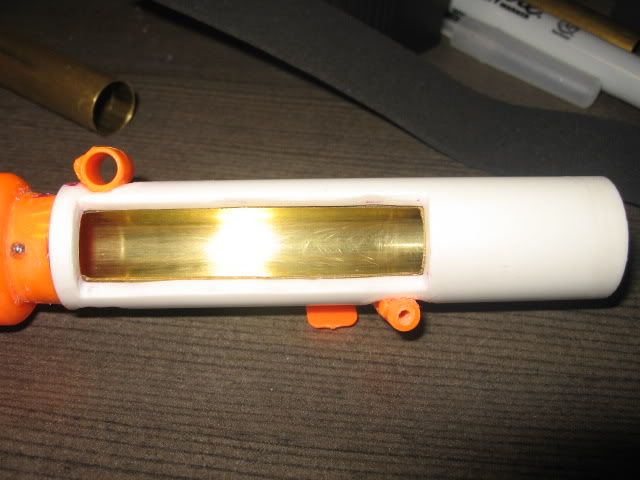
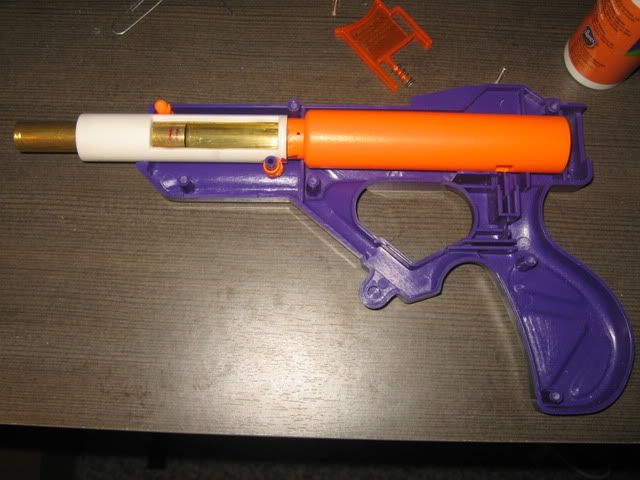
#211946 Azulsoli
Posted by
on 13 February 2009 - 09:11 AM
in
Modifications
#275419 Cpvc Doomsayer
Posted by
on 20 May 2010 - 10:25 PM
in
Modifications
I also cut down the trigger guard. The guard gets in the way of my hand and with the weight, hurts my fingers. Good bye trigger guard!
Step 10. All Done!

Ranges: With single BB stefans I was getting an average of 100ft (95 - 110).
#275440 Cpvc Doomsayer
Posted by
on 21 May 2010 - 06:27 AM
in
Modifications
@LotusNerf: Dremel and files. I own a set of jewelers files which are small files in different shapes and a couple regular sized files. Dremel away the majority of plastic and hand file everything down to where you need it to be.
@sllewgh: Maybe, but not for this blaster.
#275456 Cpvc Doomsayer
Posted by
on 21 May 2010 - 12:49 PM
in
Modifications
Since this is my first time tinkering with this particular blaster I wanted to finish it first and foremost to make sure that it worked. Improvements can come at a later point. I'm overly cautious when working on a new blaster and I didn't have funds available at the time to get extra supplies. When I do, I'll be sure to look into replacing the plunger head.
As for the seal between the plunger tube and turret, the o-rings that I used have a great seal and work for me. You're right that those aren't the only two options, but they were what I found searching for write ups specific to this blaster. I didn't consider other methods like the ones you mentioned because.... well, I didn't think about it.
That was my bad for not being specific about the two options that I talk about. I'll edit the write up to reflect that and when I change the plunger head, I'll update the post as well.
I appreciate the criticism, it's how I get better at modding.
#275418 Cpvc Doomsayer
Posted by
on 20 May 2010 - 10:23 PM
in
Modifications
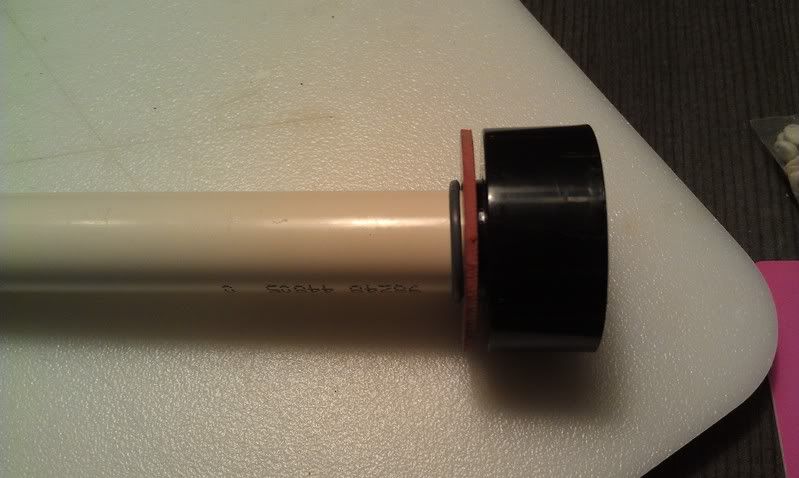
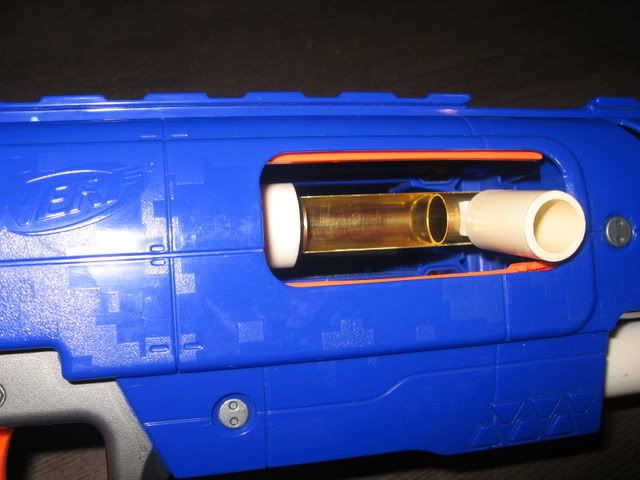
If you've read the original Doomsayer write up, I will absolutely agree that this is the most frustrating part of the modification. I was confounded for a time in trying to remove the plunger head. The plunger head is made up of two pieces. The rubber piece at the top and a plastic support piece beneath it.
When I dipped the plunger into hot water, I tried to pry off the plastic piece, but found that it was glued. This was incorrect. Dipping the plunger into hot water was to be able to safely remove the rubber piece which I was able to do with a flat screwdriver by gently twisting it underneath until it separated. When the rubber cools down, simply dip it back into the hot water until it becomes soft again.
It sounded like the plastic piece underneath would fall off once the rubber piece came off, but that was not the case for me. This was glued onto the plunger rod. So with a small screwdriver, I had to carefully pry that off as well. Altogether a little scary and I'm glad I didn't have to resort to extreme measures of either breaking the rod in half or trying to make a new plunger rod.
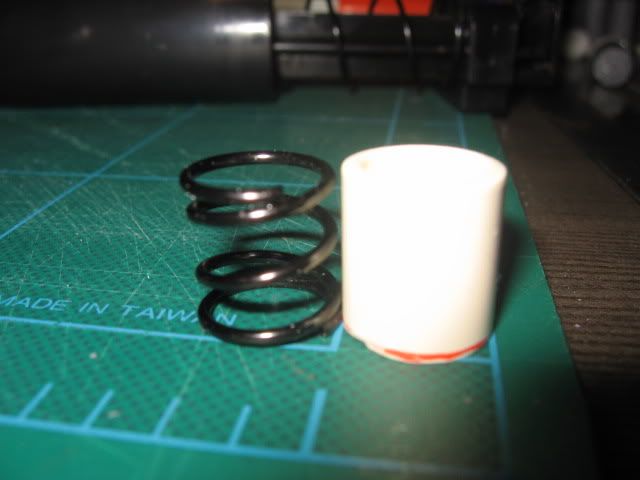
Either way, once this is disassembled, add reinforcement to the plunger rod, in my case, I used metal coat hangers secured with glue. Then I added my springs, a stock, Long Shot, and BBB spring. I also added a spacer using a small length of a PVC coupler wrapped a couple times with electrical tape.
To close it up, glue the plastic piece on and soften the rubber piece in hot water and carefully reattach with a flat head screw driver.
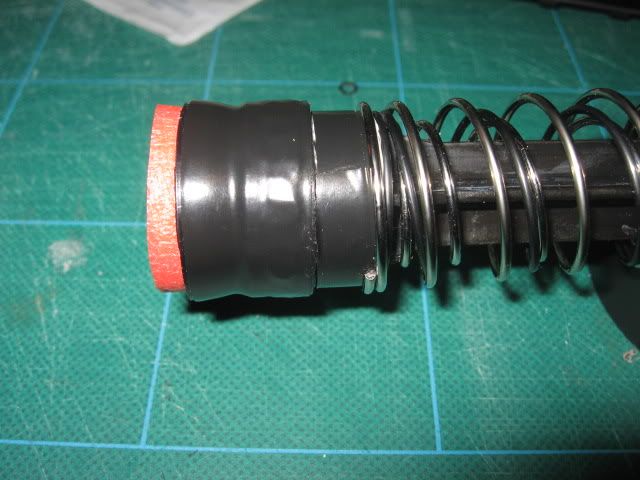
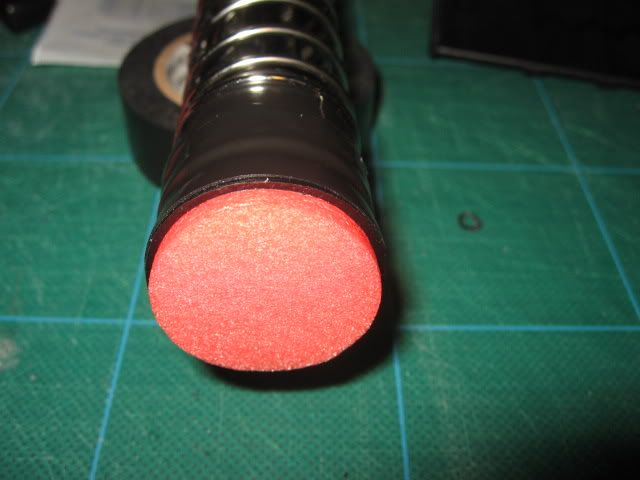
Fill the open area in the plastic piece with hotglue and wrap electrical tape around the plunger head and test fit this into your plunger tube to get an air tight seal. When that is done, add goop to the top of the rubber plunger head to seal that of leaks. I added some padding by using a slice of a BBB arrow.
When you are satisfied with the fit, add lubrication to the plunger head and tube before your final assembly.
EDIT:
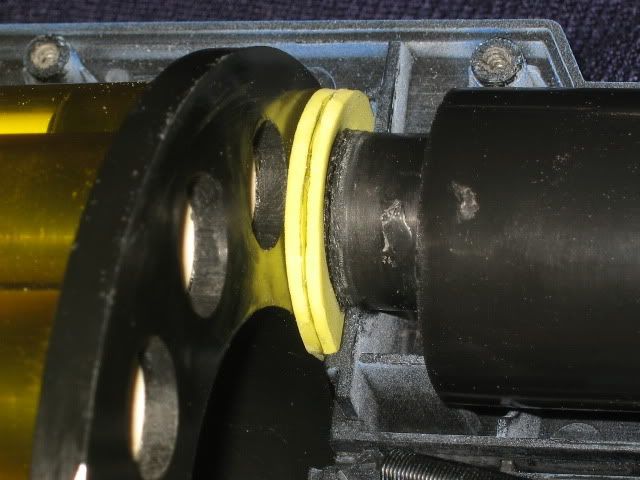
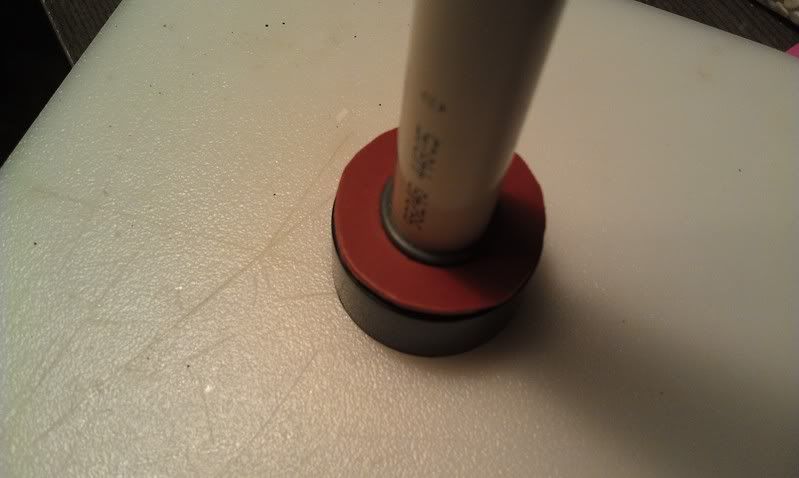
I have changed the plunger head to instead have an o-ring. This creates a perfect seal and is really easy to do. Pop on the o-ring and add a dab of glue to secure it . In the picture, the o-ring sits at the base of the rubber plunger head.
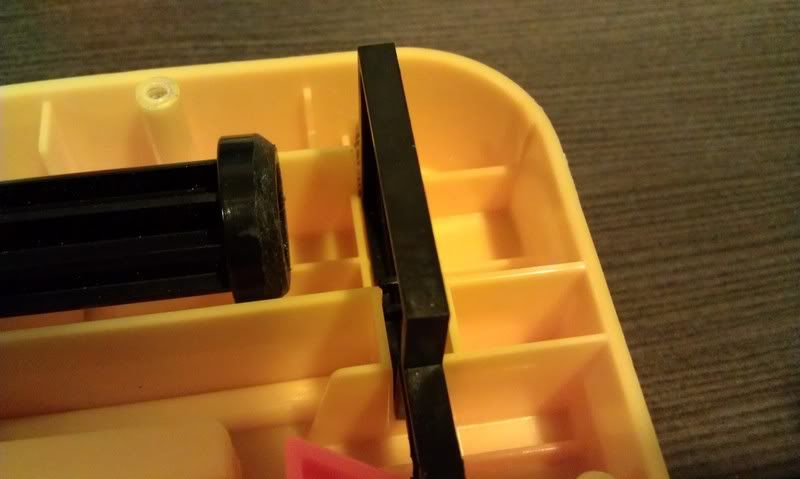
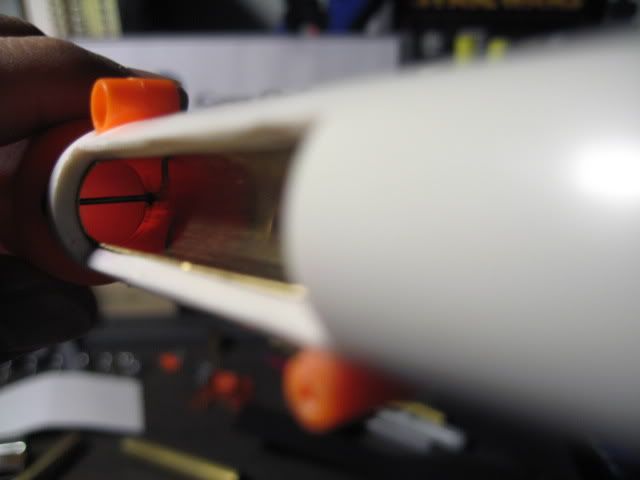
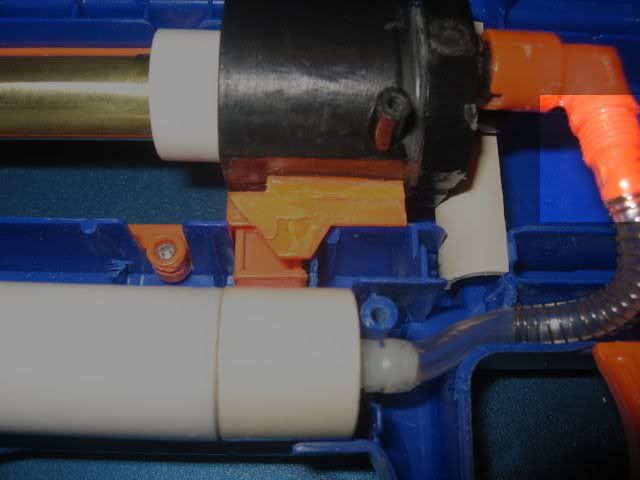
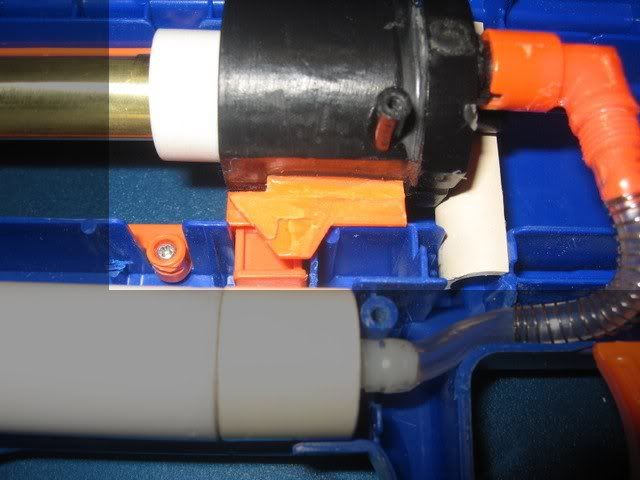
Step 6. Seal
There are two methods I found in Doomsayer write ups to create a good seal between the plunger tube and turret: hot glue or an o-ring. There are still other methods not specific to this blaster that would work very well, but I opted for the o-ring method. (Thanks to Split for reminding me of other ones)
The hot glue method is easy as greasing the turret area where the plunger rests, place the plunger tube on the turret and add hot glue all around the plunger tube. Let this dry and gently remove the plunger tube from the turret. This will help to seal the connection.
The o-ring method is to get an o-ring to do the same thing as the hot glue. Put the o-ring around the plunger tube, place the plunger tube on the turret and push down on the o-ring so that it makes contact with the turret. Glue this in place.
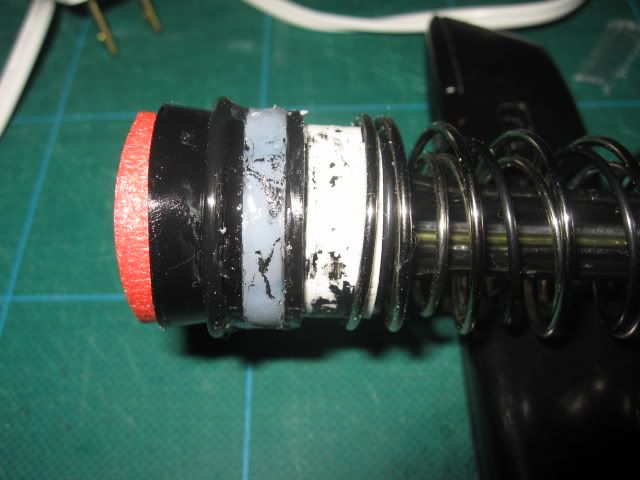
The seal with the bigger o-ring didn't work so well for me. I wasn't able to glue it on exactly right or the weight of the turret was causing the two to not sit flush. I found that a second, smaller o-ring fit on the inner lip of the plunger tube and gave me a much better, more consistent seal. It's not air tight, but it's still an excellent seal.
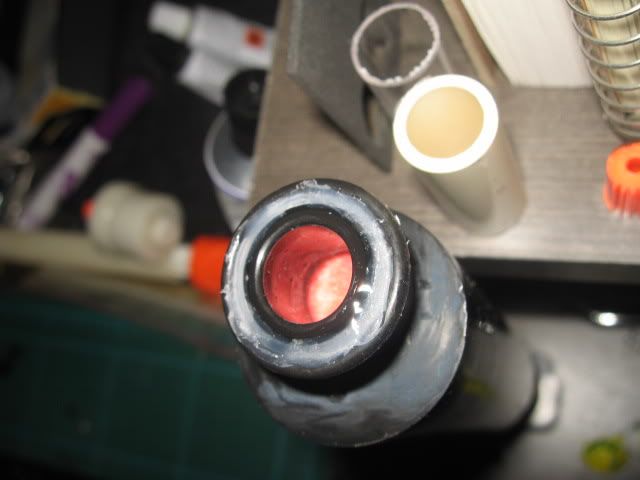
In the picture above, you can see the outer o-ring, with a hot glue ring and then smaller o-ring.
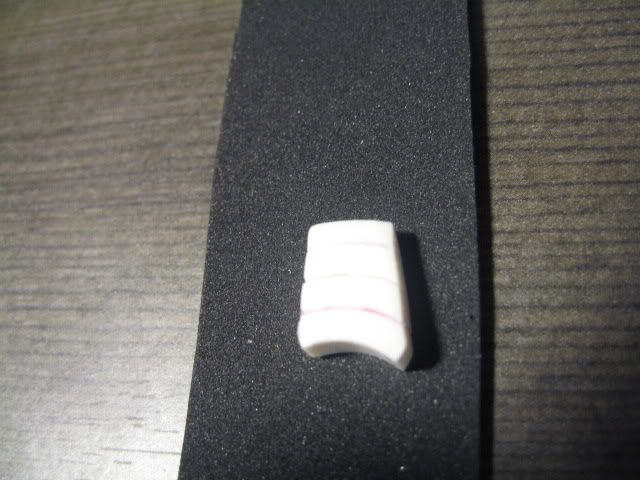
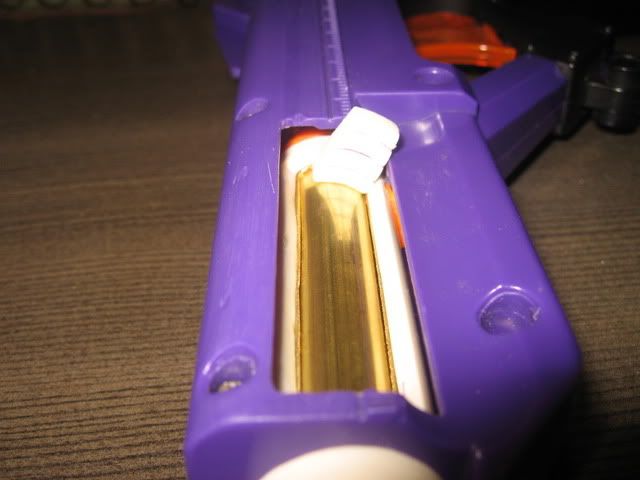
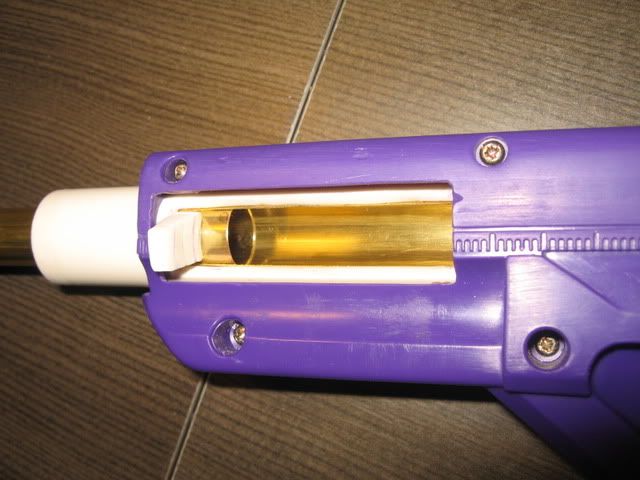
EDIT: I used two layers of craft foam along with Goop to get a nearly perfect seal and easy rotation.
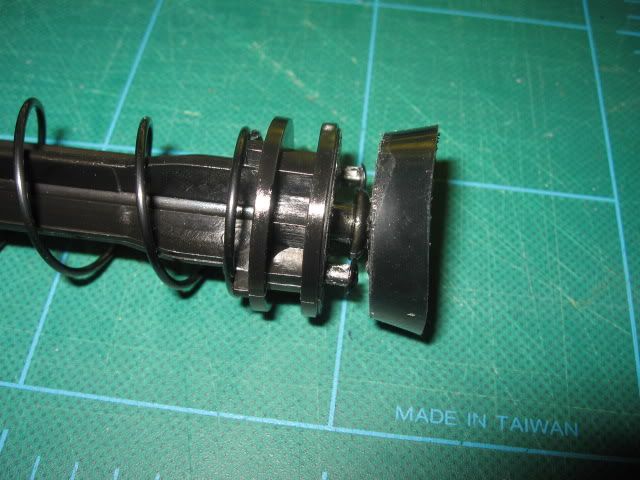
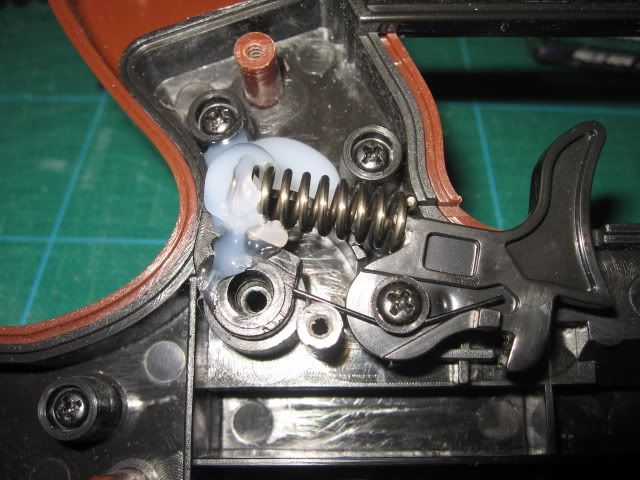
Step 7. Catch Spring
I used the old trigger lock and cut that down and glued it in place as a spring rest for the trigger spring. Once that was in place, I used hot glue to support the rest and the spring.
Step 8. Dead Balance
Obviously, this thing is front heavy! Time to even it out and quiet it down a bit.
First Add some weight to the end of the stock to help counter balance the weight from the front and fill the rest of the space with FBR or whatever you have to reduce the sound.
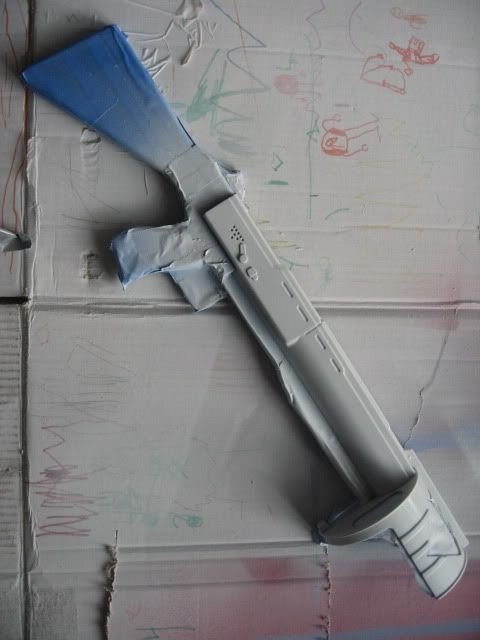
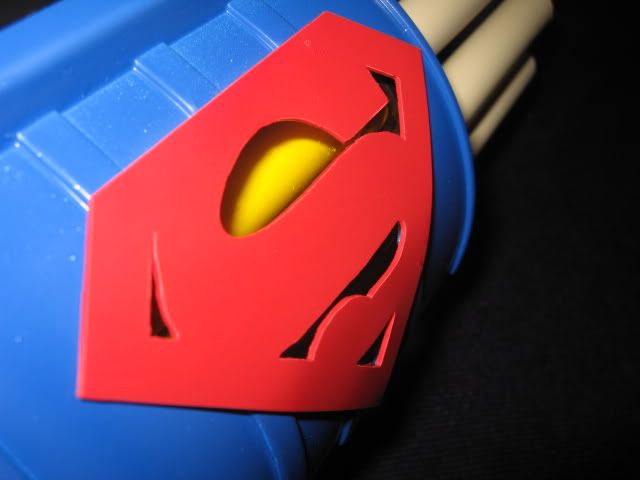
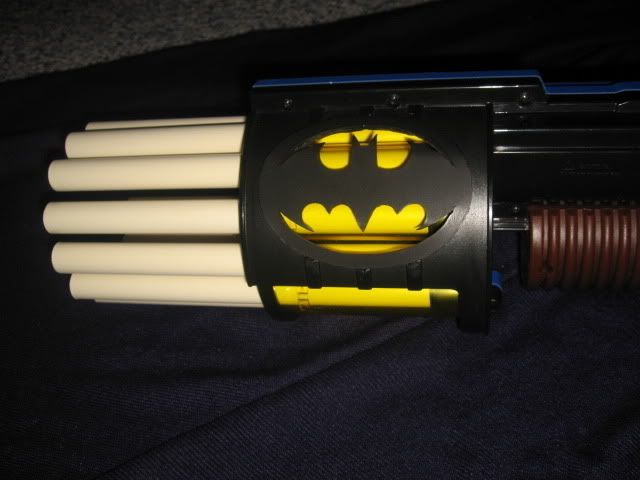
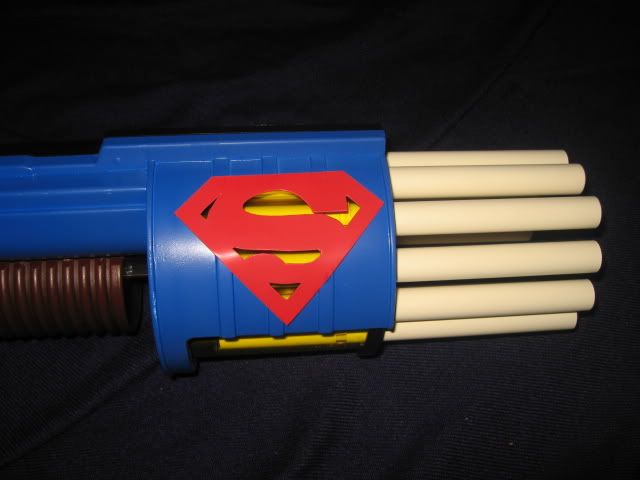
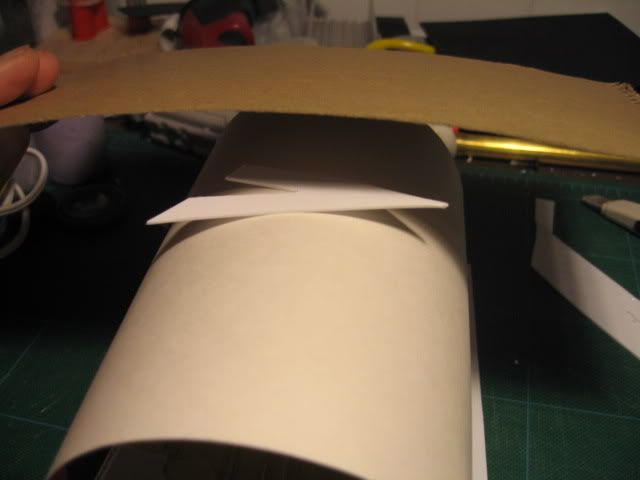
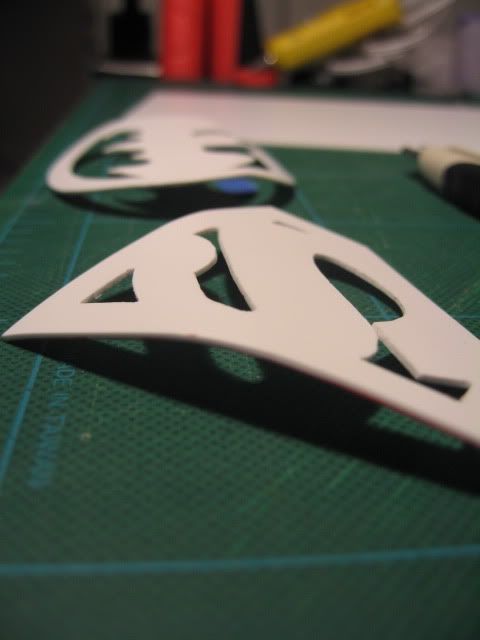
Step 9. Beautify
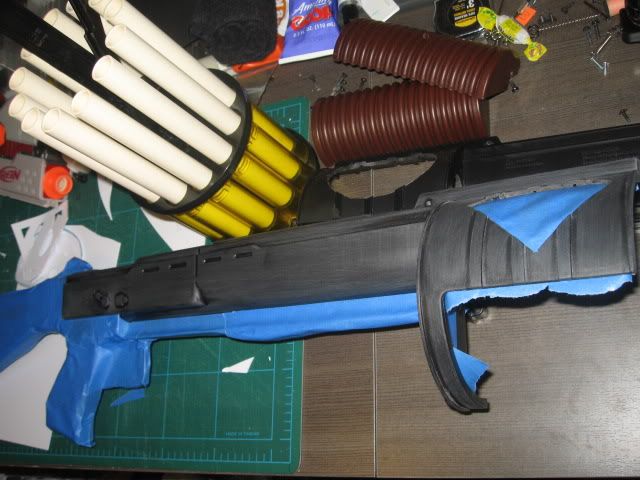
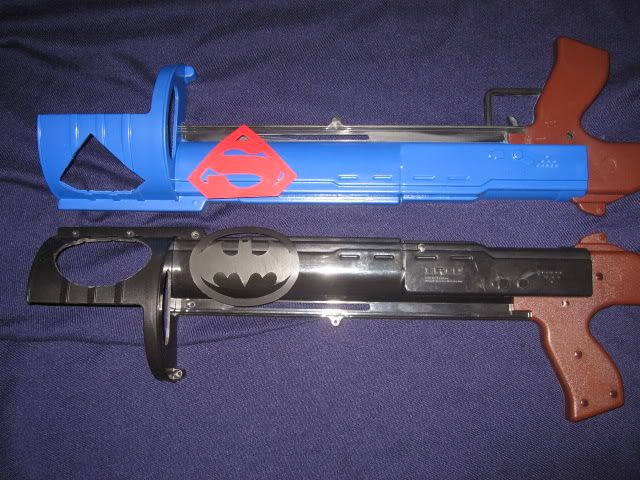
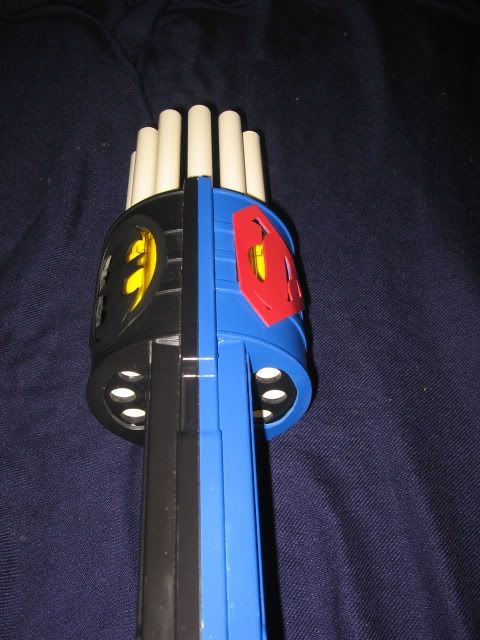
I went through a lot of ideas on how to modify the shell. Thundercats, Pac-Man, and Batman. Well, you can't have Batman without Superman so with that in place, I created the symbols in Photoshop, printed them out and traced and cut those out of styrene.
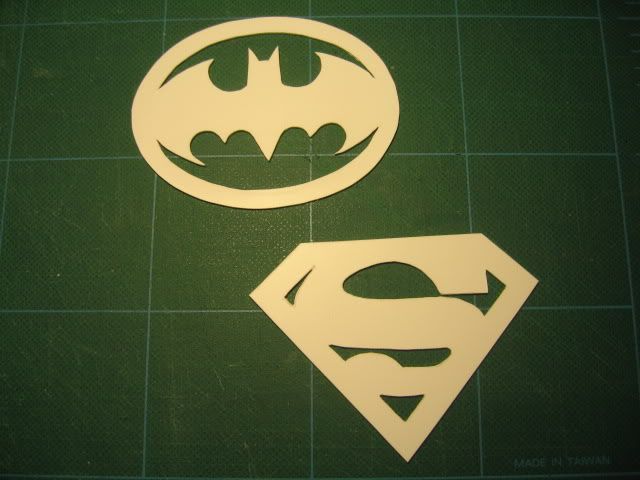
Next I need to cut the appropriate holes from the shell to expose the yellow underneath.
And to help attach these pieces I tried to bend them with cardboard and a heat gun.
#275755 Cpvc Doomsayer
Posted by
on 23 May 2010 - 09:34 PM
in
Modifications
@FA_24: I am getting another turret for PETG barrels. That way I can test my darts with this setup and see how it performs. And I will have a spare one if needed. Thanks for the info on the average maintenance timeframe.
@TantumBull: Thanks for the info, right now, the seal with the o-ring is good, but I'll keep it in mind for further improvements later on.
Thanks again!
#275417 Cpvc Doomsayer
Posted by
on 20 May 2010 - 10:22 PM
in
Modifications
Thanks to ForsakenAngel_24 for the original write up and others whom I contacted for their input.
Materials:Ertl RFSG
CPVC (12 8" barrels plus a small length for a spacer)
Extra Springs (LS and BBB)
O-ring (1 x 13/16 x 3/32) - Product specific: Danco #57
O-ring (5/8 x 1/2 x 1/16) - Product specific: Danco #28
Pushnut Fastener (3/8" O.D. #8 Pushnut Fastener)
Electrical Tape
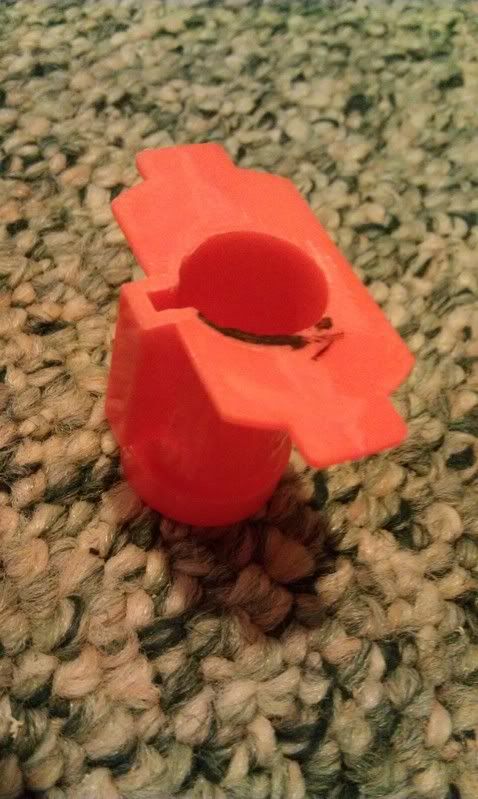
Padding for Plunger Head (BBB arrow)
Tools:Glue (Goop and Zap-a-Gap and Hot)
Dremel
Hand Saw
Screwdriver
Step 1. Take it apart and cut it down
In order to remove the shell, you will need to cut the orange tip, slip it off. Then remove the foregrip and the rest of the screws to get to the internals.
Cut down the front of the shell in order to expose all the barrels. Leave a small lip in the front to help hold the turret.
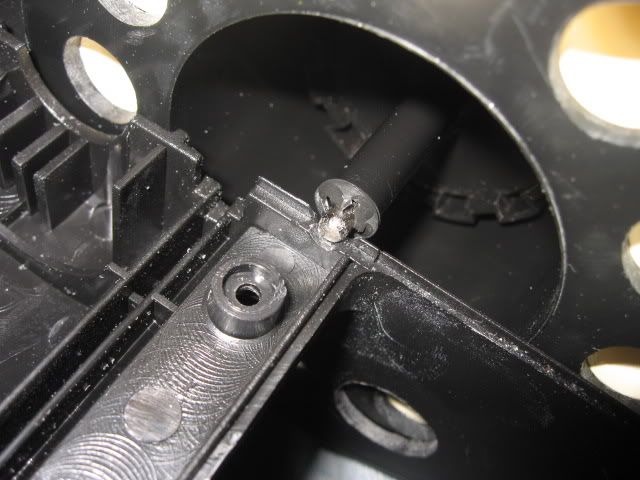
Step 2. Rotation Mech
In order to remove the rotation mech, you will need to cut the pushnut fastener off. Once removed, you can get to the spring at the bottom of the pile. The original write up calls for hotglue to secure the spring. I opted to use a matching length of CPVC instead. Stack everything together and test the rotation. I opted to not put the pushnut fastener on until after the turret was completed in order to test with the final weight of the barrels.
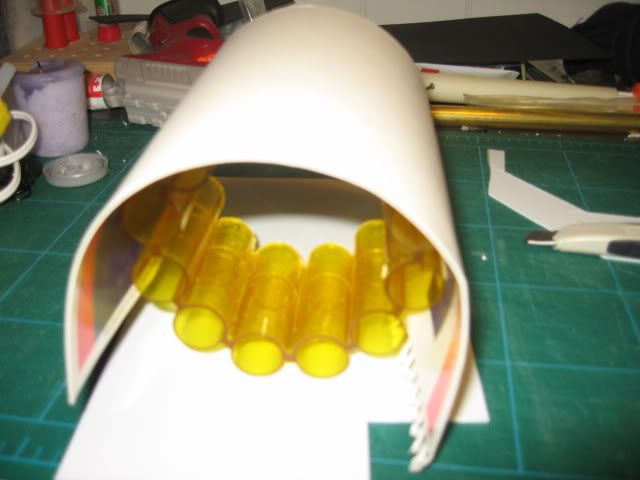
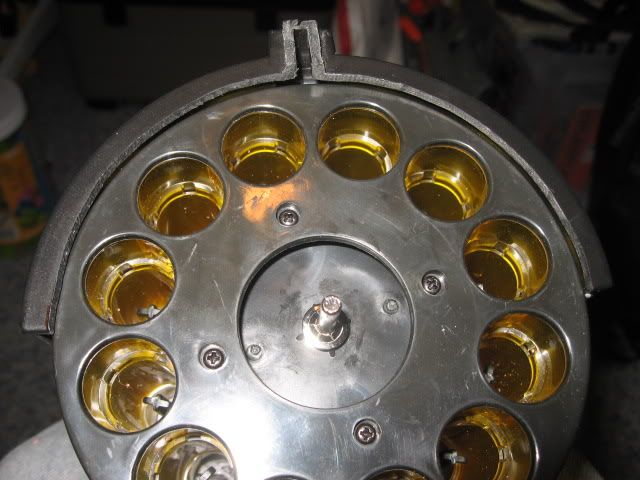
Step 3. Turret
Disassemble the turret and remove the AR's from the inner barrels. In order to get CPVC to fit, you can either sand down the inner barrels or you can cut the barrels down. I opted for the "cut" method after attempting the sanding method. The area is too far up the barrel for my Dremel, so I used hand files and that took way too long. So stick in a length of CPVC to find the point where it sticks (be sure you are cutting the bottom area), mark it and cut all the way through.
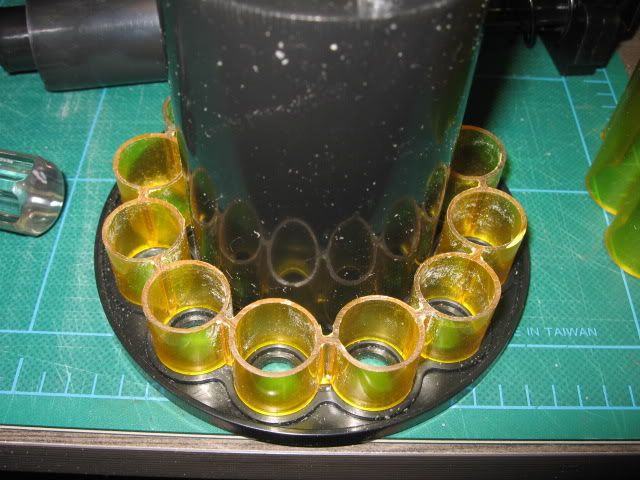
Once you have that, set it aside and take the bottom piece and widen the holes in the back in order to make it rear loading.
I opted to use 8" CPVC barrels with the bottoms coned out for easier loading of darts. Test fit with your CPVC and inspect for the fit. You will need to add electrical tape to the bottom of the CPVC to properly secure the CPVC in the turret. Use Goop to secure the bottom ring to the turret base and for the CPVC to the bottom ring. You can also glue the CPVC to the top of the outer ring if you want.
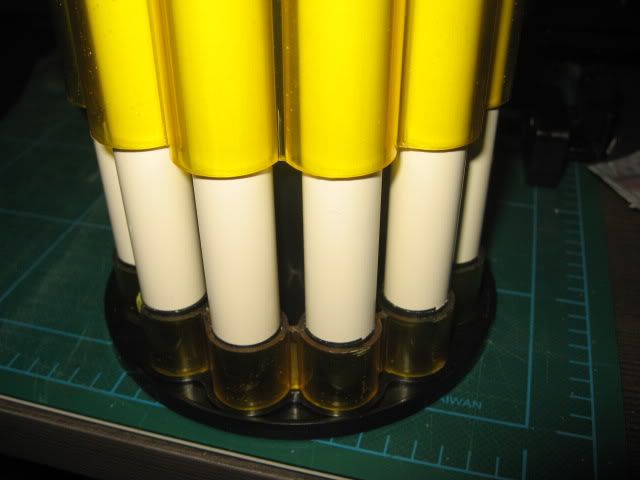
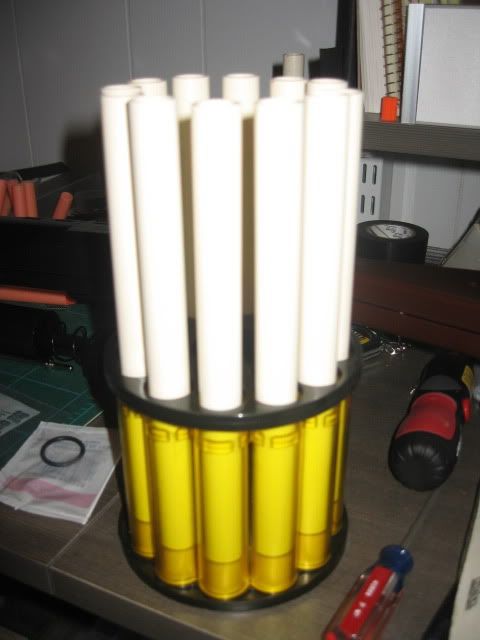
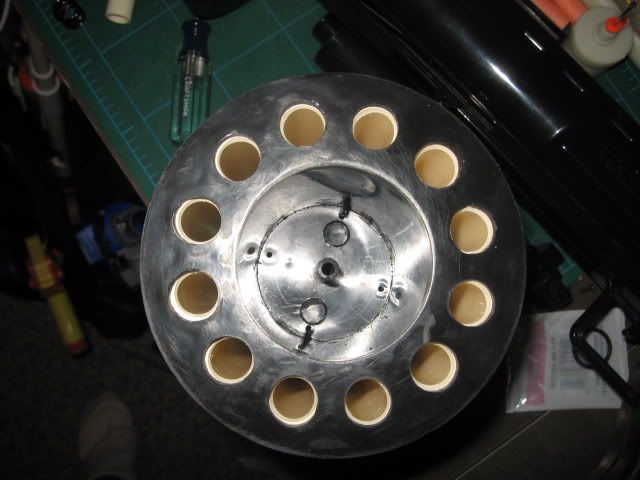
Allow this to dry overnight.
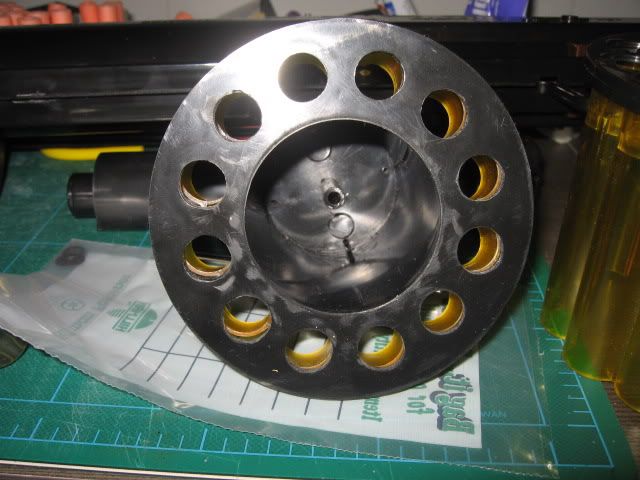
Step 4. Rear loading
Reassemble the rotation gear and add a couple pushnut fasteners. To get the fasteners on, I used a small ratcheting screw driver that accepts multiple heads. Just press down and it will slip on really easily.
With the completed turret, fit this into your shell and check the fit and rotation. I found that because of the weight, the turret had a little too much room. It tilted down just a tiny bit. To help with this problem, I sanded down the bar rest on the shell and added spacers behind the turret to keep it aligned correctly.
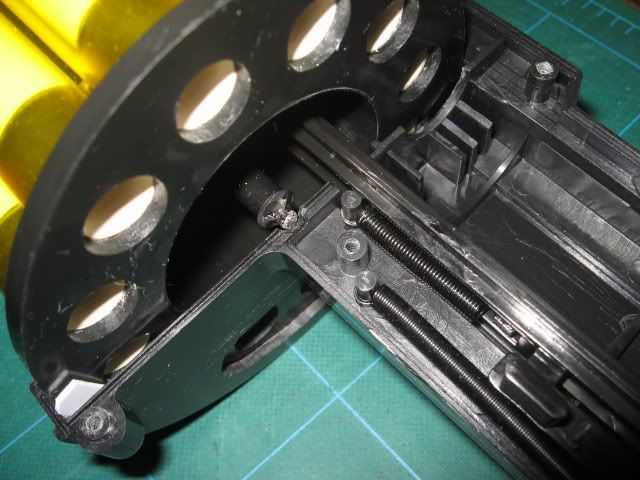
After that is set, find a thin marker that can fit down your barrels. The one I used was for a small dry erase board in the house. Line up the firing barrel and drop the marker down the following barrels (imaging the barrels as a clock face): 2, 3, 4 and 8, 9, 10. You could add 5 and 7 to get four rear loading slots if you want. When you drop the marker, find a pen to gently press down on the marker to make sure that you get a visible spot.
When you've got the marks, drill a pilot hole through the shell and make sure you've got the holes lined up correctly with your turret. If it's good, use a dremel or hand files to widen the holes to fit the barrels. This can be as neat or messy as you see fit.
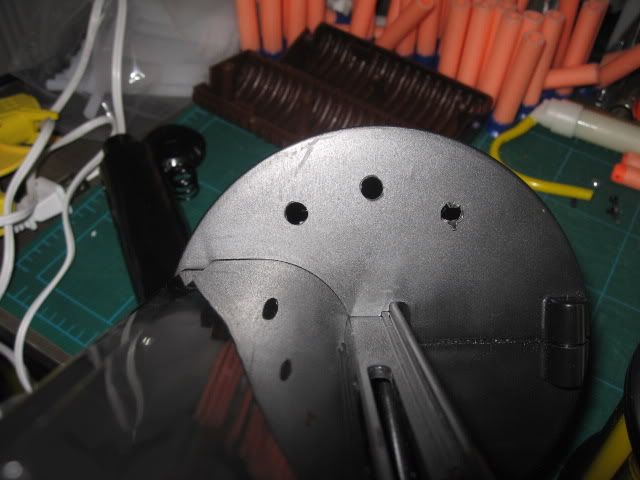
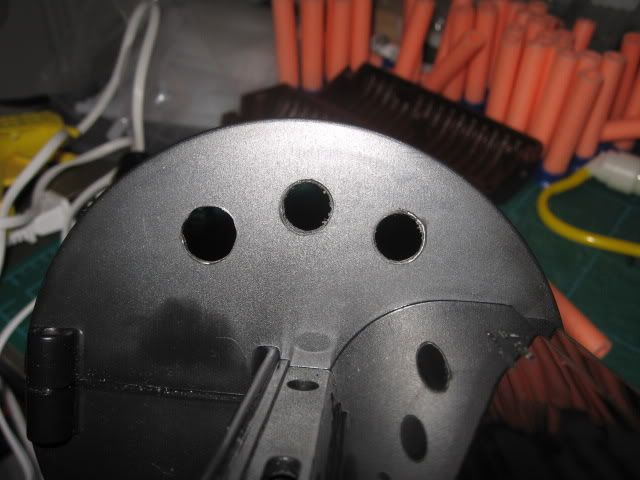
I wasn't able to keep the slots centered with the barrels so I opened it up. I like this much better.

#323199 pSyk's "Auto-Loading" Rampage 3k + Vid
Posted by
on 29 October 2012 - 07:50 PM
in
Modifications
#299147 Apocalypse 2011
Posted by
on 01 June 2011 - 06:56 PM
in
Nerf Wars
#302252 Apoc Round Schedule and Sign Up
Posted by
on 25 July 2011 - 07:19 PM
in
Nerf Wars
U3 Objective
Full Roster Deathmatch
Pistols/GSH
U3 Objectives
Deathmatch
Deathmatch
Full Roster Deathmatch
Pistols/GSH
#305642 CPVC Breach (Sodizzle) Longshot
Posted by
on 09 October 2011 - 11:21 PM
in
Modifications
#305547 CPVC Breach (Sodizzle) Longshot
Posted by
on 08 October 2011 - 07:31 PM
in
Modifications
@windtex1: Good to know. Luckily I have couplers laying around and these are pretty cheap. I just used a sanding bit on my dremel.
Also I've updated the original post with an internal and firing video: Youtube Video
#305500 CPVC Breach (Sodizzle) Longshot
Posted by
on 07 October 2011 - 10:44 PM
in
Modifications
@Green Wing: Rarely jams. It feeds really well.
@chavez_guy: I can get you measurements that I used, but I wouldn't use those as the exact ones since on this one, I didn't get the connector in the correct spot. I knew that the barrel was going to be about 10" so I cut a length about 12" for the barrel and put that into the coupler and figured out where I wanted the coupler. Then I cut out a 7" length for the bolt and once that was glued into the bolt base, I marked where it would hit the edge of the coupler. Then I knew roughly where to do my cut to match the barrel. I hope that makes sense.
@spencerak: You should definitely use a coupler to get a good seal.
#305452 CPVC Breach (Sodizzle) Longshot
Posted by
on 06 October 2011 - 10:57 PM
in
Modifications
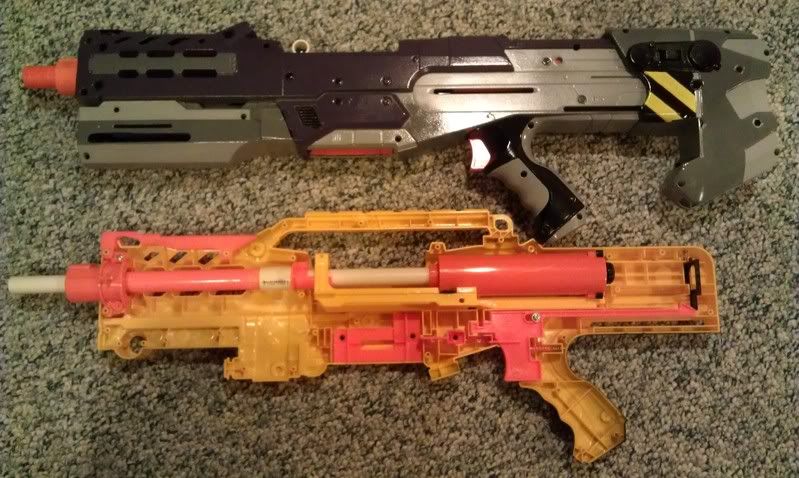
I have been wanting to try this out for some time and was finally able to get the project going. Overall, this is a fairly easy project where the most of the time spent is trying to find the correct measurements for the barrel and bolt based on where you want to put the coupler.
I also really like this setup as you only really need CPVC and a coupler as your only materials.
For tools, I used a dremel, files, scroll saw, hobby saw, and Zap-a-gap.
Youtube Mod Video
Youtube Firing Video
Either way here are some of the details that I changed in my tinkering.
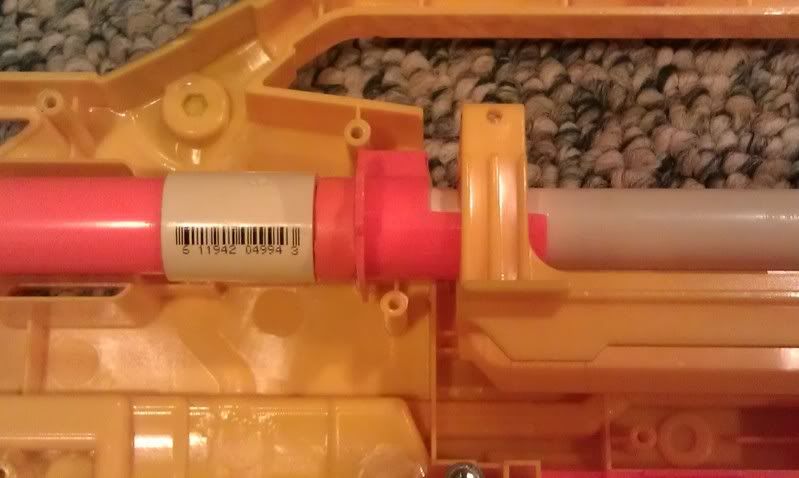
Bolt assembly:
I added a circle of rubber gasket (or a suitable sized rubber washer) to the base of the bolt assembly. CPVC didn't fit as snug through the plunger tube and this is just to help give it an extra seal. I don't know if it really helps or not (I didn't try it with or without the gasket) but it can't hurt.
Dart Guide:
Sodizzle originally uses a piece of thin wall PVC to help guide darts into the barrel. I ended up using the dart chamber instead. This is the front of the chamber that connects to the barrel to the first wall that slots into the shell. Flip this around and cut it half and you have a guide for the bolt, the dart and have support for the clip as well.
Barrel:
The barrel is glued to the coupler and uses the faux barrel as a spacer so there does not have to be any glue and everything can be shifted or replaced as necessary. Both the bolt and barrel were coned and smoothed so it is easier to feed and push darts.
OOPS:
When determining where to attach the bolt connector for the bolt sled I did not have the plunger rod attached which caused the alignment to be off due to the draw length being different. Here are some of the fixes to that mistake. (Rather than try to remove the connector and re-attach)
Basically the bolt was too far forward which meant everything needed to be shifted and so......
Plunger rod:
I originally thought that the priming draw of the bold sled went all the way to the plunger tube but that is incorrect. It stops before the plunger tube due to the priming indicator and the end of the plunger rod. Removing the priming indicator and some of the plunger rod allowed me to use the extra space to lengthen the draw enough for my setup. Make sure to bevel the end of the plunger rod to allow it to pass under the catch smoothly.
Bolt sled:
Remove the front nubs of the bolt sled to allow the sled to travel further forward.

Coupler:
The faux barrel was cut down to move the coupler forward and a spacer from another barrel was glued to the dart guide.
WAIT:
What I really should have done was just cut down the bolt. (DUH) I removed a small bit from the bolt and presto! I was able to move the barrel assembly back to the original position and loading darts worked great!
Youtube Mod Video
Youtube Firing Video
Range Tests:
LS + BBB Combo: Average 85'
K18 Single: Average 80'
K18 + BBB Combo: Average 115'
The K18 is slightly easier to prime than a [k26] and it doesn't feel like it will rip everything apart. This is a great spring for the LS.
Thanks to Sodizzle for the original build. This is a fun mod that I'll probably be doing to the rest of my Longshots.
#259619 Nite Finder - Closing The Gap On A Minimized Shell
Posted by
on 23 December 2009 - 12:45 AM
in
Modifications
MaterialsNite finder
1 mm thick plastic styrene (Brands include Plastistruct or Evergreen and can be found in most hobby shops)
- The styrene I purchased came in a pack of two 1mm sheets that are 12" x 6" in size for about $5. Here is a link to www.towerhobbies.com that sells it and so you can see the product.
ToolsSharp Blade
Glue (Zap-A-Gap)
Zip ties (a lot of them)
Files
Sandpaper
Dremel
Step 1: Minimize your blaster shell.
I opted to remove the top rail and front light. Make sure to sand the down the areas to be smooth.
Step 2: Prepare the styrene.
Cutting styrene is really easy. Just score the cut line with a sharp knife a couple times and you can snap it off by bending the styrene at the cut mark at the edge of a table. For each of these areas, I cut wide of the measured mark and sanded down to the desired point. This was done so I didn't undercut any areas and have to trash any pieces. Be sure to measure as your dimensions may be different.
Top rail: 13/16" x 4 3/16" (I cut about at most about 1/4" wider than the finished dimensions). This was then cut in half and marked to know which ends connected.
Front: This was done in two sections. Underneath the barrel and around the trigger guard.
- Underneath: 15/16" x 14/16" (because this was not a straight section I left it complete and cut it once glued to make sure the middle area didn't warp)
- Guard: 1 2/16" x 2 1/2" (also complete and cut after glued)
Once you have your styrene cut, lightly sand the area that will be glued to the blaster shell. This will help the styrene adhere better.
Step 3: Glue!
Remove the internals of your nite finder and close the shell. Starting at the top, place a small amount of glue on the top shell making sure to not get too much around the join of the shell. Take one side of your styrene and line up the inside of it with the join in the shell on both ends and press firmly. Quickly take the other side, making sure your match marks meet, line it up, press it down firmly.
Let this sit for a couple hours.
NOTE: I tried using a heat gun to get the bend right, but the plastic warped too much and I wasn't able to get it uniform.
Get your zip ties ready.
I started with the trigger guard since that was going to be the most difficult. Place a small amount of glue along the front of the guard and a little around the corner. Quickly place down the styrene press firmly. In a couple minutes, slowly bend the styrene around the guard making sure that the front area doesn't move during the bending process. Once you have the styrene bent relatively well, put some glue along the bottom, again be careful not to get too much by the join, and press down firmly.
Now grab your zip ties and start wrapping them around the guard. This will hold down the styrene to the shape of the guard. Make sure to get the zip ties tight and to pay special attention to the curves. You can use spare styrene underneath the zip ties to help keep the styrene straight and tight against the shell.
Let this dry overnight.
Once the guard is dry, remove the zip ties and inspect the styrene to make sure it fits correctly. Using your knife and a bendable ruler, lightly score a join down the entire length of the styrene. Go light and easy making multiple light passes rather than one heavy pass. In a couple minutes, the styrene will separate.
Now follow the same process for the area underneath the barrel.
Once all the areas have been covered, open the blaster and add glue to the interior of the shell for further strengthening the bond of the styrene to the shell.
Step 4: Sanding
Now that you have the shell covered up, use your dremel/files/sand paper to reduce the styrene to fit the shell any way you see fit.
Step 5: All done!
This process can work for any blaster shell and just takes time, patience and an abundance of zip ties.
Extended Draw
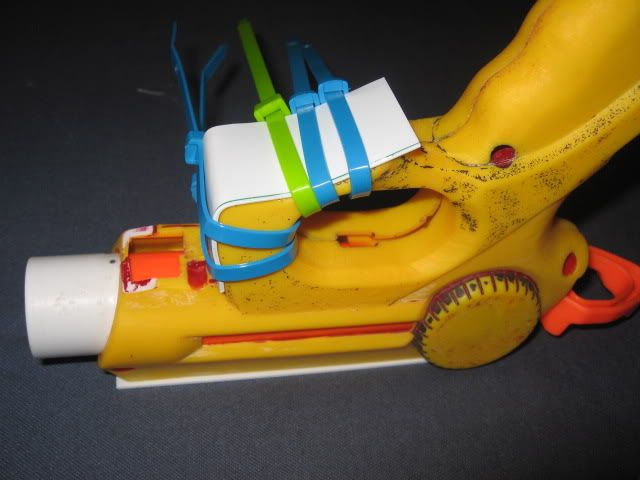
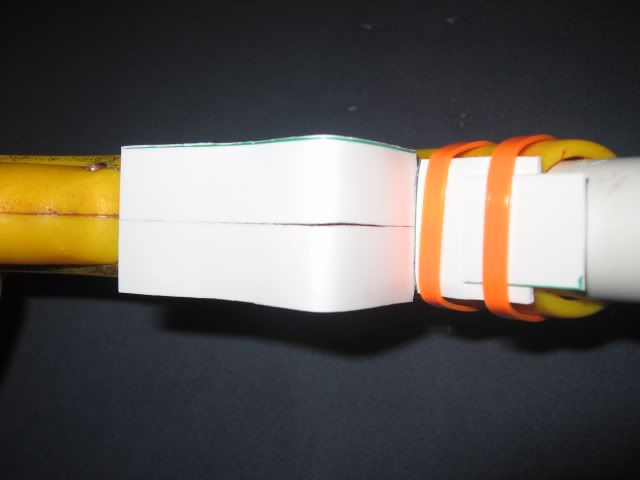
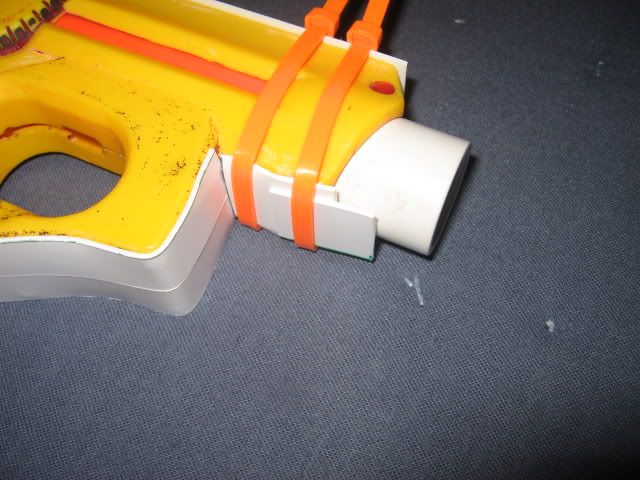
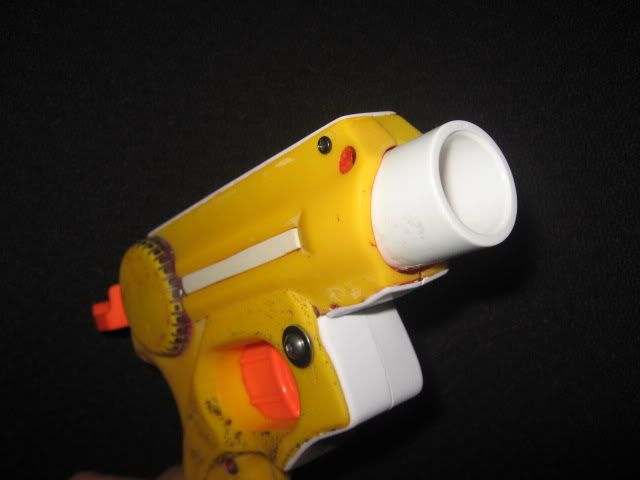
For the plunger, I glued on a PVC end cap and drilled through the cap to create a coupler and added a dart stop wire made from a paper clip. I then widened the hole in the front of the blaster to allow the PVC to fit.
To extend the draw, find the point where the plunger rod almost hits the outside of the shell and make a mark through the outside of the shell onto the plunger tube. These marks can be used to add CPVC strips to the plunger tube to secure it into the shell. I also added some supports for a post but that wasn't completely necessary.
In order for the front of the shell to close properly, I found a 1" post at Ace Hardware for the guard and cut one of the existing posts from the Nite Finder's front area for the top of the shell. The second picture doesn't show the top post.
If you have any questions, reply and I'll try to answer them as best I can.
Ranges: Averaged 75ft with a single BB stefans.
#259621 Nite Finder - Closing The Gap On A Minimized Shell
Posted by
on 23 December 2009 - 12:54 AM
in
Modifications
 I've updated the list at the top with that information. Thanks.
#259670 Nite Finder - Closing The Gap On A Minimized Shell
Posted by
on 23 December 2009 - 08:11 PM
in
Modifications
Some light scoring would definitely work with really sharp or narrow curves and corners though. Thanks for the extra thoughts, that is useful to keep in mind.
#313238 NJNO5
Posted by
on 20 March 2012 - 08:55 PM
in
Nerf Wars
I'm now confirmed to be able to go! Can I buy darts from anyone attending? PM me if so.
Also looking for a titan pump if anyone has one to sell.
#314759 NJNO5
Posted by
on 24 April 2012 - 01:03 PM
in
Nerf Wars
I'm still alive and slowly getting better. I ended up getting a concussion, a black-eye, a lot swelling on my face, multiple bruises/scratches and dizzy spells when I get up or lay down.
Regardless, it was a really fun war and when I'm able to, I'll compile the video that I took from the war... until then... spell and cold compresses!
Thanks everyone for the great turnout!
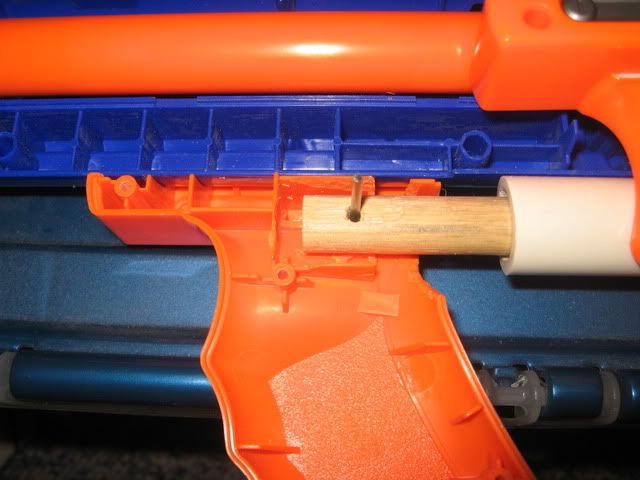
#254146 Breech Lock N' Load
Posted by
on 20 October 2009 - 09:47 PM
in
Modifications
Thanks to Cxwq and Forsaken_angel24 for the knowledge and inspiration.
Materials:Lock 'n Load
PVC: 1/2"
Brass: 17/32" & 19/16"
Paperclip
1/16" drill bit
Electrical Tape
Key Ring
Tools:Dremel
Glue: Zap-a-Gap
Files
Step 1: Remove the screws and open up the shell
Open the Lock n' Load and put away the green top shell and the bottom dart holder. These aren't needed. This is also a good time to trim and cut away any excess from the shell as desired. I trimmed the sides and back of the shell.
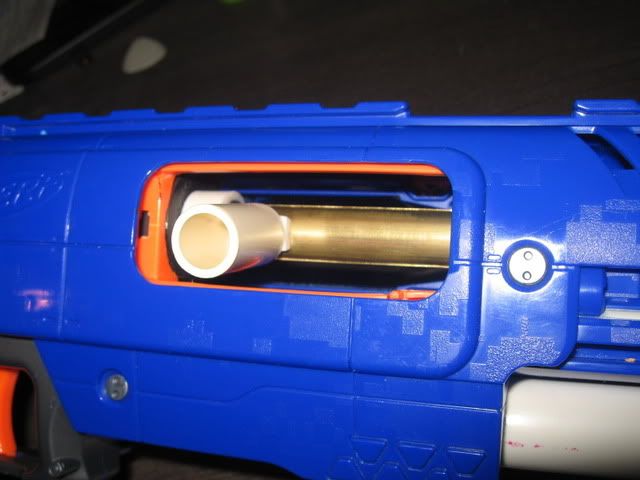
Step 2: Cut the barrel
Take the orange barrel and cut 1/4" from the plunger tube. Do not throw the barrel away just yet.
Step 3: Create the breech in the barrel
Take your 9/16" brass and cut a 4" length
Take your 17/32" brass and cut a 3 5/8" length (this could be a bit shorter as well)
Take your PVC and cut a 3 5/8" length
Start with the PVC length and measure your dart's (my darts are about 2") length 1/8" away from one end and draw the opening for the breech.
Cut this away and smooth the edges.
Insert the 9/16" brass into the PVC making sure that the two ends are flush at the opposite ends of the breech (away from the opening) and mark the opening on the brass using the PVC as your guide.
Cut this away and smooth the edges.
Use two layers of electrical tape around the 9/16" brass and insert the brass into the PVC. Dry fit the pieces together and once set, use glue on both ends of the breech to secure and make the breech air tight (so that air will only go through the brass and not leak between the brass and the PVC)
Wrap a single layer of electrical tape around the exposed 9/16" brass to give a better fit into the orange barrel.
Step 4: Create the breech opening in the shell
Insert the new barrel into the orange barrel. Make sure to line the opening in the plunger at the bottom and decide which side you want the breech to be on and twist the two pieces until it is to your liking.
And now the scary part.
Take a small drill and make a pilot hole into the side of the shell trying to get the center of breech. Hopefully you will see the brass directly below. Take a wider drill and open up the hole so that you can now see where the breech is located.
Remove the shell and slowly cut away the shell to expose the entire breech. Measure as many times as you need and go as slow as possible. Remember to take into account any filing or sanding that you might do for the edges so don't try to make your cuts final, let the file make the final edge.
The opening in the shell is about the width of a 9 volt battery as a point of reference.
Step 5: Fit the barrel into the shell
Use your dremel to widen the opening of the blaster to be able to fit the PVC. Work slowly in a full circular motion. The difference isn't too big.
In order to keep the barrel and plunger from spinning, I files two grooves into the PVC. One at the top in front and another at the bottom in the back.
Take the original orange barrel and cut the corresponding posts and trim down any excess flash. And dry fit these in place against the PVC. Make sure to not trim too much away. Once you have the fit, glue these posts to the PVC.
Alternatively, you could just hot glue the PVC against one of the shells to keep it from moving.
To keep darts from falling into the plunger tube, drill through the orange barrel and through the brass. I used a 1/16" drill bit.
Open your paperclip and insert a straight length through the openings and clip off a length enough so that the wire overhangs the barrel.
Re-insert the paperclip and glue this into place. When the glue is dry, use your dremel to sand the ends of the clip and push down to help fill in the gap and make it flush to the barrel. Add glue to seal it up.
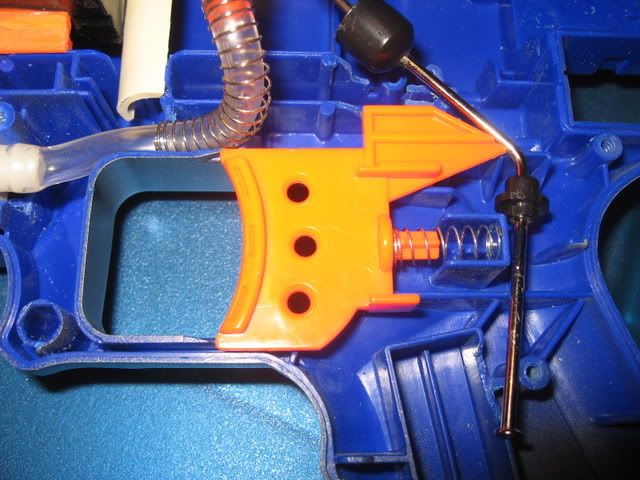
Step 6: Create breech tab
Put the barrel into the shells and close it up.
Insert the 17/32" brass length into the breech and close the opening.
I used the PVC left over from the breech opening and cut four small pieces roughly the same size. These were filed and glued on top of each other. File these into a tab and determine how you want your tab to look and where to position it.
Once you are satisfied with the tab, push the 17/32" length a little past the opening of the breech. This will make sure it is properly sealed. Do not push the length all the way to the back of the barrel because when you open the breech, the opening will smaller due to that plus the tab.
Slide the 17/32" into the middle position, mark where your tab will be and glue it to the brass being sure to not use too much glue.
Step 7: Plunger Rod and Key Ring
Make sure to clean the plunger tube and rod. Wrap two layers of electrical tape around the plunger head for a better seal. If you have an extra or different spring, add that in place. I didn't have a replacement spring for this write up.
If you have a key ring, attach that to the end of the plunger rod.
Assemble all the parts.
Step 8: Finished
All done! Ranges are about 40 ft flat and very accurate.
UPDATE:
Completed my second LnL with a CPVC breech. Both blasters have chainblazer replacement springs and some shell work. Also, a plunger handle has been added instead of the keyring.
#254166 Breech Lock N' Load
Posted by
on 20 October 2009 - 11:24 PM
in
Modifications
@heavencloud92: You could add tightening rings in the 17/32" as xbox180 stated. I don't think it would interfere with the system at all.
#254298 Breech Lock N' Load
Posted by
on 22 October 2009 - 09:13 AM
in
Modifications
And where my effort should go is entirely up to me thanks.

#254186 Breech Lock N' Load
Posted by
on 21 October 2009 - 08:00 AM
in
Modifications
#254268 Breech Lock N' Load
Posted by
on 21 October 2009 - 08:28 PM
in
Modifications
As for the barrel length, I followed the instructions from Cxwq and FA24's individual write ups that use a 4" barrel. I wanted to keep the length at 4" and so I created the tab.
@everyone else: Thanks for the compliments! This was a lot of fun!
#263505 At3k Raider
Posted by
on 28 January 2010 - 08:18 AM
in
Modifications
#263415 At3k Raider
Posted by
on 27 January 2010 - 03:14 PM
in
Modifications
This modification was made when the plunger tube of my raider exploded. Acquiring some AT3K's, it seemed like this was a perfect match. I didn't take any in-progress pictures, but I'll include what I can from the existing pictures. This was done without a plan other than to keep it simple. Much tinkering was done and each case will be different.
Here's my first experience tinkering with an air blaster.
MaterialsAT3K tank
AT3K pump or replacement pump
Raider
1 ft 17/32 brass tube
4" 9/16 brass tube
1/4" PVC
Spare CPVC/PVC
ToolsElectrical Tape
Glue (Zap-a-Gap and Plumber's Goop)
Dremel
Files
Sandpaper
Pliers
Step 1: Gut and Cut
Open up the raider fore grip and shell. You can remove everything except the jam door rails. The pieces you'll want to keep are: the front barrel cap, orange barrel, bolt sled, and the trigger assembly.
Determine how you want the pump to fit into the shell. If you use an AT3K pump, you will need to remove the bottom and front panels before the trigger. If you use a hornet pump, you can probably just remove some of the front area, but you will need to cut down the pump tube as it will be too long to attach to the raider's fore grip.
I added some PVC to the front of the pump that will still be inside the shell to keep it from moving out of the shell.
Cut and trim down the internals to get your pump to fit comfortably into the shell. Be aware of the outlet valve on your pump. I cut a hole through at the back for a valve opening.
Step 2: Prep the tank
Take the tank and remove all excess plastic from around the tank. You can use a Dremel to remove the majority of plastic, but switch to a file to shave off the rest. Be sure to clean the tank thoroughly of any plastic shavings.
Take the 1/4" length of PVC and glue this centered around the outlet valve. This will be used to secure the brass to the tank. For better adhesion, lightly sand both areas where the PVC and the tank will meet. Let this set and dry.
The inlet valve for the tank was too long to accommodate the vinyl tube and stay within the shell. You will need to cut the arm off after the 90 degree (the arm that points down when the assembly is seated), trim off a section and reattach the arm to the tank. I also trimmed off a couple of the barbs to shorten the length a little more. Test the tank to be sure you do not have any leaks.
There are a couple spacers and a spring on the pin. Remove the big spacer and the spring. The smaller one can stay or go.
Now take the bolt sled and cut off the top section leaving the bottom slide and some of the sides in tact and still connected. The tank will be mounted to the slide to better attach it to the shell and to make sure the outlet valve is lined up with the raider's barrel.
Attach the tank to the slide being aware that the intake value must be pointing down. You will need to trim down the slide until the tank fits snugly into the slide. Make sure that the slide touches the tank so it can be glued. I lined up the front of the tank with the front of the slide and cut the slide to fit up to the lip of the back of the tank.
Do not glue the assembly yet.
Step 3: Dry-fit
Take the slide and tank and tape them together and set it in place. Close your blaster shell and check the fit of the assembly. Also determine where you want the tank to be placed. I put the front of the tank in line with the back of the jam door opening. This seemed like a good location where the intake valve wouldn't get in the way of the trigger.
To further secure the tank, I added a back stop for the tank to rest against. This was a spare piece of CPVC that was wedged into the walls adjacent to the tank. Determine it's location when you dry fit the tank assembly, cut the walls and dry fit everything again.
Tape the assembly in place and look down the barrel to make sure that the outlet valve is fairly center in the barrel opening.
Step 4: Create the Breech
Take the 9/16" brass tube, add electrical tape and fit it into the PVC on the tank. Check that the length goes past the jam door. Center and make sure the breech is straight. Using a marker, mark the length of the breech. It should be a little past the PVC and up to the jam door. Use the maximum distance to account for whatever type of tab you will use to open and close the breech.
Cut the breech and file the edges smooth. Insert the 17/32" tube to make sure the fit is snug and that there are no leaks when the breech is closed.
Dry fit the breech into the tank assembly and determine the best position of the breech. Once that is set, remove the 17/32" tube and glue the breech to the tank and let that dry.
Step 5: Connect the pump
Open the blaster again and set in the pump. Determine the best path for the vinyl tube and cut away any walls that are in the way. Make sure there are no sharp edges or turns that could crimp the vinyl tube. Once you have the path opened, connect the pump to the tank and close the blaster.
Check the fit of the assembly too see if there are any more spots in the shell that need to be removed.
Step 6: Glue!
When everything is set, glue the tank assembly together and attach it and the back stop to the shell. Glue the vinyl tubing to the valves and let it all dry. Once it is dry, fill the tank with the pump to check for any leaks.
Step 7: Fore grip
Close the blaster shell with the pump. Add the fore grip and determine the stroke of the pump. You will want to try and use the entire fore grip's stroke to match the pump's stroke. I had to cut the back of the fore grip's rail to get the full range.

Make sure that the pump handle is centered with the pump tube and not angled in any way.
Cut and trim away from the fore grip to allow the pump handle to sit snugly. To attach, I drilled through the grip and pump handle and ran a thick wire through. I made a bend in one end (like an L) and made a second hole in the handle for to secure the pin. This will still allow me to remove the grip.
Test the pump and keep checking for leaks.
Step 8: Trigger
Open up the blaster and add the trigger and it's spring. You will need to make two bends in the firing pin. Get a straight edge and line it up parallel with the angle of the trigger. Where the straight edge and the pin intersect is where you will make the first bend. This bend should put the pin parallel and right next to the trigger.
Mark the spot on the pin and using some pliers, make the bend and line the two up. Make sure there is not too much tension on the pin as it could result in the outlet valve not closing all the way allowing air to escape.
Next mark the spot right on the pin after the trigger's angle. This is where you will make the second bend. This bend will allow the pin to rest inside the dart chamber in the handle. You will need to cut the wall to make sure it fits but will not come out. This is the pivot for the pin that allows the pin in the tank to be pushed by the trigger.
If there is too much tension on the pin, trim the trigger rather than trying to re-bend the pin.
Close the shell and test the trigger. (and leaks)
Step 9: The Barrel
For the barrel, I glued the Raider's orange barrel to the front cap so it will not move. Once this is installed, get the 17/32" barrel and add electrical tape in two areas of the length. This will help to stabilize the barrel. Make sure to not add too much tape. You will want the barrel to be able to slide smoothly and easily through the orange barrel. Too tight a fit could break the breech tab.
Set the barrel into the breech and close it. Create the tab and carefully glue it to the 17/32" barrel near the back of the breech. I used a length of CPVC that would extend past the shell and cut a small piece of PVC the length of the CPVC. I curved out the CPVC to fit onto the PVC and glued that together. Then, glued the tab onto the brass.
Let that dry and test the breech. (and leaks)
Step 10: All Done
Close up any gaps and add all the cosmetics you want. The clip slot on mine will either be removed and closed or drilled out on the top to keep darts for easier reloading.
Here is a short Firing Video
Enjoy!
UPDATE: Shell modifications all done:
Clip slot removed and covered
Breech tab closed and breech area closed
Pump area closed
Ranges: Average 95ft with single BB stefans
#364608 "My First 3B"
Posted by
on 11 November 2020 - 07:20 PM
in
Modifications
3D printing.... bringing back all the old mods. Now with less tape and hacksaws! Been working on a couple of longshot and LnL stuff myself. I'll have to see if I still own a BBB. 
#270981 War In New Hampshire/maine Area *date Change Take Two
Posted by
on 01 April 2010 - 03:22 PM
in
Nerf Wars
#274435 War In New Hampshire/maine Area *date Change Take Two
Posted by
on 10 May 2010 - 08:36 AM
in
Nerf Wars
#273873 War In New Hampshire/maine Area *date Change Take Two
Posted by
on 02 May 2010 - 09:48 AM
in
Nerf Wars
See y'all there.
#303059 Apocalypse 2011 recap thread
Posted by
on 08 August 2011 - 09:08 PM
in
Nerf Wars
Pros:
-------------------------------------
+ Meeting a lot of NIC members (new and familiar)
+ My blasters survived intact
+ Quick and easy drive down to NJ
+ Not a lot of downtime between rounds
+ Very organized with a lot of help
Cons:
--------------------------------------
- Too much wind!
- Driving back home in the rain
- Didn't get to hop into a gunslinger round!

