 Find content


Screw it. I'm in! Jumping in a carpool as they pass through from Wyoming.
shmmee
Member Since 14 Nov 2009Offline Last Active May 25 2018 11:46 AM
#360569 Armageddon XVIII: SoCal's Largest NIC War (6/24/17) NOW RECAPPING
 Posted by
on 14 June 2017 - 09:53 AM
Posted by
on 14 June 2017 - 09:53 AM
#359982 High Cap Magazine Collective Brain-Spew
Posted by
on 17 May 2017 - 05:22 PM


So, Hoping that worked. I can't actually see the pics due to work filters. Here's some pics of my failed prototype. The entire spool rotates inside the cookie tin so only the darts segueing between the mag and cam are moving independently of the spool. With a little more guidance between the stock mag and the cam, and a lot more rethinking for spring placement and materials (like having the ribbon feeding out through slots much lower in the mag and having a longer follower - instead of wrapping up and over the top of the mag, I think it could be viable.
#359632 slugs and breech help
Posted by
on 02 May 2017 - 12:01 PM
CPVC is a very finickey material. It's regulated by the O.D. thickness and just has a minimum wall thickness affecting the I.D. The result is that you'll see a pretty wide range of thicknesses (most will be way too tight) even among cpvc sticks of the same brand and batch. Your best bet is to take a dart and test the tubes. My best luck has been with the brand "flow guard gold". Every stick I've tried putting a dart into has been a perfect fit. I cleared the shelves of it after finding it. You'll probably need to travel to or call several different hardware stores before finding anything that will give you a good fit.
Also, I'd suggest using your hot glue gun to melt a little more of a depression into your foam for your washer to fit into. A well made slug won't have any visible metal. You should also expect your first thousand slugs to be awful, so don't get discouraged. They have a bit of a learning curve to them.
#358312 Semi auto mag fed (air powered) revisited
Posted by
on 01 March 2017 - 03:22 PM
Hi, sorry - long time, no content. I've found a local, well established nerfing group so I've been able to pick up my favorite hobby again! And as such, I've decided to start chasing my unicorn - the project I've been trying to make for years. A reasonably simple and efficient pneumatic clip fed semi auto blaster. Some of you might remember my previous attempt involving a salvo tank plumbed in line to a secret shot pump that had been re-purposed into a piston. The theory was that when the salvo tank filled the pump would also fill - pushing the pump handle out like a piston and closing the breech. The problem, is that as soon as the salvo fired the piston retracted prematurely and half the air was blasted back out of the breech. I realized I would need a separate delayed valve to open the breech shortly after the dart had left the barrel on a delay. I looked briefly at the big salvo valve assembly. As the o-ring on the salvo trigger passed the buttons it bumped them open - venting and firing the tanks. To date I'd only looked at that valve group using the traditional pump input in the back to fill from so any space between the trigger o-ring and fill line would remain pressurized. Experimentation with this failed though. As the trigger o-ring passed a button valve it would leak air from the reserve.
My revisit - and the progress to date is again based on a big salvo valve assembly. My "erueka!" moment came when I realized that the big salvo trigger (something I had looked at before but had given up on) was comprised of 4 individual button valves/check valves - so why not fill from one of the back legs (instead of the normal always open fill line - since it operated as a check valve) and add a bumper to the salvo trigger stem to open the fill while the o-ring sealed in pressure!
With the trigger fully retracted the valve group is sealed and the bumper opens the 3rd leg - filling the panther tank and retracting a piston - closing the breech and loading a dart. As the trigger piston begins to move backwards, the bumper slides off of the 3rd leg, (closing off the air reserve) and then the o-ring on the trigger piston bumps the first leg (firing the panther) and a fraction of a second later (hopefully long enough for the dart to leave the barrel) it bumps the second leg venting the piston and allowing the breech to be pulled open by a spring - chambering the next dart. When the trigger retracts the o-ring reseals the valve assembly and the third leg is bumped open again - priming the tank and closing the breech. The fourth leg won't be used.

I modeled up a longstrike trigger, added a riser with a big salvo trigger stem and then added the extension bumper on the end of it and sent it through my printer.

The white piece is my final 3d printed piece. It was a drop in perfect fit. Not bad for my first ever time modeling with anything, huh? (I used autodesk fusion 360 and printed in PLA)
So far, proof of concept has only happened as far as blowing into the third leg while sliding the trigger rod around inside. The 3rd leg air inlet shuts off at the appropriate time so I really, really think it'll work!
I bought a small piston on amazon and will be leveraging it's travel long enough to open and close the breech. I'll be picking up the fittings for the piston on my way home from work today. For my air reserve I'm using a banded rf20 bladder. I've still got some bridges to cross but for the first time in years, there is a light at the end of the tunnel!
#353872 Post your DIY/Maker/Craft/Mod hobbies
Posted by
on 31 May 2016 - 11:10 AM
Cosplay has become a family event but I sat in the background at the spring Salt Lake City comic con (Fan X) this year to focus on supporting my sisters build. She's spent an entire year hand embroidering details into her custom sewn Rapunzel dress and came to me to get the $1,000+ of hair extensions to glow. After failing with EL wire and fiber optic strands (wrong shade of white/yellow and too dim) we found a winner with LED stripping. I crammed 77' of it into her 5'6" of hair. It's powered by a 3s lipo and the hidden dimmer switch allows it to actually fade and throb when she sings. She's also pulled her husband (flynn) and my parents (mother Gothel and the ruffian Mime) into the crazy. I got to hang back to manage the remote controls to the puppet lizard I also built for her (Pascal). It sits on her shoulder. The head moves up/down left/right. the mouth opens and closes and the eyes look left and right. It runs on a separate 3s lipo. Both batteries have voltage monitors on them for safety.
We won dominated our way to first place in the masters division at this year's spring comic con (Fan X) and will be making an in costume appearance at an event for sick kids this weekend.
Attached Thumbnails


#344049 Reverse Wye Hopper
Posted by
on 08 January 2015 - 10:32 AM
That's gotta be the coolest innovation I've seen in ages! I'm wondering how much of an impact the second dart has upon the seated and ready to fire dart. I'd imagine if the second dart is sitting on the loaded dart at that 45 degree angle, there's a chance that it might fall enough to lock the loaded dart in place and that upon firing the loaded dart would first have to force it's way past the second dart - wasting energy while doing so. Do the darts in the feed tube jump much or kick back when you fire? I'd imagine that to be a symptom of secondary darts jamming primary darts.
#342785 Has anyone figured out the best way to seal slits in Elite darts?
Posted by
on 10 November 2014 - 09:22 AM
Like crusher said, Scotch tape. Light weight and durable. It's especially helpful to wrap them before you split them. Using the thinnest lightest packing tape you can find would be even better since you'll have more coverage with less overlap.
#338527 Dart and Barrels pictures thread
Posted by
on 28 April 2014 - 09:37 AM
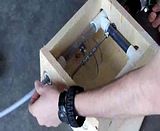
I think this thread deserves documentation of my "auto blanker".

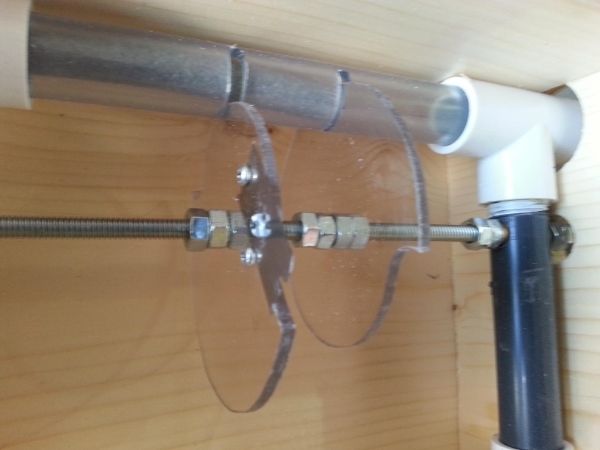
The back cam stops the foam - measuring the length as the front cam (with attached razor blade) spins around and cuts it. A wet-dry vac provides suction that feeds the foam. In the full speed operation video it cuts 100' of foam in 3min 44 seconds - though the drill battery was almost dead at that point in the night. With a full battery on low gear (high gear makes it jam up) it cut 100' in a little over 2 min.
Slow operation video (click to view):
Full speed operation video (click to view)... Photo bucket refuses to let me upload over my current slow internet connection. I'll have to get it up once I get back to a more stable connection.
Ends come up perfectly square, length is incredibly consistent. It's a beautiful result!
Write up is pending - but coming. Right now I'm focusing on the production and sale of cut blanks. (Shameless plug warning)
pre cut beige foam sale link

