Jump to content


Retiate

Member Since 29 Aug 2006
Offline Last Active Jul 13 2013 09:55 AM

Topics I've Started

Edge

29 November 2008 - 03:26 AM

It's definitely about time I get this post up here... This is long, long overdue. Like, I've had it finished since the beginning of this year overdue. Because of this, I have forgotten all the precise measurements and I can't open the gun back up. However, if I can figure this stuff out, then you should be able to as well. At least it taught me to put all important information into the little captions under the pictures in my Photobucket. Anyway, on to the mod.

The Expand-a-Blast... A not-so-popular gun, and at first glance, it's not surprising why. The gun is large, way too large for a sidearm, but it seems to lack the potential to make it a primary. My goal was to change that.

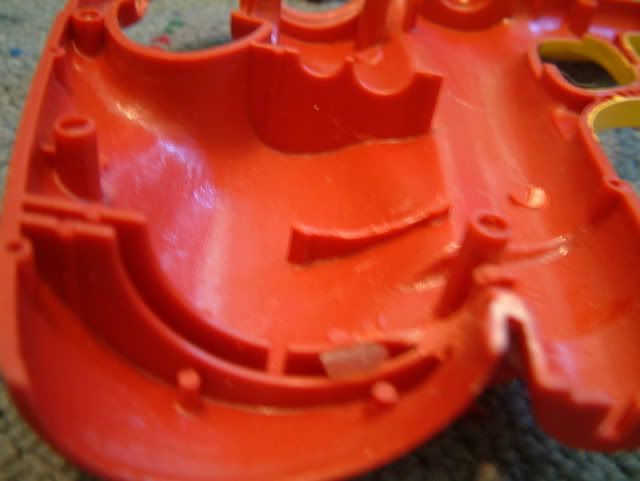
So first is to, obviously, open the gun up. No real secret screws that I can remember, and it's got those nice big screws that the older guns have, I really like those. Sorry I don't have any pictures of the internals, but they're nice and simple. Remove all of that expanding garbage, it's all useless. Keep the black handle though, it's nice to have and we'll be using it later. Just keep the plunger, plunger tube, trigger and the catch.

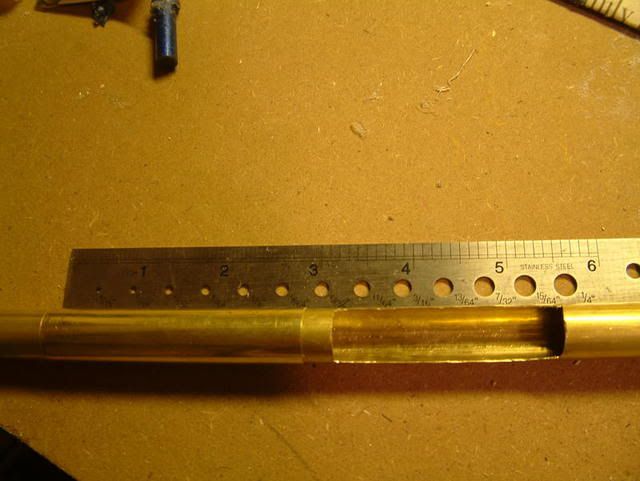
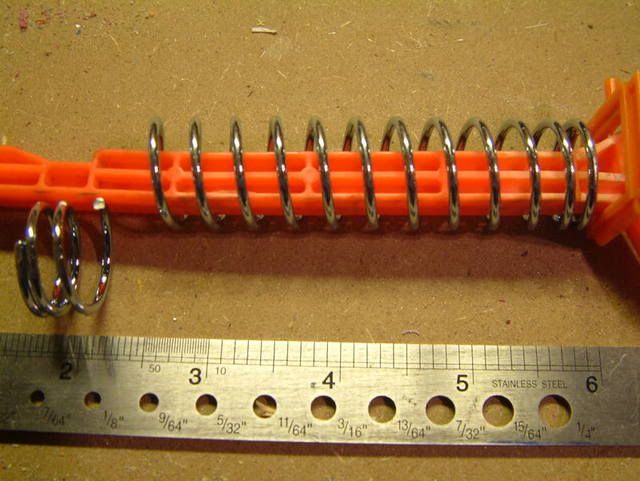
First, I did a simple spring replacement. I used one of those handyman springs that are real popular to use for Nitefinder spring replacements. The dimensions are 7/8" x 4" x .080". The length might be slightly different, as these are the dimensions to what my Home Depot now stocks, and if I remember right, were a little bit different. The 7/8" width and .080" gauge are what's important.
Posted Image

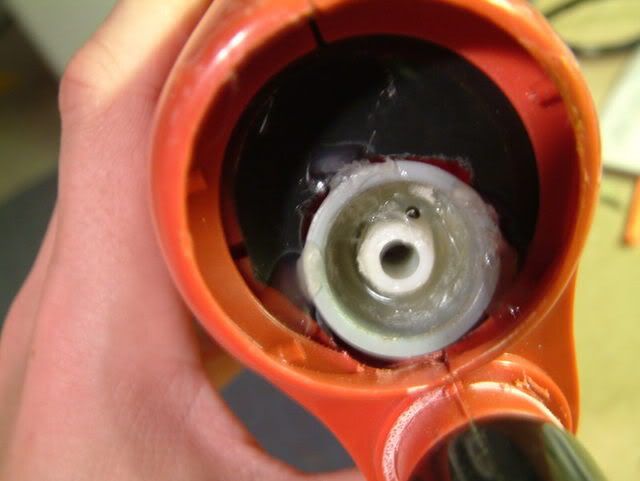
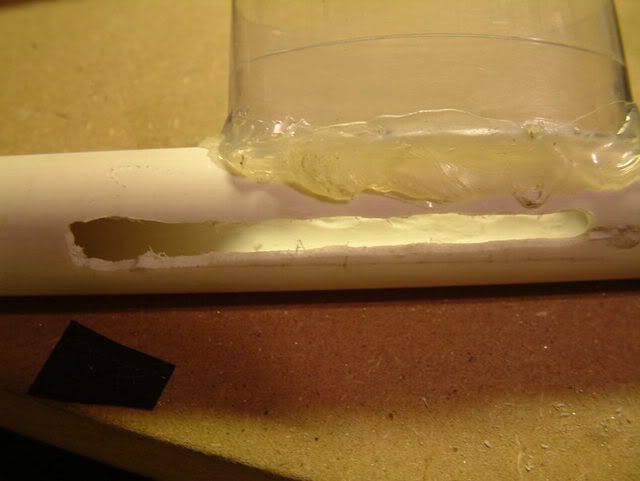
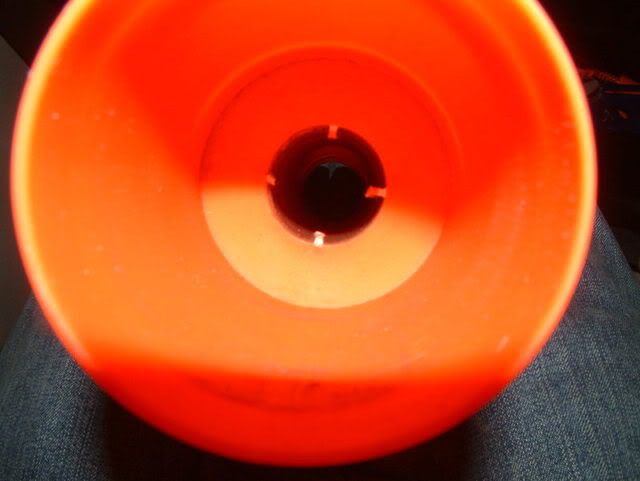
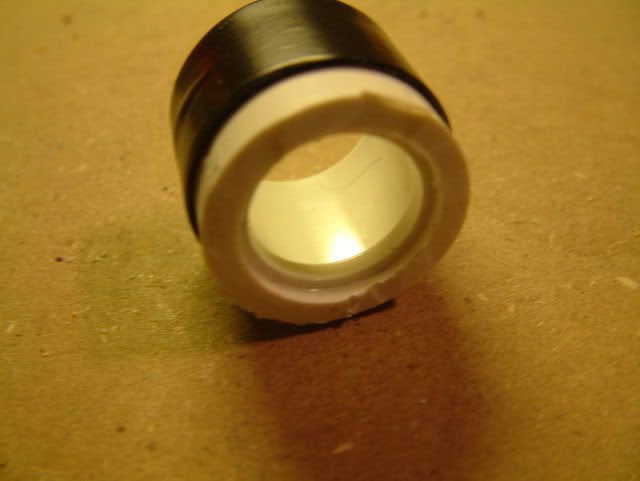
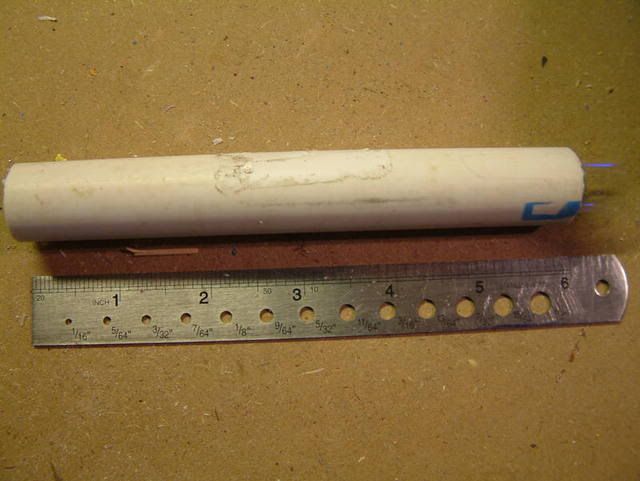
Next up, the air restrictor. Get your plunger tube, and make it look like this.
Posted Image

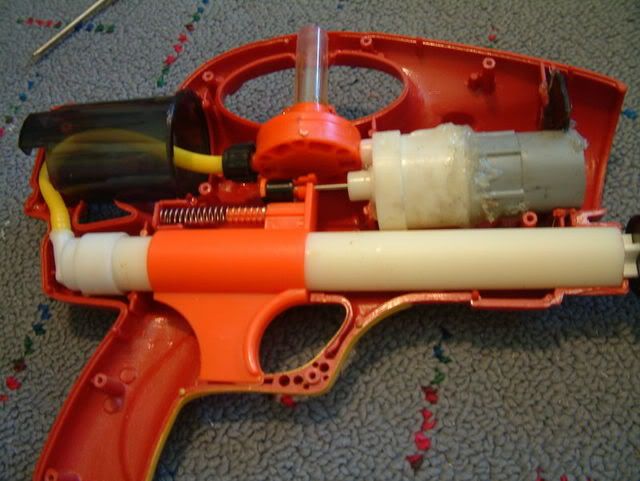
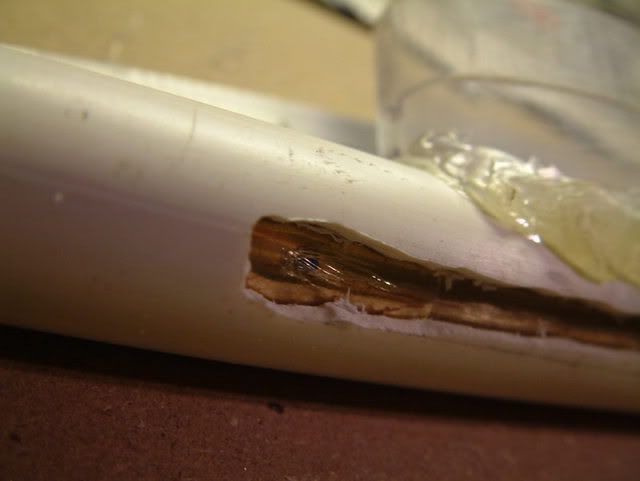
Alright, here's where things start to change. Take a look at the internals. There's a huge useless barrel in front of a very short but wide plunger tube, allowing for a shorter but faster airflow. To me, this thing just screamed "Inline Clip!". So get a 1/2" PVC coupler and chop one side off, so you have a section for 1/2" PVC to go then the little divider thing. This needs to seal in the big barrel as close to the plunger tube as possible. Wrap electrical tape around it until it fits snug back there. Don't make it too tight or you will stress the plastic. You should be able to push it down fairly easily, but it should be snug.
Posted Image

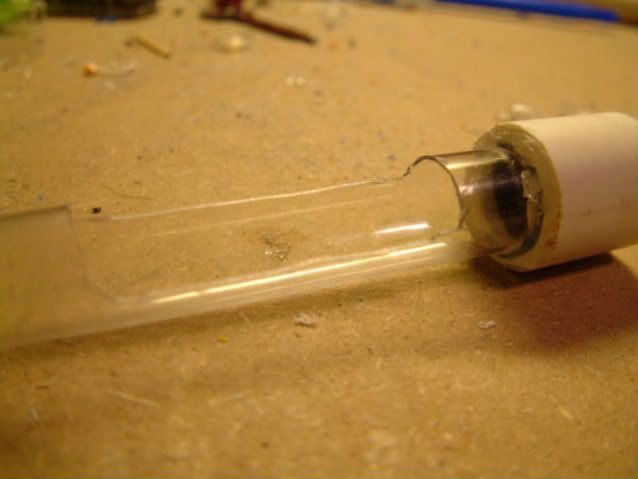
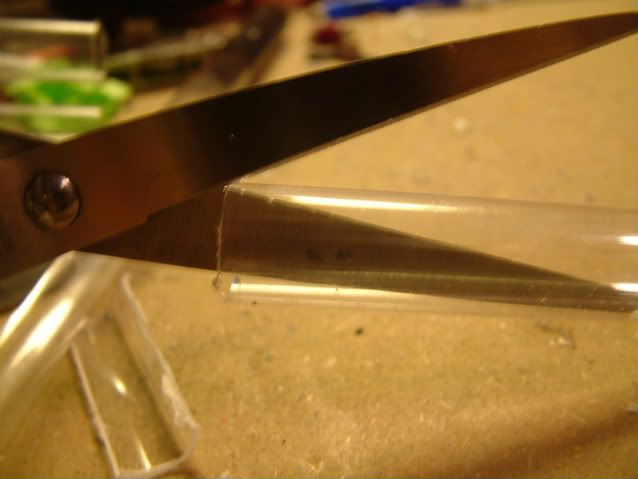
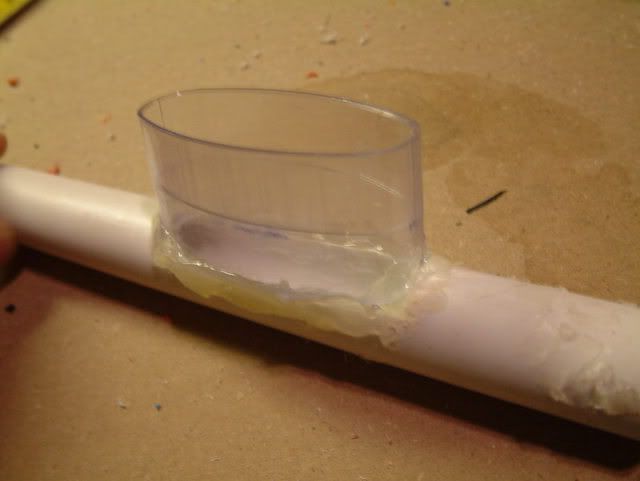
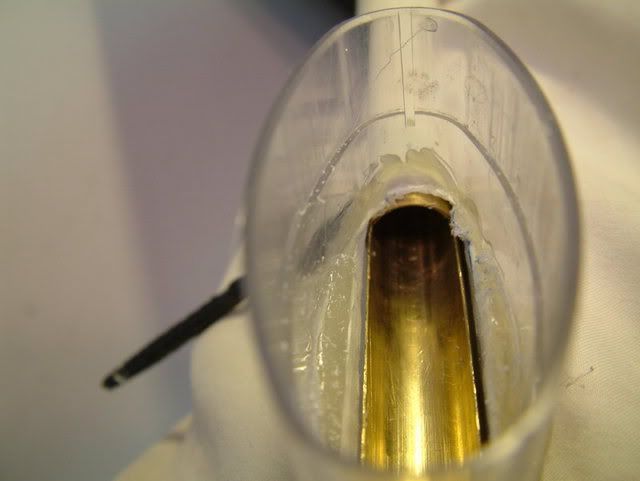
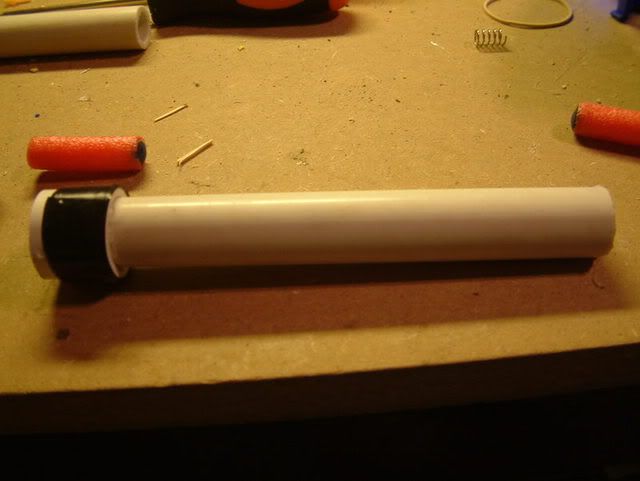
Now you need a section of 1/2" THINWALL PVC to be the inline clip. This will attach to your half coupler in the back of the barrel and connect to a full coupler on the front for a barrel. Cut it long enough so you can fit a coupler on top that sticks out about halfway. Glue the half coupler to one end of this.
Posted Image

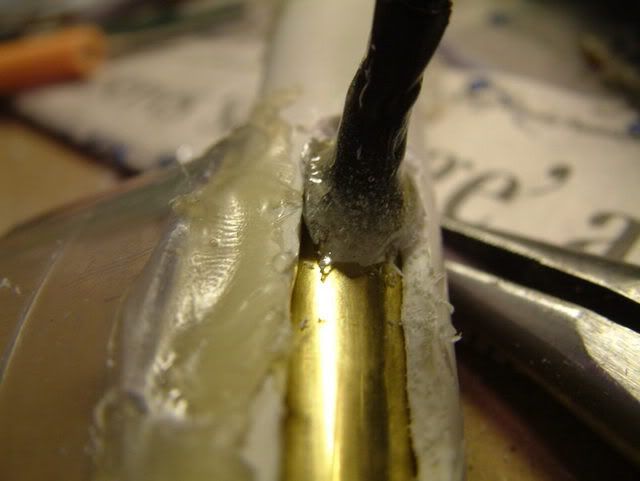
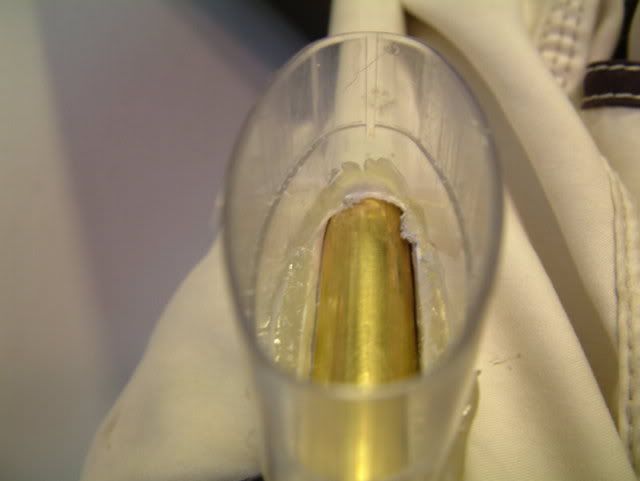
Now on the end of the half coupler you need something to keep the darts from falling into the plunger tube. I cut a toothpick to size and glued it on there. Anything will work as long as there's no chance of a dart slipping through it. Note in this picture I was using 1/2" Sch. 40 PVC, not thinwall. It didn't work. I had to switch over to thinwall.
Posted Image

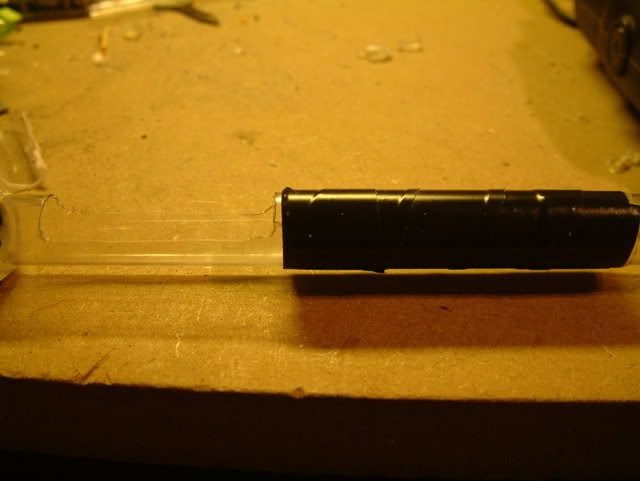
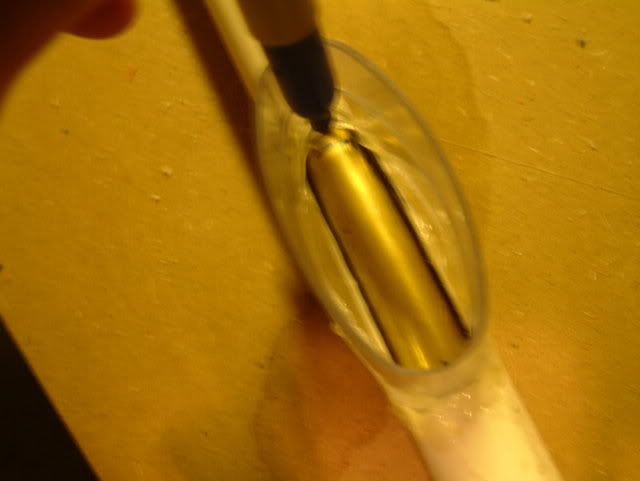
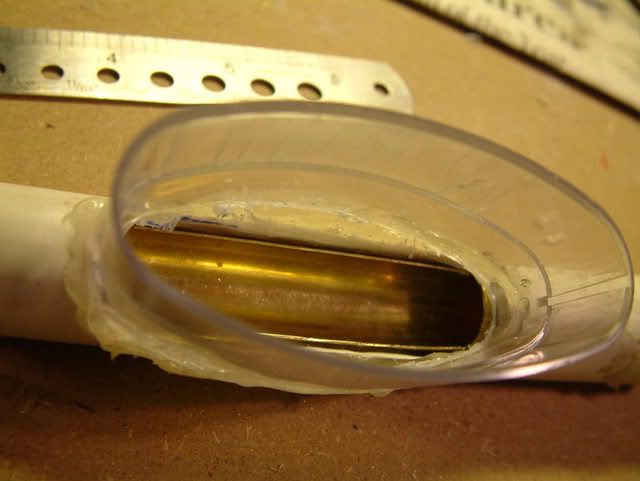
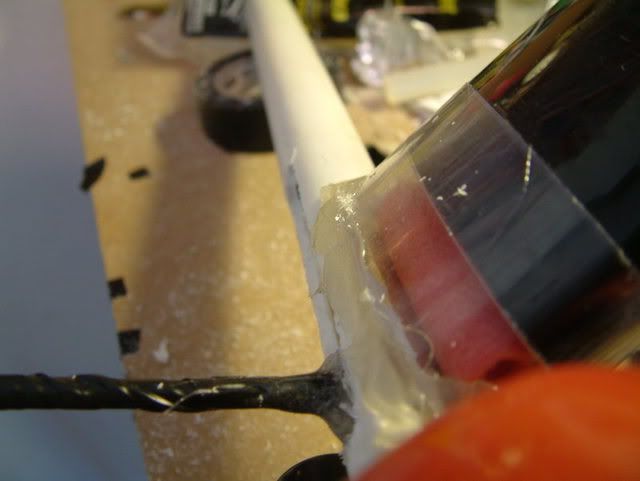
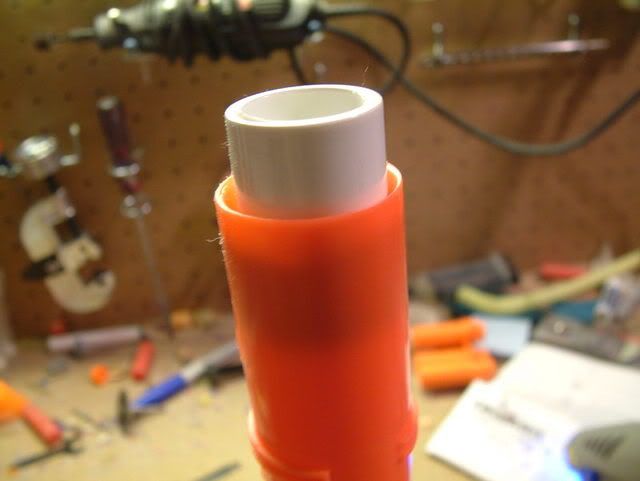
Now slide that into the plunger tube. If your electrical tape is snug enough, it shouldn't need to be glued, the tape should seal well. Here's a picture of about how far your full coupler should stick out. Mine is almost a perfect size and sits just short of flush with the case when the gun is together. Once you have that measured out alright, glue the coupler to the thinwall PVC. Then wrap electrical tape around the coupler and glue it to the big orange barrel. When you put the case back together, you might notice that it doesn't come together in the front. You need to Dremel it out to make room for the coupler.
Posted Image

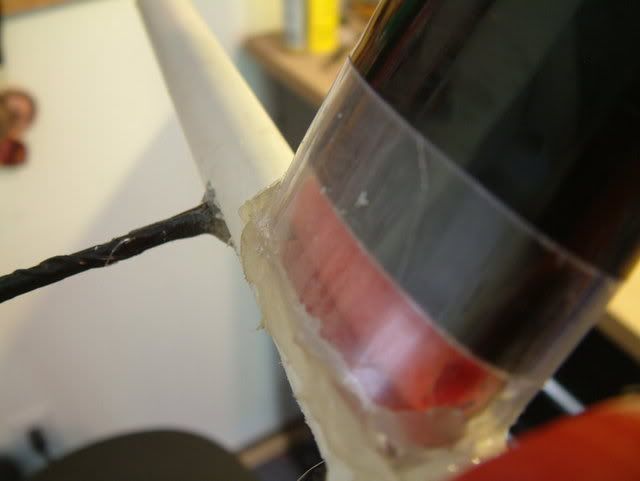
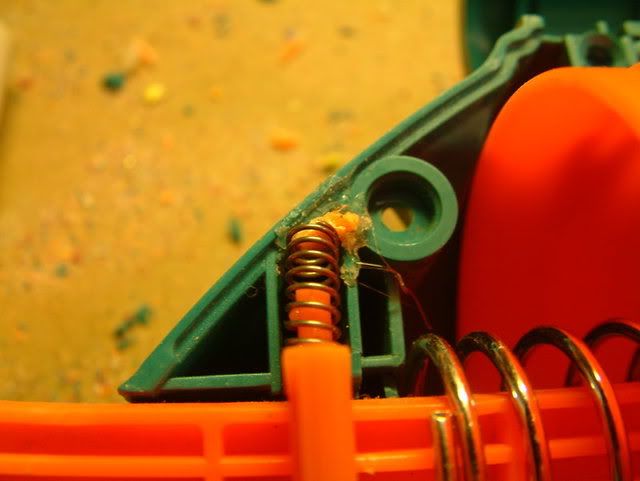
I think mine had trouble catching, so I reinforced it a bit.
Posted Image

And now it needs a barrel. Cut a length of 1/2" PVC and put a barrel of choice on there. You want it to be tight in the back. Otherwise when the gun is fired, darts will just fly through your barrel instead of stopping in the back.
Posted Image

In case you don't know how an inline clip works, I'll give a little description. Darts are loaded end to end in the thinwall PVC, then one is loaded in the barrel. When the gun is fired, most of the pressure from the plunger flows around your stacked up line of darts and shoots the dart out the barrel, and some of it pushes your line up, where a dart is then pushed into the back of your barrel, ready to be fired. Pretty neat. Thank Carbon for coming up with and building the first inline clip. It's a brilliant design.

Ok, so now you have your inline clip Expand-a-Blast. And you're not done yet. I don't know about you, but I wouldn't want to go into a war with just that as my primary.

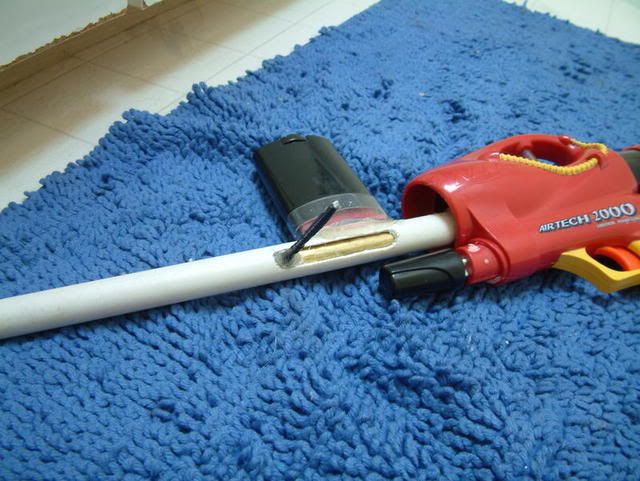
So I decided to take another step and integrate a SuperMaxx 1500 into it. Yes, I'm sure an Airtech 2000 will work as a substitute. I had three or four SM1500s sitting around at the time, so I decided to use one of those.

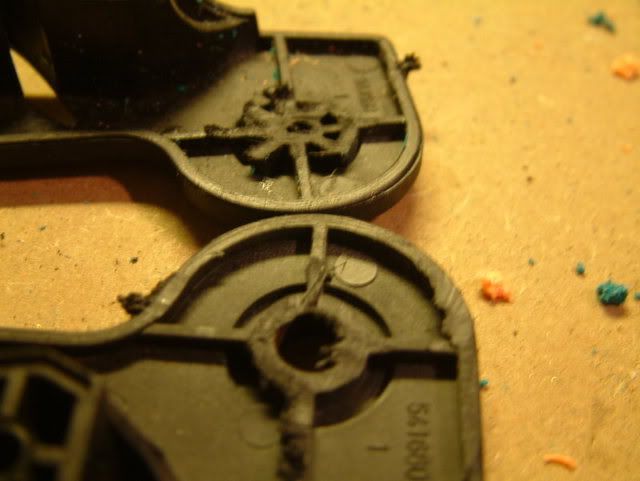
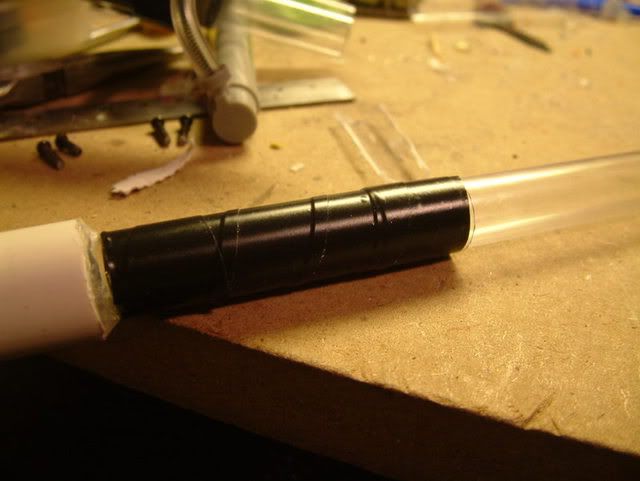
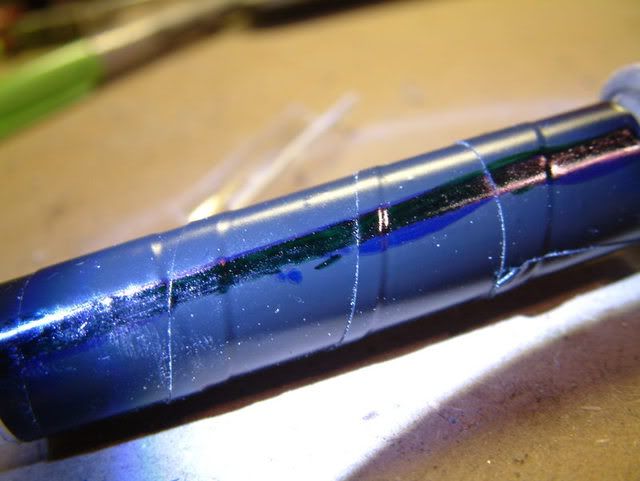
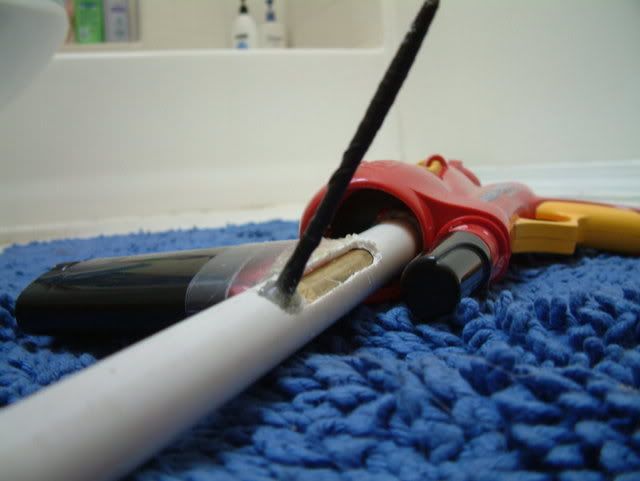
I figured right where the black handle is would be the best, and maybe the only, spot where the tank could fit. So bust out your Dremel and prepare to sand. A lot. First, take your black handle pieces that look like this:
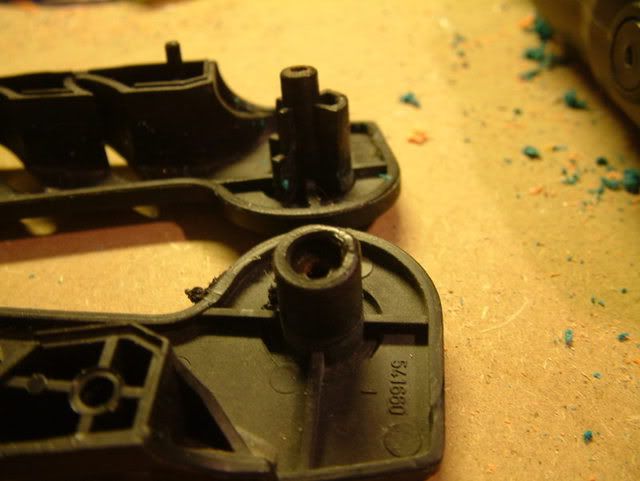
Posted Image

And do this:
Posted Image

Wall War

08 July 2008 - 04:05 PM

Official news:
When: Saturday, August 9th. 11am - whenever we can't move anymore (probably like 4-5 pm).
Where: Sunnyslope Elementary School.
4183 Sunnyslope Road SW
Port Orchard, WA 98367

What to bring: Guns, eye protection, extra guns, a lunch, money (if people want to buy/sell anything). Also, bring a spring pistol. It is more than likely that we will be doing pistol rounds. So, if you don't have one, pick one up. Nitefinders are great and go for ~$7.
-Eye Protection is REQUIRED. If you don't have a pair, I suggest you get one. I will have some pairs of Dart Tag/Spiderman glasses if anyone does not have a pair.
No guns that will injure people.
-Guns will be banned if they cause too much pain and no one enjoys playing with them. Singled Titans and singled Big Blasts with the pump plugged will be banned.
-Homemades are allowed on a case-by-case basis. Bring them to the war, we will see whether they are acceptable or if no one will enjoy playing with them.
-I will have extra "loaner" guns if anyone needs them.
-Bring your own lunch.
-I would highly recommend bringing extra guns. Last time, we had several problems with guns and had to swap them out.


Pictures are provided by Blackfox on page 2.

Standard 3/15 Deathmatch will most likely be the main game type. Check out the Nerf War Etiquette thread.
From that thread:
The rules of Deathmatch:

1. The round is played with the 3/15 rule.
2. Each player has to be hit three times before they are eliminated from the round.
3. After each hit, they must point their gun into the sky to show everyone that they have been hit and count to 15. While they are counting, they must clear the combat area.
4. Once they reach a count of 15 and have removed themselves from the active combat area, they must shout "CLEAR!" and then they may return to the round.
5. A valid hit is any hit from a projectile onto any part of their body. If their gun is hit, they are still out, with the exception of the Manta Ray. It is the only gun hit allowed since the gun was designed to also be a shield. Ground skipping darts and ricochets don't count.
6. Another valid hit is a close quarters hit, or tapping, in which the assailant takes someone out by tapping the barrel of their gun onto the person.
7. Once a player has been hit three times, they are eliminated from the round. They must clear the field and return to the staging area to wait for the current round to end.

Those are the rules we are going by. Read over them if you are unfamiliar with them.

All updates will be added to this post.

Possible attendance List:
-Retiate + 1-3
-Renegademilitia15
-Psilence
-Hierarchy + 1(?)
-Blackfox + 2
-Used Man
-Smiggetti + 4
-Chilipepperfender + 1

Petg Magstrike Question

04 May 2008 - 11:23 AM

For anyone who has made a PETG Magstrike following KBarker's write up, after drilling out the barrels with a 9/16" drill bit, can I use a 5/8" spade bit to drill it out the rest of the way? Or will I have to use a 5/8" drill bit?
Thanks.

A Test

21 April 2008 - 12:30 AM

A while back, Galaxy613 said something about cutting a piece of PETG and putting it over another piece of PETG for a breech. I thought this was a good idea, and so I decided to try it out.

I made a quick barrel to first test how well a standard 12" PETG barrel did. I decided to use my Pump Shotgun as the gun to test the barrels, mainly because it's one of the only couplered guns I have.
So, for the tests, I pushed a dart into the back of my heavy wall 12" PETG barrel, then pushed it up a bit so it was at the position it would be if I had loaded it with a breech, to keep things constant.
I shot it 3 times, using the same dart, and pushing it up roughly the same distance.
The dart landed an average of about 100' (From where I shoot, there's a wall of bricks almost exactly 100' ahead of me, and it either hit the bricks, or dropped right at them).

I then used the same barrel to cut my breech. So I started by marking then cutting the hole for my breech.
Sorry these pictures have horrible white balance, it was dark outside, so I had to use the work light in my room.
The cut is roughly 1.75" long.
Posted Image

Then I needed to make my breech cover. I cut a ~2.25" section of medium wall PETG for this. I then cut this piece lengthwise using a pair of scissors.
Posted Image

Then I slid it over the heavy wall PETG barrel. I sealed off one end, then blew down the other to see how good of a seal this basic set up had. It was terrible, air leaked out all over the place. So to improve this, I wrapped the breech cover in e-tape.
Posted Image

And here it is, breech closed.
Posted Image

I tested this set up to see if the seal improved, using the same procedure as before. It worked. The seal was so much better. To keep this seal, the slit I cut, now a small gap, had to be on the opposite side of the cut breech. To make sure this side was always down, I drew a line over it with a sharpie so I could tell where it was.
Posted Image

And the whole barrel, breech installed.
I had to spray silicone lube over the parts that the breech cover contacted since it was really hard to move back and forth.
Posted Image

I went outside and range tested again, using the same dart. I shot it 3 times again, and to my surprise, the dart went the same distance as before. I don't know it was because of the breech, but two out of the three shots, the barrel blew off. I think it was because I put the barrel in the coupler looser so I could pull it off without risk of it breaking.

Now, there are some definite downsides to this compared to a brass breech:
-The whole thing is flimsy, the section of the barrel that was cut for the breech can twist from side to side and it feels very weak. I don't think this will matter too much though, as it should normally be encased in PVC.
-The breech cover is harder to move back and forth, even with the silicone lube.
-Occasionally the breech cover will catch on part of the breech hole when it's closing. This really only happened when I was trying to close it really fast, but fast is how it will always be closed in a war situation.
-The added e-tape will make it tougher to add a breech handle.

I think I can work out some of these flaws. This was only a quick prototype. I'll update this as I solve these problems, or if I come across anything else worth noting.
Hopefully I can get this whole thing to work well. Maybe in the future perfectly nesting materials won't be necessary for a breech.

Clipped At2k

15 July 2007 - 10:54 PM

So I decided to do this mod for a couple of reasons. I wanted to experiment with breaches and clips before I started on my Angel Bow mod, and I wanted a mid range blaster that could take shots off fairly quickly without having to worry much about reload times (mostly for keeping people back or forcing people to take cover and play defense). I don't like the Longshot much, and a quadded 2K didn't have enough shots. Plus I wanted the extra turret incase I wanted to turret a gun.
[I'm sorry some of the pictures a bit blurry, those were the ones I took earlier and I was still getting used to the camera]

Anyway, here's how I did it.

Tools needed:
-Dremel (required if your going to cut a breach)
-Pipe cutters (optional)
-Hotglue gun
-Ruler
-Screwdriver (both philips and flat head)

Materials needed:
-Hotglue sticks
-Quick drying Epoxy (I used 90 second)
-Plumbers Goop
-1/2" Sch. 40 PVC (12")
-1/2" Sch. 40 PVC Coupler
-9/16" brass (12") [Whatever your preferred brass size for air guns is here, just make sure it's not a tight fit]
-19/32" brass (at least 3") [the next size up from the size of brass for your barrel]
-Electrical Tape
-Aluminum foil

Part 1: The Easy Stuff (Internal Mods)

Ok, so start off by opening up your gun. I got the pump cap off by cutting one side with a dremel, then prying it all off with a flat head screwdriver.

Once you get it open, take out all of the internals and set them aside. All you should have are the 2 shell halves. Remove the screws if you haven't already and set those aside as well. Using a magnet to keep all the screws is one place works well.

You're going to need to sand down quite a bit of the shell so you can fit your PVC coupler in there. Just keep sanding and testing to see if the coupler fits in there well.
Posted Image

Once you get both shells sanded down, put the coupler over the front of the airtank and hotglue it in place.
Plug the pump and do a Bic Pen mod while it's open.
Posted Image

I then reinforced the coupler by drilling/burning a hole in the side of the coupler and squeezing some hotglue in there. This was first mentioned by CaptainSlug in his Big Blast mod. He describes this process much better than I do. You don't want to hotglue to seep into the side of the coupler where the PVC barrel will go. I made that mistake, so my barrel isn't as stable as I could be. But that's ok, as it will be hotglued into the coupler anyway (unless you want your barrel removeable)
Posted Image
In that picture, you can see how I put too much hotglue. You can also see I made used part of a CD case to stabilize the PVC coupler.

After you get the coupler in and all the other internal mods, screw the case back together, you're done with internals.

Part 2: The Clip

First, we are going to make a Deoderant Clip (invented by Forsaken_Angel24 on his Angel Bow. So get an empty deoderant case to use as the clip.
Clean it out and snap off the back end and clip off the long post. I added some cardboard on the side of my clip so it fit my darts better and added electrical tape to the back end of my clip so it would stay on.
Posted Image

Take the lid of the deoderant case and cut off the top end, so it's hollow on both end.
Make sure you know which side you cut, and which side slides on the deoderant case.

Now you will need to make a PVC barrel to attach the clip to. So take your 12" of PVC and measure where you want the clip to be. Measure then cut out a section of the PVC so the deoderant lid fits in there without much dead space.
Hotglue the lid in place, making sure the side that slides over the rest of the deoderant case is up.
Posted Image

Part 3: The Breach

Now for the most difficult part of this mod - the breach.

Take your 9/16" brass (or whatever size brass you use for a barrel) and slide it inside your 12" of PVC. Then mark how long your breach needs to be using the PVC breach as a guide. It's kind of hard to explain, but the picture should clear things up.
Posted Image

Go ahead and cut out the breach after you have it measured. Make sure you draw it out first so your cuts are straight.
Posted Image
Here it is inserted back inside the PVC.

Now to make a breach cover. So cut your 19/32" brass (one size up from size of your brass barrel) larger than the section you cut out of the brass barrel. If you used pipe cutters, you must flare out the side you cut (I used a file).
Here's picture showing both the breach cover and the section I cut out of my barrel.
Posted Image
As you can see, the breach cover is nearly 3", while the section I cut is just under 2.5".

A breach handle must also be made, so you will need to make a long cut across the side of your PVC for it to go. This took me quite a bit of testing and measuring. Make sure the cut is long enough so the breach handle can slide far enough to completely open and close the breach.
Posted Image

You can see I make a blue dot to represent the breach handle placement while I was testing the stroke of the breach handle.
Posted Image


[End of first post, please do not post until I finish the rest of the write up]


Alright, now that you have all the breach handle pieces ready, it's time to glue the breach handle on. I used a long nail wrapped in electrical tape. If you decide to use a nail too, make sure the head of the nail is what's being glued to the breach cover, otherwise it will not hold. Trust me, I tried it.
Be sure to thank Gengar003 for teaching you How to Epoxy.
But, just before you glue it on, you will want to make sure no glue gets on the PVC and bonds the breach cover to the PVC. So, take some aluminum foil and form it to the PVC. That way, if any epoxy does go out there, you can just rip off the aluminum foil and your breach will still work just fine. And just incase you hadn't already inferred this, you must glue the breach handle to the breach cover while the breach is inside the PVC. Once the breach handle is glued on, there is no way to get the breach in/out of the PVC.
Posted Image

Hold the breach handle to the breach cover for a minute while the epoxy dries. Once it does, see if it's wobbly or not. You might find it isn't as solid as you'd like it to be. No worry's, just add some Plumbers Goop using the same aluminum foil idea. That should hold, as Plumbers Goop bonds very well with brass.

Now you should have a fully functional breach, complete with a breach handle attached to a breach cover.

Here's how it should look.

Breach open.
Posted Image

Breach closed.
Posted Image

[Note that I made my breach open when the handle is forward, as there was not enough room for it to open backwards]

With the clip installed (breach closed) and attached to AT2K.
Posted Image

With the clip installed (breach open) and attached to AT2K.
Posted Image

The final product.
Posted Image

Posted Image

I went outside to range test, shooting 4 darts. Using 5 pumpd, a 100' tape measure, 2" 3/0 weighted Angel's red foam darts, from around 5' off the ground and no wind, here's what I got.
[Ranges do not include dart skip, I measured from where I shot to where to approximately where the dart hit the ground]
1st shot - 90'
2nd shot - 77'
3rd shot - 57'
4th shot - 45'

Now, your probably wondering "Wow, what's with that?"
Apparently, my goo gauge broke and there was a major loss of pressure, each shot increasing the size of the hole the air leaked out of. I looked at the gauge to see if I had pumped the gun up, saw it was empty and just thought "Hm, weird." then came the reassuring hissing sound everyone knows and loves. By the 4th shot, I doubt the gun could hold pressure for more than maybe 6 seconds.

I opened up the gun to find a nice suprise of orange goo stuff around the insides. Sucks since I wanted to keep the goo gauge. So, once the Plumbers Goop dries, I'll get out and range test again. This time, I hope it will actually work.
The clip worked nice, but I need a heavier weighted dart to push the darts in easier.