Find content


Video.
NOT A CONTEST ENTRY
- - - Intro - - -
In my time as a nerfer there has always been one quest the NIC can't quite seem to get their hands on. In the words of VACC... well, just see his words here.
It seems to me, however, that 3DBBQ has already conquered this task. His blasters easily meet all the requirements VACC has posted (see "Political Things" #3 and 4 at very bottom of this post). However, I don't think I've ever seen a “3DBBQ style” blaster at a war here in the states. I don't know if it's his awesome paint jobs, the fact that his website is in another language (which Google translate does alright with, I might add), or that he hardly ever posts, but for whatever reason nobody seems to want to reproduce his style of gun.
I'm not here to change that, but I am here with a writeup, and some claims about the ease and the results and general AWESOMENESS. I'll leave further ado at the end since this is supposed to be a writeup and not a political discussion, but first and foremost: ALL CREDIT GOES TO 3DBBQ.
Now, on to business.
- - Key Features - - -
First off, this write-up is long because it's detailed. Don't let that make you think this gun is at ALL hard to build.
This project didn't really have any goals besides “damn, 3DBBQ has got his shit down, let's see if I can't reproduce some of it.” So instead of goals, here are the key features:
- Highly customizable (this write-up is intended as a TEMPLATE).
- Build Time: Less than 2 hours.
- No complicated instructions (in my opinion) or pieces or "cut 1.73mm slot from x to y at height z."
- 100% “homemade” (IE does not use any part of anything made by Hasbro)
- Skill required: Limited. Can you drill straight holes? Okay.
- Cost: $20-30 depending on your pump and chosen accessories. Cost of pipe pieces alone is about $18. My pump was $8 and I needed a $2 barbxMIP.
- Range: At least 60 feet with 2 pumps, but depends on your build, and see range test at the bottom for details.
- Required tools: Drill, hacksaw or pipe cutter, wrench (or handy work with pliers). Maybe a dremel.
I call it (TH)^2. Because I'm a math guy. And “T.H. squared” is kinda catchy to say. Anyways, (TH)^2 breaks down into (T^2)(H^2), which is equivalent to TTHH, which stands for “The Two Hour Homemade.” It could also be “The Three Hour Homemade” depending on how far away your hardware store is. But yea, that's how long it took me, travel time and all. Like I said, 3DBBQ has got his shit down.
- - -Write-up - - -
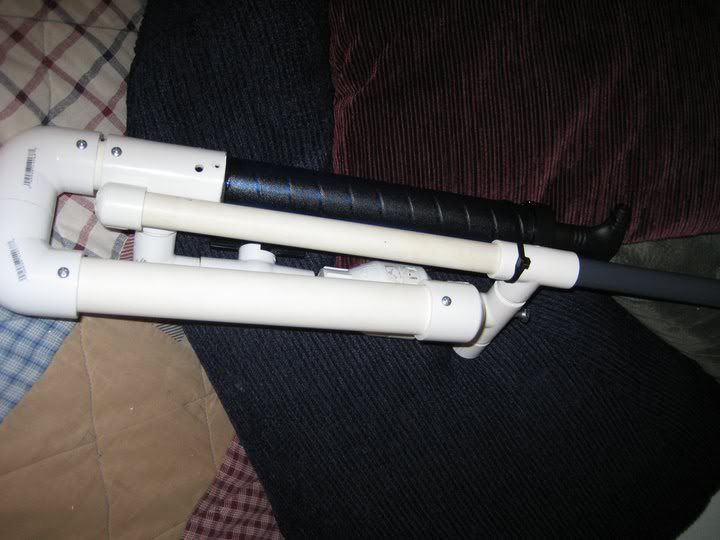
First I want to make it clear that this is a TEMPLATE. I've included instructions for various available pumps, and you can make yours look however you want. You can easily add or subtract ball valves, air tank space, etc. This is a write-up for the gun you see pictured, but please, modify as you like.
For the diagram I used 3DBBQ's software which can be downloaded here.
Materials Required:
1/2” Sch. 40 PVC:
18” of pipe
2x Tee
1x Coupler (depending on how you want your handle)
2x Endcap
1x Check Valve
1x Ball Valve (optional)
1x 90 degree Elbow
1” Sch. 40 PVC:
12” of pipe
2x 90 degree Elbow
1x Endcap
1x Check Valve – depending on your pump
Barrel:
I used 1/2” Sch. 80 PVC but you may wish to use something of your own. To follow my plans it will need to fit in a 1/2” Sch. 40 PVC Coupler – perhaps some nested brass?
Other:
1x 1”x1/2” Tee
1x Pump – Mine is a dual-action ball pump from the drugstore for $7.99
1x 1/8” Barb by 1/4” MIP – depending on your pump
4-10x Small screws – size doesn't really matter, about 1/4” long is ideal but no shorter
1/4”x4” Lag Screw – Lowe's #63352
1/4”x1/2” O-Ring – Lowe's #0531, comes in packs of 2
Tools Required:
Drill
Drill bit for your screws (see below)
Drill bit for the lag screw (see below)
Hacksaw or Pipe Cutter
Wrench, or pliers and creativity
Dremel (depending on your pump and how you want it attached)
Hot glue + gun
Super glue
A drop of oil/lube (optional, but recommended. I used Tri-Lube, since I always have some floating around for biking purposes)
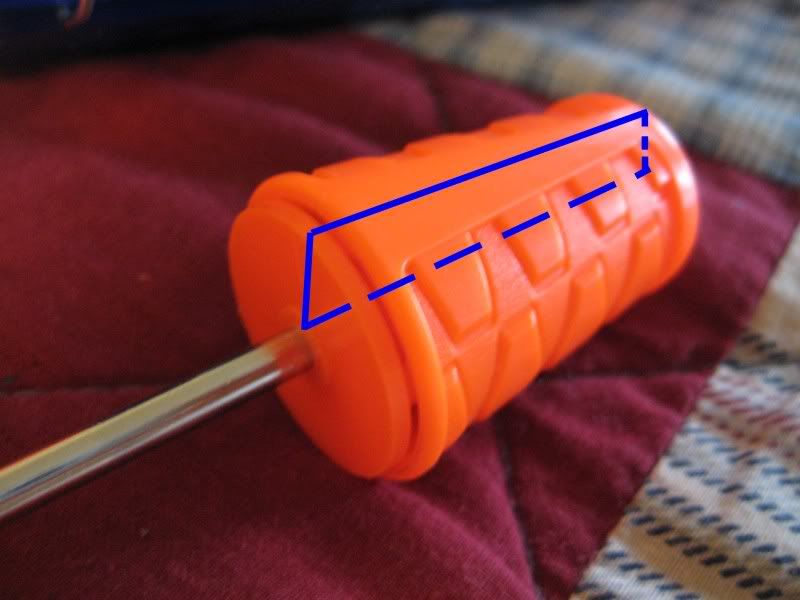
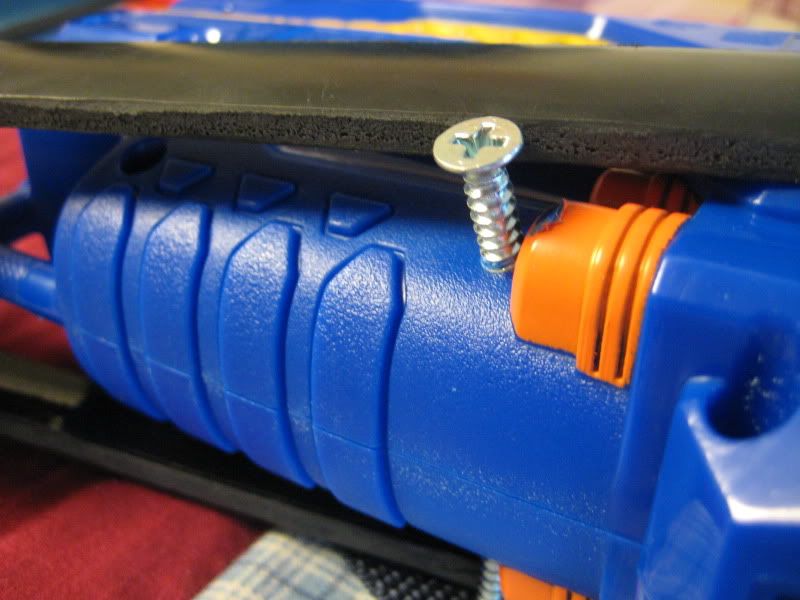
Drill bit selection: Rather than letting you mindlessly choose the drill bit I chose, I'll just teach you how to pick the right size. Hold your drill bit in front of your screw like so:
If you can see the threads poking out the sides but not any body of the screw, your bit is the right size. If you can't see threads, your bit is too big. If you can see the body of the screw, your bit is too small (as is this bit). Voila.
- - -
1. Figure out how to get air from your pump into your gun.
Option 1) If you're lucky, your pump is single action, and fits right into your 1”x1/2” Tee. So for you, this step consists of pushing in your pump and sealing it with hot glue. Yes, hot glue. Did I say hot glue? I've been nerfing for 5 years now and used properly, hot glue is, in my experience, air tight. If you disagree, don't argue (after all, I did say "in my experience"), just use epoxy. Oh, and no BarbxMIP here.
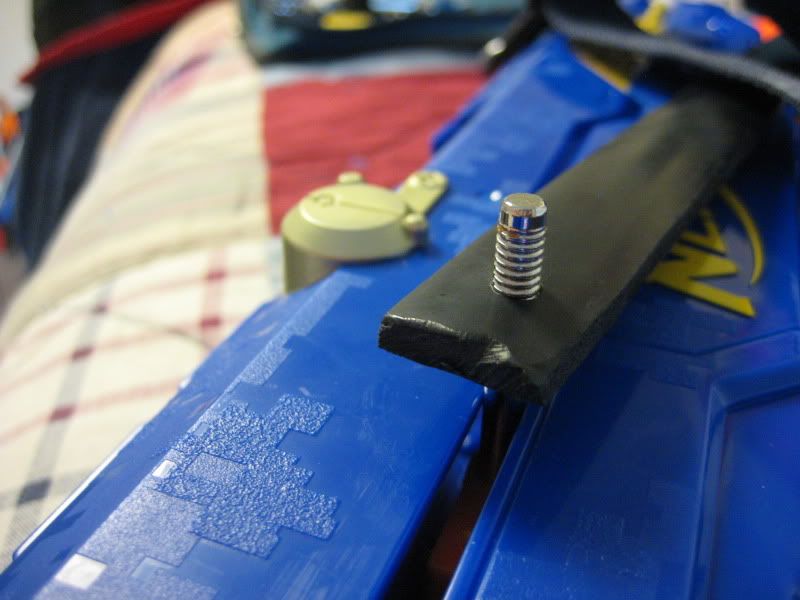
Option 2) If you're less lucky, your pump is dual-action, like mine (see photo below), and/or has a hose. Buy an extra 1/2” endcap. Drill a hole for your MIP in the endcap and screw it in with the wrench, nipple side out. Push the hose onto the nipple. No, you don't need a zip-tie, but it won't hurt. Wrap the endcap in electrical tape until it fits snug in the 1”x1/2” Tee. Glue it in according to the diagram below the photo below. Drill holes in your Tee between the 1/2” endcap and the pump itself (over the nipple of the BarbxMIP) for the backwards action of the pump to breathe. If the pump fits in your tee, glue it in (but it doesn't have to be airtight). If not, see next option.
Here's a dual-action pump. As you can see, it needs to breathe from both ends, so we can't just glue it in.
Option 3) Your pump doesn't fit into your Tee. You have two options. You can whip out the dremel and increase the ID of the Tee until it fits (what I did), or you can find another place to attach your pump. If it has a hose this will be easy (drill a hole for the BarbxMIP and follow relevant instructions of option 2). If not... well, I recommend you try another size Tee.
Option 4) You are either extremely unlucky or you got a $0.99 pump. Your pump doesn't have it's own check valve. Unlikely, but possible. If this is the case you need another PVC check valve. I would get a 1” and shove your pump into it, following options 1-3 but replacing the word “Tee” with “Check Valve.” Make sure your valve is oriented correctly.
Note) I recommend, wherever and however you place your pump, that it have a straight line of PVC to the butt of the gun. If not, when pumping, you may find it breaks off, or you may find the force of pumping breaks your gun elsewhere. If the pump makes a straight line of PVC to the butt, the force of pumping goes straight through the PVC and into your shoulder/chest/whatever you pump against.
- - -
2. Cut your PVC (hacksaw/pipe cutter).
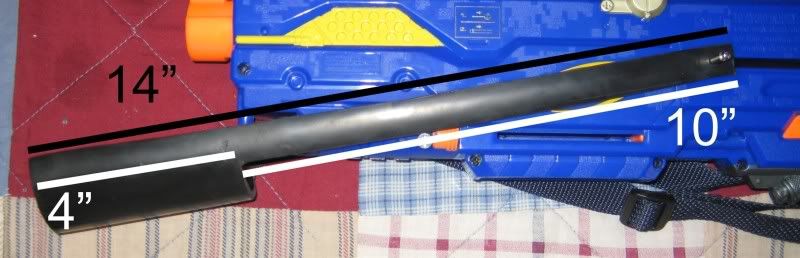
You will need 7x 1” long pieces of 1/2” PVC to connect your 1/2” PVC fittings, and I have a 10” tube clip behind my barrel.
You'll need 2x 1” long pieces of 1” PVC to connect your 1” PVC fittings, and I have a 10” piece for my air tank.
Cut your barrel as necessary. Mine is 8” long. I know it could be longer, but I wanted this gun to be compact.
If you want to paint your baby, now is the time, before you have to... you know... take it apart again.
- - -
3. Make your trigger.
Substep 1) If your check valve comes apart, take it apart now.
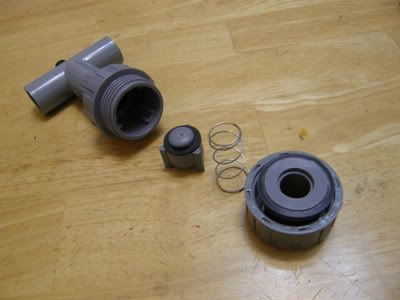
Photo is copyright 3DBBQ
Substep 2) Drill a hole in the exact center of the plunger head, for your lag screw. If your valve does not come apart I recommend pushing it all the way back with your drill bit before you begin SLOWLY drilling, and pointing up so the PVC shards come out the bottom and don't get stuck in your valve. FYI, my valve did not come apart, and I did no damage to it (at least, it still works as it should) by following these steps.
Don't worry about going all the way through, we're going to plug the hole with a lag screw anyways.
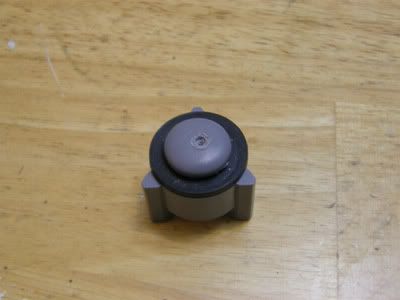
Photo is copyright 3DBBQ
Substep 3) Gently screw in and out your lag screw. This threads the hole so it will be easier to get in when it really matters.
Substep 4) Drill a hole in the exact center of the closed side of your Tee.
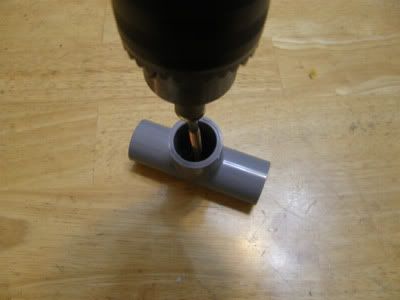
Photo is copyright 3DBBQ
Substep 5) Drill a 1/2” diameter slot centered over the hole you just drilled, from the inside out. DO NOT go all the way through.
Substep 6) Super glue your o-ring into that slot. It's tricky to get the glue into the middle of the tee but it's doable with some patience, and maybe a toothpick. Wait to dry.
Substep 7) Attach the Tee to the back end (IE the end air comes only out of, and never goes into) of the check valve. Screw your lag screw into the tee and then screw it a comfortable distance into the plunger head (it should give only with the valve when you push/pull on it, and if you put your valve together and blow on the opposite end, it should work as a trigger should).

Photo is copyright 3DBBQ
He uses a hex head for his drill, but a wrench will work just fine.
Substep 8) If you took apart your check valve, put it back together.
Substep 9) (Optional) Add a drop of oil/lube to the outside of the lag screw. Hold the trigger assembly with the lag screw up so the oil drips down to where the O-ring is. If you don't do this your o-ring might keep your valve from automatically resetting. If you don't have lube you can put a spring between the head of the lag screw and the outside of the Tee to solve this.
- - -
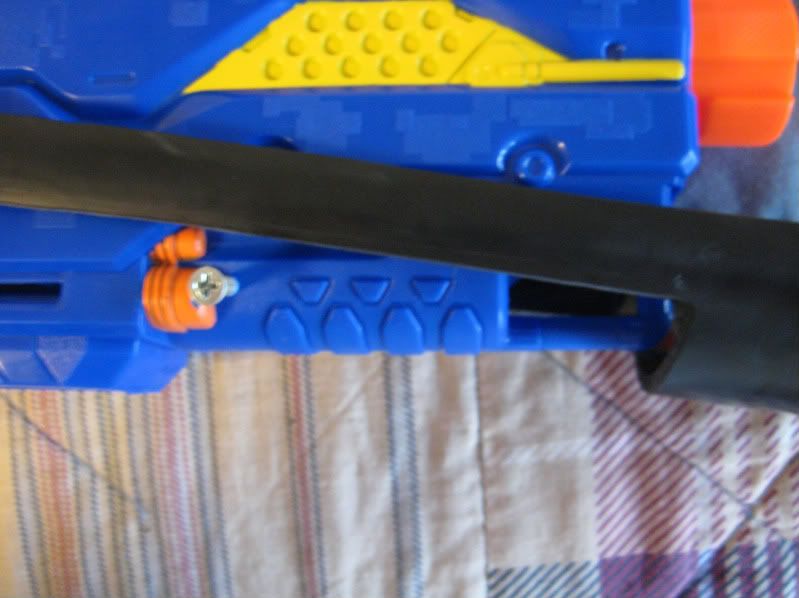
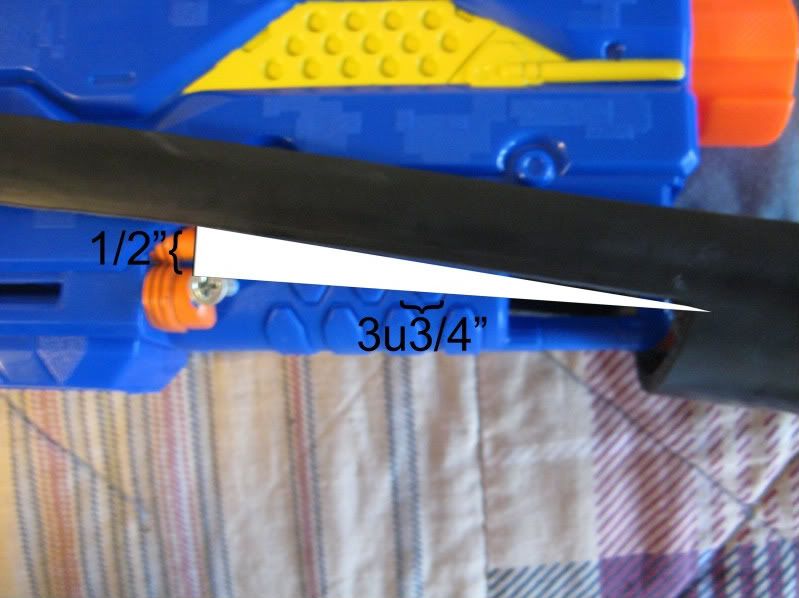
4. Anything not together, push together HARD. PVC cement if you wish – I don't think it necessary, but if you feel otherwise, do otherwise. Remember to shave a ramp shape into the back of your barrel so the loading mechanism works properly.
Between fittings use your 1” long connectors. The rest should be pretty self-explanatory.
I recommend filling the red piece with hot glue. I haven't proven any physical ramifications but it can't hurt. Theoretically, it keeps air from “flushing” into the bottom of the handle, moving it that much faster to the barrel, improving ranges (?). I don't know. But like I said, can't hurt.
- - -
5. Screws
To keep this thing from blowing apart you'll want to put screws anywhere you have a PVC connector. I just have my screws on the 1” connections, actually – the 1/2” stuff hasn't blown apart yet (from the perspective of a physicist, this makes sense, since the inside of the 1/2” pipe has less surface area for air to pressurize/push out on – but still, choose where or where not to place screws at your own risk).
As long as you use the proper size drill bit you need not worry about creating leaks - your screws will plug the holes you make. Be careful, however, not to drill into a critical part of your pump, or you'll have to buy another (not that I'm speaking from experience... cough I swear, the one-way valve is hard to miss!).
- - -
6. Semi-Auto
Just to add-on to your guide, for the semi-auto function to work in his V6 design, you don't open and close the ball valve each time, you just open the ball valve very slightly and leave it in a fixed semi-open position, that acts as a simple air regulator, the larger the valve opening -- the more air flow that re-fills the space in between each shot.
When you fire a shot, the air between the ball valve and check valve will exit, then the air from the main pipe sections will fill in the space through the small opening at the ball valve.
You'll need to pump it up beforehand with enough air volume and pressure to sustain the firing of many shots though. I've found that 30-40 PSI of pressure (my pump has an in-built pressure gauge) along with the right amount of ball valve opening, was enough to fire around 6-7 shots continuously in semi-auto.
Try it out, you'll see how the semi-auto system works.

Here's a demonstration by 3DBBQ himself.
I personally have not had any luck with this method, but I suggest you try it, it might be a function of being me.
function doesthiswork(areyouhilt)
|if hilt, then false
|if !hilt, then true}
I'm going to try another system later this week and, if successful, will post instructions here.
- - -
7. Extra
I chose to zip tie my pump to the T of my barrel. This helps keep it stable when pumping. I'll edit this section if anybody else thinks of anything else one might want to do.
- - -
Done. And you thought there would be as many steps as step 3 had substeps.
To reload you can just drop darts in the front of the barrel. The firing sequence is then pump, tilt forward, tilt back/aim, fire, repeat. I've never liked this loading method because I always get either too many or too few (IE zero) darts in the barrel, but with practice, I'm getting better. I recommend you give it a try. If you're not up for it, consider swapping the T for an elbow, and loading one at a time.
You can also use the ball valve for a semi-auto effect, but with two pumps a shot I haven't found this necessary. Pumping takes less time then opening and closing the ball valve for me. As well, one might need a bigger tank for the ball valve to have a decent effect.
- - - Ranges - - -
My clip holds 4 darts + 1 in the barrel so that's how many I tested.
2 pumps (recall this is a dual-action pump):
63 ft
70 ft
71 ft
67 ft
73 ft
For political reasons (welcome to my University) I only use stock darts – at 3 pumps or more they all fishtailed. I'm interested to see the ranges that someone with a similar build gets when using stefans.
Also, recall I am using a Sch. 80 barrel, which is roughly equivalent to 19/32” brass – a tad big. This makes for easy front loading, but you may wish to use a smaller barrel and I'm guessing you'll then get better results.
- - - Further Ado/Political Things - - -
1. As I mentioned, all credit goes to 3DBBQ. Except the actual writing. My fingers are on this keyboard. Why? Simply because I don't give a shit about the flame wars created by claiming credit on this forum. This write-up is solely for the good of the sport. I don't want to waste one post about who came up with what first or “isn't this mine because I put that PVC tee there” – I just want to see this out on the field. It's a good, cheap, easy-and-quick-to-build, effective, highly customizable design. Yes, I know I used a lot of adjectives there.
E.G. if you're thinking of posting: “So basically you did a writeup of 3DBBQ's work,” the answer is “Yes.” And he gets all the credit.
2. Why do a write-up of somebody else's work: After building a 3DBBQ-style gun I can claim they are ridiculously easy to build and yield phenomenal results. 3DBBQ has done plenty of work already with the guns themselves and his website, not to mention the write-ups would be hell to translate (nothing personal... I wouldn't want to do a write-up in a forum of his language either). It seemed like common sense to me to publicize something that worked so well and should be (in my opinion) in much wider use. If 3DBBQ or the mods have a problem with this, I understand – just lock the thread. Apologies in advance.
3. This is not my work and thus obviously not an entry in the mod contest. I pointed out VACC's requirements because in my opinion, they are exactly what the NIC has been looking for in an airgun and exactly what this design meets.
3.5/4. In order to meet VACC's requirement #2 (easily regulatable) you need an appropriate size air tank, an appropriate strength pump, or McMaster-Carr #48435K71 (thanks T3K for the part number).
5. I admit I have thought about VACC's reward and no, I don't think I deserve it under any circumstances (for starters, this isn't a submission to the contest). I just bring it up because I think it would be cool to offer it to 3DBBQ.
- - - Personal Statement - - -
For a long time I have looked for the cheap way out. Cheap pumps, cheap parts, not even willing to build a gun if it costs more than $15. Well frankly, that sucked. Most of my guns held up a few matches but in the end, it seems like (provided you are spending reasonably) the more you spend the more you get. Or, “you get what you pay for.” When I first started on this adventure I made a deal with myself to spend as much as necessary. I ended up spending $30, which all in all wasn't bad. And she works. Beautifully. So if you're sitting there thinking, “I can get by with crayola barrels,” then go back to third grade.
For example, I think that dolling out $6 for the check valve was definitely worth a trigger that worked. I know there are homemade air gun triggers out there, but this one was easy to make, and I don't see much that could go wrong. I mean, the whole point of a check valve is basically to be an inoperable trigger... we just make it operable.
...because these components are more or less designed for this very purpose, once bought they will function flawlessly, and will stand up to much more abuse than most other alternatives (including stock components).