Jump to content


Photo

Clipped At2k

A Write Up

27 replies to this topic

#1 Retiate

Retiate

    Member

  • Members
  • 778 posts

Posted 15 July 2007 - 10:54 PM

So I decided to do this mod for a couple of reasons. I wanted to experiment with breaches and clips before I started on my Angel Bow mod, and I wanted a mid range blaster that could take shots off fairly quickly without having to worry much about reload times (mostly for keeping people back or forcing people to take cover and play defense). I don't like the Longshot much, and a quadded 2K didn't have enough shots. Plus I wanted the extra turret incase I wanted to turret a gun.
[I'm sorry some of the pictures a bit blurry, those were the ones I took earlier and I was still getting used to the camera]

Anyway, here's how I did it.

Tools needed:
-Dremel (required if your going to cut a breach)
-Pipe cutters (optional)
-Hotglue gun
-Ruler
-Screwdriver (both philips and flat head)

Materials needed:
-Hotglue sticks
-Quick drying Epoxy (I used 90 second)
-Plumbers Goop
-1/2" Sch. 40 PVC (12")
-1/2" Sch. 40 PVC Coupler
-9/16" brass (12") [Whatever your preferred brass size for air guns is here, just make sure it's not a tight fit]
-19/32" brass (at least 3") [the next size up from the size of brass for your barrel]
-Electrical Tape
-Aluminum foil

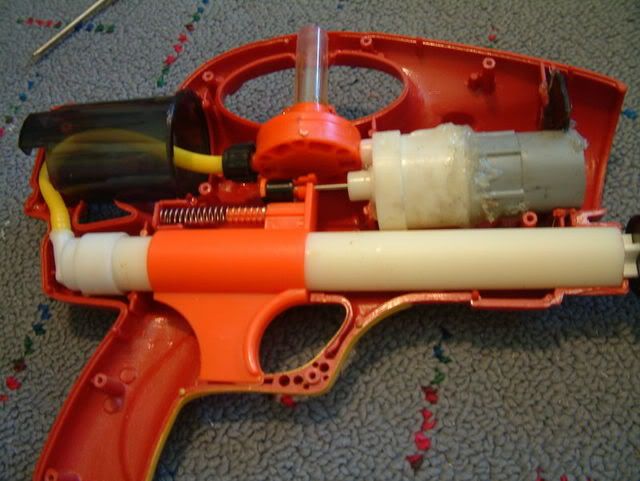
Part 1: The Easy Stuff (Internal Mods)

Ok, so start off by opening up your gun. I got the pump cap off by cutting one side with a dremel, then prying it all off with a flat head screwdriver.

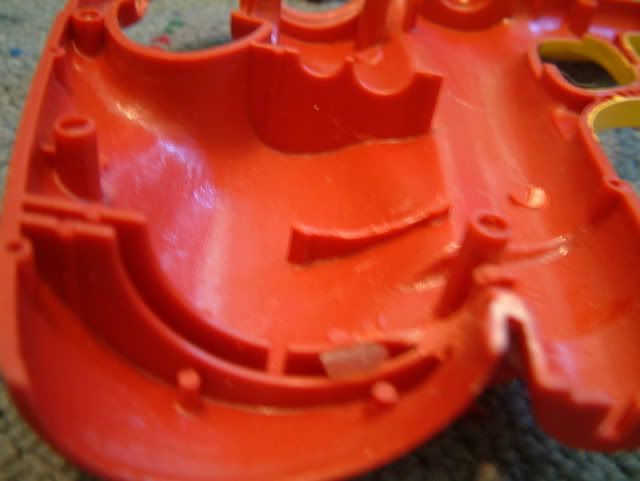
Once you get it open, take out all of the internals and set them aside. All you should have are the 2 shell halves. Remove the screws if you haven't already and set those aside as well. Using a magnet to keep all the screws is one place works well.

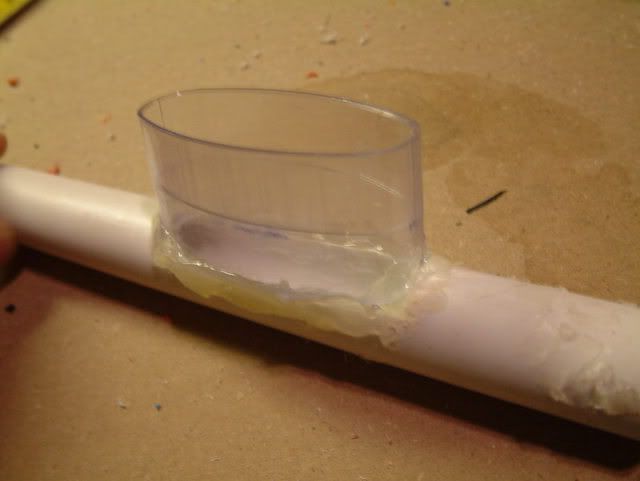
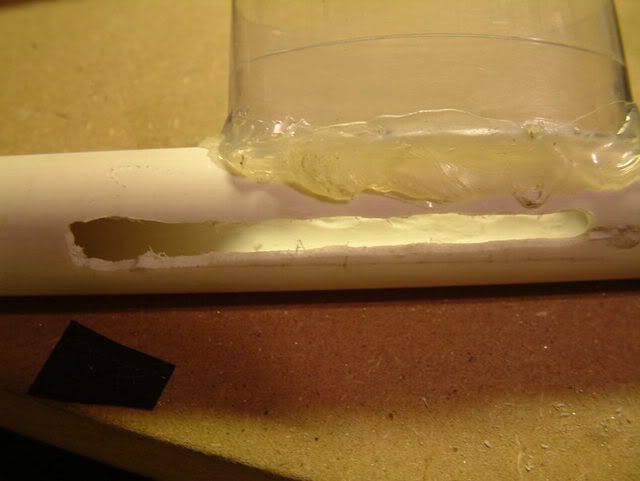
You're going to need to sand down quite a bit of the shell so you can fit your PVC coupler in there. Just keep sanding and testing to see if the coupler fits in there well.
Posted Image

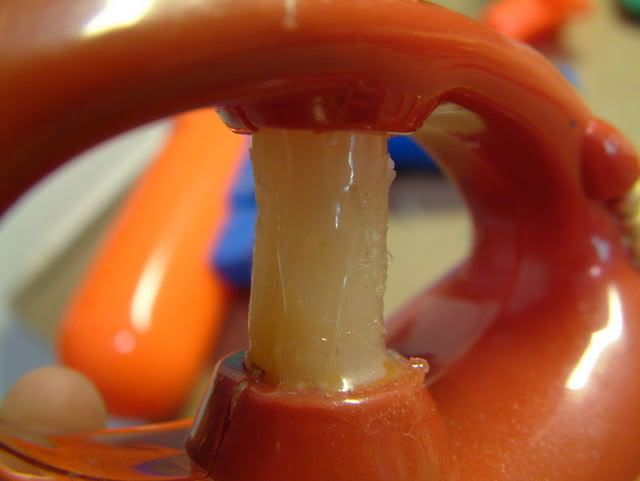
Once you get both shells sanded down, put the coupler over the front of the airtank and hotglue it in place.
Plug the pump and do a Bic Pen mod while it's open.
Posted Image

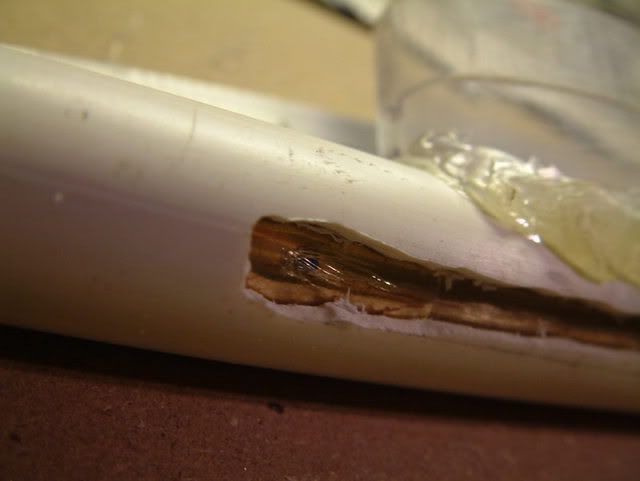
I then reinforced the coupler by drilling/burning a hole in the side of the coupler and squeezing some hotglue in there. This was first mentioned by CaptainSlug in his Big Blast mod. He describes this process much better than I do. You don't want to hotglue to seep into the side of the coupler where the PVC barrel will go. I made that mistake, so my barrel isn't as stable as I could be. But that's ok, as it will be hotglued into the coupler anyway (unless you want your barrel removeable)
Posted Image
In that picture, you can see how I put too much hotglue. You can also see I made used part of a CD case to stabilize the PVC coupler.

After you get the coupler in and all the other internal mods, screw the case back together, you're done with internals.

Part 2: The Clip

First, we are going to make a Deoderant Clip (invented by Forsaken_Angel24 on his Angel Bow. So get an empty deoderant case to use as the clip.
Clean it out and snap off the back end and clip off the long post. I added some cardboard on the side of my clip so it fit my darts better and added electrical tape to the back end of my clip so it would stay on.
Posted Image

Take the lid of the deoderant case and cut off the top end, so it's hollow on both end.
Make sure you know which side you cut, and which side slides on the deoderant case.

Now you will need to make a PVC barrel to attach the clip to. So take your 12" of PVC and measure where you want the clip to be. Measure then cut out a section of the PVC so the deoderant lid fits in there without much dead space.
Hotglue the lid in place, making sure the side that slides over the rest of the deoderant case is up.
Posted Image

Part 3: The Breach

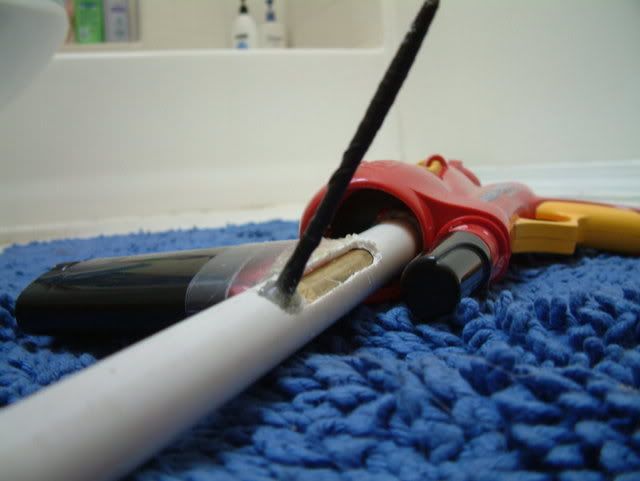
Now for the most difficult part of this mod - the breach.

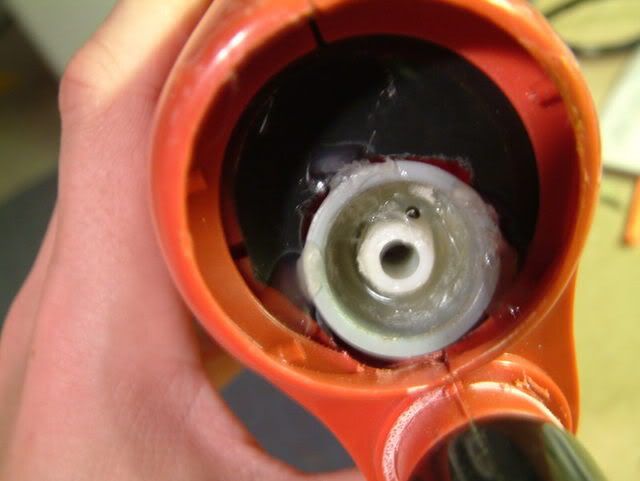
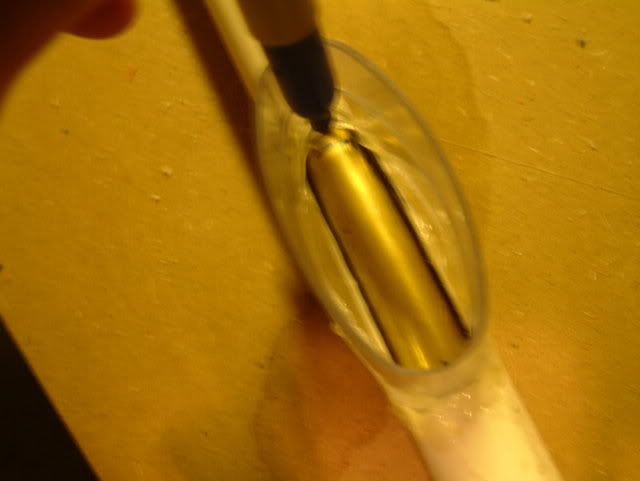
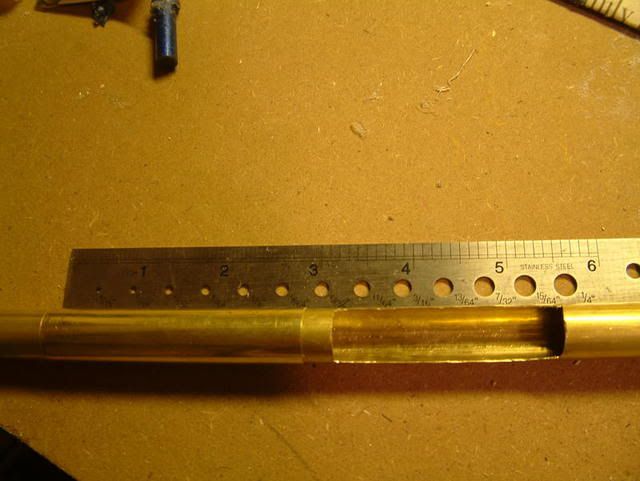
Take your 9/16" brass (or whatever size brass you use for a barrel) and slide it inside your 12" of PVC. Then mark how long your breach needs to be using the PVC breach as a guide. It's kind of hard to explain, but the picture should clear things up.
Posted Image

Go ahead and cut out the breach after you have it measured. Make sure you draw it out first so your cuts are straight.
Posted Image
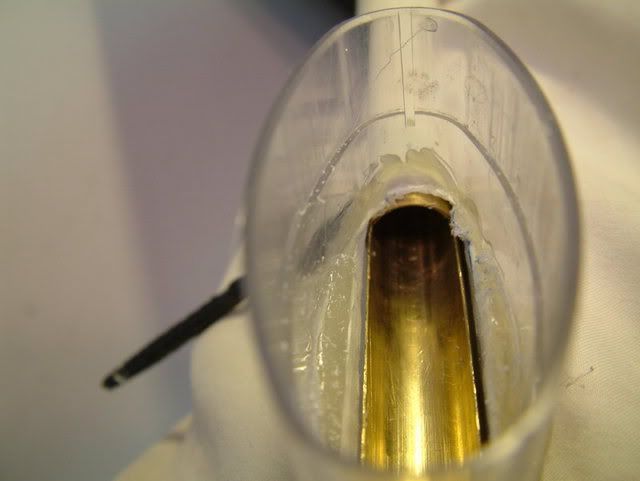
Here it is inserted back inside the PVC.

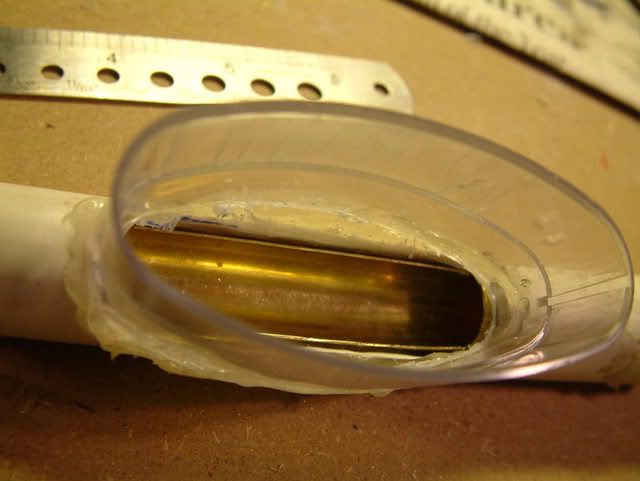
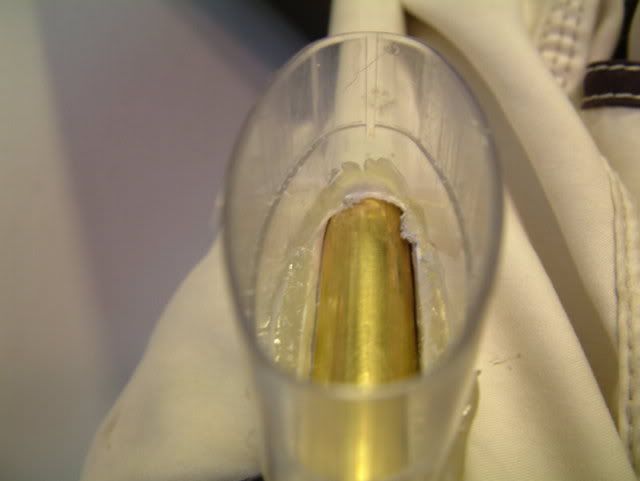
Now to make a breach cover. So cut your 19/32" brass (one size up from size of your brass barrel) larger than the section you cut out of the brass barrel. If you used pipe cutters, you must flare out the side you cut (I used a file).
Here's picture showing both the breach cover and the section I cut out of my barrel.
Posted Image
As you can see, the breach cover is nearly 3", while the section I cut is just under 2.5".

A breach handle must also be made, so you will need to make a long cut across the side of your PVC for it to go. This took me quite a bit of testing and measuring. Make sure the cut is long enough so the breach handle can slide far enough to completely open and close the breach.
Posted Image

You can see I make a blue dot to represent the breach handle placement while I was testing the stroke of the breach handle.
Posted Image


[End of first post, please do not post until I finish the rest of the write up]


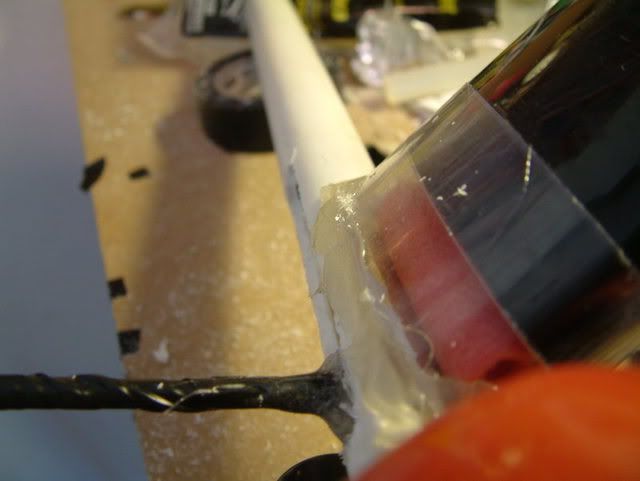
Alright, now that you have all the breach handle pieces ready, it's time to glue the breach handle on. I used a long nail wrapped in electrical tape. If you decide to use a nail too, make sure the head of the nail is what's being glued to the breach cover, otherwise it will not hold. Trust me, I tried it.
Be sure to thank Gengar003 for teaching you How to Epoxy.
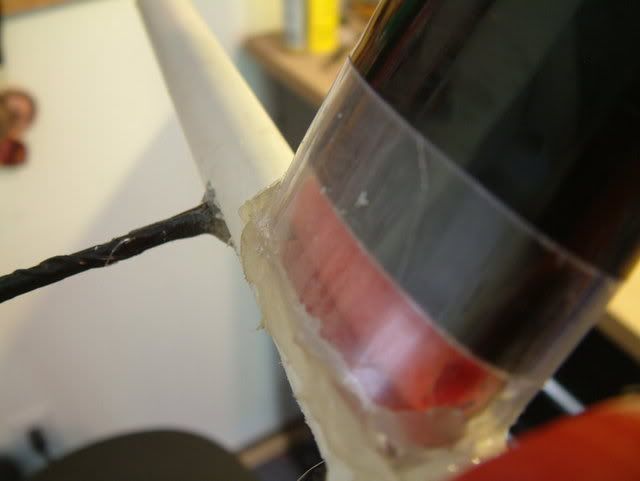
But, just before you glue it on, you will want to make sure no glue gets on the PVC and bonds the breach cover to the PVC. So, take some aluminum foil and form it to the PVC. That way, if any epoxy does go out there, you can just rip off the aluminum foil and your breach will still work just fine. And just incase you hadn't already inferred this, you must glue the breach handle to the breach cover while the breach is inside the PVC. Once the breach handle is glued on, there is no way to get the breach in/out of the PVC.
Posted Image

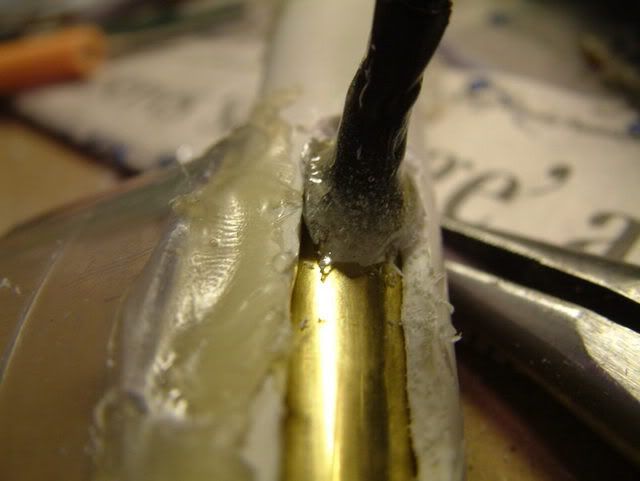
Hold the breach handle to the breach cover for a minute while the epoxy dries. Once it does, see if it's wobbly or not. You might find it isn't as solid as you'd like it to be. No worry's, just add some Plumbers Goop using the same aluminum foil idea. That should hold, as Plumbers Goop bonds very well with brass.

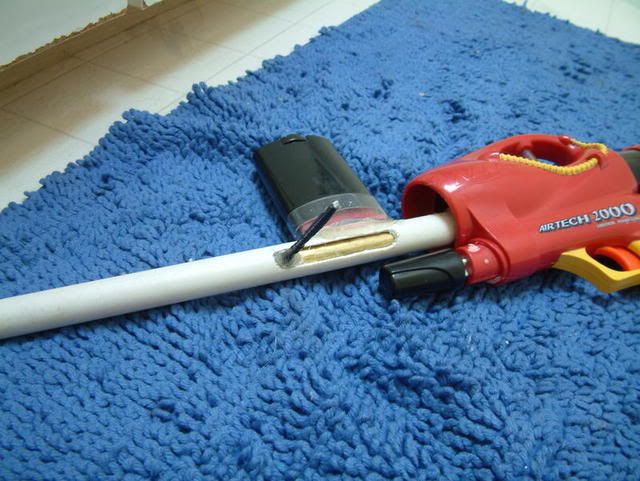
Now you should have a fully functional breach, complete with a breach handle attached to a breach cover.

Here's how it should look.

Breach open.
Posted Image

Breach closed.
Posted Image

[Note that I made my breach open when the handle is forward, as there was not enough room for it to open backwards]

With the clip installed (breach closed) and attached to AT2K.
Posted Image

With the clip installed (breach open) and attached to AT2K.
Posted Image

The final product.
Posted Image

Posted Image

I went outside to range test, shooting 4 darts. Using 5 pumpd, a 100' tape measure, 2" 3/0 weighted Angel's red foam darts, from around 5' off the ground and no wind, here's what I got.
[Ranges do not include dart skip, I measured from where I shot to where to approximately where the dart hit the ground]
1st shot - 90'
2nd shot - 77'
3rd shot - 57'
4th shot - 45'

Now, your probably wondering "Wow, what's with that?"
Apparently, my goo gauge broke and there was a major loss of pressure, each shot increasing the size of the hole the air leaked out of. I looked at the gauge to see if I had pumped the gun up, saw it was empty and just thought "Hm, weird." then came the reassuring hissing sound everyone knows and loves. By the 4th shot, I doubt the gun could hold pressure for more than maybe 6 seconds.

I opened up the gun to find a nice suprise of orange goo stuff around the insides. Sucks since I wanted to keep the goo gauge. So, once the Plumbers Goop dries, I'll get out and range test again. This time, I hope it will actually work.
The clip worked nice, but I need a heavier weighted dart to push the darts in easier.
  • 0

#2 The Crackerjack Man

The Crackerjack Man

    Member

  • Members
  • 203 posts

Posted 15 July 2007 - 11:03 PM

I think its safe to post right?

Anyways clean clip and i'd like to see the ranges once the goop dries. Suck when that goo gage goes.
  • 0
"Wow, you realy screwed that guy over"

#3 Retiate

Retiate

    Member

  • Members
  • 778 posts

Posted 15 July 2007 - 11:10 PM

Yeah, the write up is finished.

This is the first time I've had the goo gauge blow on an AT2K. I hope I got the leak completely sealed up (I filled the goo container with Plumbers Goop). If it still doesn't work, I'll just remove the goo gauge entirely.

Apparently, my 2 posts got merged together, so I am unable to edit my post, as it says "You are over the picture post limit" or something like that. So, I'll just have to post the ranges once I can get them (I'm going to wait at least 48 hours for the goop to dry).
So, check my post for them then.

I'll probably edit the new ranges into this post too.
Edit:
Ranges:
1. 86' 1"
2. 87' 1"
3. 92' 4"
4. 92' 10"
5. 99' 7"
6. 100'

Edited by Retiate, 29 July 2007 - 12:31 AM.

  • 0

#4 OfAllTheNerf

OfAllTheNerf

    Member

  • Members
  • 714 posts

Posted 16 July 2007 - 05:44 AM

OmfQzors!

Dude! I thougt this up about a week ago, and was going to do it to some of my other guns!

Ah, well. Great minds think alike, eh :P ?

Great job, I'm going to do exactly the same thing on my Maxshot and.... Well you'll see.

-OfAll'
  • 0
[color=#FF6600][Finesse]-[BitchX]

#5 b00m13

b00m13

    Member

  • Members
  • 386 posts

Posted 16 July 2007 - 01:21 PM

Damn that is one sweet looking breech!
It's so similar to the one I just made 2 days ago, like OFTN said, "great minds think alike" :D
You might already know this, but if you should ever hear that dreaded hissing sound again, a really good way to locate it is by 1st trying to hear where it's coming from, then slather some soap (Dawn, Mr. Clean, etc.) all over that area. The escaping air will blow bubbles.
On a personal note, I've never had an AT before, can someone tell me what that clear tube on top of the gun does? (I was guessing it's some kind of pressure gauge.)
  • 0
The only place Wal-Mart exists in New York, is in our TV's.

#6 monkey with a nf

monkey with a nf

    Member

  • Members
  • 110 posts

Posted 16 July 2007 - 03:28 PM

When the tank is pressurized, the goo raises in the chamber, acting as a pressure gauge. Other than that, it's useless. It used to be popular to drain and seal it (supposedly to increase ranges), but cxwq showed it had no effect.
  • 0
QUOTE(Pineapple @ Sep 12 2007, 03:13 PM) View Post

For maximum efficiency?


1. Pump up. Count how many pumps.

2. Keep going until you hear a loud "bang".

3. Subtract one pump from the total. Rebuild your air bladder.


There you go.

#7 Retiate

Retiate

    Member

  • Members
  • 778 posts

Posted 16 July 2007 - 04:06 PM

OmfQzors!

Dude! I thougt this up about a week ago, and was going to do it to some of my other guns!

Ah, well. Great minds think alike, eh :D ?

Great job, I'm going to do exactly the same thing on my Maxshot and.... Well you'll see.

-OfAll'


Hmmm... I never thought about clipping the Maxshot... That's a good idea. I wonder how hard it would be to install it so pulling back the handle also loads the breach.
I look forward to seeing what you can do.

Damn that is one sweet looking breech!
It's so similar to the one I just made 2 days ago, like OFTN said, "great minds think alike" :D
You might already know this, but if you should ever hear that dreaded hissing sound again, a really good way to locate it is by 1st trying to hear where it's coming from, then slather some soap (Dawn, Mr. Clean, etc.) all over that area. The escaping air will blow bubbles.
On a personal note, I've never had an AT before, can someone tell me what that clear tube on top of the gun does? (I was guessing it's some kind of pressure gauge.)


Heh, thanks. I think it's pretty cool how we all came up with the same breach idea pretty recently.
I pretty much did that soap idea, except the leftover goo bubbled up for me. I jsut decided to fill the entire thing so I wouldn't get anymore leaks from there.


Tomorrow I will be getting some better weights for my weighted dart and I'll be range testing again.
I currently have a dart stuffed with around 6 slingshot weights. My new one will be using 7/0 fishing weights and it will be a bit longer, as I cut my current one a little too short.
  • 0

#8 nerfer34

nerfer34

    Member

  • Members
  • 1,594 posts

Posted 16 July 2007 - 06:36 PM

I hate to break it to you guys, but you're acting like you all thought of this breech.

This breech has been out for a while. I think Fa 24 altered Zero's breech, to make this brass breech. So they really should get the credit. I will post a universal brass breech much like yours tomorrow. Keep a heads up for it.

I like the nail as a handle. That seems like it will bond well.

nice.
  • 0
<!--quoteo--><div class='quotetop'>QUOTE</div><div class='quotemain'><!--quotec-->God Damn it Groove, you stole my kill.<!--QuoteEnd--></div><!--QuoteEEnd-->-OMC

#9 Retiate

Retiate

    Member

  • Members
  • 778 posts

Posted 16 July 2007 - 06:56 PM

I hate to break it to you guys, but you're acting like you all thought of this breech.

This breech has been out for a while. I think Fa 24 altered Zero's breech, to make this brass breech. So they really should get the credit. I will post a universal brass breech much like yours tomorrow. Keep a heads up for it.

I like the nail as a handle. That seems like it will bond well.

nice.


Yeah, I knew the breach had been done before. Lots and lots times, actually. I always thought of it as the "Standard Breach".
I'll look out for that universal breach, it sounds pretty cool.

The nail was giving me some trouble, it would hold, but it would be a little wobbly. Then I put some Plumbers Goop on it, now it's solid.
  • 0

#10 Forsaken angel24

Forsaken angel24

    Member

  • Contributors
  • 2,472 posts

Posted 16 July 2007 - 09:49 PM

Awesome! Good work. Shame the goo gauge blew. When I modded my magstrike and brought it out to test it I heard the dreaded leak. Then I had to take it back, fix it and range test again. I like the idea of the nail but aren't you worried its going to snap off easily?

As for the whole breech credit thing. I have never read of a Zero breech. I was inspired to do my breech after reading pissbacons mod to the BBB. He talks about his breech but I could never understand how to do it. Then I made my own.
  • 0
I don't get my kicks out of you,
I don't feel the way I used to do.
I know its bad,
After what we had,
But I’m just not the angel you knew.

#11 Zaxbys

Zaxbys

    Groove's Protégé

  • Members
  • 510 posts

Posted 16 July 2007 - 09:59 PM

Great job on the clip, and very thorough write-up! I just have one question. When you mark your brass in preparation for the breech, how far do you slide the brass into the 12" of 1/2 PVC? Should the two ends be flush?

Edited by Zaxbys, 16 July 2007 - 10:01 PM.

  • 0
QUOTE
"Bitces be crazy"


QUOTE
"Hey girl... you like water sports?"

~Groove 6/26/09

#12 Retiate

Retiate

    Member

  • Members
  • 778 posts

Posted 16 July 2007 - 10:37 PM

Awesome! Good work. Shame the goo gauge blew. When I modded my magstrike and brought it out to test it I heard the dreaded leak. Then I had to take it back, fix it and range test again. I like the idea of the nail but aren't you worried its going to snap off easily?

As for the whole breech credit thing. I have never read of a Zero breech. I was inspired to do my breech after reading pissbacons mod to the BBB. He talks about his breech but I could never understand how to do it. Then I made my own.


Thank you. Yeah, my new Magstrike started leaking in the middle of a war when I lent it to my friend. Though this time I know where it was and how to fix it, so I wasn't as worried when my first one started leaking.

I was sort of worried the nail was going to break off, as it was very wobbly at first (I originally wanted the nail head out because I liked the look of it). Then when I flipped it around so the head connected to the breech cover, it was much sturdier. Though it's still a little bit wobbly, I think it'll hold. I can slide it up and down pretty quickly without any signs of it breaking off, just as long as I don't hold it by the tip.
Any idea on what I could use instead of the nail? I originally was going to use a section of 3/8" wooden dowel left over from the Rattler mod, but I changed my mind when I saw how thick it was in relation to the PVC/brass.

The Zero breech is a breech kind of like this one, except it has a hole in both the barrel and the breech cover, and you pull the barrel forward to line up the holes and drop the dart in. It's in the Homemades section of the site.

Great job on the clip, and very thorough write-up! I just have one question. When you mark your brass in preparation for the breech, how far do you slide the brass into the 12" of 1/2 PVC? Should the two ends be flush?


Thanks. When I marked it, I had the barrel slid all the way into the PVC, both ends flush.
  • 0

#13 Zaxbys

Zaxbys

    Groove's Protégé

  • Members
  • 510 posts

Posted 16 July 2007 - 10:58 PM

Your welcome.

Thanks, I didn't realize that both peices were 12inches long. Wow a no- brainer there.

Edited by Zaxbys, 16 July 2007 - 11:03 PM.

  • 0
QUOTE
"Bitces be crazy"


QUOTE
"Hey girl... you like water sports?"

~Groove 6/26/09

#14 b00m13

b00m13

    Member

  • Members
  • 386 posts

Posted 17 July 2007 - 12:55 AM

I think I have a solution for your wobby nail.

If you relocate your breech by placing it a lil more forward, you can drill the nail deeper, all the way to the other wall of the barrel.

Here's a pic to help.

Posted Image
  • 0
The only place Wal-Mart exists in New York, is in our TV's.

#15 Retiate

Retiate

    Member

  • Members
  • 778 posts

Posted 17 July 2007 - 01:38 AM

I don't think that would work for a couple reasons.
1. The nail would restrict airflow, while that doesn't do too much, it still negatively affects the blaster.
2. Drilling the nail all the way to the other side of the barrel would require another slot cut into the barrel for the nail to move and operate the breach cover. This slot would be uncovered, resulting in large amounts of air loss.

The nail isn't that bad. If I hold it by the very tip and push on it from side to side it'll wiggle a little bit. So, it's not that big of a deal. Though, when something catches or pushes on it, then I might have a problem. If it comes off, I'll probably just use straight Plumbers Goop, that should hold it on real well.
  • 0

#16 hierarchy

hierarchy

    Member

  • Members
  • 336 posts

Posted 17 July 2007 - 02:22 AM

Man that is sweet. I couldn't wait for you to make this and now I can't wait to use it. Good job.
  • 0
QUOTE(Retiate @ Aug 13 2007, 08:43 PM) View Post

I guess you have some heavy duty industrial strength toilet paper holders. Do they advise you to wear eye protection when changing rolls?

My TTG mod.

#17 Retiate

Retiate

    Member

  • Members
  • 778 posts

Posted 17 July 2007 - 04:46 PM

...and now I can't wait to use it. Good job.


Ha... Ha... Ha...
I guess I'll let it go for a round or two... Ok, just a round.


Today, I brought in the 2k guts and tested it by pumping it up 4 times. I brought my ear real close to the goo gauge listening for any leaking. One, two, three pumps... Nothing. So far, so good. But then came the 4th pump. At about a total of 3 1/2 pumps, there was this loud popping sound, then it wouldn't hold any pressure. I am guessing it was a layer of plumbers goop. The goop in there didn't really settle to the bottom like I'd hoped it would. I guess it mixed with the orange goo and it sort of expanded, leaving it all bubbly and weak. I'm going to fill up the entire thing with goop, all the way up to the top this time. If it still has problems, I'll just pick up some vinyl tubing and cut out the goo gauge.
  • 0

#18 Retiate

Retiate

    Member

  • Members
  • 778 posts

Posted 28 July 2007 - 11:32 PM

Older thread, newer updates.

So, after trying and failing multiple times on fixing the leak on my 2k, I gave it a rest for a while. It was really starting to annoy me, and I almost scrapped the 2k and put the clip on my other one. Then, just recently, I decided to try and fix it again. I picked it up, and pumped it, expecting the usual hiss it's been making for a while. However, it held pressure! Making it's way to 5 pumps, and holding there for a minute or so, it fixed itself! I guess I never really gave it the proper amount of time to dry, I had thought 3 days was more than enough. Guess it needed a lot longer. I just assumed the left over goop settled and hardened over the past week and a half or so. And look what it did to the goo gauge...
Posted Image
I guess Plumbers Goop really does react a lot with plastic...
Yes, those are dips and bends in the tube.

So earlier today, I went out to see if it still fired strong. I went outside, reeled out my 100' tape measure, and fired off 6 shots. The tests were done under the same conditions as the first ones, except this time I just fired off all the darts then went and did much more precise measurements, rather than estimating where it hit the ground and going with that. So that means there's a bit of dart skip. There was also a little bit of wind from the side, though I tried to shoot when it had mostly died down.
The order isn't from which darts I fired first, but from what I picked up and recorded first.
Ranges:
1. 86' 1"
2. 87' 1"
3. 92' 4"
4. 92' 10"
5. 99' 7"
6. 100'

I now have 2 weighted darts, one filled with slingshot weights, and the other filled with 7/0 fishing weights. The 7/0 weighted one is quite a bit heavier, but when I tried using it alone, it wasn't as reliable as I would have liked it to be. Some darts would take a little shake before they went in, but with the 2 weighted darts, they go in nice and smooth, no problems at all.

Edited by Retiate, 28 July 2007 - 11:33 PM.

  • 0

#19 BlackFox

BlackFox

    Member

  • Members
  • 286 posts

Posted 20 October 2007 - 04:31 PM

How did you get the coupler to fit inside the casing so well? I know that you have to cut away some of the reinforcing plastic strips, but my coupler fits down below the hole where the turret was.
  • 0
"Until we meet in the place where there is no darkness"
-George Orwell, 1984
-----------

Think that piece is beyond repair? Think again!

#20 Retiate

Retiate

    Member

  • Members
  • 778 posts

Posted 20 October 2007 - 04:40 PM

I'm not completely sure. I just kept dremeling it down until it fit in there straight, then added the faceplate to secure it so it couldn't wobble around. The first three pictures in the write up should show pretty much all I did to get it to fit.
  • 0

#21 BlackFox

BlackFox

    Member

  • Members
  • 286 posts

Posted 20 October 2007 - 10:23 PM

Lol, well, I just finished mine and the coupler has the barrel at such a crazy angle. It's like thrity degrees above a flat shot. The breech is still in production. The nail is a little wobbly and there isn't much room to reinforce it or reglue it. As for the clip, I ditched the whole spring loaded idea because the darts were too loose. It might work with a rectangular deodorant stick, but with the oval ones, there isn't enough room to add cardboard with the spring inside.
  • 0
"Until we meet in the place where there is no darkness"
-George Orwell, 1984
-----------

Think that piece is beyond repair? Think again!

#22 Retiate

Retiate

    Member

  • Members
  • 778 posts

Posted 21 October 2007 - 01:31 PM

Lol, well, I just finished mine and the coupler has the barrel at such a crazy angle. It's like thrity degrees above a flat shot.

Did you sand away all the protruding plastic under the coupler? In the 3rd picture, you can see where that's all sanded down.

The breech is still in production. The nail is a little wobbly and there isn't much room to reinforce it or reglue it.

Plumbers Goop held it pretty well for me.
Though I still have to reglue every now and then. It's not that bad though.

It might work with a rectangular deodorant stick

Good luck finding one of those.
  • 0

#23 BlackFox

BlackFox

    Member

  • Members
  • 286 posts

Posted 21 October 2007 - 06:40 PM

Posted Image


I guess the term rectangular wasn't completely true. It's rectangular with rounded edges.
  • 0
"Until we meet in the place where there is no darkness"
-George Orwell, 1984
-----------

Think that piece is beyond repair? Think again!

#24 hierarchy

hierarchy

    Member

  • Members
  • 336 posts

Posted 21 October 2007 - 07:41 PM

Hey Black Fox your pic isn't working for me. Try reposting it.
  • 0
QUOTE(Retiate @ Aug 13 2007, 08:43 PM) View Post

I guess you have some heavy duty industrial strength toilet paper holders. Do they advise you to wear eye protection when changing rolls?

My TTG mod.

#25 BlackFox

BlackFox

    Member

  • Members
  • 286 posts

Posted 21 October 2007 - 09:10 PM

[IMG]http://i215.photobucket.com/albums/cc161/o0BlackFox0o/DSC04084.jpg[/img]

There, it should work this time.
  • 0
"Until we meet in the place where there is no darkness"
-George Orwell, 1984
-----------

Think that piece is beyond repair? Think again!


0 user(s) are reading this topic

0 members, 0 guests, 0 anonymous users