Jump to content


Photo

The Chainblazer

An official write-up: chainless CPVC + Repair guide (new)

11 replies to this topic

#1 frost vectron

frost vectron

    Member

  • Members
  • 526 posts

Posted 06 June 2007 - 03:30 AM

EDIT: Repair guide is further down this page (not in the top post). Thanks.

So recently I aquired a chainblazer, without any chains. I had formulated plans to build chains from CPVC and couplers, but when the thing came, it was much smaller than I had expected.

Posted Image

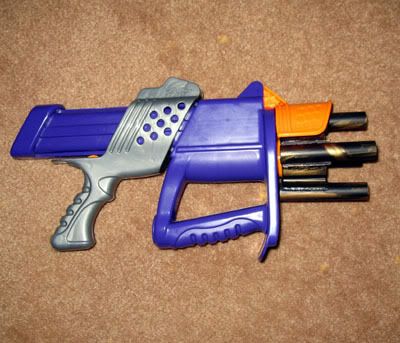
Seeing the small size, I decided to build the gun as a large secondary rather than a chain-fed primary. I opted for the classic slap-the-barrels-on-the-rotation-device-and-go-with-it modification. Here's the writeup:

Materials needed:
1/2" CPVC
1/2" PVC
Chainblazer
Plumber's Goop
Spring (optional)

Tools needed:
Dremel

or

File
Sandpaper
Hacksaw

Paints (optional):
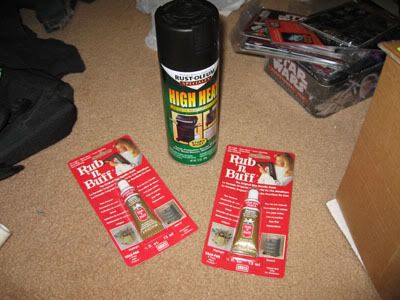
High Temperature BBQ grill paint (or any Flat Black)
Antique Gold Rub 'n Buff
Gold Leaf Rub 'n Buff
Satin Acrylic Clearcoat

Materials Not Needed:
CHAINS!

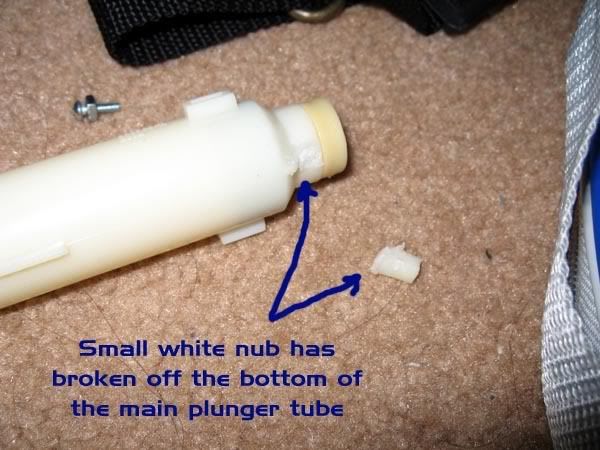
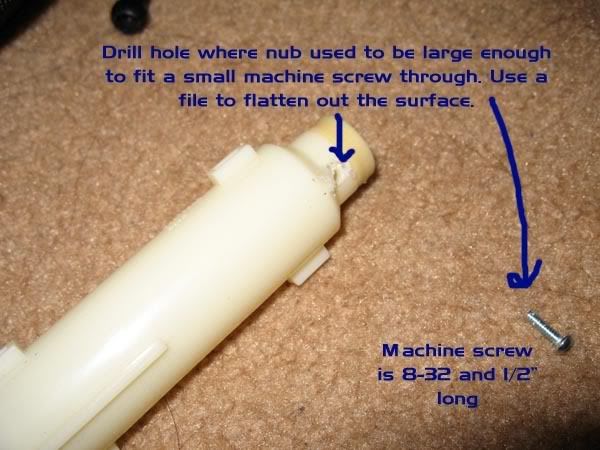
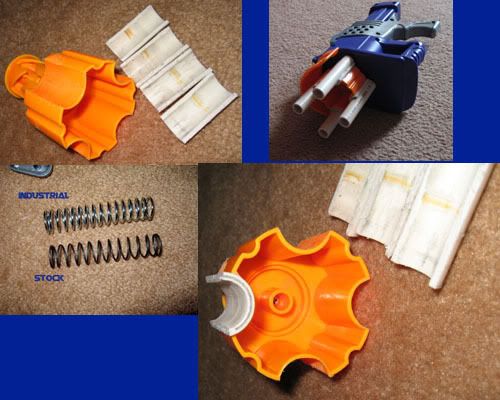
First, open up the gun and you'll find this:

Posted Image

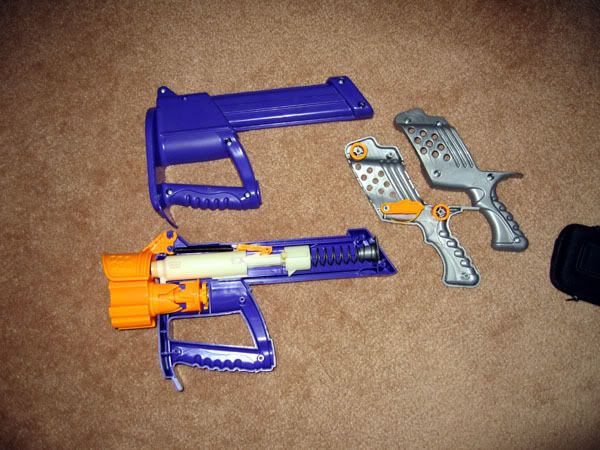
Remove the large orange rotation piece at the front of the gun. You can't miss it.

Now, cut two segments of your 1/2" PVC to a length of 1.5". Clamp them down and cut them lengthwise with your dremel or hacksaw. After cutting lengthwise, you should have four 1/2" PVC halfshells that are 1.5" in length. Use your dremel or file (rounded edge) + sandpaper to thin down the inner wall of the 1/2" PVC segments until the 1/2" CPVC can fit easily inside the half-shell.

Now cut out your 1/2" CPVC barrels. You'll need four. I made my barrels 3" in length.

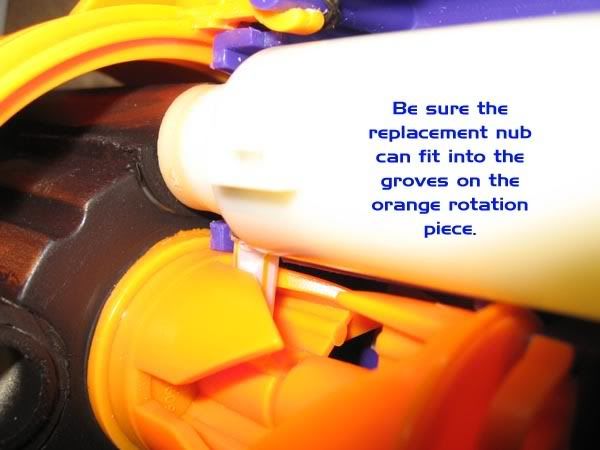
Take that large orange rotation piece and dremel down the circular grooves around the sides (where the chains fit in) until your 1/2" PVC sits flush against the orange groove. The 1/2" PVC serves as a spacer so the 1/2" CPVC barrel will line up correctly with the air chamber.

Posted Image

Use the plumber's goop (or your favorite, strong as hell adhesive) to attach the 1/2" PVC pieces onto the orange rotation piece. Make sure they are flush with the rear part of the orange rotation piece. Before you goop anything, though, use sandpaper to rough up the surface on the orange rotation piece--it is very slick plastic. Just a little roughing up will go miles for the plumber's goop to bond correctly.

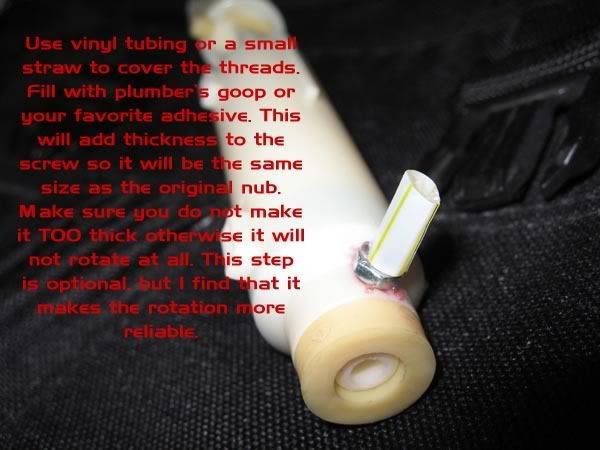
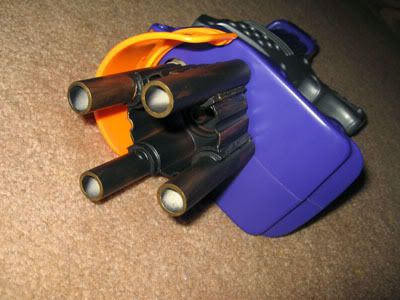
Use the plumber's goop to then attach your 1/2" CPVC barrels to the 1/2" PVC half shells. Do not glue them on flush to the rear end of the turret. Instead, let them stick out about 2mm from the edge of the rear of the turret. When you goop it, I suggest putting rubber bands around the entire turret to keep pressure on the CPVC and the PVC shells. Good contact will result in a high-strength bond.

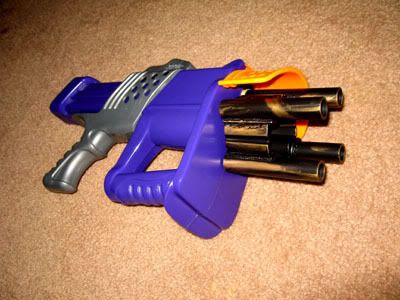
Here is a top view of the turret installed on the gun:

Posted Image

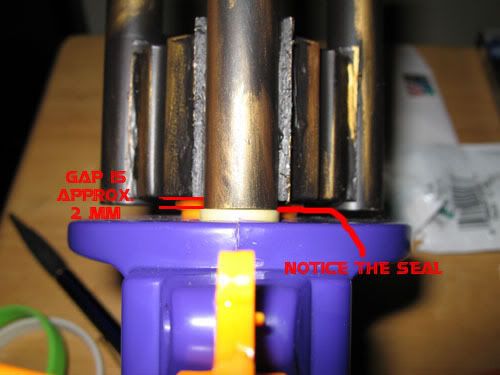
All of this spacing stuff is just so you maximize the air seal, but prevent jamming. The orange turret piece has a little "give" and moves forward/backward slightly. If the barrel stub length in the photo exceeds 2mm, you will experience jamming (I had them longer at first, but then I had to file them down until the damn thing stopped jamming). The white rubber piece in the photo is the tip of the air chamber, and it moves forward and backward. During rotation, it is pulled back inside the gun, once the barrel is in place, it will push forward and form a seal on the rear of the 1/2" CPVC barrel. The gun is then fired.

I also used an industrial spring instead of the original stock spring. It isn't much different from the old stock spring--it only has a wire gauge of .062, 13/16" O.D., and 3.5" length. I suspect the specs are similar to the stock chainblazer spring.

That wraps it up for the performance mods.

I decided to experiment with painting. I just wanted to paint the turret and nothing else (because I enjoy nerfing outdoors in public places).

Posted Image

First I used the sandpaper to rough up the surfaces (especially the orange plastic on the rotation device). I washed off the dust and put the internal parts under masking tape and newspaper. I hit it with my flat black. I then opened up the Gold Leaf rub'n'buff. I made my weathering marks by putting a dot on my finger, starting it on the flat black, then rubbing it in the direction I wanted to show wear. I then used Antique Gold to make the heavier weathering. The final look makes it seem like the gun was brass/copper that was painted black. Over the years, the black faded in some areas (barrel tips, edges, corners) and let some of the metal show through.

Posted Image

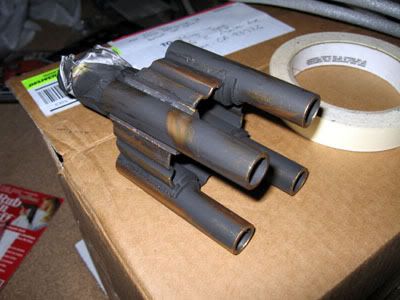
Lastly, I hit the thing with Satin Acrylic finish (do not use polyurethane with Rub'n'Buff--it will react). Prop makers dislike using clearcoat on Rub'n'Buff since it dulls the finish. Since this is a nerf gun, though, I don't want it to be rubbing off everywhere. I opted to just spray it down with clearcoat.

Slap everything back together and...

Posted Image

Posted Image

Posted Image

Range Test:

62' Average Flat shot, no wind, shoulder-level.

Video:

Edited by frost vectron, 05 February 2008 - 03:24 AM.

  • 0
Latest Modification: The Professional

"I am a leaf on the wind--watch how I soar" - Hoban "Wash" Washburne, Serenity.

#2 neomike88

neomike88

    Member

  • Members
  • 30 posts

Posted 06 June 2007 - 03:35 AM

Nice mod and cool paint job. I still would have like to see that thing with chains plus that nice ROF.
  • 0
Mike

#3 Ixius

Ixius

    Member

  • Members
  • 19 posts

Posted 06 June 2007 - 05:56 AM

It sounds so menacing when fired...I like it.
  • 0
System.out.println ("Hello World");

#4 OfAllTheNerf

OfAllTheNerf

    Member

  • Members
  • 714 posts

Posted 06 June 2007 - 10:24 AM

Very nice mod, and PJ.

That's a very clever way to use the Chanblazer without chains. The max distance is pretty good, too.

One thing I would recommend, though (you probably can't do that now, but for others if they do this), is to put o-rings at the back of the CPVC, so that it gets a better seal. Although, that seal looks pretty good on what you've already done, maybe the o-ring might get an extra foot or something :D .
  • 0
[color=#FF6600][Finesse]-[BitchX]

#5 Forsaken angel24

Forsaken angel24

    Member

  • Contributors
  • 2,472 posts

Posted 06 June 2007 - 10:42 AM

Awesome, I think this is our first CB write up.
Good job on it. I like the way you didn't use any chains. 80% of the time when I find a chain gun it has no chains with it.

As for an air seal I would recommend using thick, flat and squishy rubber disc washers. Hollow them out and place them under the pvc. If memory serves me right, I think they were made of neoprene. Nice video too!

Edited by Forsaken_angel24, 06 June 2007 - 10:42 AM.

  • 0
I don't get my kicks out of you,
I don't feel the way I used to do.
I know its bad,
After what we had,
But I’m just not the angel you knew.

#6 PointBlank

PointBlank

    Member

  • Members
  • 528 posts

Posted 06 June 2007 - 11:02 AM

I recently bought a titan and a bbb from sam, which both were as advertised, and I think it came ARed out. Unfortunately my dad became interested in it and pumped it 40 times after I just plugged the pump, so naturally the little tube that brings the air to the tank is broken. I ordered a new one today, and I would like to know where the ARs are. I checked in the mods directory and found several modifications which didn't show me where the ARs are. I think they are in the barrel, but if anyone could post a picture it would be appreciated.

Cool mod Frost! If I had a chainblazer I would do this mod.
  • 0
You can agree with me.... or you can be wrong.

My Latest Mods
The Cyclops
Pointblank Titan

#7 SirTofu

SirTofu

    Member

  • Members
  • 424 posts

Posted 06 June 2007 - 02:24 PM

Ahh, an old school gun being modded. We need more of this.
You're not the first one, but you are to post a write up. Nice and clean, good work.

It is essentially useless to have chains on the chainblazer because they jam easy. The funny thing about the chainblazer is that it's essentially a crippled arrowstorm.
  • 0
Nobody online Nerfs in the SE :(

#8 frost vectron

frost vectron

    Member

  • Members
  • 526 posts

Posted 05 February 2008 - 03:21 AM

Just wanted to post a repair guide on this mod. After a few hundred shots or so, my chainblazer refuse to rotate. Here's what was wrong with my gun and how I fixed the problem:

Posted Image

Posted Image

Be sure that you do not drill into the other end of the plunger chamber! You only want this hole on the bottom. Additionally, you want to sand the end flat enough so you can put a nut securely onto the bottom of the screw. This may require you to file into that angled bevel of the plunger tube. If you have to do that, you can always close up the hole with plumber's goop.

Posted Image

Posted Image

See how the nut is flat against the bottom of the plunger tube? You want it to look like that. If it is angled or isn't flush against the tube, use a file to make the tube flat in that area so you can put the nut there. Otherwise the screw might wobble when you fire the gun and it will lead to more problems.

Posted Image

Posted Image

After I did these steps, it appears to work flawlessly. Enjoy!
  • 0
Latest Modification: The Professional

"I am a leaf on the wind--watch how I soar" - Hoban "Wash" Washburne, Serenity.

#9 Cmdrmack

Cmdrmack

    Member

  • Members
  • 545 posts

Posted 05 February 2008 - 09:05 AM

That looks like it would work on the Razorbeast too. Good to know.
  • 0
QUOTE(Predalien_Ro @ Apr 7 2008, 10:24 PM) View Post

Oompa: FECES!? Who in their right mind would try that shit!?


Bigger Salvo

{FWPC}

#10 Captain

Captain

    Member

  • Members
  • 814 posts

Posted 05 February 2008 - 04:31 PM

Sweet! I have a chainblazer that's broken, and now I can fix it! I still don't have the cover for the top, though...
  • 0
I don't care what anyone else says, Atom Blasters are fucking awesome.

#11 bobafan

bobafan

    Member

  • Members
  • 635 posts

Posted 05 February 2008 - 05:24 PM

Mine broke differently.
Posted Image
I tried to fix it with epoxy and JB Weld but it keeps breaking.

Do you have any ideas? I can't think of anything.
  • 0
thaygor: all i remimber is pumping it hard and shooting than trying to pump again

---

<death09>my girlfriend broke up with me and sent me pix of her and her new boyfriend in bed
<ktp753>ouch.
<death09>yeah.i sent them to her dad

#12 frost vectron

frost vectron

    Member

  • Members
  • 526 posts

Posted 06 February 2008 - 12:31 AM

The peg that holds the orange clip piece thing with an extension spring broke off?

Maybe you can get creative with some sheet metal and then drill a hole into the sheet metal and put a screw threw it to simulate the peg.

That looks like it would work on the Razorbeast too. Good to know.


IF ONLY I knew that when I was 9 years old, my razorbeast would not be chopped up into pieces right now. :(

Edited by frost vectron, 06 February 2008 - 12:33 AM.

  • 0
Latest Modification: The Professional

"I am a leaf on the wind--watch how I soar" - Hoban "Wash" Washburne, Serenity.


0 user(s) are reading this topic

0 members, 0 guests, 0 anonymous users