
Part 2: "Tadpole"
I needed to make a laser pointer have small leads on it so that I could mount it further away from where I wanted the switch. So, I real quick thought of this.
First off, you will need:
- A laser pointer
- A 1/2" CPVC coupler
- A two-way electrical switch
- Two insulated crimp-style connectors which work for your switch*
- Two identical length pieces of 20 AWG electrical wire and a 2.5" length of 20 AWG electrical wire.
- Wire cutter
- Electrical wire insulation stripper
- A 1/16" drill
- A hand drill (preferred), but electric will do
- Very fine needle-nose pliers or a 6" hemostat
- Clear Tape
- Paperboard from a cereal box
- Writing tool, preferably something with a sharp, fine edge.
- Sharp, fine pointed knife, like an Xacto knife with a #11 blade.
This is what I did to relocate the switch. I did not move the battery since I didn't have to; however, if you have a battery holder for two AAA, AA, A, B, C, D, don't be afraid to wire it in between the switch and the body of the laser. I'm pretty sure that if you have a holder on hand, you probably don't need my instruction on how to bypass those tw button cells.
1.) Remove both ends of the laser. No picture necessary.
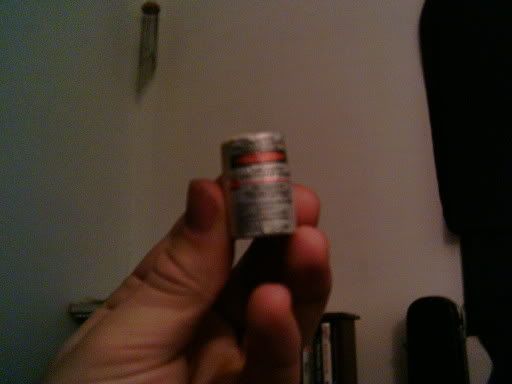
2.) Remove the batteries. Also, carefully remove the sticker on the outside of the laser pointer body. Put the sticker on the coupler so that the rectangle is coplaner with a plane section perpendicular to the bases. Wrap clear tape around the information sticker to keep in in place and ledgible. If you don't remove that sticker, you life will be slightly harder since the coupler will remove it for you later.
3.) Take the back cover of the pointer (the thing which holds the button cells in). Remove any key chain attachment. This is easily done with those pliers/hemostat. Now take your drill and make a 1/16" hole through this back plate. Make it anywhere as long as it goes through. See picture later down in the guide.
4.) Take a battery. Either battery. Now place in on the paperboard and trace it. Good. Now take your knife. Do not cut off a digit in this step. Cut that circle you just made to the best of your abilities. Check to make sure that it fits in the laser pointer by assembling the pointer, putting in both button cells then the paperboard, followed by the cap. More than likely, those cells will be posi-up. Make sure that the pointer does NOT turn on when you press the button. Disassemble the pointer once you make the paperboard cicle fit right. Good job, have a cookie!
5.) Take your drill bit. Make a hole the same place in the paperboard as it is in the battery endcap. Make another hole about 3/16" towards the opposite side of that hole. Make sure that neither of the holes are within 1/32" of the edge of the paperboard. Set it down where you will not lose it.
6.) Take a length of 20ga wire. Thread it through the hole in the battery endcap. Now strip the insulation off of the first 5/16" of wire. Bend it just after the insulation ends to a right angle. Thread the paperboard circle onto it. Now carefully bend the remaing wire into that other hole. If it doesn't fit, remove the paperboard, straighten the wire a bit and strip of a little bit more insulation. You may repeat that process once more after that. Any more and you will have to scrap that piece of wire.
7.) You should have this now:
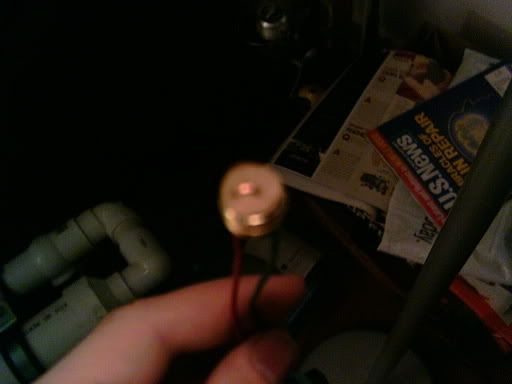
(shitty photo)
Take the empty laser pointer body. Put it through the 1/2" CPVC coupler, making sure that the button is depressed. Now take a 2.5" (roughly) length of 20ga wire and wrap it around the pointer's body, stuffing it into the coupler. This stabilizes the pointer within the coupler and keeps the button depressed. You should now have this:
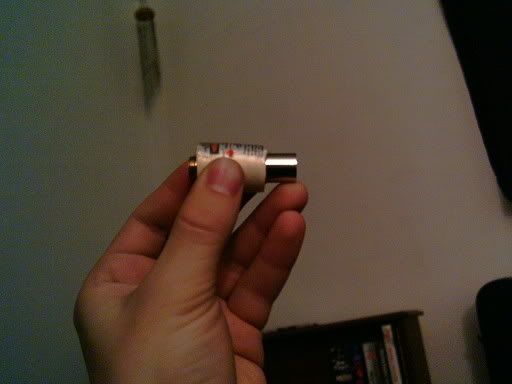
(another shitty photo)
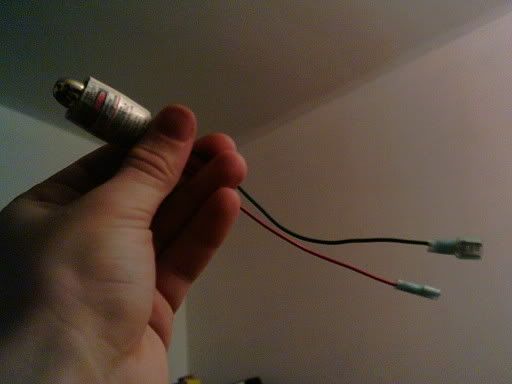
10.) Take your other piece of wire. Strip the first 5/16" of insulation off of the wire, Now thread it through the hole on the endcap that used to have the keychain attached to it. Make the insulation be flush with the edge of the hole. Bend the wire around the keychain adapter hole.
11.) Reassemble your laser pointer. Remember the polarity of the button cells, if you still are using them. Strip the first 1/4"-5/16" of insulation from both leads (the wires sticking off the back of the pointer). Attach your connectors to these stripped ends. You should hopefully know how to use a crimp connector. Attach your switch and try it out. You may now put the protective cap back on the front of the pointer. Why did you take it off? I wanted to show you that it was pointless except to protect the emitter.
Well, it should look similar to a tadpole now:
(a tadpole)
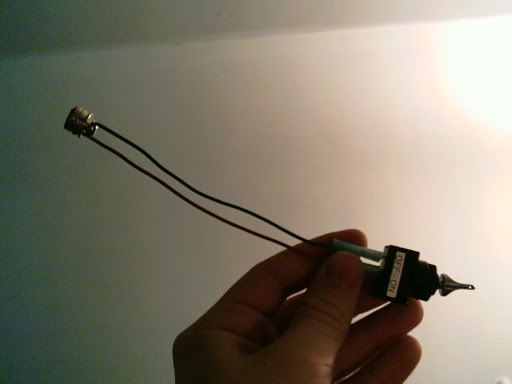
(a constant toggle switch attached via 1/4" blade connectors to the battery endcap)
I'll probably do this to a KAF member's laser pointer (a plastic Class II one, not a metal Class IIIA) and retake some of those pictures.
Questions? Comments?
Edit: the point of the coupler is to give both a surface to mount this thing using a machine screw and to keep that button depressed, since I didn't feel like soldering the connection together by removing the whole laser emittor and integrated leaf switch. If I did that, then I would've jsut made a new body for it out of 1/2" CPVC so that I could then mount it in even more places.
Edited by GeneralPrimevil, 04 April 2006 - 10:38 AM.


