Jump to content


Photo

Maverick End-clip -[update]-

should make longer barrels possible

16 replies to this topic

#1 CaptainSlug

CaptainSlug

    Resident Mad Scientist

  • Administrators
  • 4,763 posts

Posted 28 March 2006 - 03:48 AM

UPDATE: This modification was an experiment and didn't prove too reliable after prolonged use. For a much more reliable modification see my drop-clip mod.

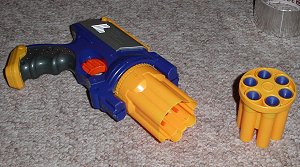
Okay, here's my first modification write-up. There are plenty of other modifications discussed for this all too popular models but none that I've seen that would allow for longer barrels to be used. So I decided to dissect mine and see if I could find a way to permanently fix the cylinder to the main body of the gun. Here's basically what I managed to do that not only gives this gun a drop-and-swap clip but will also allows for longer barrels to be added (something I may work on next). I didn't want to jump right to stefans with this gun because I wanted to see whether or not this modification negatively affected the ranges on the gun so I won't be covering post removal either.
Posted Image
Tools Used
+ Band Saw (scrollsaw, hack saw, jigsaw, or dremel will do. You just need something for cutting the frame)
+ Power drill
+ X-acto Knife
+ Smallish Screwdriver
+ Sanding Sponge
+ Container for all the parts

Step 1
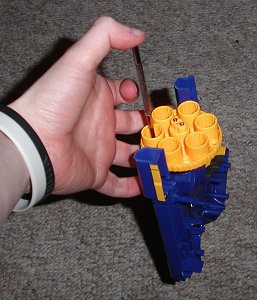
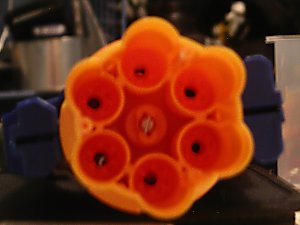
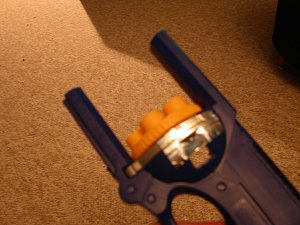
Obviously you need to completely disassemble the gun. Remove EVERYTHING except for the springs attached to the body. Use a flathead screwdriver to pry the forward bracket off of the cyclinder. Set aside all of the parts is a container of some kind. I used the lid to a stack of CD-Rs.
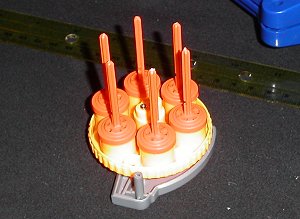
Step 2
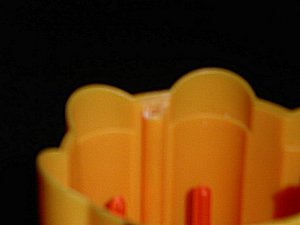
Mine did not but MAKE SURE that the pieces with the posts on them are not glued to the base of the cyclinder. These will get in the way of some of the following steps so the entire cyclinder has to be disassembled and the parts set aside as well.
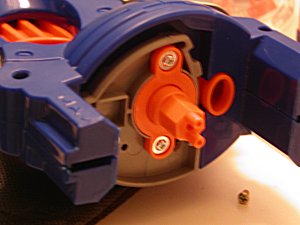
Posted Image
Step 3
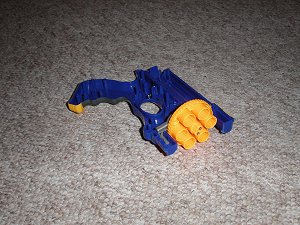
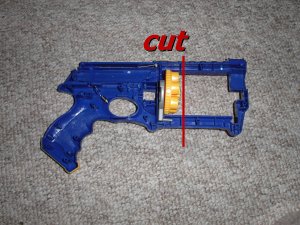
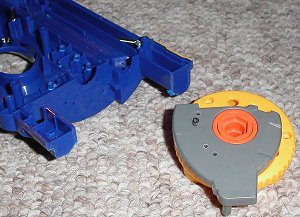
Cut just ahead of the bulkheads on both frame halves as shown in the image above so that you can sand the surface smooth and not have a huge gap left to fill after the gun is reassembled. Cutting further forward (as I discovered) will make later steps rather awkward.
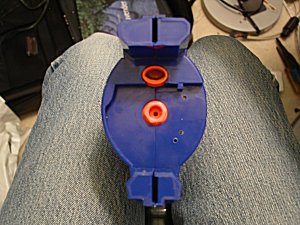
Posted Image
Posted Image
Step 4
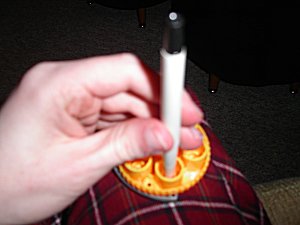
Use a fine point permanent marker through one of the base holes in the rear end cylinder part to make several screw holes (2 or 3 will do).
Posted Image
Step 5
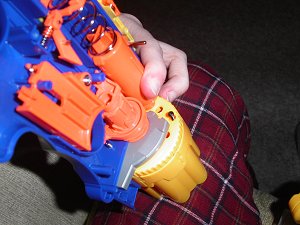
Temporarily tape the cylinder piece to the left-side frame piece and then drill the marked holes through both pieces with a very small drill bit (around 3/32").
Posted Image
Step 6
Redrill the holes in the cylinder end using a 7/64" bit.

Edited by CaptainSlug, 28 May 2007 - 12:05 AM.

  • 0
The little critters of nature, they don't know that they're ugly. That's very funny, a fly marrying a bumble bee. I told you I'd shoot, but you didn't believe me. Why didn't you believe me?

#2 CaptainSlug

CaptainSlug

    Resident Mad Scientist

  • Administrators
  • 4,763 posts

Posted 28 March 2006 - 03:50 AM

Posted Image
Step 7
Use some of black screws from the disassembly of the gun to affix the cylinder end to the left-side body part of the gun by using a small screwdriver.
Posted Image
Step 8
Use an X-acto knife or sanding bit in a dremel or drillpress to grind down the threaded posts inside the rear half of the cylinder. This allows the front half of the cylinder to be loaded without having to line these posts in the rear half up with the matching divots in the front half. Now you're ready to start reassembling.
Posted Image
Posted Image
Step 9
Learn from my mistake by affixing the rear cylinder half to the end cap before putting the rest of the rest of the internal parts in their place and the process will go much smoother. Either continue with an additional modification while you have the gun disassembled or simply put everything back where it was originally excluding of course the ejecting button that was on the left side and the cylinder axle.
Posted Image
And there you have it. Now, combined with other modifications, you can load 6 bullets at a time AND still have the options of experimenting with longer barrels. As far as I can tell this clip hasn't affected my ranges, which with this gun are comparatively poor to begin with.

And that's the end of my first modification and my first write-up.
Cheers.

Edited by CaptainSlug, 28 March 2006 - 03:59 AM.

  • 0
The little critters of nature, they don't know that they're ugly. That's very funny, a fly marrying a bumble bee. I told you I'd shoot, but you didn't believe me. Why didn't you believe me?

#3 Paloose

Paloose

    Member

  • Members
  • 143 posts

Posted 28 March 2006 - 06:35 AM

Nice, and clean.

But, why didn't you get rid of the air restrictor posts?
  • 0

#4 Black Wrath

Black Wrath

    Member

  • Members
  • 1,071 posts

Posted 28 March 2006 - 07:53 AM

Looks very cool, clean and relatively original.
  • 0
Xx_Black-Wrath_xX of The Canadian Foam Militia

Not in the game anymore, but it was great while it lasted. Thanks for the great years of fun, NH!
--
Resident "Spawn of Talio"

#5 CaptainSlug

CaptainSlug

    Resident Mad Scientist

  • Administrators
  • 4,763 posts

Posted 28 March 2006 - 04:23 PM

Nice, and clean.

But, why didn't you get rid of the air restrictor posts?

I'm still working on making stefans. I'll remove the posts once I have some to shoot with.
  • 0
The little critters of nature, they don't know that they're ugly. That's very funny, a fly marrying a bumble bee. I told you I'd shoot, but you didn't believe me. Why didn't you believe me?

#6 Forsaken angel24

Forsaken angel24

    Member

  • Contributors
  • 2,472 posts

Posted 28 March 2006 - 04:25 PM

Looks great. If I wasnt so frustrated with the Maverick I would buy another to try this out.
  • 0
I don't get my kicks out of you,
I don't feel the way I used to do.
I know its bad,
After what we had,
But I’m just not the angel you knew.

#7 Rip32

Rip32

    Member

  • Members
  • 177 posts

Posted 28 March 2006 - 04:53 PM

Thats a nice mod, and write-up. Good job!
  • 0
http://www.break.com...iencechild.html
Funniest video ever. This kid needs some serious help

#8 Greek Assassin

Greek Assassin

    Member

  • Members
  • 75 posts

Posted 28 March 2006 - 06:13 PM

Nice mod, but I dont think longer barrels would help the Maverick much. Its the air seal that needs improving, along with that midget plunger tube. I you could combine that with Falcon's Mav-Finder, and find a thin O ring to improve the seal, adding new barrels could give it NF-like ranges!
  • 0
QUOTE (Arcanis @ Apr 9 2005, 12:02 AM)
When I insert a dick, nothing happens.

#9 KirbySaysHi

KirbySaysHi

    Member

  • Members
  • 100 posts

Posted 28 March 2006 - 06:14 PM

Added to the directory, good job for sure!

Copy!
  • 0
Kids in the backseat cause accidents... Accidents in the backseat cause kids.

#10 CaptainSlug

CaptainSlug

    Resident Mad Scientist

  • Administrators
  • 4,763 posts

Posted 28 March 2006 - 10:12 PM

Longer barrels or simply a barrel replacement would allow for the darts to be pushed further back, hopefully all the way to the back of the cylinder so that the spring-loaded parts in the cylinder could be removed, which are only vital when the stock barrels are used.

Nice mod, but I dont think longer barrels would help the Maverick much.  Its the air seal that needs improving, along with that midget plunger tube.  I you could combine that with Falcon's Mav-Finder, and find a thin O ring to improve the seal, adding new barrels could give it NF-like ranges!

Agreed. I've been thinking about a temporary solution of simply adding some teflon tape to the "lips" on the front of the plunger to see if it would make a differene. The biggest problem I've discovered is that the trigger rotation mechanism can't overcome very much friction.
I'm still trying to thick of other ways to improve the gun but this was the first one I felt like attempting since it doesn't require any materials.

Edited by CaptainSlug, 28 March 2006 - 10:56 PM.

  • 0
The little critters of nature, they don't know that they're ugly. That's very funny, a fly marrying a bumble bee. I told you I'd shoot, but you didn't believe me. Why didn't you believe me?

#11 DarkSide

DarkSide

    Member

  • Members
  • 31 posts

Posted 29 March 2006 - 12:38 PM

Nice Mod! I think I'll replace the plunger or spring on my mav, then do this mod so I can have longer barrels for better range, and multiple clips, and possibly a speed loader for faster reloading.

Edited by DarkSide, 29 March 2006 - 12:40 PM.

  • 0
~D.S.~

#12 pat 1st Lt

pat 1st Lt

    Member

  • Members
  • 236 posts

Posted 29 March 2006 - 06:34 PM

Excellent first mod: Very clean and coherent right-up combined with good quality, self-explanatory pictures.

This is a nifty ROF mod, but when combined with our Nite-Mav configuration (The same as Flacon's Mav-Finder, only our name is better), rear o-rings, and dremeled CPVC barells, this gun should get NF ranges (High 60's/low 70's) with a devastating rate of fire.


I am going to requisition one of our Nite-Mavs and try this mod right now! The only problems we've been having with them has been the poor reload times, as the large NF plunger and the subsequent dremmeling impeeds the clip-release button occaisonally causing difficult reload problems.

With this modification, the {SF3G}'s Mavericks will be the coolest sidearms ever! Nite-Finder ranges, removable and sturdy magazines, decently accurate, and killer great looks!

I'm looking forward to doing this mod later tonight.

Thanks for the inspiration.


Sincerely,
Pat
  • 0
QUOTE(euphemism) View Post
QUOTE(Pat) View Post

It gave the site a sort of 'homy' feeling.

Did you know that "m" can sometimes look like "rn" when read quickly?

#13 CaptainSlug

CaptainSlug

    Resident Mad Scientist

  • Administrators
  • 4,763 posts

Posted 04 April 2006 - 07:36 PM

Alright, here's a much-needed update/revision to this mod. The previous mod was all well and good but I wasn't completely happy with it because the cylinder was still a tad wiggly and that was affecting the contact between it and the lips on the plunger. Here's what I discovered that made the problem very easy to fix.
Posted Image
The two tiny little screws in the center of ^this part^ need to be removed. This frees the rear part of the cylinder from the grey frame/hinge and the orange center spindle.
Posted Image
Posted Image
What you need to do is drill the center of this part with a 7/64th-inch bit then tap it for UNC #6-32. You may also need to drill out the orange center spindle and rear cylinder cap to 9/64th.
Posted Image
Now you can simply attach the cylinder directly onto the advancing mechanism by using a 2-inch-long #6-32 machine screw. This allows you to remove the ENTIRE cyclinder without having to take part apart the rest of the gun. It also allows you to adjust the tension in order to get the best fit.
Posted Image
And now that I have some stefans I went ahead and removed the posts and cut some 1/2-inch long sections off the stock darts to fill some of the excess space inbetween the rear of the cylinder and the orange washers (what's left of them after removing the posts from the center of them).

These changes only took about 10 minutes but made a huge difference in the range consistency. I'm also experimenting with the plunger but I haven't been able to test the results.

Edited by CaptainSlug, 04 April 2006 - 07:41 PM.

  • 0
The little critters of nature, they don't know that they're ugly. That's very funny, a fly marrying a bumble bee. I told you I'd shoot, but you didn't believe me. Why didn't you believe me?

#14 DragonX

DragonX

    Member

  • Members
  • 8 posts

Posted 09 March 2008 - 10:35 PM

Is that plumbers goop in the back of your last pic?
  • 0

#15 badger

badger

    The Walking Nerf-wiki

  • Members
  • 1,171 posts

Posted 09 March 2008 - 10:58 PM

Did you notice the date of the last post on this thread? Holy fuck it was 2 years ago! Please read the date before you post. You could have PM'ed CaptainSlug rather than bringing back such an old thread. As the CoC says, "Don't post in months-old topics unless you have something significant to add".
  • 0
As Carbon once said,

"The moment you can no longer see the fun in running around like a little child is the moment you begin to die."

Roses are FF0000
Violets are 0000FF

ALL YOUR BASE ARE BELONG TO US

#16 CaptainSlug

CaptainSlug

    Resident Mad Scientist

  • Administrators
  • 4,763 posts

Posted 10 March 2008 - 08:35 AM

This mod is dead and not recommended. It's effectiveness over time became questionable and it doesn't works as well as the drop-clip mod.

Is that plumbers goop in the back of your last pic?

It's liquid nails.

Edited by CaptainSlug, 10 March 2008 - 08:36 AM.

  • 0
The little critters of nature, they don't know that they're ugly. That's very funny, a fly marrying a bumble bee. I told you I'd shoot, but you didn't believe me. Why didn't you believe me?

#17 VACC

VACC

    Vacc is Legend

  • Founders
  • 3,265 posts

Posted 11 March 2008 - 07:58 AM

Is that plumbers goop in the back of your last pic?


This topic is 2 years old and you added nothing. Read the Code of Conduct. This serves as the only warning I'll give.

VACC
~The Merciful~
  • 0


1 user(s) are reading this topic

0 members, 1 guests, 0 anonymous users