Jump to content


Photo

Re-creating the Nerf SledgeFire: The SuperSledge

homemade 3d printed sledgefire shell ejecting

5 replies to this topic

#1 Silly

Silly

    Member

  • Members
  • 244 posts

Posted 27 December 2021 - 02:17 PM

Decided that NerfHaven would probably be the best place to document the step-by-step development of my newest blaster design, the SuperSledge. 


The SuperSledge is a full recreation of the Nerf SledgeFire, but improving it for NIC use in every way. Larger plunger tube, stronger springs, community designed shells (Spring Thunder right now, more later), quick takedown functionality, quick barrel, stock, spring, and ammo type swapping (no screws, all takedown pins), and the whole blaster uses easily accessible hardware and pretty simple 3d prints. 


The only spring in this blaster is a chunk of [[[k25]]] for the plunger. The catch, trigger return, priming lever return, and ejection are all covered by two pieces of elastic cord. The top barrel locking lever uses a rubber band or hair tie.


The barrel and stock can be easily removed, with two takedown pins for the barrel, and one takedown pin for the stock. The ammo type can be swapped quickly with a swap of the barrel and breech face, only three takedown pins. The spring can be swapped easily as well, with only three takedown pins removed. All able to be done at a game, maybe even on the field if you wanted to.


Homemade Sledgefire SuperSledge v582 1.png

Homemade Sledgefire SuperSledge v582 4.png

Homemade Sledgefire SuperSledge v582 2.png

Homemade Sledgefire SuperSledge v583 - Copy.png

Homemade Sledgefire SuperSledge v582 3.png

Homemade Sledgefire SuperSledge v582 5.png


Here are some development photos: 


Homemade Sledgefire v4 1.png

I started out by doing a straight 1:1 sketch of my SledgeFire's internals.


https://www.youtube....h?v=OJQCfiQKtqw

I also took some video of the SledgeFire's internals, just to work over them in my head.


Homemade Sledgefire v11.png

This is where the 1:1 sketch ended up after some refining.


Homemade Sledgefire v58.png

Homemade Sledgefire v58 2.png

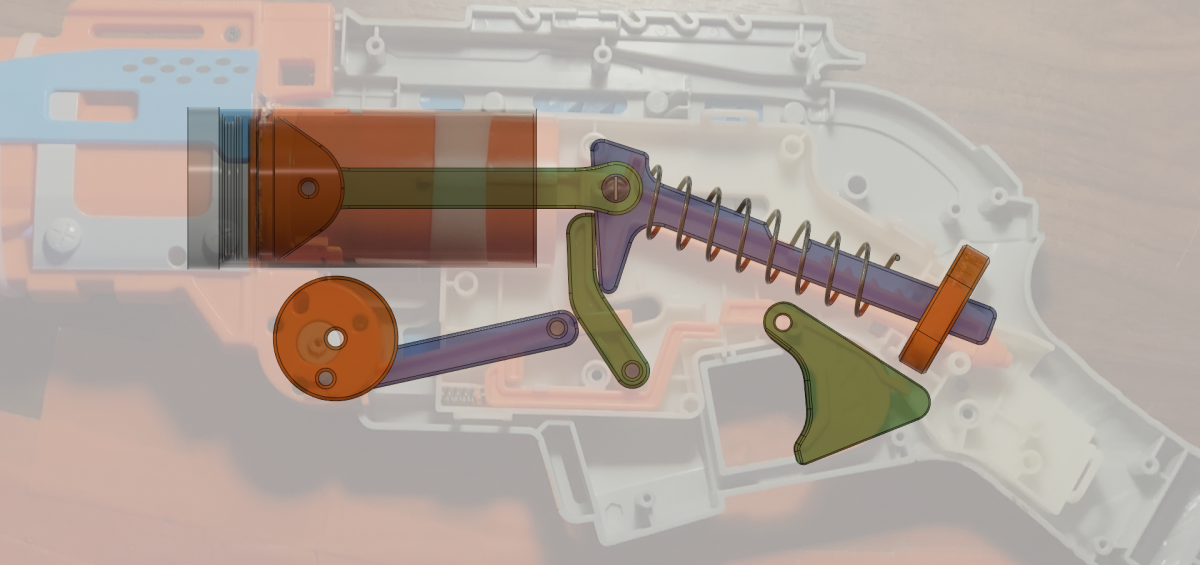
Here you can see that I have removed the trigger lock and fleshed out all the internal components. There is a rudimentary priming pivot, as well as more properly sized levers and bars. I have also added a segment of FLAK 2"OD plunger tube and begun work on a plunger.


Homemade Sledgefire v84 2.png

The first side panels are now in place! Lots of small tweaks were made to all the internals, tweaking thicknesses and lengths. The catch is now properly supported, there are spacers to keep the internals centered between the side plates, and the plunger has been simplified. The priming lever is now an actual lever. There is a small dingus on the back of the trigger used for attaching an elastic through the catch, but it was pretty quickly removed in favor of a simple hole through the whole trigger.


https://www.youtube....h?v=UtcTChv5F5E Video overview of the design so far.


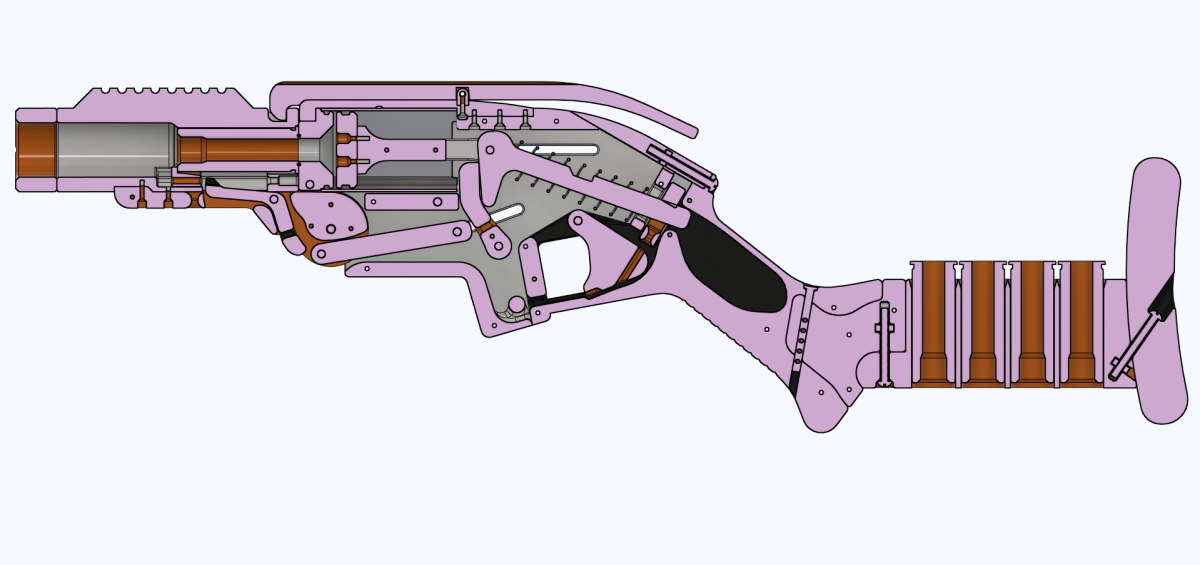
This was the point where I made my first test print, just to check internal functionality and printability. There were definitely tweaks to be made to improve reliability, but this was when I was 100% sure that this concept could work in the real world, not just in CAD.

https://www.youtube....h?v=8y1QMHJ7zKs


Homemade Sledgefire v136.png

Homemade Sledgefire v151 2.png

This is where I began modeling the grip. I used the basic thickness and length of a v4 Caliburn grip, but that didn't last for long as you will see next. You can also see that the internal spacers are now small discs instead of larger parts. There are now also connection blocks and a bottom cover.


Homemade Sledgefire v255.png

Homemade Sledgefire v309.png

Here I've begun to smooth out the edges and corners of the side panels. The top-back of the blaster now has nice covering plates. The grip has also progressed into it's basic final design, split into 3 pieces; a core and two side panels (SpudSpudoni helped me a bit with figuring out the Fusion tools to make the finger groove curve near the trigger well. Thanks Spud!). There is now a shell storage stock as well.


Homemade Sledgefire v323.png

Homemade Sledgefire v429.png

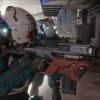
Barrel! The shell ejection mechanism can be seen much better in the next image. You can see the stock lug now too.


https://www.youtube....h?v=R51Mks6aqek I also did another video overview around this point.


Homemade Sledgefire v494.png

Lots of work around the plunger tube. The breech face is now thicker and locked in place with a top strap and a takedown pin. The barrel latch is now also in place.


Homemade Sledgefire SuperSledge v584.png

Homemade Sledgefire SuperSledge v583.png

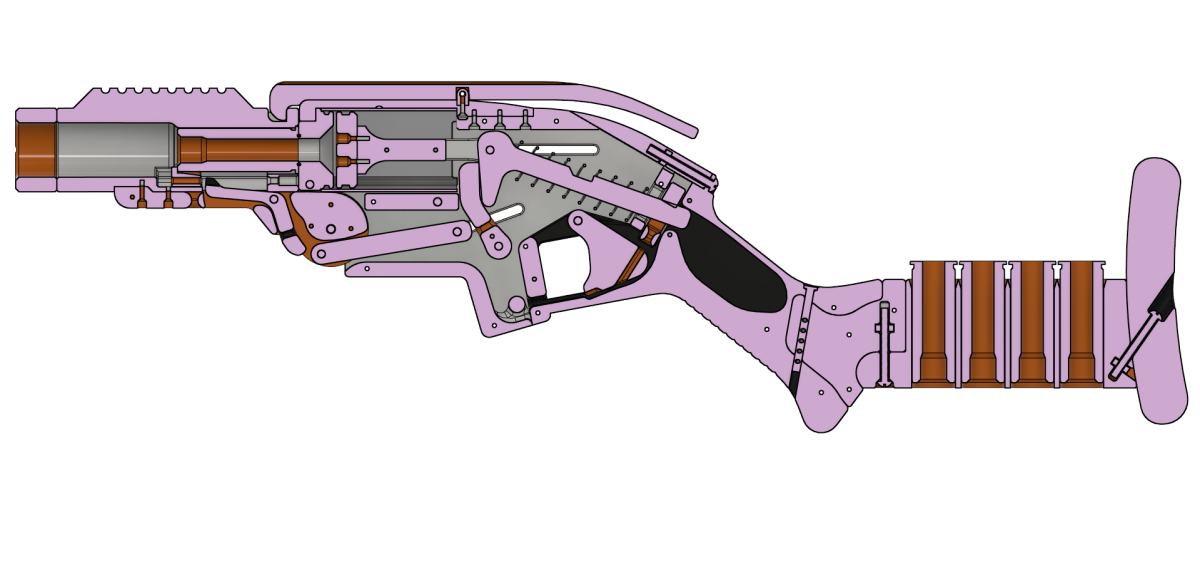
And here is the current design! Lots of small tweaks to parts, lots of smoothing and print optimization. Previously, some parts were just floating in place. Now, all the screws and connections are modeled. Some parts have been combined (the bottom cover and the elastic guide pin). I also made all the hardware visible in this photo (minus some screws and the three pieces of elastic).


Edited by Silly, 27 December 2021 - 02:34 PM.

  • 0

Co-Owner of the History of Nerf Modding research project, moderator of r/Nerf, owner of BlasterWiki, maker of 3d printed blasters (GitHub/Thingi) and Nerfy art.


#2 Spud Spudoni

Spud Spudoni

    Member

  • Members
  • 321 posts

Posted 29 December 2021 - 01:26 AM

I'm still massively impressed with how well this turned out, and how efficient your productivity was with it. Excellent photo and contextualization. Above all else, the utilization of pre-existing hardware kits to constrain your development but also make recreating it easier on anyone else is something I've heavily considered in future builds. (Thanks for the shoutout as well!) You're going to have to tell me how you take these images in Fusion. I know they aren't renders. Are these just screenshots from your computer? Mine never look this good when I do so. Depending on the performance, I could easily see this becoming a standard jump-off point for other remixes and modulations. Thanks for keeping the NH writeup train going!


Edited by Spud Spudoni, 29 December 2021 - 01:26 AM.

  • 0

industrial designer


#3 Silly

Silly

    Member

  • Members
  • 244 posts

Posted 29 December 2021 - 03:54 PM

I'm still massively impressed with how well this turned out, and how efficient your productivity was with it.


Thanks! I managed to do all of the design so far in less than a month, I'm pretty happy about that. 


Excellent photo and contextualization.


Thanks x2
 

Above all else, the utilization of pre-existing hardware kits to constrain your development but also make recreating it easier on anyone else is something I've heavily considered in future builds.


I enjoy using all the same hardware that Slug uses, preferably all the same lengths that he uses as well. It makes it a lot easier for individual builders to get hardware, since they can either order from Slug, or find it pretty easily themselves.


And since people have already made metric versions of Slug's designs, its easy for international people to use metric hardware instead of trying to get imperial stuff shipped overseas. It also makes setting up production of the designs with other sellers a LOT easier, since most other big hobby printing shops already sell Slug blasters and usually have the hardware on hand already.
 

(Thanks for the shoutout as well!)


Np ;)
 

You're going to have to tell me how you take these images in Fusion. I know they aren't renders. Are these just screenshots from your computer? Mine never look this good when I do so.

Screenshot 2021-12-29 153629.png

Capture.PNG


I'm surprised at the amount of people that don't know of Fusion360's image capture feature!


Depending on the performance,


I'm still working on getting my first fully functional prototype printed, but I am expecting FPS of over 200 with a singled, barreled shell. The standard SpringThunder shells without a barrel will definitely be getting less, but will still be serviceable. The plunger volume here is more than a v4 Talon Claw, so it's nothing to scoff at. 


I could easily see this becoming a standard jump-off point for other remixes and modulations.


As usual, I'm planning to release the files for free, so people can go make modifications however they want (as long as they don't try to sell it without chatting with me first :P ). The only thing I usually ask of people is to consider buying something on my RedBubble shop, just so I can get some kickback for the time sunk into each design. I might open up a "PayPal.me" thing at some point so people can more directly throw money at me, but idk how well that would work out. 


Thanks for keeping the NH writeup train going!


NerfHaven fo life!


Edited by Silly, 29 December 2021 - 03:58 PM.

  • 0

Co-Owner of the History of Nerf Modding research project, moderator of r/Nerf, owner of BlasterWiki, maker of 3d printed blasters (GitHub/Thingi) and Nerfy art.


#4 Spud Spudoni

Spud Spudoni

    Member

  • Members
  • 321 posts

Posted 30 December 2021 - 01:29 AM


I'm surprised at the amount of people that don't know of Fusion360's image capture feature!

To be honest, I've been a little embarrassed to ask for a while. I've been using Fusion360 forrrrrr maybe 6 years now? Never knew about it. But I also render everything that's worth showing, which is usually finalized images, and cloud rendering is quick so I never needed an alternative. Every now and then being able to see the modeling lines on a part is super helpful for showing WIP images. Even an old dog can learn new tricks!

The only thing I usually ask of people is to consider buying something on my RedBubble shop,

This is where you design a cool Super Sledge patch or decal to slap on the blaster  B)


Edited by Spud Spudoni, 30 December 2021 - 01:30 AM.

  • 0

industrial designer


#5 Silly

Silly

    Member

  • Members
  • 244 posts

Posted 01 January 2022 - 07:59 PM

The prototype is working excellently! I have a bunch of things to tweak, but the majority of this turned out really nice!


https://youtu.be/pdmsKouHnXU


  • 0

Co-Owner of the History of Nerf Modding research project, moderator of r/Nerf, owner of BlasterWiki, maker of 3d printed blasters (GitHub/Thingi) and Nerfy art.


#6 Silly

Silly

    Member

  • Members
  • 244 posts

Posted 05 January 2022 - 02:26 PM

I and Spud also made some cool MegaXL barrels that I'll be using in the SuperSledge. Going to have a barrel just for MXL. 


https://github.com/S...rlyMegaXLBarrel


STEP and F3D files are included so you can go make your own edits on the design, or integrate it into your own blaster/mod.


  • 0

Co-Owner of the History of Nerf Modding research project, moderator of r/Nerf, owner of BlasterWiki, maker of 3d printed blasters (GitHub/Thingi) and Nerfy art.


Also tagged with one or more of these keywords: homemade, 3d printed, sledgefire, shell ejecting

0 user(s) are reading this topic

0 members, 0 guests, 0 anonymous users