
The Mark-15
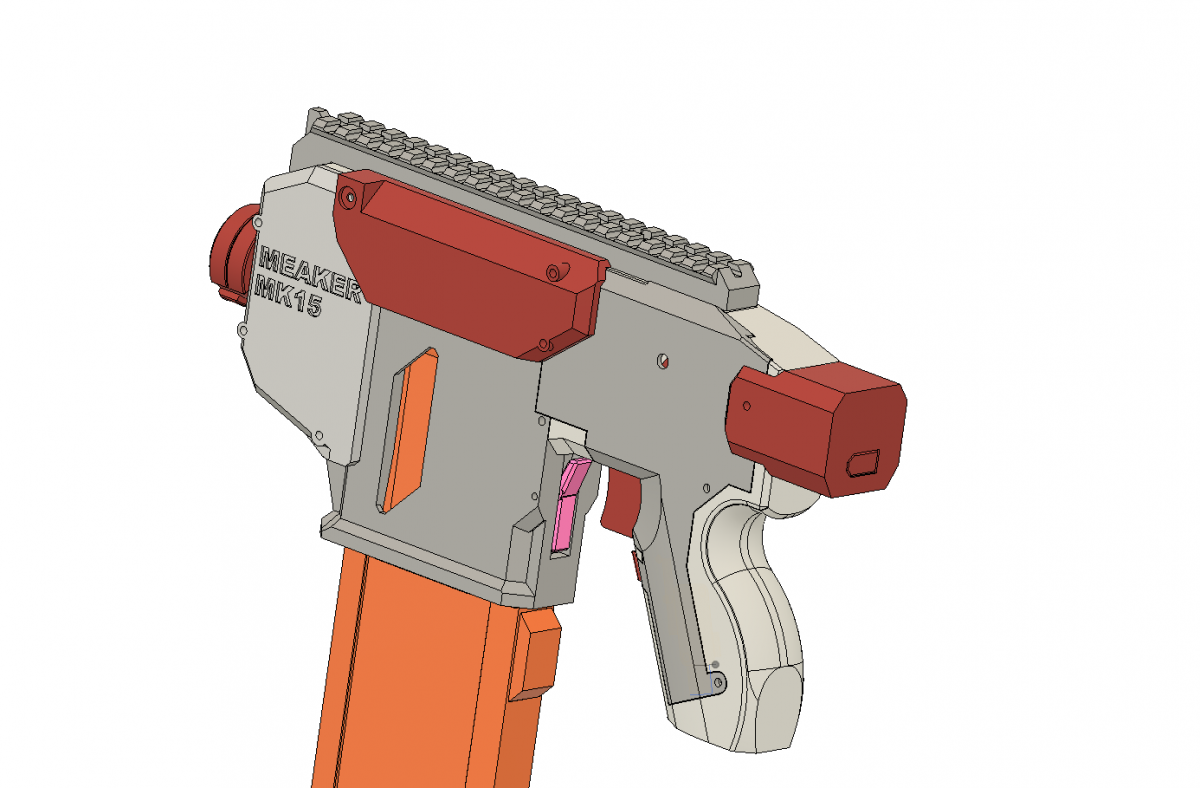
Internal photo:

This is basically copy-pasta from the Thingiverse post, which I will probably be keeping more up-to-date than I will this post. However, I am posting here for posterity and because I always post here.
Overview:
This is a redraw of Markmarx1066's Freigewehr V-1 Nerf Blaster. It is designed as a semi-auto magfed flywheel system at present, though in the future I'd like to expand the system to accept other feed methods and firing modes. I've adjusted it to accept Open Flywheel Project cages, look different, and print more readily on smaller machines (the largest dimension should be less than 6"/150mm except the pic rail which should fit diagonally on a 6"x6"/150mmx150mm machine). While it has been tested, I have made extensive changes based on that test and there may be issues in the current version I am unaware of.
I usually print with 1.6-2.0mm shells, .2mm-.28mm layers (with a 0.4mm nozzle), 20% infill. This was designed to not need much support or adhesion help, but YMMV. My understanding of printed part strength is that larger nozzles with larger layers are better for structural use, though again, YMMV.
Orientation shown for each of the parts may not be ideal, adjust to my suggested orientation, your machine, or preference.
Annotated Printed Partslist:
All parts print with the most flat side down unless noted otherwise.
-
Grip_Frame.stl: The main assembly of the whole blaster. The pusher, trigger, rev trigger, grip cover, pic rail, (optional) stock cap, magwell, and magwell covers bolt to or are assembled in this.
-
Trigger.stl: The main trigger
-
Pusher.stl: Bolted to the lever arm, the blaster, and provided an extension return spring, this will push the darts into the wheels when the trigger is depressed and return to it's start position when not.
-
Pusher Katana Forward.stl: Experimental file for short-dart "Katana" mag users. This extends the pusher ~1.5"/36mm. It will require a means of pushing the katana all the way to the front of the existing magwell. I investigated making a katana-compatible magwell but it'd require redesigning the grip frame and mag release for at best ~1.5"/36mm of overall length reduction.
-
LeverArm.stl: Bolts to the pusher and to the blaster, slots into the trigger.
-
RevTrigger.stl: Drops into the grip frame. May require an additional return spring if your switch isn't strong enough to push it alone.
-
Grip_Cover_v1.stl: Covers the internals in the grip. Should print smooth outer side down.
-
Stock_Cap.stl: Optional & experimental piece that should allow NERF-style stocks to attach to the blaster. Has a punchable hole in it for wiring.
-
Pic_Rail.stl: Structural piece that slots into the flywheel cage-cage and bolts to the grip frame. Printed to tolerance, it should fit standard picatinny airsoft/nerf/real-steel accessories. Also has an integral iron sight. Should be printed pic-side down. This is the longest piece and may need to print diagonally on smaller machines.
-
Magwell.stl: Structural piece that slots and bolts into the flywheel cage-cage and grip frame. Print standing up.
-
ClipRelease.stl: Combined with magwell, this allows NERF-brand (or similar) N-strike Clips to lock into the blaster. Should also work with off-brand mags.
-
Magwell_Cover_L.stl & Magwell_Cover_R.stl: One of these is meant to be structural, the other should be possible to remove without disassembly. The one that is removable has area behind it for an extra nut on the bolt holding the assembly together.
-
Barrel_Lug.stl: An optional part that should allow you to attach NERF-brand or compatible faux barrels for optimal tactics. Also just looks good IMO. It should print with the screw recesses down, the hexagonal cutout should allow a GEN2 OFP cage to press fit onto it. The screws should still be used to ensure accurate positioning and strength, may require drilling to fit.
-
FLYWHEEL_CAGE-CAGE.stl: Front end structure. Attaches to pic rail, magwell, and the magwell covers. Then insert a flywheel cage, may need to be wired in place. After the cage is installed, wired, and wheeled, add flywheel cage-cover and a motor cover of your choice.
- FLYWHEEL_CAGE-COVER.stl: The cover for the flywheel cage. Attaches to the flywheel cage-cage, magwell, and magwell covers.
- Motor_Cover_Short.stl & motor_Cover.stl: You only need one of these. Motor cover short should fit 130 and 132 sized motors, motor cover should fit 180 sized motors. These are the only parts I expect to need support, printed flange-side down (outside/visible side up).
Non-printed Hardware:
-
A small extension and compression spring. Working on specc'ing this out, but I usually find something that works in a box of assorted small springs. Finding something at a hardware store that will work shouldn't be hard.
-
A handful of nuts & bolts. I drew it sized so that M3x50's would fit most everything, but #4-40x1-1/2" to 2" should also work and there's room to bore most of the holes out. Flywheel cage mounting may require a different size as it was determined by stock blaster configurations.
-
To watch the MTB Stryfe wiring guide (removed formatting and link because thingiverse wanted to put the video at the front of the image stream)
-
Xt60 (Sub for your connector if your lipo isn't an Xt60, or carefully resolder your lipo - NEVER CROSS THE STREAMS! - so it is)
-
And Wheels: Artifact, OOD Insutanto, Worker, CC Cyclone
-
It's also good to have an Alarm, I'm partial to the style listed so you can check voltage between rounds and leave it off the rest of the time, though he sells others.
- A good battery setup for up to 60 Amps motor draw, according to /u/LukeKoboJobo: these lipos
Tray fits a 35x19x75mm box with some wiggle room all around, so similar packs should fit.
/u/Lukekobojobo also came up with the openwheel, which would make it so you need to buy ~$10-15 in parts, but can make like 20 sets of wheels with those parts and prints if you've got the printer. Openflywheel project has cages you can just download and print that are, IMO, optimal if you have a printer anyway.
/u/outofdarts sells other mod parts specific to your build not linked, if you want to look around. Containment Crew and Foamblast are also good shops, Outofdarts is just local to me.
License is CC:A because the Freigewehr is CC:A, I'd have released it CC0 otherwise so don't worry about attributing me. However, commercial vendors should note: if you appreciate the work I've done, please consider that it takes time for me to do it and I'd be able to do more if you can support it with a different licensing agreement.
Shoutout to /u/MFWIC3D on reddit for helping me prototype, /u/Lukekobojobo/Tantumbull for helping generally, and /u/Captain-slug for the mag models
STP file is available on thingiverse, I don't feel like zipping it to include it in the post ATM.
Attached Files
-
 Barrel Lug.stl 434.36KB
493 downloads
Barrel Lug.stl 434.36KB
493 downloads
-
ClipRelease.stl 55.65KB
460 downloads
-
FLYWHEEL CAGE-CAGE.stl 365.9KB
454 downloads
-
FLYWHEEL CAGE-COVER.stl 172.45KB
491 downloads
-
Grip Cover v1.stl 666KB
474 downloads
-
Grip Frame.stl 719.81KB
480 downloads
-
LeverArm.stl 58.29KB
539 downloads
-
Magwell Cover L.stl 72.74KB
464 downloads
-
Magwell Cover R.stl 65.8KB
453 downloads
-
Magwell.stl 92.86KB
473 downloads
-
Motor Cover Short.stl 51.45KB
499 downloads
-
motor Cover.stl 51.64KB
459 downloads
-
Pic Rail.stl 371.37KB
459 downloads


