Jump to content


Photo

Caliburn: Mag-fed Pump-action Springer

Mag-Fed Pump-Action Springer Homemade

252 replies to this topic

#1 CaptainSlug

CaptainSlug

    Resident Mad Scientist

  • Administrators
  • 4,763 posts

Posted 20 September 2016 - 08:12 AM

3D-Printed and Cast Version - 11/01/17 Updated partslist
 
rs3_126.jpg
 
http://captainslug.c...3DPAssembly.pdf
http://captainslug.c...DPAssembly2.pdf
http://captainslug.c...DPAssembly3.pdf
 
https://www.thingive...m/thing:2376150
 
Partslist
Spoiler

 
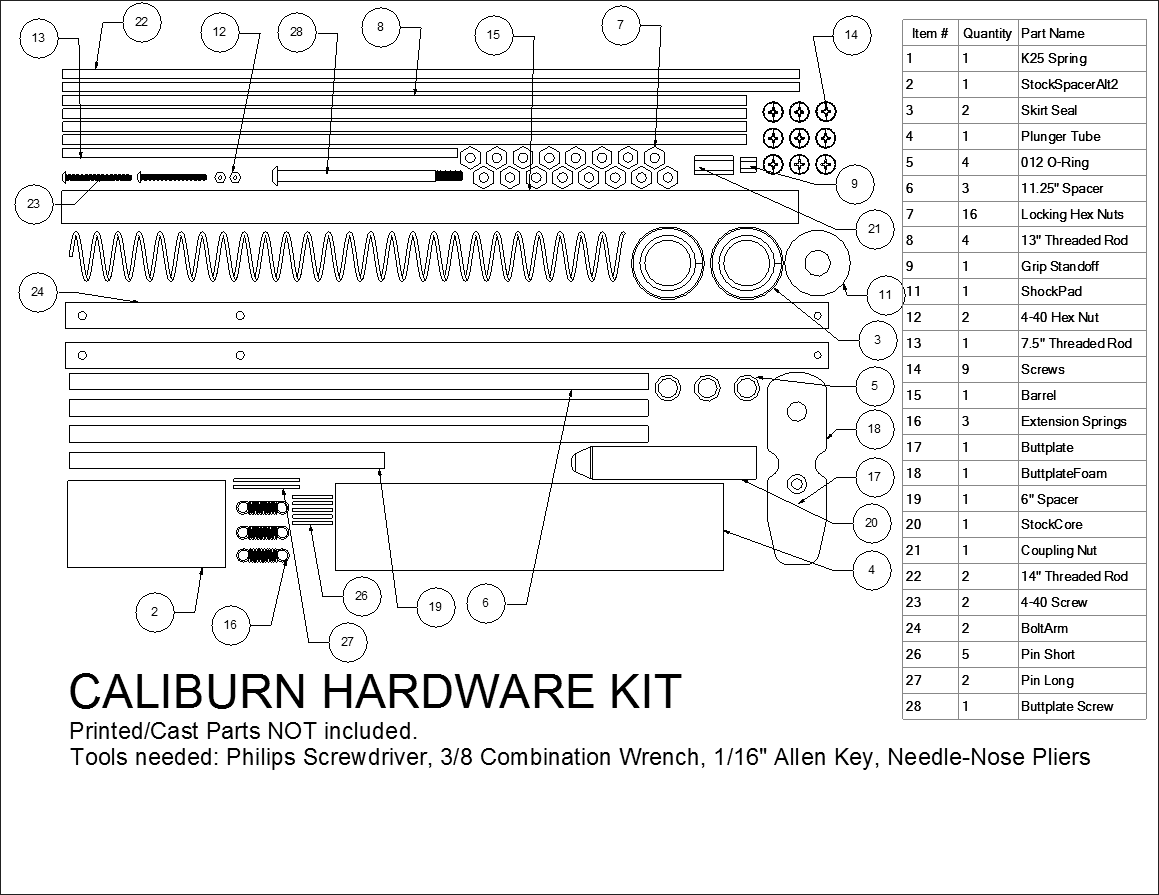
http://captainslug.c...HardwareKit.gif
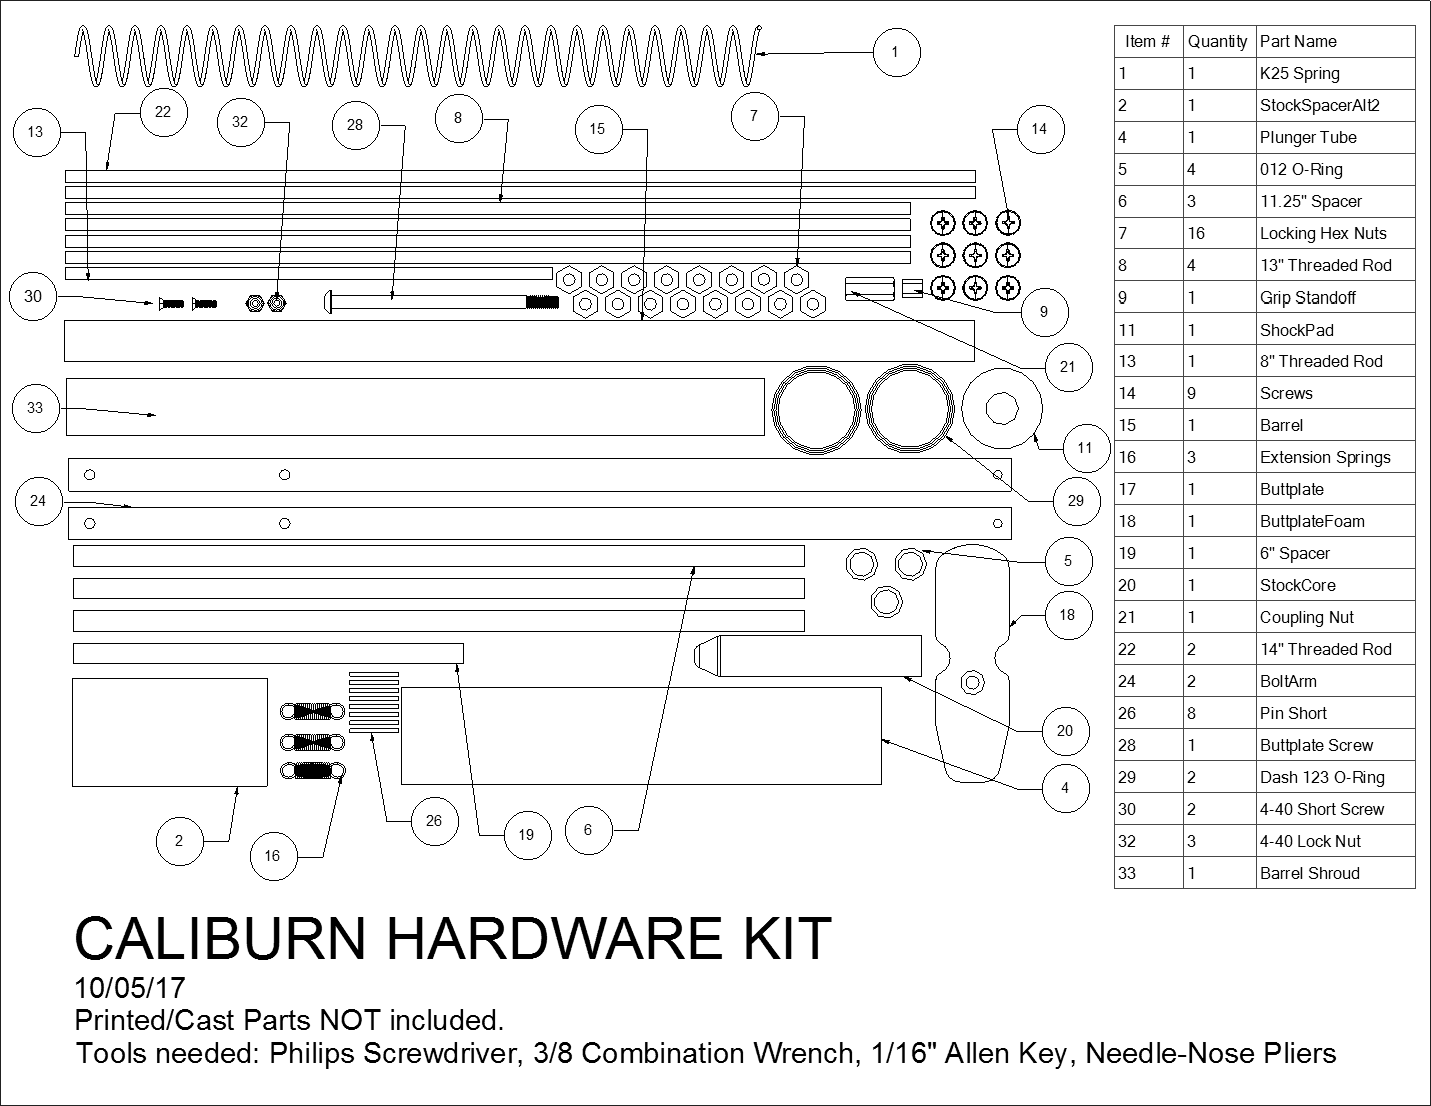
http://captainslug.c...ardwareKit2.gif
http://captainslug.c...ardwareKit3.gif
 
MACHINED VERSION
caliburn_c38.jpg
Write-Up: http://captainslug.com/caliburn.html
 
Partlist: http://captainslug.c...n_partslist.xls

Partslist
Spoiler

 
Templates: http://captainslug.c...n_templates.doc
 
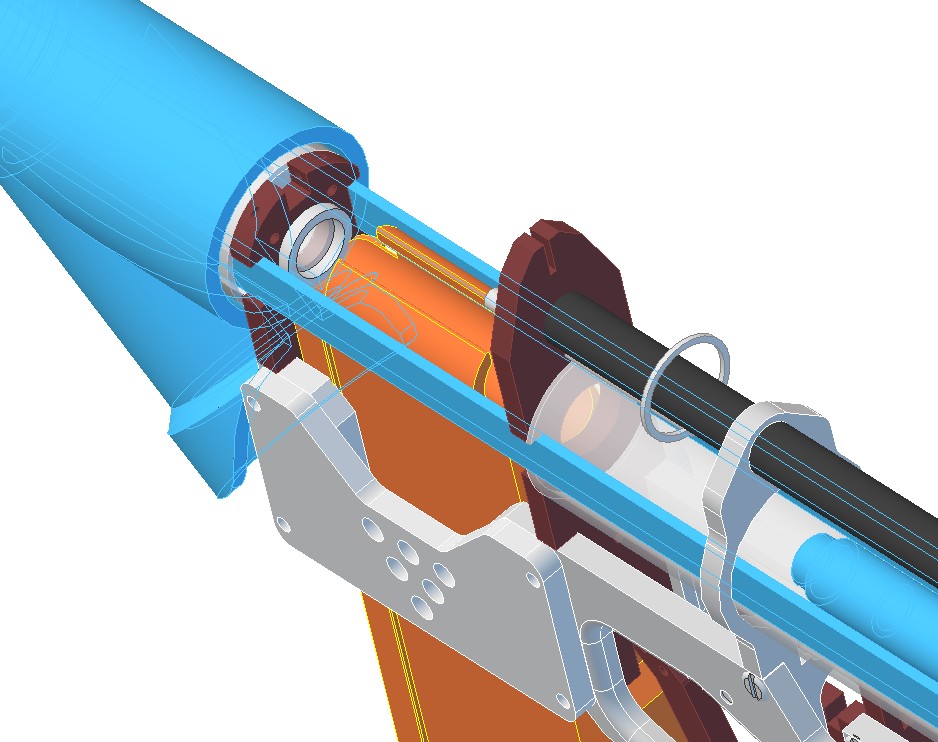
STEP 214 CAD files: http://captainslug.c.../OGCaliburn.zip(436kb)
 
DXF Set: http://captainslug.c...aliburn_dxf.dxf
 
Assembly: http://captainslug.c...rn_assembly.pdf
 
Photo Gallery: http://imgur.com/a/3FVV3
 
Two of the parts in the write-up are optionally 3d-printed. If you don't have access to a printer those parts are available here.
 
https://www.shapeway...Y4NG/fgrip-ring
 
https://www.shapeway...RVQ4Q8DU/frame2
 
And if you want to add nameplates to your grip panels, here are the ones I'm using.
 
https://www.shapeway...49LW5/nameplate
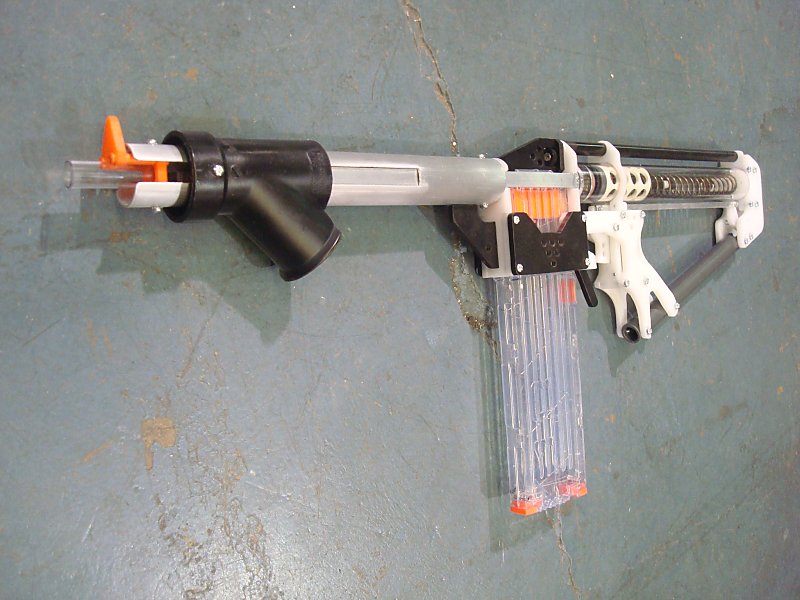
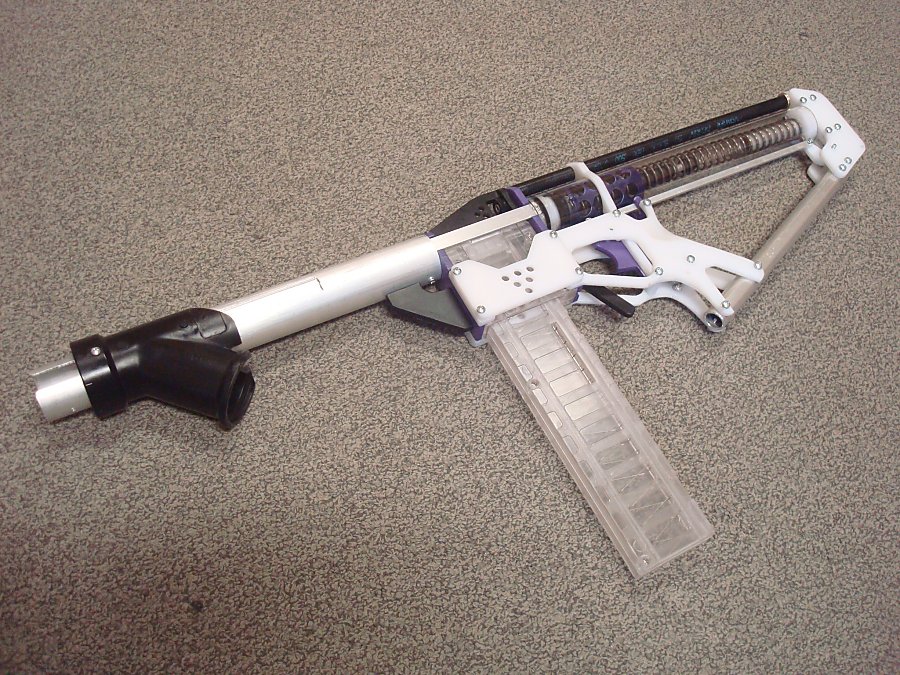
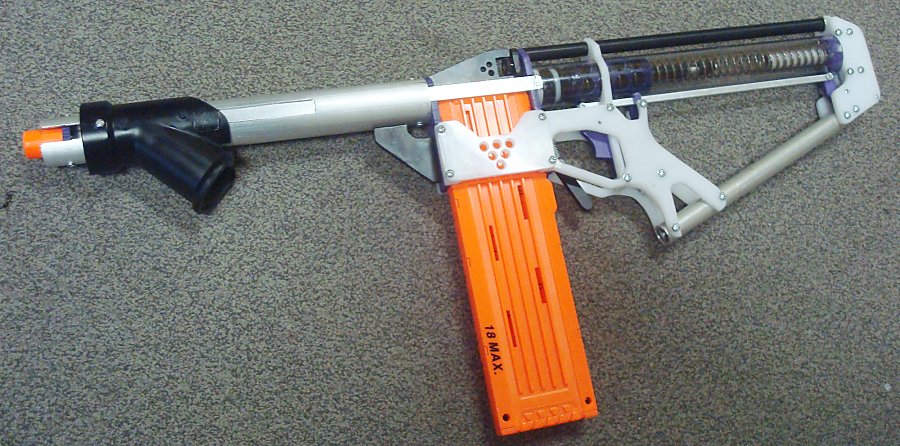
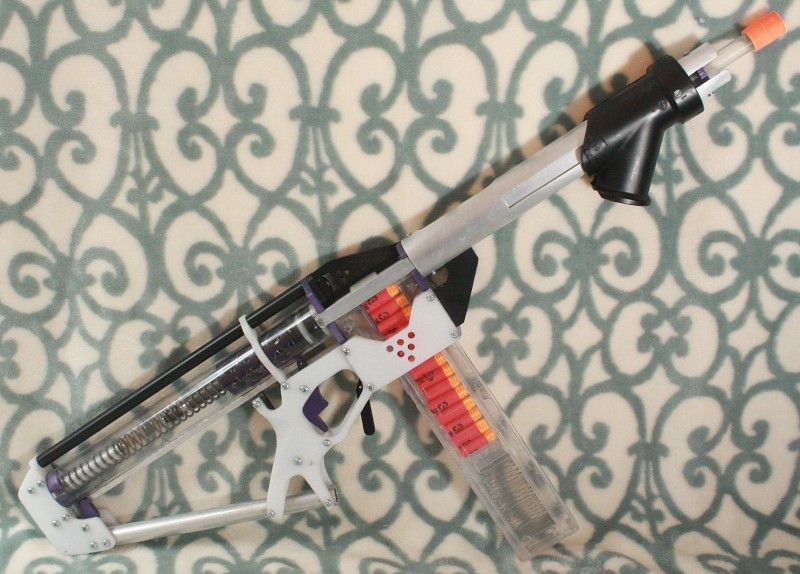
 

Prototype

rs_18.jpg
rs_19.jpg


Special Thanks to skullface44, Meaker VI, RS09, jwasko, and RazgrizInferno. This design is directly inspired by the Rev-Shot, even if it doesn't really share any dimensions or parts.

Edited by CaptainSlug, 25 July 2019 - 12:48 PM.
Hardware List

  • 0
The little critters of nature, they don't know that they're ugly. That's very funny, a fly marrying a bumble bee. I told you I'd shoot, but you didn't believe me. Why didn't you believe me?

#2 DjOnslaught

DjOnslaught

    Member

  • Members
  • 350 posts

Posted 20 September 2016 - 08:23 AM

That magwell loops awesome, is that a separate piece or part of the lower receiver?
  • 0

#3 shandsgator8

shandsgator8

    Member

  • Members
  • 603 posts

Posted 20 September 2016 - 08:29 AM

Sweet work. This is actually a homemade I'd consider using, since I can use equipment from my superstock set up.


  • 0

#4 CaptainSlug

CaptainSlug

    Resident Mad Scientist

  • Administrators
  • 4,763 posts

Posted 20 September 2016 - 08:32 AM

The mag well includes 9 parts. This render is outdated.
rs_07.jpg
Two side panels, two front "cheek" parts that the front profile of the mag rides on, two rear "check" parts that do the same for the rear profile are part of the grip panels, the front plate of the well, the rear plate of the well, and the jam door.

The pump-grip is connected directly to the bolt, with is basically the front face of the plunger tube.
rs_10.jpg
So when you slide the pump-grip backwards the plunger gets pushed backwards into the catch. When you slide the pump-grip forwards it loads a dart into the barrel. Since there are no interlocks you can cycle the pump-grip again if you want to load more than one dart into the barrel.
  • 0
The little critters of nature, they don't know that they're ugly. That's very funny, a fly marrying a bumble bee. I told you I'd shoot, but you didn't believe me. Why didn't you believe me?

#5 jwasko

jwasko

    PowerBeard

  • Moderators
  • 1,021 posts

Posted 20 September 2016 - 10:13 AM

Wait a minute.


Are you using (a piece of) a dart to seal the breech?


So simple and so brilliant.


  • 0

-Jwasko, STILL Sole Surviving member of Steel City Nerf and Sober Sister of the Sex Dwarves
We NERF ON all day, and FUCK OFF all night


#6 CaptainSlug

CaptainSlug

    Resident Mad Scientist

  • Administrators
  • 4,763 posts

Posted 20 September 2016 - 10:16 AM

At the moment yes. Having the output of the plunger tube go through the middle of the dart nib is proving to be restrictive and I'll need to add another piece in the magwell to keep longer darts from buckling. Short darts are firing maybe 80 feet at the moment as a result, though I may need to reduce the barrel length.

The testing phase is going to involve a ton of trial and error with multiple part configurations. I'm going to make a 1/2" PEX bolt as well.
  • 0
The little critters of nature, they don't know that they're ugly. That's very funny, a fly marrying a bumble bee. I told you I'd shoot, but you didn't believe me. Why didn't you believe me?

#7 Meaker VI

Meaker VI

    Member

  • Moderators
  • 1,192 posts

Posted 20 September 2016 - 10:20 AM

... A few of you are already aware of this and are working on a 3D-printed version.


Right, about that:

MK12.png


I've printed the small PH and breech/bolt pieces. The catch is ready for a test print, but the catch-plates are not, because they need to align with the grip and that needs to align with the magwell. So I've got that long track, which may be too long, but we'll see (it's segmented, but that much volume is a lot to print). Anyway, once I work out the grip to frame to magwell connections, I'll be ready to really start printing. I'm hoping that's this week or next; though the prints will take a few days once I get them started.


My real goal with a printed version is to take all the machining work away from the end user. So far, it feels like I've nearly done that, BUT I'm still relying on the split-plunger rod that wants to be made on a drill press. I've got some ideas on how to make that easier, we'll see if they pan out.


My challenge is to then also keep all loads off printed parts. I feel like I've got that figured out everywhere but across the magwell. I could require the end user to slap some strips of something on there or I could hope it's fine. Not sure which to go with, leaning toward hoping it's fine, especially since the plates that push the bolt/breech thing back go through it.


  • 0

#8 CaptainSlug

CaptainSlug

    Resident Mad Scientist

  • Administrators
  • 4,763 posts

Posted 20 September 2016 - 01:26 PM

Having feed issues. I think the best way to resolve them is to make the bolt longer and add a "chamber" that the dart can be pushed into. This chamber will fit the darts really loosely, but will provide a well for it to be pushed into PRIOR to being rammed into the barrel. That way there won't be any opportunity to the foam of the dart to buckle.

I also probably need to add a bearing surface of some kind to the rear mag well to improve alignment between the bolt and barrel. Though I'll address that after adding the chamber to see if the chamber addresses that for me.

My challenge is to then also keep all loads off printed parts.

My recommendation would be to have all the components held together in compression with a threaded rod or two. They can straddle the sides of the plunger tube and mag well.
  • 0
The little critters of nature, they don't know that they're ugly. That's very funny, a fly marrying a bumble bee. I told you I'd shoot, but you didn't believe me. Why didn't you believe me?

#9 jwasko

jwasko

    PowerBeard

  • Moderators
  • 1,021 posts

Posted 20 September 2016 - 02:40 PM

Having feed issues. I think the best way to resolve them is to make the bolt longer and add a "chamber" that the dart can be pushed into. This chamber will fit the darts really loosely, but will provide a well for it to be pushed into PRIOR to being rammed into the barrel. That way there won't be any opportunity to the foam of the dart to buckle.


I posted some thoughts on a chamber and ram made of brass here a little while back based on some prior experience. Of course other materials that fit closely (or can be made to fit closely if one has access to a lather and such) could be substituted.

Mine was made to be used to feed a three-dart RSCB from a Nerf magazine, but it can be re-configured for something like the Caliburn. The essential parts were a loose-fitting barrel material and a conical-tipped ram. It fed very reliably without the "dart clipping" seen in traditional ("Angel")brass breeches

Edited by jwasko, 20 September 2016 - 02:46 PM.

  • 0

-Jwasko, STILL Sole Surviving member of Steel City Nerf and Sober Sister of the Sex Dwarves
We NERF ON all day, and FUCK OFF all night


#10 Meaker VI

Meaker VI

    Member

  • Moderators
  • 1,192 posts

Posted 20 September 2016 - 02:41 PM

Having feed issues. I think the best way to resolve them is to make the bolt longer and add a "chamber" that the dart can be pushed into. This chamber will fit the darts really loosely, but will provide a well for it to be pushed into PRIOR to being rammed into the barrel. That way there won't be any opportunity to the foam of the dart to buckle.


Yeah, I was figuring on using loose-ish PETG as the barrel, but if I were to go tighter it'd be a PETG starter to let the dart feed. Alternatively, I've previously drawn a tight-fitting 3d printed magwell that might feed into a tighter barrel, but it was drawn/tested for PETG also because the mag itself offers no resistance against bending the dart.
 

My recommendation would be to have all the components held together in compression with a threaded rod or two. They can straddle the sides of the plunger tube and mag well.

That might work. I was also thinking a bolted on bar or rod across the trouble area. The problem is that I can't run many screws/bolts into the front of the PT (I'm already planning for 2 between the breechy thing and the magwell) and I have the same issue on the front of the magwell because of the barrel and pump-guides. The threaded rod would avoid that, but then put *all* the load onto printed pieces for some distance (and require more printed volume), while the bolted bits would transfer it from the PT to bolts to the bars to the front grip area. We'll see, it might be strong enough as-is.


  • 0

#11 TantumBull

TantumBull

    Member

  • Moderators
  • 1,929 posts

Posted 27 September 2016 - 10:39 PM

I'm also working on a 3d printed variant in parallel with Meaker, but he has made FAR more progress than me. I've only really figured out a small portion of the lower reciever and the stock+catch assembly. I'm tempted to scrap the linear trigger to catch linkage that I have at the moment - I did the math and it comes out to an 8-10 mm trigger pull. Probably about 100 times greater than that of an actual firearm. Not attractive. I don't know if its visible in these pics, but Slug has a very nifty trigger that acts as a moment arm to pull on a rod, which then rotates another piece to push on the catch. I haven't spent the time to characterize it but basically a 3 bar linkage with 3 pin joints, and 2 of the pin joints are fixed in space. Classy shit, I should probably just copy it.


caliburn%20927.png


  • 0

#12 CaptainSlug

CaptainSlug

    Resident Mad Scientist

  • Administrators
  • 4,763 posts

Posted 03 October 2016 - 08:21 PM

If you do copy my linkage I would recommend moving the moment of the linkage from the trigger back a half inch or more. i.e. move the threaded hole where the trigger link screw currently  is on the trigger towards the back of the blaster so it's behind the pivot point. Doing that might remove the need for a second spring on the trigger itself.


I haven't had the energy or time to make progress on the next step in testing Caliburn. I lost a day or two of work due to being sick and had to make up the hours this weekend. I have a full-length ramrod finished and I need to test it. And if that test sucks I can make a shorter one to overcome the issues I might run into.


  • 0
The little critters of nature, they don't know that they're ugly. That's very funny, a fly marrying a bumble bee. I told you I'd shoot, but you didn't believe me. Why didn't you believe me?

#13 CaptainSlug

CaptainSlug

    Resident Mad Scientist

  • Administrators
  • 4,763 posts

Posted 15 October 2016 - 06:09 PM

Special thanks to jwasko for inspiring this update. Ahead of the magwell is a "chamber" made out of .527" ID aluminum. This looser fit on every size of dart means that darts won't buckle in the process of being pushed out of the magazine. The updated ram rod seals inside the chamber using an o-ring instead of sealing into the back of the barrel.

rs_20.jpg

The chamber has a clear PETG coupler added to the end of it. This coupler allows the barrel opening to be adjusted to multiple dart lengths so that when the dart is rammed through the chamber, only the very tip of the dart has to be loaded into the back of the barrel. EDIT: It appears that adjustments are not needed based on dart length. Just set it for full-length then leave it there.
rs_21.jpg

The window cut into the top of the front tube allows adjustments to the barrel to be made by eye based on where the tip of the dart ends up after being fed into the chamber by the ram rod.

I've done testing with the aluminum barrel and it's shooting beige foam slugs 90 to 110 feet. That's pretty good for a 10-inch long barrel with a somewhat loose fit.


Next I'll make a frame piece for the 1/2" ID clear barrel and test it with multiple lengths of men-gun darts.


  • 0
The little critters of nature, they don't know that they're ugly. That's very funny, a fly marrying a bumble bee. I told you I'd shoot, but you didn't believe me. Why didn't you believe me?

#14 CaptainSlug

CaptainSlug

    Resident Mad Scientist

  • Administrators
  • 4,763 posts

Posted 17 October 2016 - 01:42 PM

First tests with full-length darts are a success.
rs_22.jpg
Going to do a full set of range tests with both barrels and three types of darts, then make a demo video.
  • 0
The little critters of nature, they don't know that they're ugly. That's very funny, a fly marrying a bumble bee. I told you I'd shoot, but you didn't believe me. Why didn't you believe me?

#15 jwasko

jwasko

    PowerBeard

  • Moderators
  • 1,021 posts

Posted 17 October 2016 - 08:38 PM

Looking fantastic, Slug.


I really like the window. It not only helps you set up the barrel and check that the blaster is loaded, but it looks awesome.


By the way: The front (aluminum) tube that houses the barrel/supports the pump is the same tube used for the+Bow Rev3 plunger tube correct? (and is similar in dimension to 1.25" PVC)


Edited by jwasko, 17 October 2016 - 08:51 PM.

  • 0

-Jwasko, STILL Sole Surviving member of Steel City Nerf and Sober Sister of the Sex Dwarves
We NERF ON all day, and FUCK OFF all night


#16 CaptainSlug

CaptainSlug

    Resident Mad Scientist

  • Administrators
  • 4,763 posts

Posted 17 October 2016 - 10:05 PM

Correct. Same part number and dimensions.


The only extra thing I discovered in testing today is that lower durometer o-rings are too pliable for this application and will work themselves off of the ram-rod eventually. I switched to a normal durometer o-ring of the same size and it hasn't managed to escape. I also may need to widen out the through hole or chamfer in the rear plate of the mag well to prevent any potential ram-rod jamming inside the plunger tube. Or add a piece that will aid alignment of it inside the plunger tube.


I'm going to buy a chronograph before I do any further testing. Using range for evaluation purposes has been pretty worthless so far due to how inaccurate full-length darts are. I can also finally glue the hinge pin for the jam door in place.


This is a very complicated blaster so every core component is going though extensive testing because the goal is to fully dummy-proof this design before releasing the partlist and templates.


  • 0
The little critters of nature, they don't know that they're ugly. That's very funny, a fly marrying a bumble bee. I told you I'd shoot, but you didn't believe me. Why didn't you believe me?

#17 CaptainSlug

CaptainSlug

    Resident Mad Scientist

  • Administrators
  • 4,763 posts

Posted 26 October 2016 - 07:27 PM

rs_23.jpg

Today I did about one third of the testing I intend to do with the chronograph. The results are pretty interesting so far though. I wanted to see if the barrel position affects muzzle velocity at all. So I ran two lengths of darts, and three different types of foam through the same barrel.

Beige Slugs - PETG Barrel - Head-Spaced
208
211
206
207
208

Beige Slugs - PETG Barrel - Not Head-Spaced
204
205
208
206
210
200

Red Men-Gun Short - PETG Barrel - Head-Spaced
210
198
205
193
198

Red Men-Gun Full - PETG Barrel - Head-Spaced
199
206
194
192
213

Elite Full Length - PETG Barrel - Head-Spaced
192
208
200
210
204
202

It looks like range isn't impacted at all by having the barrel in the "wrong" location for shorter darts. When loaded with a dart that's too short to reach the barrel, the chamber that the dart is being pushed into by the ram-rod is acting like an RSCB that only holds a single dart. The initial puff of air into the chamber is loading the dart into the barrel, even if the ram-rod hasn't pushed it far enough to reach it yet.


This is nice because it means that the location of the barrel can be fixed and doesn't need to be adjusted for different lengths of darts.


I did a handful of tests with an aluminum barrel, but as expected it's not a great fit on the foam of any of the darts I currently have, so the muzzle velocity for all of those shots was 30 fps lower than the shots through the PETG barrel.


The next set of tests I will do will be to see how much the muzzle velocity drops when the o-ring isn't on the ram-rod.


I also have a minor tweak to make to the bolt assembly.


  • 0
The little critters of nature, they don't know that they're ugly. That's very funny, a fly marrying a bumble bee. I told you I'd shoot, but you didn't believe me. Why didn't you believe me?

#18 PBZ

PBZ

    Cap'n Whitebeard

  • Members
  • 142 posts

Posted 27 October 2016 - 06:04 PM

I am amazed and excited to see blasters like this. It utterly blows my mind how you guys come up with this stuff... I will probably use some of this design when I get around to building my magfed Tbow.
Excellent work. I look forward to more photos and videos!


  • 0
"There's nothing quite like hunting children." -VACC

#19 jwasko

jwasko

    PowerBeard

  • Moderators
  • 1,021 posts

Posted 27 October 2016 - 07:26 PM

I'm particularly surprised how consistent those numbers are...I'd think there would be at least a few where the dart didn't quite "feed" into the barrel/out of the chamber smoothly.


Out of curiosity, have you chrono'd one of your +bow rev3s or the durendal?


  • 0

-Jwasko, STILL Sole Surviving member of Steel City Nerf and Sober Sister of the Sex Dwarves
We NERF ON all day, and FUCK OFF all night


#20 CaptainSlug

CaptainSlug

    Resident Mad Scientist

  • Administrators
  • 4,763 posts

Posted 27 October 2016 - 08:39 PM

Build is completed. I have nothing left to tweak or improve aside from adding a front sight post of some kind.

rs_24.jpg
 

Here's a ton more photos.
http://imgur.com/a/3FVV3


I will be making the completed/updated CAD files and templates available soon, but I'm not sure when I will get around to a construction write-up. Doing that would require building a second one, which isn't something I expect to have time to do until next year.

Out of curiosity, have you chrono'd one of your +bow rev3s or the durendal?

Not yet. I just got it on Monday. I checked the speed of my first +bow Rev3 at Apoc using Koree's handheld and was only getting 165 fps with a hopper. I got roughly the same number out of the Piranha, which has an identical hopper setup. I'll test the Durendal I just finished both with a hopper and without probably by the end of tomorrow.


  • 0
The little critters of nature, they don't know that they're ugly. That's very funny, a fly marrying a bumble bee. I told you I'd shoot, but you didn't believe me. Why didn't you believe me?

#21 Silly

Silly

    Member

  • Members
  • 244 posts

Posted 28 October 2016 - 03:53 PM

Man is that a beauty. Dang. 

Anyway, would the design accept other materials for the handle? Like wood, clear polycarb, or even maybe *ooh shiny* aluminium? 

Also, would you recommend using that Y you are currently as a pumpgrip for other homemades?


  • 0

Co-Owner of the History of Nerf Modding research project, moderator of r/Nerf, owner of BlasterWiki, maker of 3d printed blasters (GitHub/Thingi) and Nerfy art.


#22 Meaker VI

Meaker VI

    Member

  • Moderators
  • 1,192 posts

Posted 28 October 2016 - 04:38 PM

Man is that a beauty. Dang. 

Anyway, would the design accept other materials for the handle? Like wood, clear polycarb, or even maybe *ooh shiny* aluminium?


I can't see why it'd need to be what it is. Probably can't use wood without a redesign (that end-screwed piece holding the trigger area to the PT won't translate well; if you've got the chops to make it solid wood that'd work fine), but aluminum and clear polycarb should be fine.


  • 0

#23 CaptainSlug

CaptainSlug

    Resident Mad Scientist

  • Administrators
  • 4,763 posts

Posted 28 October 2016 - 06:23 PM

I was too busy at work today to get any extra chronograph runs in.

Man is that a beauty. Dang. 

Anyway, would the design accept other materials for the handle? Like wood, clear polycarb, or even maybe *ooh shiny* aluminium? 

Also, would you recommend using that Y you are currently as a pumpgrip for other homemades?

The side panels for the grip, magwell, and stock can be made from any material that's 1/4" thick and will hold decent tolerances on drilled holes. Hardwoods should be fine provided you seal them and try to avoid splitting the edges of the holes when you drill them. Aluminum will be much harder to sand into a comfortable shape, but will work fine otherwise.

The parts that need to have holes drilled and tapped into them should otherwise be made only with polycarbonate, delrin, HDPE, aluminum, or anything with tensile strength comparable to those.


I really like using 1-1/2 DWV Pipe Wyes as foregrips because they fit the OD of the plunger tube material beautifully, and they're fairly cheap to buy. It's a nice shape that fits your hand well and the flare-out for the socket ends mean you get a good grip on it whether you're pulling back or pushing forwards.


  • 0
The little critters of nature, they don't know that they're ugly. That's very funny, a fly marrying a bumble bee. I told you I'd shoot, but you didn't believe me. Why didn't you believe me?

#24 3DBBQ

3DBBQ

    Member

  • Members
  • 214 posts

Posted 28 October 2016 - 08:13 PM

Really COOL works! Expect 3D version!

Feel that there seems to be a new spark


  • 0

#25 CaptainSlug

CaptainSlug

    Resident Mad Scientist

  • Administrators
  • 4,763 posts

Posted 30 October 2016 - 02:49 PM

Did some testing without the O-Ring today.

Red Men-Gun Full-Length - PETG Barrel - Head-Spaced - No O-Ring
148
151
155
164
155
166

Blue Men-Gun Full-Length - PETG Barrel - Head-Spaced - No O-Ring
162
142
150
152
154
165

Removing the O-Ring seems to be a decent way to handicap FPS by 25% without having the adjust anything else.


I'm not sure how best to test accuracy to compare stock darts.


  • 0
The little critters of nature, they don't know that they're ugly. That's very funny, a fly marrying a bumble bee. I told you I'd shoot, but you didn't believe me. Why didn't you believe me?


Also tagged with one or more of these keywords: Mag-Fed, Pump-Action, Springer, Homemade

0 user(s) are reading this topic

0 members, 0 guests, 0 anonymous users