

This is your shopping list, it is small and I'll bet most of you have most of this cap lying around anyway.
1/2in CPVC
5/8in CPVC
Tiny machine screw
Rotary tool
Tube cutter
Saw
Two part epoxy
Electrical tape
Hobby knife
Small screwdrivers
Disassemble
1. Pry off the large orange piece from the rear of the blaster with a small screwdriver.
2. The orange tip is glued in place, to remove it cut where the two halves of the shell meet.
3. Remove 7 screws and clam shell the blaster.

Modification
1. Lift the internals out and set the shell aside.

2. Separate the tank from the OPRV and pump.
3. Cut the barrel off about 1/2 in from the tank. This will expose the air restrictor. Cut it off as well. Be careful not to let debris fall into the tank.

4. Wrap about 7 layers of electrical tape around the end of a piece of ½ inch CPVC. Insert the CPVC into what is left of the barrel and cut the exposed tape off with a razor. Cut the CPVC so that it sticks out about ¼ inch when inserted into the barrel.

5. Rough up the outside of the CPVC and the inside of what is left of the barrel, wash and dry the two pieces, then epoxy the CPVC stub into place. When the epoxy has fully hardened trim any excess from the edge of the barrel.
6. Slide a 3in. piece of 5/8 inch I.D. CPVC over the ½ inch CPVC stub and epoxy it into place. This will form the outside of your breech, an will be trimmed to rest in the ribs of the blaster later.

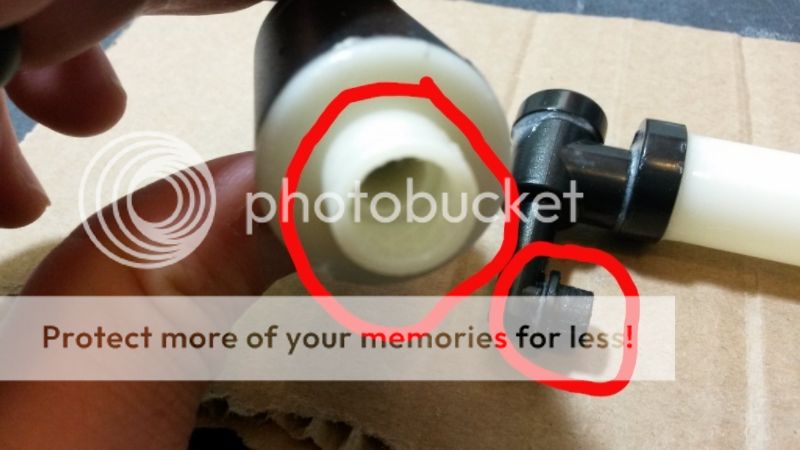
7. Cut the OPRV along the line and clear any debris.

8. Rough up the inside of the rear of the tank and the area where the ORPV was removed. Wash and dry them, then epoxy them into place.

9. When the Epoxy has cured lay the internals back into the shell and cut the 5/8 I.D. CPVC so that it rests snugly on the rib just behind the tip of the blaster.

10. Clear out all of the areas where the modified internals hit the shell halves.


11. Cut a channel in the end of the breech piece that is a third of the way around the tube.

12. Cut a hole in the side of the breech that is opposite the channel and large enough to fit a dart. Make sure that you don’t cut too near the channel as to make it weak or too near the tank as to not allow the barrel to form an air tight seal.

13. Cut a piece of ½ inch CPVC for your barrel 5 to 7 inches works for me.
14. Slide the barrel into the breach and mark where the machine screw will rest against the channel.

15. Drill and tap a hole for the screw. Sink the screw so that the head can rest on the outside edge of the breech without it passing through to the inside of the barrel. Epoxy it into place.

16. Mark the barrel along the inside perimeter of the hole in the breech and cut it out.


In order to feed stock darts you will need to sand the edges of the hole in the barrel as wide as possible to accommodate the foam. Stock darts are an extremely tight fit in the 5/8's O.D. tubing so the inside of the barrel will need to be sanded to increase its I.D. so that it feeds and fires smoothly.
17. Place the newly completed internals back into the shell and remove enough material to expose the breech and load darts.


18. At this point you may add a tank expansion, a write up of the technique I use can be found HERE.
19. Replace the internals and screws and get to a war!


To operate the blaster give the barrel a half turn to open the breech, insert a dart, turn the barrel a half turn the opposite way to close the breech. Pump the blaster 8 times and fire as normal.
Note: To use stock darts the inside of the barrel must be sanded quite a bit in order to feed them properly.
This breech system is good for about 110 ft without the expansion and stock darts. With extra air volume and slugs it can hit over 150 ft.
You now have a small, powerful, self contained system that is perfect for integrations. Now go do something cool with it!
As you may have noticed there were pictures from several different projects in this write up, here is what they turned into.
Here is the stock blaster once again just for the comparison.

This one now has much shorter barrel on the Air Max and an OMW six shot kit on the Hammershot.

Some time ago I noticed a lot of modders were making minimized Hammershots and Sweet Revenges. I decided to take it another direction and make a MAXIMIZED Sweet Revenge. It has 6 inch brass barrels, rear loading slot, LED's that activate on trigger pull, the tank has been expanded, and more shell work than I dare to think about.


Edited by Majistic, 15 October 2015 - 12:24 AM.


