Jump to content


Photo

Cycloneshock barrel extension

It's all about the brass

13 replies to this topic

#1 ompa

ompa

    Introductinator

  • Moderators
  • 2,368 posts

Posted 20 April 2015 - 11:46 PM

I'm sure the vast majority of you know that the barrels allowed by the Cycloneshock are most likely too short for micros/stefans/whatever smaller caliber of dart you're probably using. Because of this, I wanted to see just how, and if, a barrel extension mod could be done for the Cycloneshock. So far, the results are fairly promising. This isn't necessarily a complete mod because the basic mods themselves are fairly obvious. However, I am going to post some of the dimensions of the materials I used in case people are curious to replicate it themselves. For reference, I used 5.5" 9/16 barrels with about 2.5" of 17/32 nested brass at the back.

Posted Image

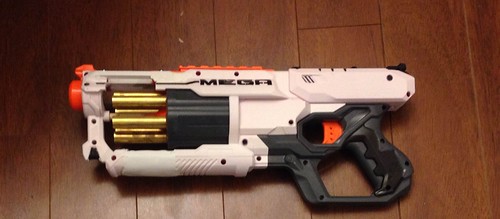
First and most importantly is the shell extension. Obviously the ideal situation is to be able to use plastic rods, and just use some plastic solvent or adhesive to make a nice, strong bond. For those of us who are less well off in terms of materials access or funding you can go the same route I did. I just used some square wooden dowels (I know the definition of dowel is round, but that's what it is called online) with screws, which ended up costing about $4 total?. Makeshift yes, but also effective. In order to retain the ability to take the blaster apart, you can use some parchment paper (or wax paper) when you're slopping the bondo on, as bondo doesn't stick to the surface of the paper. I ended up putting all the square dowels in place, putting the two halves of the blaster together, and then putting the bondo on both side of the parchment paper. After the bondo was dried I kept the blaster together, slid out the parchment paper, and then sanded it down.

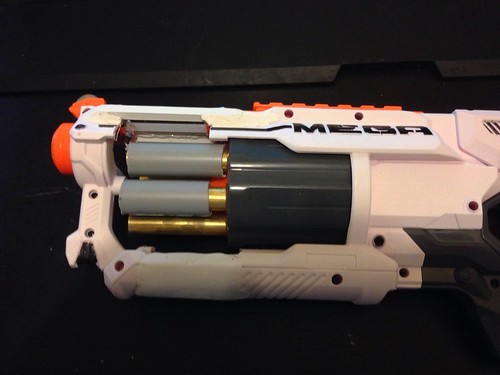
The post in the center of the turret, or the nub that sticks out and supports the barrel at the front of the blaster, is slightly over 8mm in diameter and I used an 8mm round dowel that were being sold at the hardware store as an extension. The dowel itself at that diameter rotates quite well within the little alcove at the front in which the old center post used to sit. I just stabilized it with the shell of a pen which happened to fit the post/dowel junction better than any other piping I found, but really a screw would also work. The center of the turret is hollow, as is the center post, so a screw can be run straight down the center and attached to the center post that way.

Posted Image

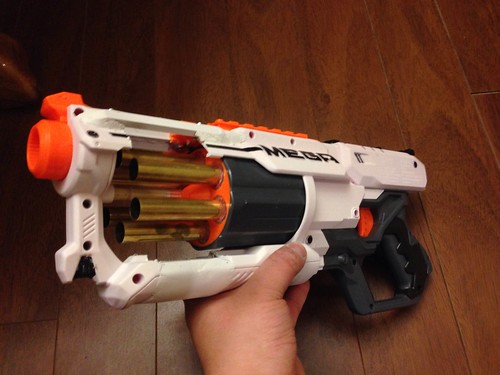
Stabilizing and increasing the comfort to hold the bottom after you've lopped off that much of the shell is fairly easily accomplished by using Bondo. Someone with more patience could make it far better looking than I have here, but I'm not really styling these modifications to win any beauty pageants.

As for common questions:
-Yes, the turret still seems to be rotating fine even with all the brass. I obviously haven't put it through thousands of rotations, but so far it seems to be holding up. It doesn't feel like anything is going to break any time soon either.
-No, I have not replaced the spring or added one. I don't always have easy access to blasters and I'd much rather sacrifice a bit of power to reduce the stress on the harder-to-replace components.

~ompa
  • 0

#2 Langley

Langley

    LGLF - Since 2002

  • Administrators
  • 2,997 posts

Posted 21 April 2015 - 12:23 AM

That looks great. The perfect application of 2005 style barrel mods to a 2015 blaster.
  • 0

You can poop in my toilet anytime champ.

2016 Nerf War Schedule
Bless you, my son. Now recite 3 New Members Guides and 5 Code of Conducts for your sins.


#3 ravetrooper

ravetrooper

    Member

  • Members
  • 216 posts

Posted 21 April 2015 - 12:31 AM

This is awesome. Thanks for the info! I already want a cycloneshock just to do this mod. One question: do you know if 1/2 pvc fits well over the brass you used? If I even end up using brass I'd like to be able to paint over it.
  • 0

Gut the electronics, drill a hole in the shell, and attach a crank to the gear. Bam, crank-action stampede that doesn't require batteries, or even a trigger.

...(also judging by your past posts, I would consider you pretty dang wise elder like in the modding community :lol: )


#4 ompa

ompa

    Introductinator

  • Moderators
  • 2,368 posts

Posted 21 April 2015 - 12:54 AM

Posted Image

The answer to your question is yes. It also I think would look awesome. However, the turret at this point is very weighty; I'm not sure how comfortable I'd be adding all that pvc as well. I think the IDEAL solution would be to use a lighter barrel material (like PETG), with 17/32 nested in the back, and then use the PVC. I believe that should lower the weight, although I don't have any PETG to actually do weight measurements so I'm operating under the assumption that it's lighter.

Also Langley, all the current mods center around brass breeches for clip systems and flywheels. I'm not a fan of clip systems and I haven't dipped into the flywheel arena. I'm really glad to see nerf producing some good old springers (rotofury, cycloneshock, the jolt iterations, the hammershot, and even that crazy flipfury. I'm excited to start working on some (or all) of them. I know that currently homemades with hoppers is all the rage right now, but to me nothing beats the feel of the blasters you can buy in a store. Come on, you know what I'm talking about. You can't hide that crossbow forever.

~ompa

Edited by ompa, 21 April 2015 - 01:04 AM.

  • 0

#5 Gin

Gin

    Member

  • Members
  • 78 posts

Posted 21 April 2015 - 07:27 AM

Posted Image

The answer to your question is yes. It also I think would look awesome. However, the turret at this point is very weighty; I'm not sure how comfortable I'd be adding all that pvc as well. I think the IDEAL solution would be to use a lighter barrel material (like PETG), with 17/32 nested in the back, and then use the PVC. I believe that should lower the weight, although I don't have any PETG to actually do weight measurements so I'm operating under the assumption that it's lighter.

Also Langley, all the current mods center around brass breeches for clip systems and flywheels. I'm not a fan of clip systems and I haven't dipped into the flywheel arena. I'm really glad to see nerf producing some good old springers (rotofury, cycloneshock, the jolt iterations, the hammershot, and even that crazy flipfury. I'm excited to start working on some (or all) of them. I know that currently homemades with hoppers is all the rage right now, but to me nothing beats the feel of the blasters you can buy in a store. Come on, you know what I'm talking about. You can't hide that crossbow forever.

~ompa


one option would be to cut down on the stock turret to reduce weight, all you really need are the front and back plates and by removing the plastic in between you can reduce the weight and if you wanted use the top plate to help space the barrels right at the front. by doing this you would also be able to sheath the brass in pvc all the way along and have the whole blaster look very professional.
  • 0
Leader of the Wrecking Crew, Student of Ninjitsu and Kendo, Avid Otaku, Metal head, Amateur engineer, and In my spare time I kill zombies. I'll sleep when I'm dead... 'Till then, There ain't no rest for the Wicked.

#6 ompa

ompa

    Introductinator

  • Moderators
  • 2,368 posts

Posted 21 April 2015 - 08:03 AM

That is pretty ingenious; I didn't even think about that. Removal of the main body of the turret, the barrels themselves help keep the turret plates stable, and it would reduce the weight considerably. I've never taken apart the turret though, it's possible that it is glued together as I see no signs of screws. I unfortunately don't have a heat gun, and previous attempts to use a hair dryer were not even close to successful. To note, you have to keep the top plate though, as the center post is only attached to the front plate, and that part is kind of essential. You could still cut two lengths of pvc to make it fit though, before and after the plate, and it would serve to not only help stabilize the plate but also look pretty nice. I'm not sure of the actual net gain or loss of weight though, as I'd have to weigh the turret, which would involve cutting the necessary lengths of pvc and then weighing the turret vs the pvc plus plates. Given I don't have a good way of removing the plates, I'd have to ask someone else to undertake that particular venture.

EDIT: also, I'm fairly certain the turret comes in only 2 pieces, the orange piece which consists of the front and the barrels, and the grey piece which serves as a shroud of sorts and the backplate.

Edited by ompa, 21 April 2015 - 08:09 AM.

  • 0

#7 Gin

Gin

    Member

  • Members
  • 78 posts

Posted 21 April 2015 - 08:16 AM

That is pretty ingenious; I didn't even think about that. Removal of the main body of the turret, the barrels themselves help keep the turret plates stable, and it would reduce the weight considerably. I've never taken apart the turret though, it's possible that it is glued together as I see no signs of screws. I unfortunately don't have a heat gun, and previous attempts to use a hair dryer were not even close to successful. To note, you have to keep the top plate though, as the center post is only attached to the front plate, and that part is kind of essential. You could still cut two lengths of pvc to make it fit though, before and after the plate, and it would serve to not only help stabilize the plate but also look pretty nice. I'm not sure of the actual net gain or loss of weight though, as I'd have to weight the turret, which would involve cutting the necessary lengths of pvc and then weighing the turret vs the pvc plus plates. Given I don't have a good way of removing the plates, I'd have to ask someone else to undertake that particular venture.

I'm not known as an amateur engineer for nothing lol. I would say try cutting but you would be more or less flying blind while doing so, making it a rather risky idea. I would try it but I do not a heat gun either, and I have yet to try the boiling technique so I would prefer not to risk my only cycloneshock on this. I may have to go buy another one just for the sake of trying this out .
  • 0
Leader of the Wrecking Crew, Student of Ninjitsu and Kendo, Avid Otaku, Metal head, Amateur engineer, and In my spare time I kill zombies. I'll sleep when I'm dead... 'Till then, There ain't no rest for the Wicked.

#8 ompa

ompa

    Introductinator

  • Moderators
  • 2,368 posts

Posted 21 April 2015 - 08:19 AM

I don't think there's a real need for concern. Making two cuts like half an inch from the front and back would remove the vast majority of the turret weight, while still keeping the back and front plates functional. The center post is literally a part of the orange part, so I don't think accidentally cutting it off will be of concern. The only problem is doing so might make it look a bit... messy. More importantly if you want a more cosmetic look to it you'd want to cut off everything but the minimum amount of front plate possible. The problem with that ends up being stabilizing the plate to make sure the center post is still centered, but the pvc should help with that, provided you make the appropriate measurements and can make accurate enough cuts.
  • 0

#9 Gin

Gin

    Member

  • Members
  • 78 posts

Posted 21 April 2015 - 08:26 AM

I don't think there's a real need for concern. Making two cuts like half an inch from the front and back would remove the vast majority of the turret weight, while still keeping the back and front plates functional. The center post is literally a part of the orange part, so I don't think accidentally cutting it off will be of concern. The only problem is doing so might make it look a bit... messy. More importantly if you want a more cosmetic look to it you'd want to cut off everything but the minimum amount of front plate possible. The problem with that ends up being stabilizing the plate to make sure the center post is still centered, but the pvc should help with that, provided you make the appropriate measurements and can make accurate enough cuts.

see for me thats the problem... I am still getting used to my dremal and my cuts tend to be very sloppy requiring either clean up after words or a new part all together.
  • 0
Leader of the Wrecking Crew, Student of Ninjitsu and Kendo, Avid Otaku, Metal head, Amateur engineer, and In my spare time I kill zombies. I'll sleep when I'm dead... 'Till then, There ain't no rest for the Wicked.

#10 ompa

ompa

    Introductinator

  • Moderators
  • 2,368 posts

Posted 21 April 2015 - 08:31 AM

I was thinking more a miter box and a hacksaw. You could even use just a sheet of sandpaper nailed to a flat piece of whatever and run the cut turret along the sandpaper to smooth out the area or correct any minor imperfections. Or if you know anyone with a circular saw that should work too. Just don't lop off any fingers on accident.

If you really want to use a dremel though you can buy a dremel stand, attach the cutting wheel, and mark where you want on the turret and slowly turn the turret while the cutting wheel is doing its work. If you're not really careful though the lateral force might end up snapping the cutting wheel though, so I'd recommend a reinforced cutting wheel for that particular use. But again, a hacksaw or circular saw would probably make this much easier.
  • 0

#11 Gin

Gin

    Member

  • Members
  • 78 posts

Posted 21 April 2015 - 08:38 AM

I was thinking more a miter box and a hacksaw. You could even use just a sheet of sandpaper nailed to a flat piece of whatever and run the cut turret along the sandpaper to smooth out the area or correct any minor imperfections. Or if you know anyone with a circular saw that should work too. Just don't lop off any fingers on accident.

If you really want to use a dremel though you can buy a dremel stand, attach the cutting wheel, and mark where you want on the turret and slowly turn the turret while the cutting wheel is doing its work. If you're not really careful though the lateral force might end up snapping the cutting wheel though, so I'd recommend a reinforced cutting wheel for that particular use. But again, a hacksaw or circular saw would probably make this much easier.


I think I have a hacksaw in my garage... somewhere XD after I finish a few more of my projects that are cluttering my workbench and have some spare funds I think I will have to give this a shot
  • 0
Leader of the Wrecking Crew, Student of Ninjitsu and Kendo, Avid Otaku, Metal head, Amateur engineer, and In my spare time I kill zombies. I'll sleep when I'm dead... 'Till then, There ain't no rest for the Wicked.

#12 ravetrooper

ravetrooper

    Member

  • Members
  • 216 posts

Posted 21 April 2015 - 11:42 AM

I have used the boiling technique on several blasters and it works every time for me. I just boil some water in a small pan on my stove (or heat some in the microwave) then gently dip the glued blaster parts in with some tongs all blacksmith style, being carefull not to let the plastic touch the bottom of the vessel. Having the hot water surrond the parts keeps the heat relatively even, so warping shouldn't occur if you keep the part in constant motion. Don't use focused heat like a blowdryer or heat gun, unless you want to melt a hole in your blaster ;)
  • 0

Gut the electronics, drill a hole in the shell, and attach a crank to the gear. Bam, crank-action stampede that doesn't require batteries, or even a trigger.

...(also judging by your past posts, I would consider you pretty dang wise elder like in the modding community :lol: )


#13 Birch

Birch

    Member

  • Members
  • 181 posts

Posted 21 April 2015 - 09:02 PM

As Langley said, fantastic old school take on a modern blaster. Going with the old school theme, I thought I would ask the proverbial disyllabic question of the ages: Ranges?
  • 0

It's like a Hurricane ate a Tornado and shat out a Monsoon!!


#14 ompa

ompa

    Introductinator

  • Moderators
  • 2,368 posts

Posted 22 April 2015 - 07:23 AM

So until I move, or get a chrono (ideally later this year when funds are more... present) ranges aren't something I can easily get. In fact, it's far more likely I'll end up getting a chrono before I get ranges. But when I do, I'll post the chrono numbers. And thanks for reminding me of the boiling method rave, I'll have to do that for the next one.

Also, interesting things I have noted:

-There is a spot when you open the blaster where it seems a spring should go; it's a location that sits between the plunger tube and the rotation mech. I've now opened two cycloneshocks and neither has the spring there, although some sites have internal pictures with it there. Putting one in would serve to push the plunger tube back, allowing the turret to rotate more easily. The force of the plunger moving forwards within the plunger tube serves to push the tube itself against the back end of the turret, but I imagine that there is still a bit of pressure loss due to the system in place. Really I don't think it's necessary and have no clue why there are little nubs where a spring would usually go there.
-The stock main spring is loose in the shell. This isn't really a huge deal, and a larger spring would just mean that the plunger tube would always be sitting up against the turret.
-You can stuff a magnus spring in there. This actually has a few interesting benefits, although I decided against it in the end because I don't want to stress the plunger system more than necessary, but it does result in more power and a better turret/plunger tube seal (since the spring doesn't sit loose in the shell and does a good job of pushing the plunger tube right up against the turret; although since the only time that seal REALLY matters is when the plunger starts its forward motion, having it sealed any other time than during forward plunger motion is probably more of a negative than a positive)

Edited by ompa, 22 April 2015 - 10:49 AM.

  • 0


0 user(s) are reading this topic

0 members, 0 guests, 0 anonymous users