Jump to content


Photo

The TitanTurion

Nerf Mega Centurion never looked so painful to get hit by.

7 replies to this topic

#1 OzNerf-Sarge

OzNerf-Sarge

    Member

  • Members
  • 24 posts

Posted 13 April 2015 - 06:54 PM

First post here, let's make it a good one.

This design was originally done by Apollo441 in Melbourne, Australia, but a writeup was never done. Hence, I feel since my design is considerably different to his (and more space-effective), I can call dibs on the writeup.

Long and short of it: The Titanturion was built to be a micro-firing, clip feeding, compressor powered Titan, and it uses the real estate of the Centurion shell to fit all the components.

Let's begin. First, I gutted the Centurion.
Posted Image

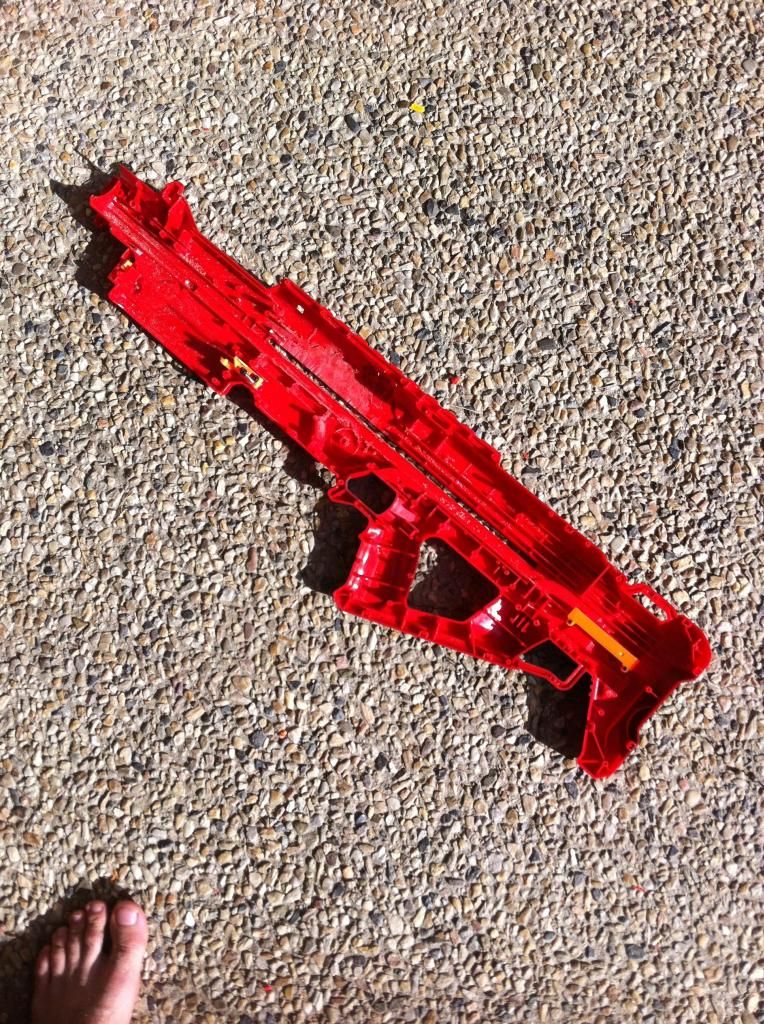
Note where I have ground out the shell. This is where I fitted my Titan tank.

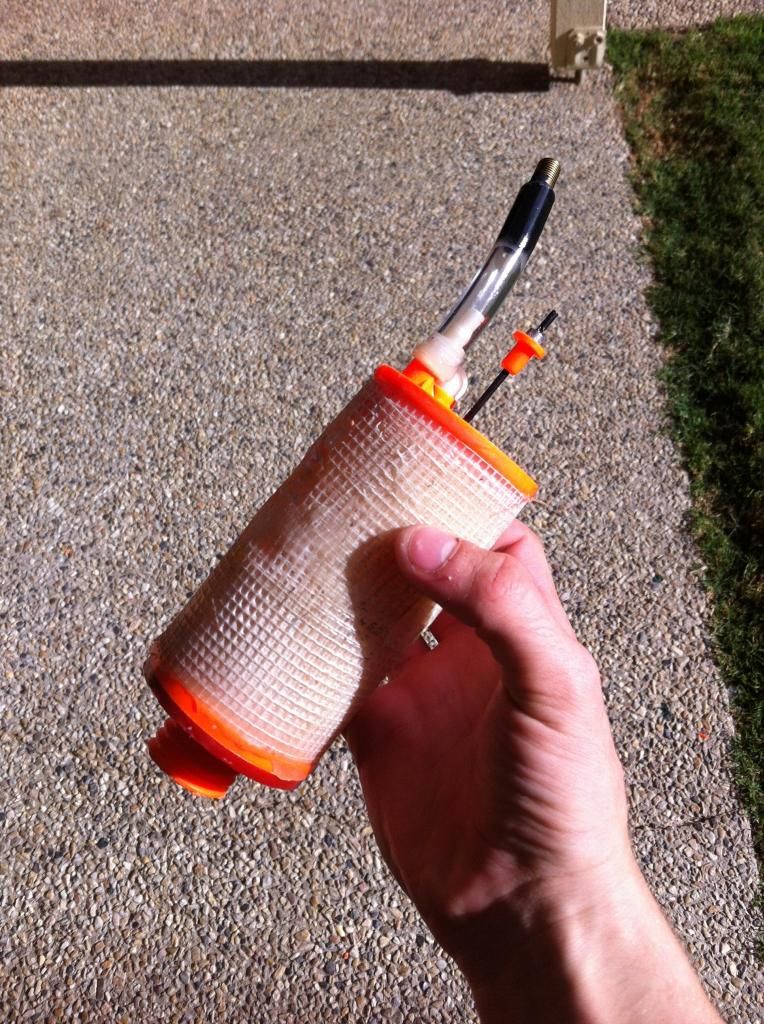
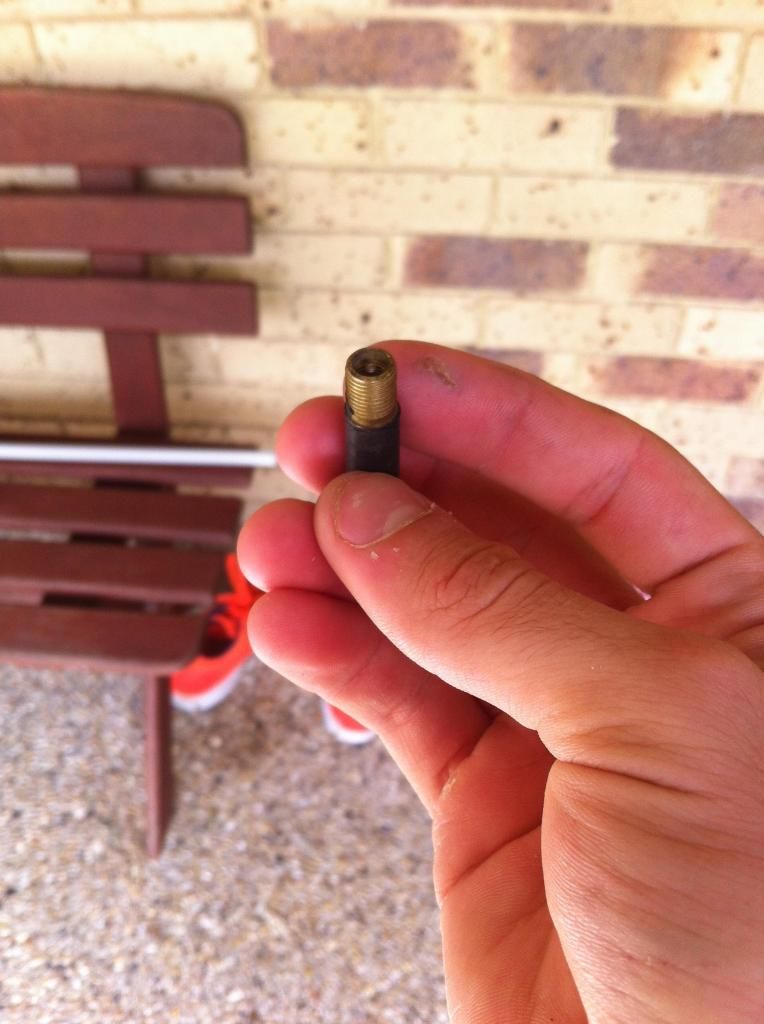
I then reinforced my Titan tank as per MiG's writeup with fibreglass mesh tape and epoxy glue, and fitted some garden air tubing to the inlet valve, as well as epoxying a Schrader valve to the end to make the tank sealed. This valve makes it easy to connect any pump/compressor of choice as most pumps are designed to connect to these valves.

Posted Image
Posted Image

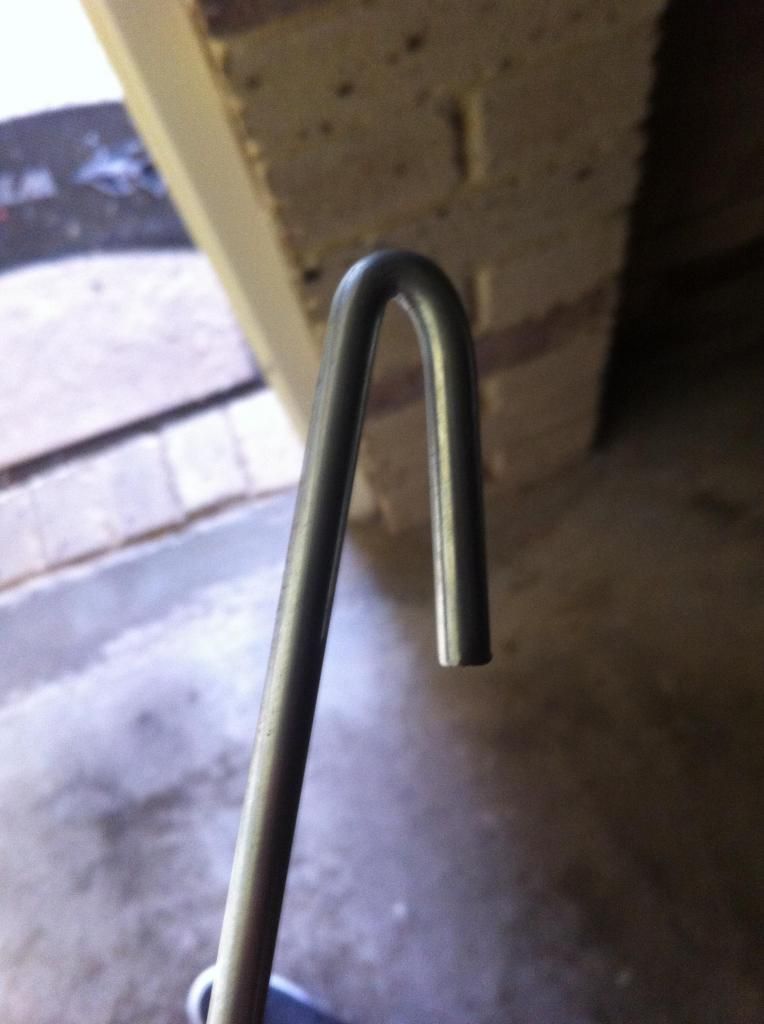
I also grabbed a rather large tent peg (6mm diameter) and bent the end of it into a more uniform U shape, which will be a means of direct trigger a little later on.

Posted Image

Time to fit tank to shell. This part was a lot of grind-fit-close, test to see if shell fully closes, rinse and repeat until shell fully closes over it.

This was my final result (taken a little later on in the build, but remaining relevant for now):

Posted Image

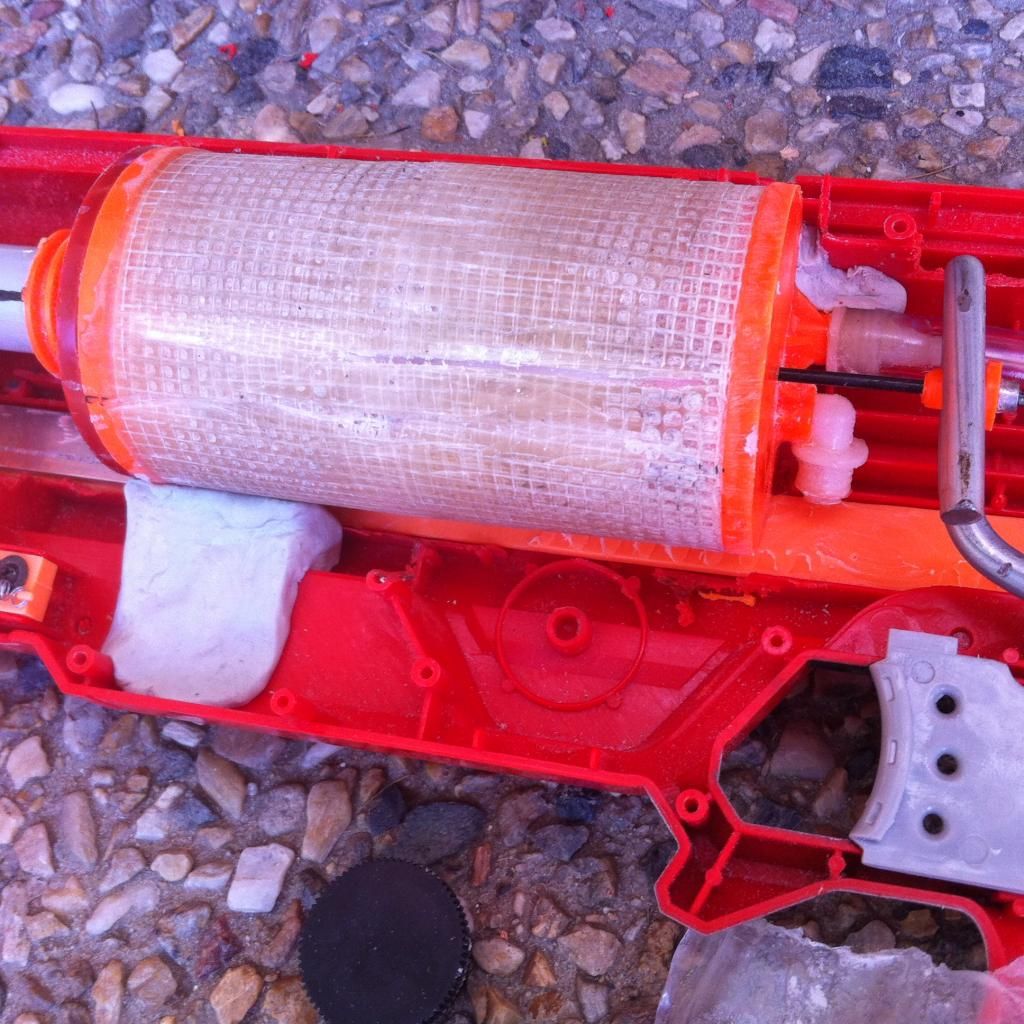
Note the putty in the corner and underneath; these are there for the sake of keeping the tank in place.

Next, I did the trigger. I bent the tent peg to a roughly 90 degree angle and taped it to the Centurion's trigger rail while I applied liberal amounts of epoxy glue.

Posted Image

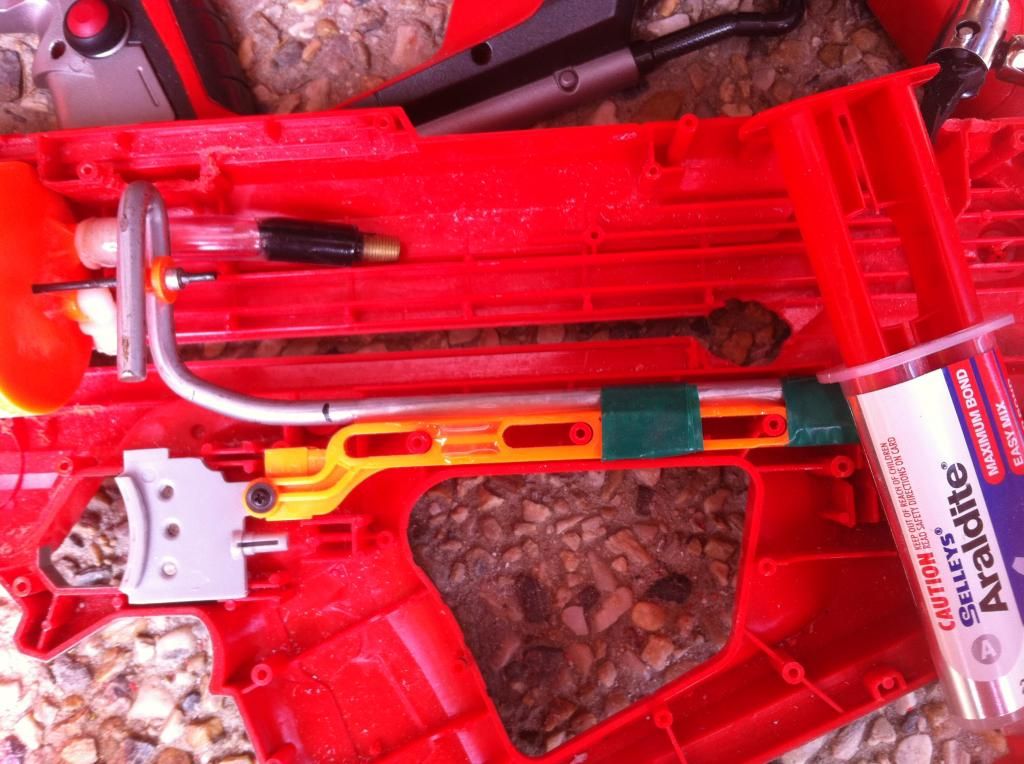
This was a two-stage epoxy process; I applied epoxy to one side, allowed it to cure and then flipped the trigger assembly over and epoxied the other side. This gives it enough strength to withstand being pulled vigorously at pressures above OPV levels. Also note the hole in the bolt rail here; this is to accommodate the air line from the compressor. Now we will move on to that.

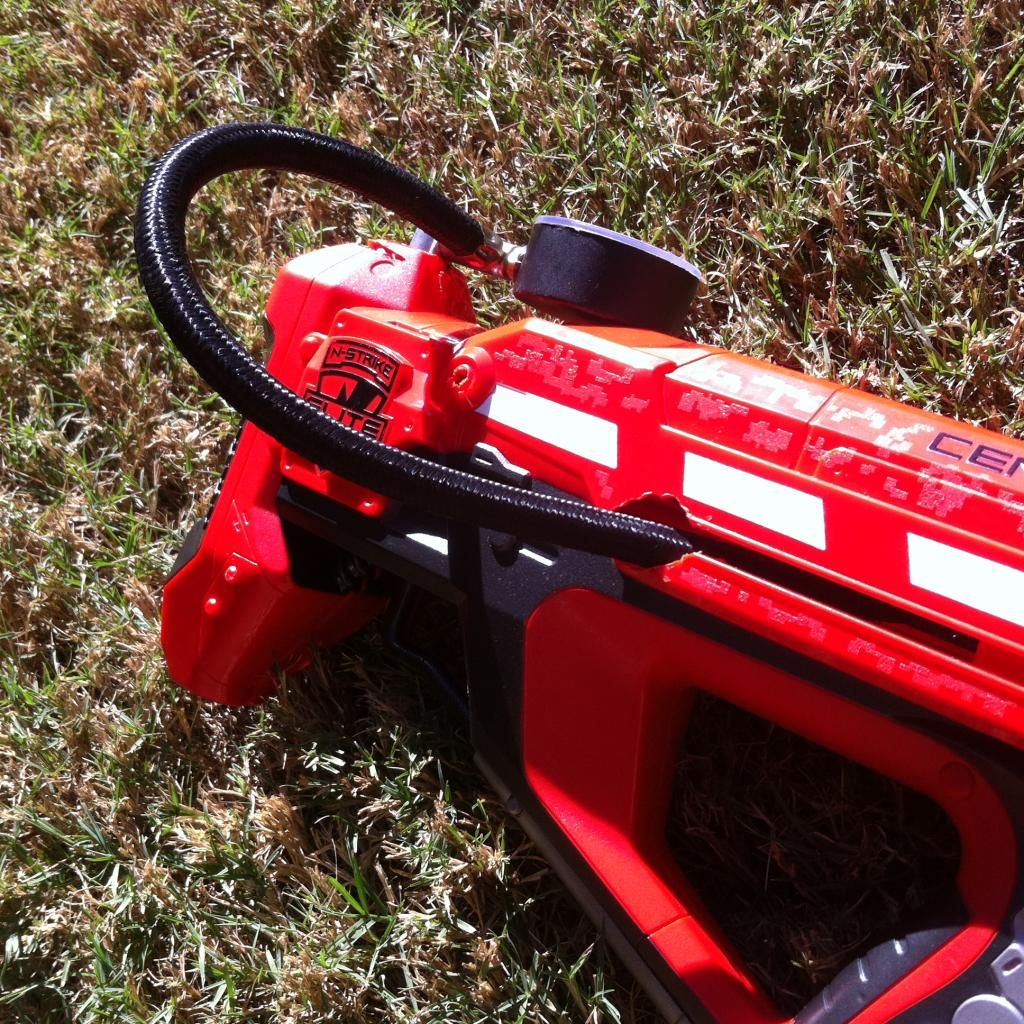
Integrating the compressor was a similar task to the Titan tank; grind, fit, test shell closed. The difference was, the pressure gauge and air line had to remain external, so I ground out a hole at the top of the shell on both halves to accommodate the compressor as cleanly as possible. This is the result after running the air line back through to the Titan's Schrader valve:

Posted Image

We'll move onto the breech next. This is a three-part process: One is making the conversion to streamlines and making the receiver section, two is making the barrel, three is filling in the magwell to make sure Nerf streamline clips fit snugly and without wobble.

1/2" PVC (20mm conduit in Australia) came in handy to make the clip receiver section. Basically I just threw a clip on it from through the magwell, drew around it, cut it out with a Dremel.

Posted Image

The barrel was made by simply fitting some PVC/conduit fittings to a (insert your choice of barrel length here, I used 65cm) length of 1/2" CPVC (16mm conduit in Australia). I used a piece of 20mm conduit, with a 20mm conduit mounting saddle to link it to my bolt rail, which was the stock bolt rail, with a length of 2mm sheet aluminium epoxied to the end, cut in an L shape and bent to connect to the mounting saddle.

Posted Image

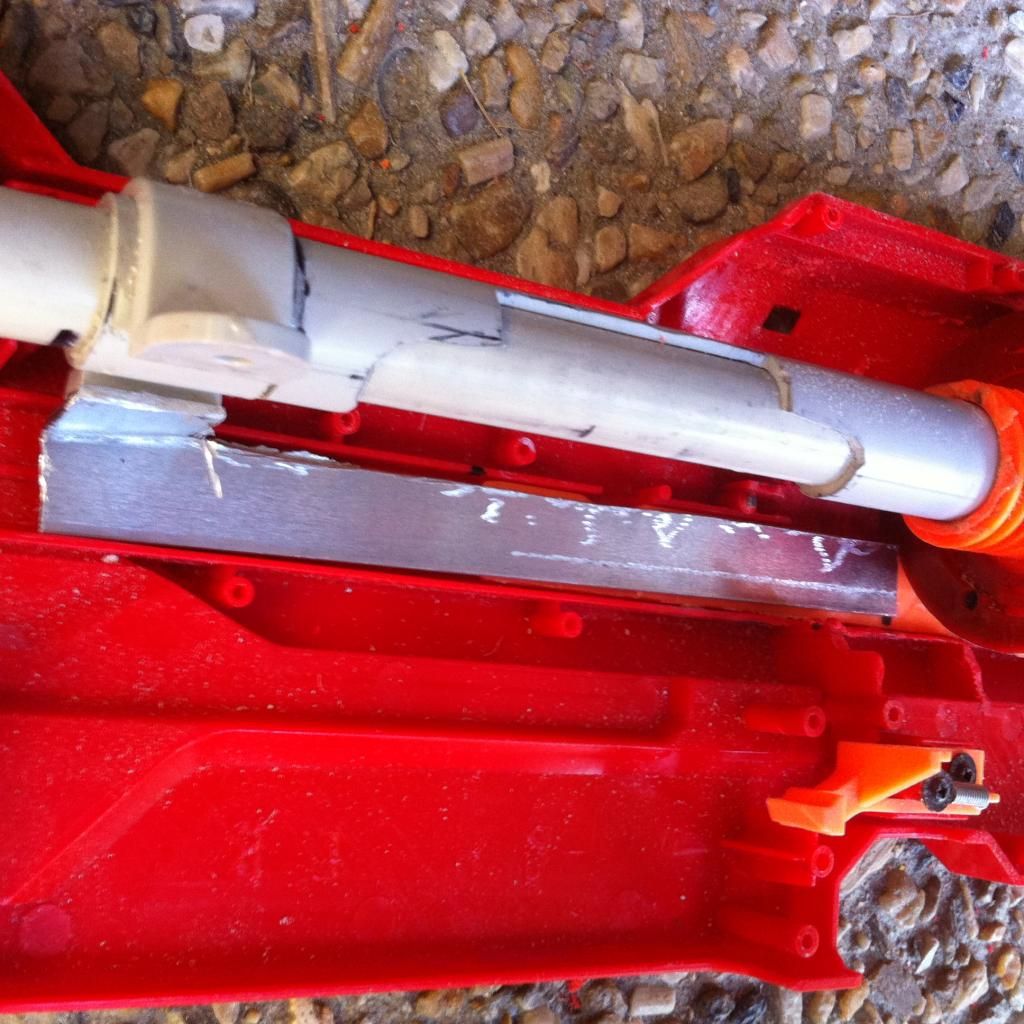
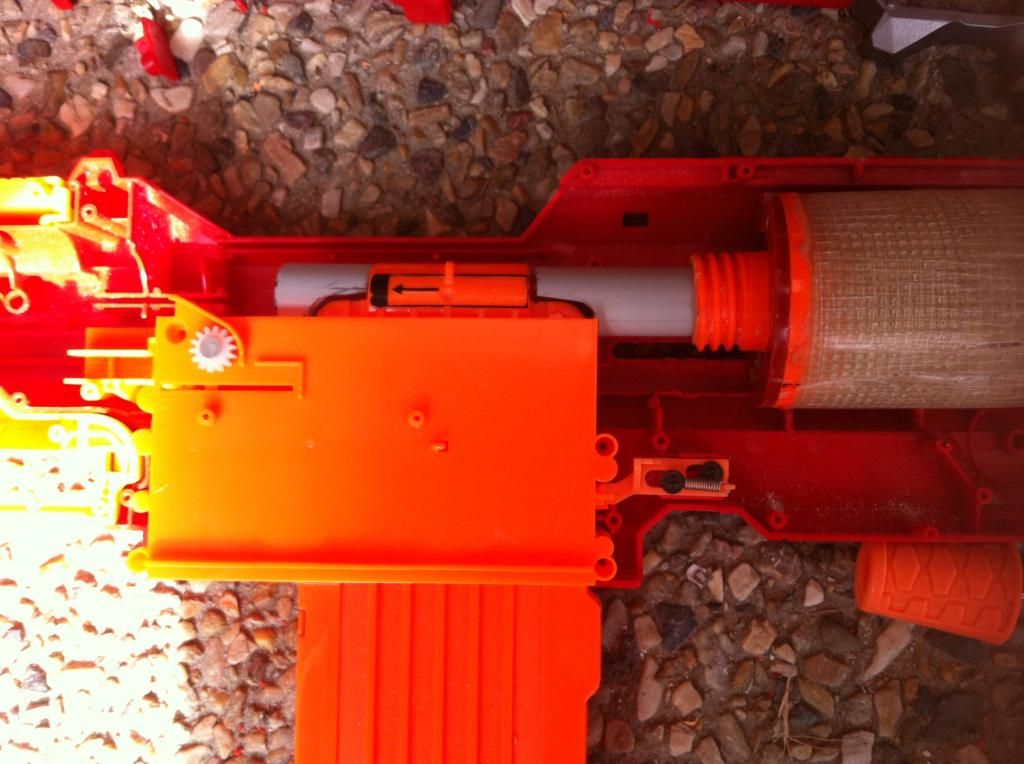
Behind the tank, I drilled a hole in the bolt rail and fitted the stock bolt to the side to give me priming ability. Do note that the loading of this blaster is forward-back, as opposed to back-forward, because of the Titan tank. (I am left handed; the right hand side of the shell is most convenient for me to prime using the bolt. You can do this with the left hand side of the shell if you so wish.) It's secured on the inside using a blob of epoxy putty. I don't have any photos of this until after I wired up the compressor; I did that a little later.

Now, after testing this a few times, I was having trouble getting the bolt all the way forward due to shell ribbing. Pretty much grind out the inside of the shell just in front of the magwell on both sides and you'll be fine.

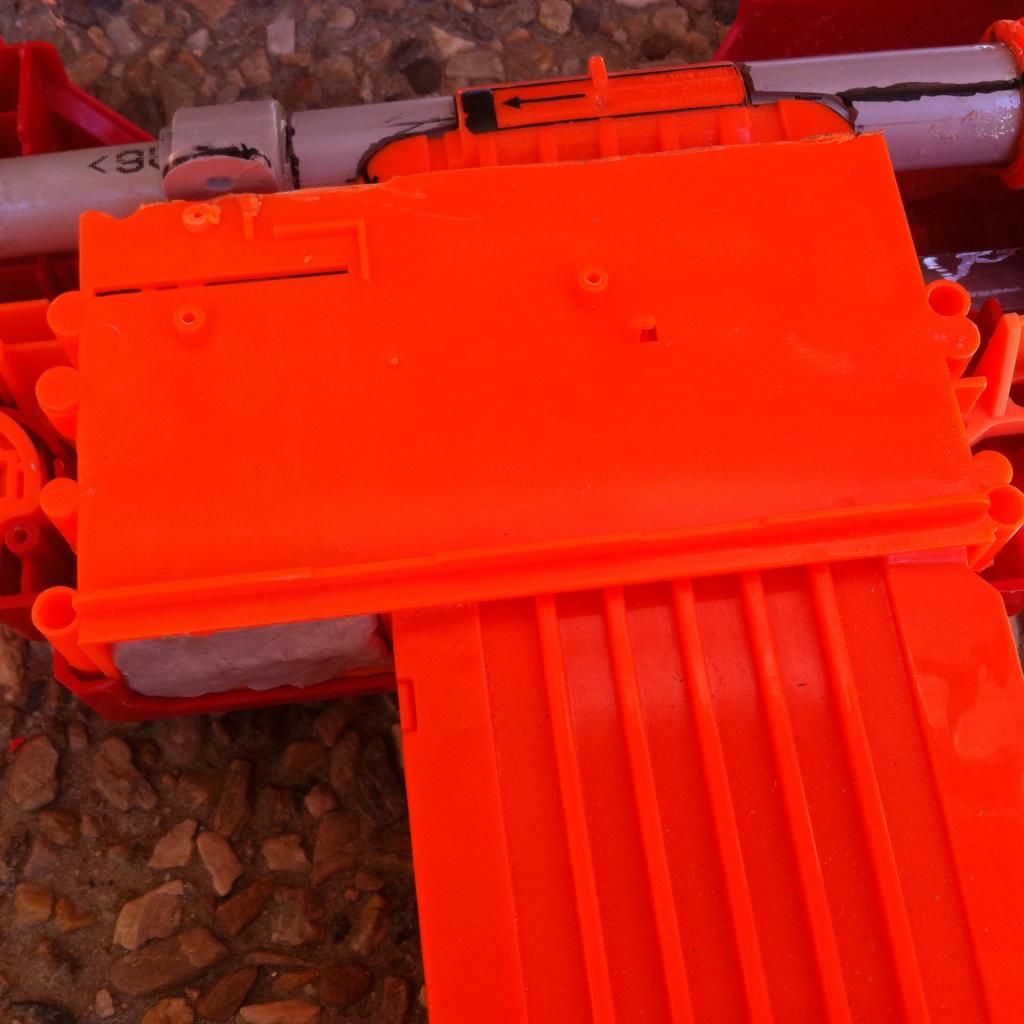
Next is filling the magwell. I used liberal amounts of putty in front of the clip after thoroughly lubricating the test clip. Then to do the sides of the magwell, just do the same thing with less putty, and grind away at the putty if you have difficulty loading the clip. It's a LOT of guess and check. If you do it the way I did, your clip will be held in by the Mega clip's clip lock and won't wobble on either side after you've ground away enough excess putty to successfully load the clip. Pic below of a midway-through-putty magwell.

Posted Image

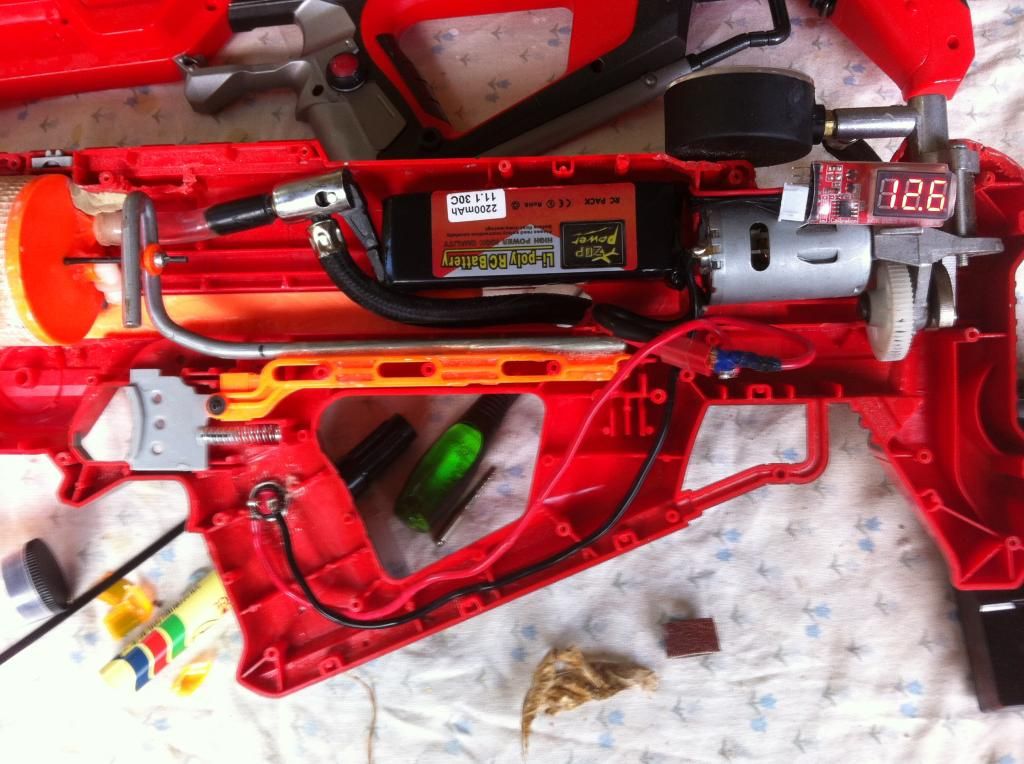
Now, we will wire up the compressor. Simple diagram, if you have done a Stryfe you can do this. I initially used 15A rated wire and a push button integrated onto the side of the trigger grip. Here's my wiring with my first choice of battery. I later changed it to a 4000mah 4S for faster compression.

Posted Image

Finally, at the front of the blaster I applied a ring of putty around where the barrel protrudes (and added an LSFG barrel for orange-stockness look) to help "guide" the barrel and keep it straight.

This was the result:

Posted Image

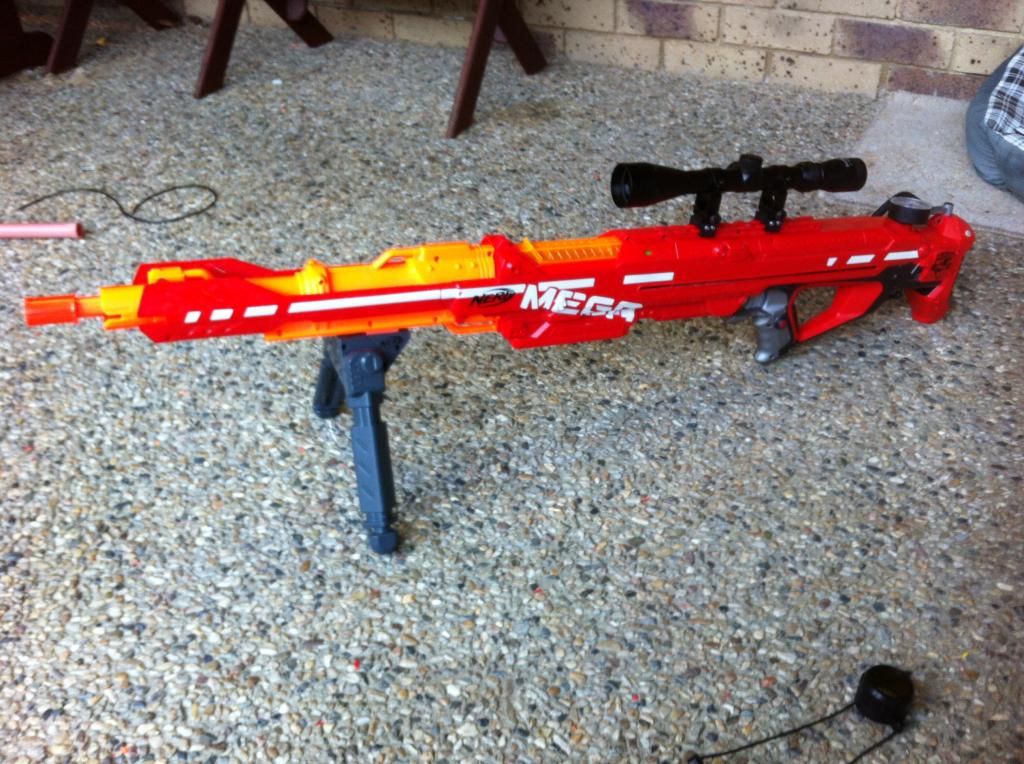
The results of this are a blaster that is obnoxiously loud and ridiculously painful. Feel free to ask any questions regarding the build and I'll do what I can to answer them when I have the time. I may have rushed this writeup a little due to being finished all my work at uni and using the available time between classes. Still I hope the gist of this build is gotten and you can base your own builds off it, should you choose to replicate it.

Edit: I have a YouTube overview of it, if this helps at all.
I will have a firing demo of it on my channel as well should you choose to browse.

Edited by OzNerf-Sarge, 14 April 2015 - 06:50 AM.

  • 0

If you see me on here, chances are it's because I'm bored.


#2 Guest_TheSilverhead_*

Guest_TheSilverhead_*
  • Guests

Posted 13 April 2015 - 08:01 PM

What are you doing in my garage? Seriously. That's creepy. Anyway, superb write up. I likely would never have gotten around to it anyway. I'd recommend keeping your battery external, or at least removable. Never, ever charge Lipo's in their circuit or in an enclosed space, even if there's a kill switch.
  • 0

#3 ompa

ompa

    Introductinator

  • Moderators
  • 2,368 posts

Posted 13 April 2015 - 11:01 PM

Very nice, awesome utilization of the massive amount of space inside that shell. If my guesstimates about dimensions are correct, you could probably lop off the bottom part of the shell right in front of the trigger (and before the clip), and use it as a space to store the battery while still making it more easily accessible. Just curious, how many shots can you get off of a single battery?

Also, I love the use of putty. I'm a huge proponent of "use whatever the hell you find laying around in your drawers", as I know a good chunk of us don't have access to more... advanced tools, and these types of mods just seem to be so much more accessible to people starting out.

~ompa
  • 0

#4 OzNerf-Sarge

OzNerf-Sarge

    Member

  • Members
  • 24 posts

Posted 13 April 2015 - 11:26 PM

Very nice, awesome utilization of the massive amount of space inside that shell. If my guesstimates about dimensions are correct, you could probably lop off the bottom part of the shell right in front of the trigger (and before the clip), and use it as a space to store the battery while still making it more easily accessible. Just curious, how many shots can you get off of a single battery?

Also, I love the use of putty. I'm a huge proponent of "use whatever the hell you find laying around in your drawers", as I know a good chunk of us don't have access to more... advanced tools, and these types of mods just seem to be so much more accessible to people starting out.

~ompa

I changed it up to a larger battery and fitted it as best I could to the shell. I do think your suggestion actually could come in handy for that size battery though, and I may take that suggestion up the next time I open it up.
As for shot count, I can get about 200 shots off for a 4000mah 4S when charging to 40psi. That's pretty much a day's worth of shots at our Brisbane high-power wars.

What are you doing in my garage? Seriously. That's creepy. Anyway, superb write up. I likely would never have gotten around to it anyway. I'd recommend keeping your battery external, or at least removable. Never, ever charge Lipo's in their circuit or in an enclosed space, even if there's a kill switch.


I do remove my battery to charge it, and as for your garage, I had this blaster finished a year ago. I'm new to Nerfhaven, but not to modding. I've hopefully got more posts to come in the coming weeks until I am up to date with all my blaster builds.

Thanks for the encouragement, though, guys!

Edited by OzNerf-Sarge, 13 April 2015 - 11:27 PM.

  • 0

If you see me on here, chances are it's because I'm bored.


#5 Gin

Gin

    Member

  • Members
  • 78 posts

Posted 14 April 2015 - 03:40 PM

hmmmm this looks so familiar i can't figure out why....... same real rifle scope.... same name for the blaster.... same country..... same volt meter..... same mini compressor.... are you Liam perhaps?
EDIT: nevermind answered my own question, didn't see the youtube link... say hi to rob and mutzy for me.

Edited by Gin, 14 April 2015 - 03:47 PM.

  • 0
Leader of the Wrecking Crew, Student of Ninjitsu and Kendo, Avid Otaku, Metal head, Amateur engineer, and In my spare time I kill zombies. I'll sleep when I'm dead... 'Till then, There ain't no rest for the Wicked.

#6 jwasko

jwasko

    PowerBeard

  • Moderators
  • 1,021 posts

Posted 14 April 2015 - 03:41 PM

It looks like you have to watch the pressure gauge in order to determine when to stop the compressor. Correct?

Also, did you just gut a random compressor or did you obtain those components (motor, pump, etc) in some other way?
  • 0

-Jwasko, STILL Sole Surviving member of Steel City Nerf and Sober Sister of the Sex Dwarves
We NERF ON all day, and FUCK OFF all night


#7 OzNerf-Sarge

OzNerf-Sarge

    Member

  • Members
  • 24 posts

Posted 14 April 2015 - 10:15 PM

hmmmm this looks so familiar i can't figure out why....... same real rifle scope.... same name for the blaster.... same country..... same volt meter..... same mini compressor.... are you Liam perhaps?
EDIT: nevermind answered my own question, didn't see the youtube link... say hi to rob and mutzy for me.

That is correct, who are you? Expect more from me here. I hope to be a regular after a while.

It looks like you have to watch the pressure gauge in order to determine when to stop the compressor. Correct?

Also, did you just gut a random compressor or did you obtain those components (motor, pump, etc) in some other way?

I removed the compressor components from the shell of a $10 Kmart mini compressor. The benefits of not having an OPV is that I can choose anywhere between 20psi and 80psi to stop. On a 4S LiPo I have figured out it takes about a second per 10psi to fill, so if I count to 4, I can get 40psi filled up. Otherwise, yes, I have to watch the gauge.
  • 0

If you see me on here, chances are it's because I'm bored.


#8 Gin

Gin

    Member

  • Members
  • 78 posts

Posted 15 April 2015 - 08:09 PM

eh just one of robs subscribers.... tends to have the news quicker than other channels lol


EDIT: and I think I speak on behalf of most of NH saying this, always nice to get a skilled contributor.

Edited by Gin, 15 April 2015 - 08:26 PM.

  • 0
Leader of the Wrecking Crew, Student of Ninjitsu and Kendo, Avid Otaku, Metal head, Amateur engineer, and In my spare time I kill zombies. I'll sleep when I'm dead... 'Till then, There ain't no rest for the Wicked.


0 user(s) are reading this topic

0 members, 0 guests, 0 anonymous users