

Now, I have discovered one problem with this blaster, and pump blasters in general. When you're pumping, the act of pumping itself can mildly warp the frame. Given how exacting the brass/brass interface is, it CAN be a bit troublesome. Holding the trigger down so no pressure builds up results in a near-perfect interface every time, but once pressure starts building up it becomes more of an issue as the frame/faux barrel ever so slightly warps. I have not yet thought of a way to deal with this outside of just filling the entire inside of the shell with bondo in order to make it solid.
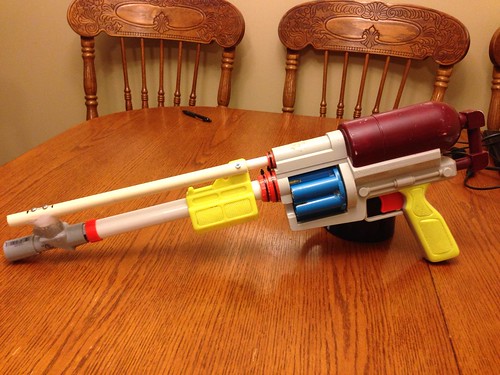
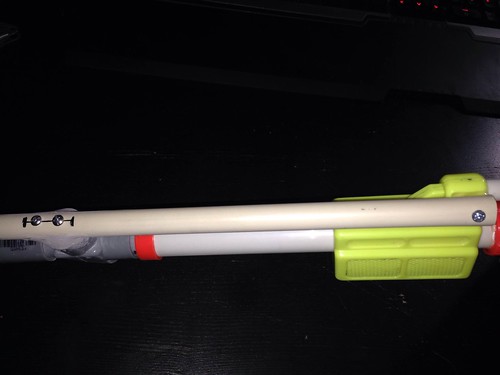
I'm going to start with a finished picture, simply because I know my explanations aren't exactly going to be the most clear (it's been a while), and having the final product for reference will make it easier.
Necessary materials:
-1/2 PVC (SCH40 or 80 depends on the darts you're using)
-1/2 CPVC, or just the same PVC from above
-1/2 PVC T coupler, or L coupler
-2 nesting diameters of brass tubing (I used 12" of 9/16 and about 12" of 17/32", but this of course will vary with your darts)
-Bondo and/or epoxy (if you decide to not use an L or T coupler to join the pump to the main barrel: this will be explained later)
-A few 1" screws, depending on where/how you mount various aspects of the gun
-Hot glue (honestly the stuff is terrible, but if you ever want to re-do or change mods like I do, it's easier to undo).
First things first, you're going to want to take your 1/2 pvc and shove it right down the barrel until it's nearly flush with the turret. It doesn't necessarily have to be perfect, because it's the brass/brass connection that's most important. I left about 3" after the tip of the faux barrel and chopped it there. I then took the L coupler (Or T, or whatever works for you) and sanded out the inner lip so I could push the pvc all the way through. At that point, you want to want to fill in the opening perpendicular to the direction of your barrel with Bondo or epoxy. You could ALSO just jam an L or T bracket onto/into the L/T bracket you already have attached to the main barrel; I did not do this because a.) I'm cheap and b.) the store I was at didn't have a CPVC L-coupler. Nor did it have a 1/2 PVC T-coupler (don't ask).
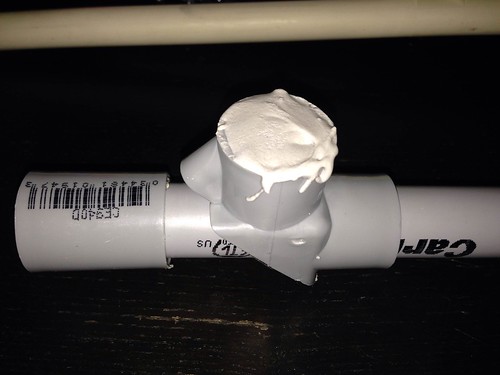
You'll then want to sand the bondo/epoxy until it's flat.
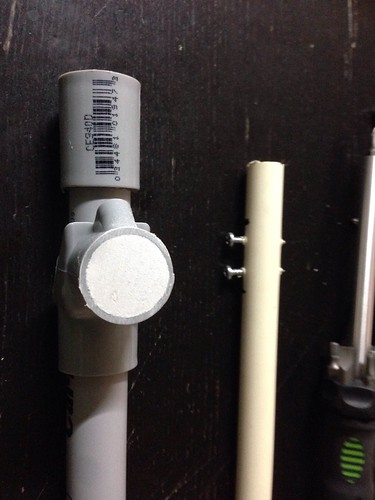
At this point, you'll want to start measuring the arm that will connect the barrel to the pump, as the whole assembly will move as a unit. put the pump at the rearmost position, and measure the cpvc (or pvc) so that it is at least long enough to go from the back of the pump to the vertical portion of the T or L coupler. Ideally you should then measure the diameter of the T-coupler and mark it accordingly onto the piece of CPVC (only if you didn't have a second T or L coupler available to you). As you can see, I was just lazy and instead just took a permanent marker and eyeballed it.
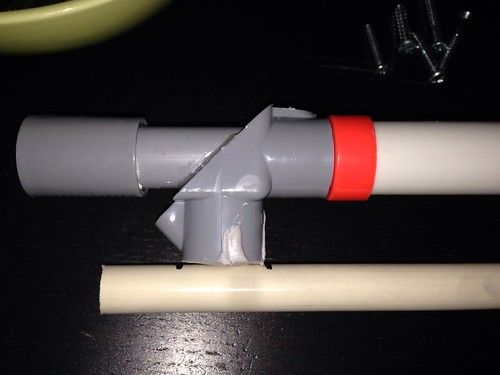
Assuming the bondo is dry (or you're using an L or T coupler like you should, provided the hardware stores around you aren't complete crap) you can either just attach the piece of pvc or cpvc to your coupler or screw it in like I did. If you look back at the final product picture I did add some bondo around the junction to smooth it out a bit, but it's up to you really, and you won't need bondo if you used an L or T coupler at that junction.
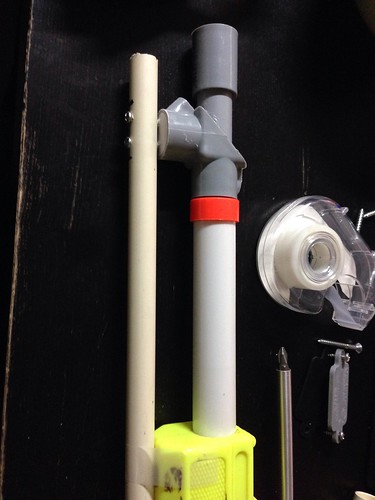
The last thing you'll need to do with this barrel is to take your larger diameter brass (for me I used 12" of 9/16" brass) and flare out one end of it. I honestly just take a larger pair of pliars and spin it around one end until I get a nice flared edge going and then smooth the surface with a dremel. This is so that even with the small amount of play present with the turret, ideally the larger brass will catch the smaller brass stubs and guide them into place. Afterwards mount it on the inside of the barrel leaving about 3/4" sticking out the rear end, assuming you left your pvc about flush with the front of the turret when you measured it. I just did this with some tape around the brass to center it, followed by some hot glue to secure it.
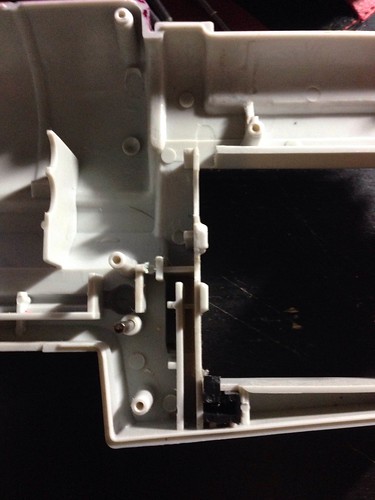
At this point you can take out the whole assembly and set it aside, now it's time to take apart the gun. P.S. taking the gun apart may make you utter a number of profanities. The two orange rings at the base of the faux barrel and the base of the pump are both glued on. I just heated up the rings to try to loosen them; it worked for the pump ring, but I didn't have as much luck with the one around the faux barrel. I ended up just scoring along the split in the gun itself and took the gun apart. The first thing you'll notice is that a bunch of pieces flew out. Fortunately, you really don't need many of them, because the vast majority of them make up the overly fragile and complicated rotation mechanism. Given the propensity of the rotation mech to break upon adding anything at all to the turret, it's best to just remove it now. Worst case if you want to undo everything, you can always put it back in. The one piece you will want to leave in is the little black piece at the bottom that acts as a sort of ratchet for the turret.
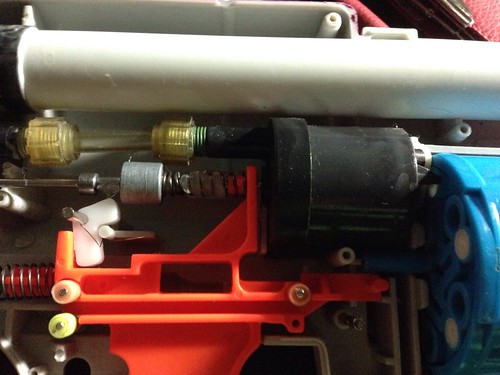
Given the lack of the rotation mech, the trigger pull becomes excessively long. You can remedy this with really anything, but my preferred choice is to just chop off a bit of the ink tube of a bic pen, slit it lengthwise, and wrap it around where the trigger would normally engage the (honestly I don't know what to call it) pin. In this particular picture, it's to the left of the large metal cylinder, and to the right of the smaller metal cylinder. A bit of superglue or epoxy will keep it in place.
This next part is kind of optional. The gun has a very unusual way of preventing the firing of non-approved darts (I'm looking at you marbles). At the rear end of every dart chamber within the turret is a small white pin and a spring. The dart depresses the pin, which then exits the back of the turret. This pin then serves to move the flap that is otherwise covering the air chamber, allowing air to pass from the air chamber to move the dart out. Once the dart is out, the pin resets, and the turret can continue rotating. It's actually a really nifty little mechanism, but useless for our cause. Thus, I just glued the cover into the "open" position. A more ideal solution would be to rip it off and replace it with a rubber washer to increase the seal between the air chamber and the turret, but I didn't have one on me at the time, although I might change this in the future if I ever find myself enjoying pump guns again.
This brings us to our next section, as well as oddity. While you still have the gun disassembled, look down the dart chambers within the turret. For the vast majority of nerf-branded weapons, additional pressure is placed on the darts via a constriction in the dart chamber itself. In this particular case, it's actually little ridges. Now these can be dealt with in one of two ways. The ideal way would be to have a nice drill press and just get rid of them entirely.
For those of you that don't have one (me), you'll have to improvise by wrapping some tape around the base of short brass barrels (these will be the smaller of your two brass diameters; in my case it was about 1.5" of 17/32"), pouring hot glue over the base, and jamming it in as fast as you can, praying that this fills in the space that will inevitably be left in the tape/ridge junction. Again, better with the drill press, but not all of us have that luxury. By jamming the barrel stubs in with the hot glue you also have another bonus; the hot glue helps to stabilize and center the barrel, which really helps improve the reliability when it comes to the barrel sliding over it. If you jam the brass back far enough, it's likely you'll engage those little white pins we talked about earlier. Given that the air chamber cover is now permanently open (either due to my method or the preferred rubber washer) this will inevitably interfere with the functionality of the blaster, so once you jammed the brass in there just chop off the pins at the back so they're flush. Then, hot glue the little holes on the outside of the turret. Assuming you placed hot glue around the outside of the brass stubs before jamming them in the turret the seal should be sufficient, but better safe than sorry.
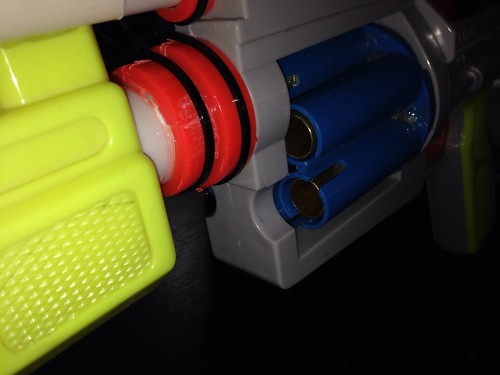
When you assemble the whole thing, assuming everything has been centered properly, sliding the barrel down the tube should result in it sliding nicely over the brass stubs inside the turret.
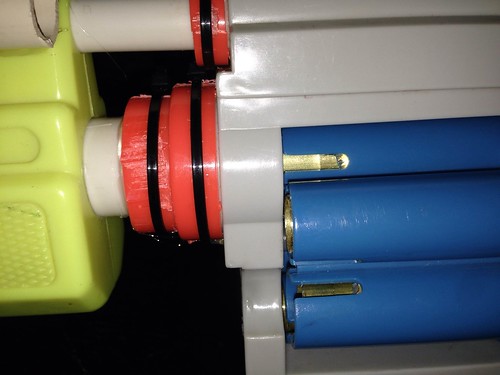
Make sure that it slides consistently over the brass stubs for all chambers, and then decide where you want to link the faux barrel to the pump. I chose the top (as you already saw from the first picture), but really anywhere works as long as you fill in whatever gaps are present between the linking arm and the pump. Also, don't mind the differently sized screws, when I said that I just found random screws in my drawer I wasn't kidding.
Again, I apologize for the lack of ranges and/or chrono values at the moment. Once I get around to making some Stefans maybe I might risk trying to find a place where I can do some range testing, but until then I really do apologize for the lack of values.
~ompa


