Jump to content


Photo

New AABow Write-up

Updated 2014-06-25
homemade writeup bow

15 replies to this topic

#1 Naturalman7

Naturalman7

    Member

  • Contributors
  • 158 posts

Posted 01 June 2014 - 04:03 PM

My aim here is to elaborate on the design by KaneTheMediocre. The original Aabow write-up was not very in-depth and the pictures, as of recently, are all broken. I've seen several different ways people make their bows, but this way is still relatively simple, takes a short amount of time, and is entirely mechanically fastened which means you can swap out parts and can have more customization such as changing out different bow arm lengths, adding a stabilizer, or re-tensioning the string.

End product is a 4' bow powered blaster with ~10" of draw.

14507766505_4737e19a70_z.jpg
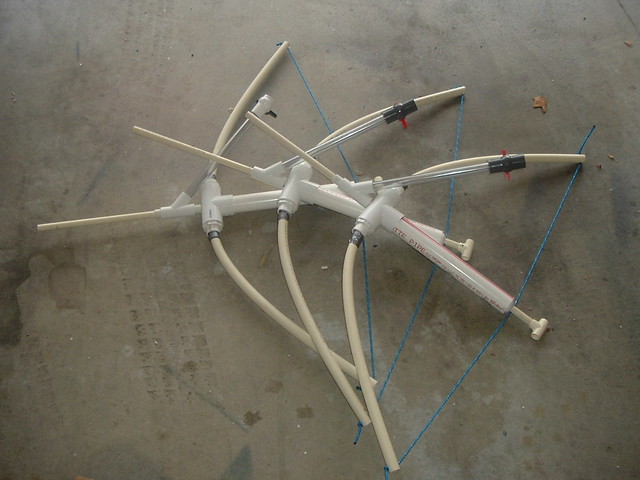
AAbow (1) by Naturalman_7, on Flickr


Materials:

  • 4x #6-32 x 3/8-in Machine Screws
  • #8- 32 x 1/2-in Machine Screw
  • #8 Finishing Washer
  • 1" x 1/2" PVC Bushing
  • 6" of 1" x 10-ft PVC
  • 12"+5.5" of 1/2" CPVC
  • 1/2" CPVC Endcap
  • 1/2" CPVC Tee
  • 2x .75" of 1/2" PVC
  • 13" of 1-1/4" PVC
  • 1-1/4-in PVC Tee
  • 2x 1-1/4-in x 1-in PVC Bushings
  • 3/16-in x 1-1/2-in Rubber Washer
  • 3/16-in x 1-1/4-in Fender Washer
  • 3.5' of 3/16-in x 75-ft Braided Polypropylene Rope
  • 4' of 3/4" CPVC
  • 3/4" PVC Endcap
  • Duct Tape


Cost:
Total cost is just over $10. I've sold several of these to people locally for $20 ea.


Tools:
The only tools I use for these bows are a hacksaw, drill, and dremel sanding wheel - sand paper may also work. I used 1/8", 3/16", and 1/4" drill bits and a 5/8" spade bit. I also use a mallet for fittings that are unusually tight.


Procedure:

After cutting the necessary sections of pipe, I like to make the cross for the arms first.

Take the two 1-1/4-in x 1-in PVC Bushings and sand down the inside so the 1" PVC can fit. I use a dremel sanding wheel, but sand paper could also work.

14321163239_9f7013b35e_z.jpg
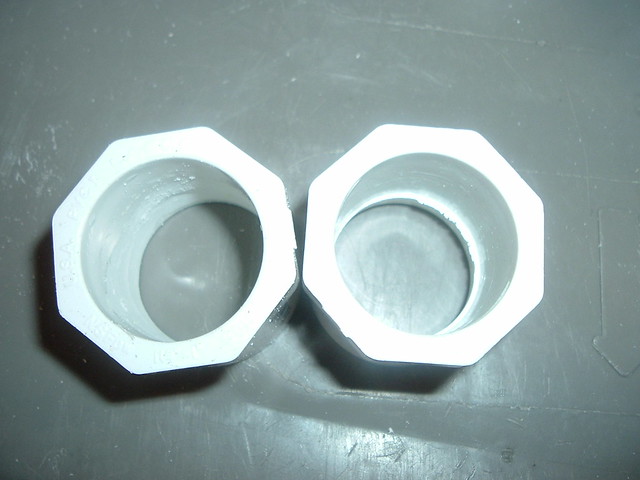
AAbow (2) by Naturalman_7, on Flickr


It should fit fairly easily on 1" PVC.

14321317257_c33374d3e6_z.jpg
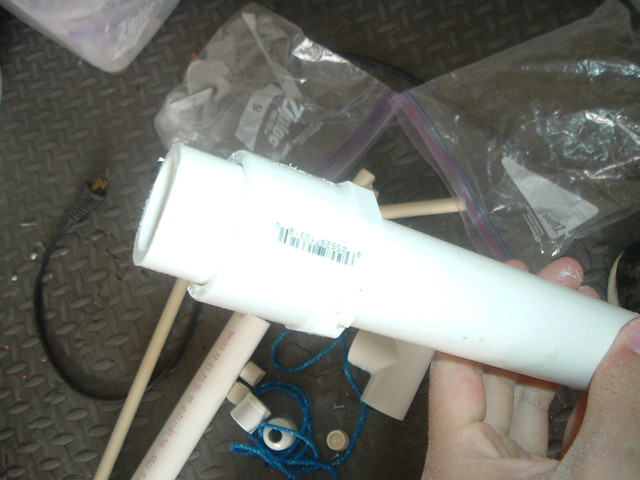
AAbow (3) by Naturalman_7, on Flickr


Push these fittings into the ends of the PVC tee and add the 1" section of PVC.

14484666076_7a79a06d03_z.jpg
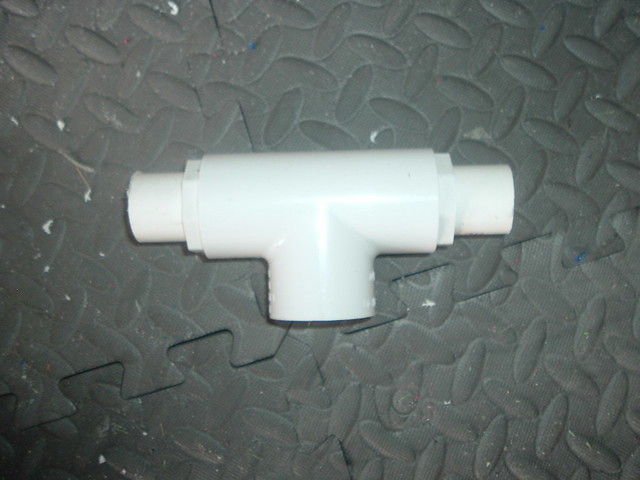
AAbow (4) by Naturalman_7, on Flickr


Drill a 5/8" hole through the center of this tee assembly.

I use this series of reducer bushings and PVC to make a centered hole.

14506411964_6a382b34e6_z.jpg
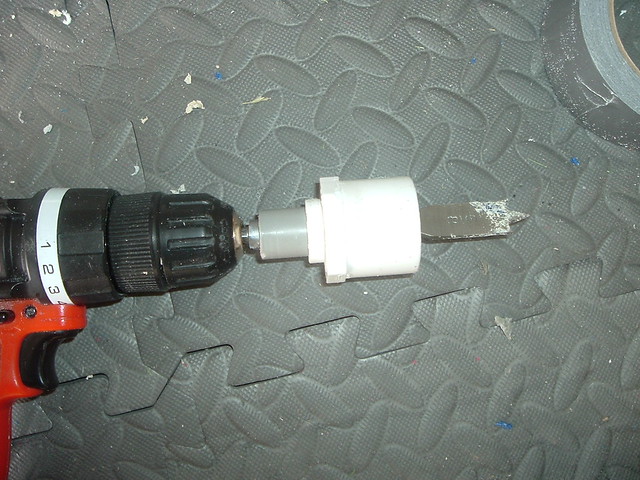
AAbow (10) by Naturalman_7, on Flickr


Once I'm through most of the way, I remove the centering rig and continue drilling the hole because the rig stops the bit from drilling all the way through. Just take a pair a pliers and pull out the bushings, then continue the hole.

14321313777_7a065e5829_z.jpg
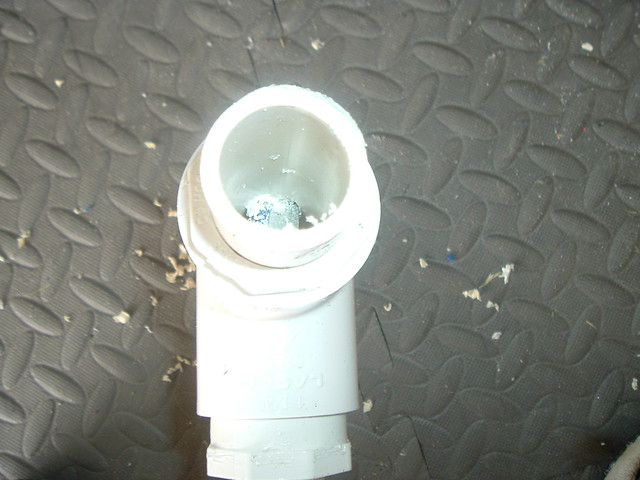
AAbow (11) by Naturalman_7, on Flickr

14506627722_652af6c062_z.jpg
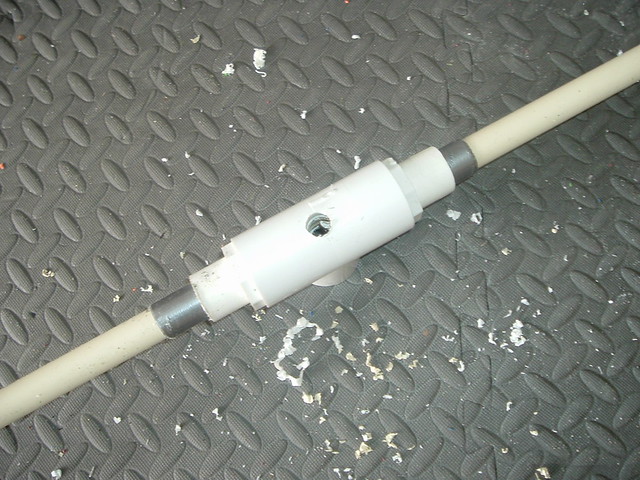
AAbow (12) by Naturalman_7, on Flickr


At this point, make sure that 1/2" CPVC can fit through the hole centered and with relatively little friction. If not, take a dremel or a file and sand the inside of the hole and check fit again.

14321105220_78cf39bc3c_z.jpg
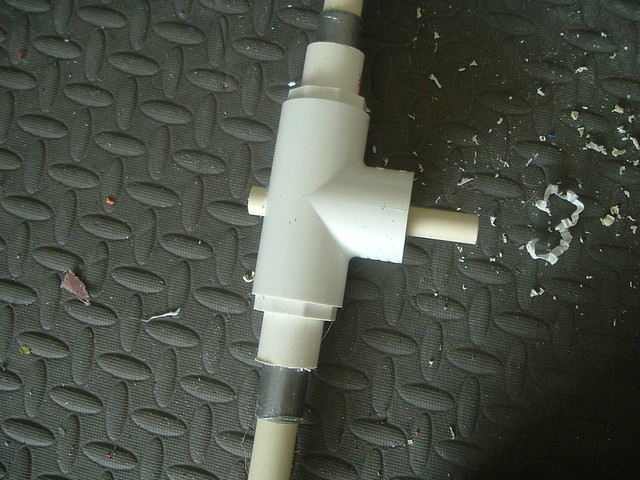
AAbow (13) by Naturalman_7, on Flickr


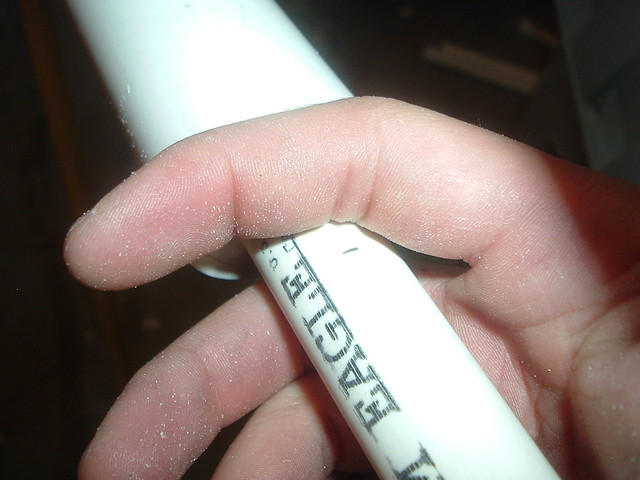
Take the bow arms, measure the middle, then wrap duct tape around 3.5 inches on either side of the middle. The arms should fit inside of the 1" PVC. The measuring should put the marks where pictured.

14504372131_500de33425_z.jpgAAbow (5) by Naturalman_7, on Flickr

14504371861_61c2ede6ab_z.jpg
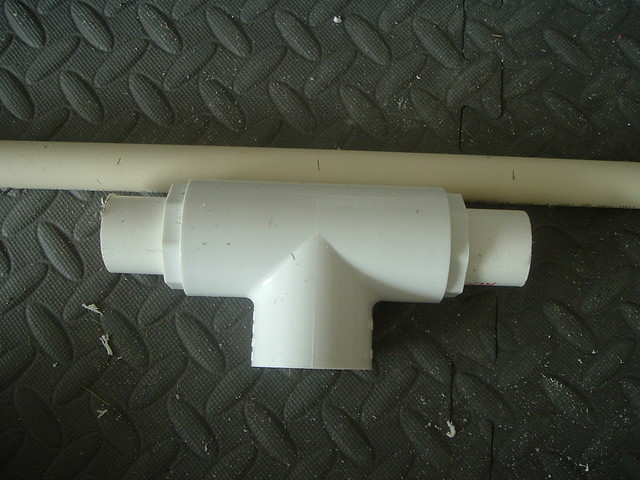
AAbow (6) by Naturalman_7, on Flickr

14321162399_53fc3ea677_z.jpg
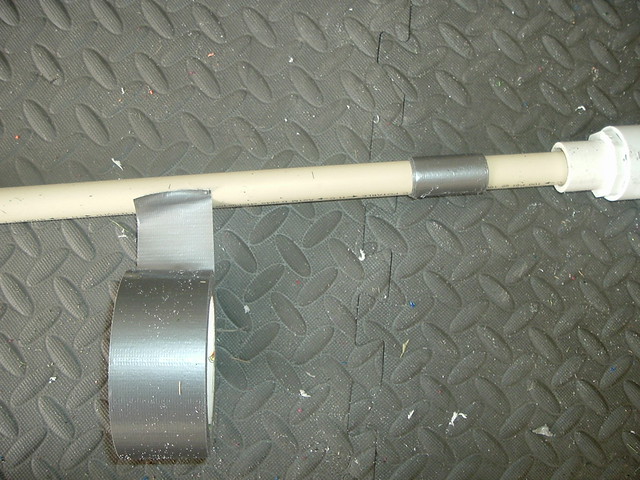
AAbow (7) by Naturalman_7, on Flickr


Drill another 5/8" hole in the arms. It's okay if the hole isn't clean.

14484665096_5578bc4604_z.jpg
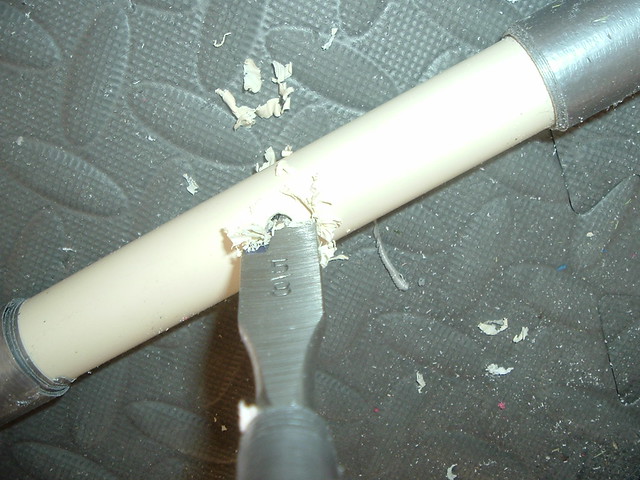
AAbow (8) by Naturalman_7, on Flickr

14484663556_21eb002c46_z.jpg
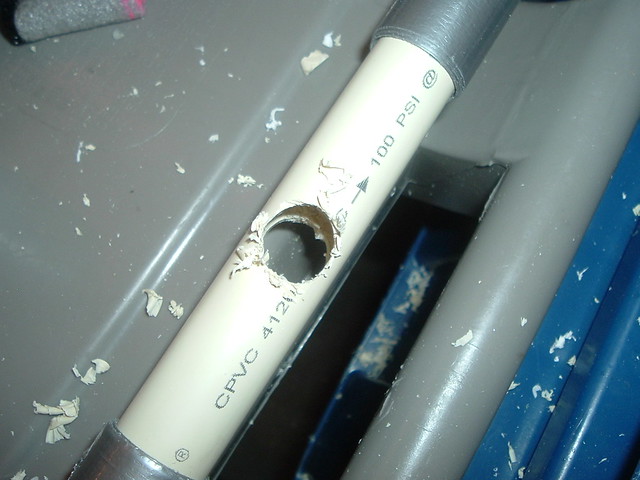
AAbow (9) by Naturalman_7, on Flickr


Take the CPVC endcap and drill a 1/8" hole as centered in it as possible. I try to make a center mark by putting a sharpie through a section of CPVC to mark the center.

14527868633_11567d8d97_z.jpg
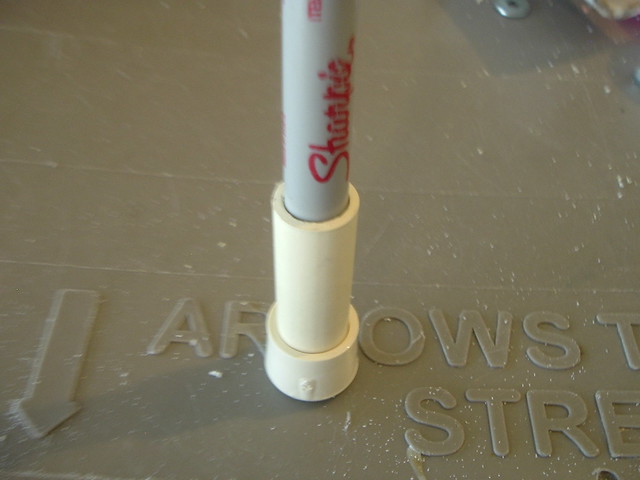
AAbow (16) by Naturalman_7, on Flickr

14506627872_ec39cc8900_z.jpg
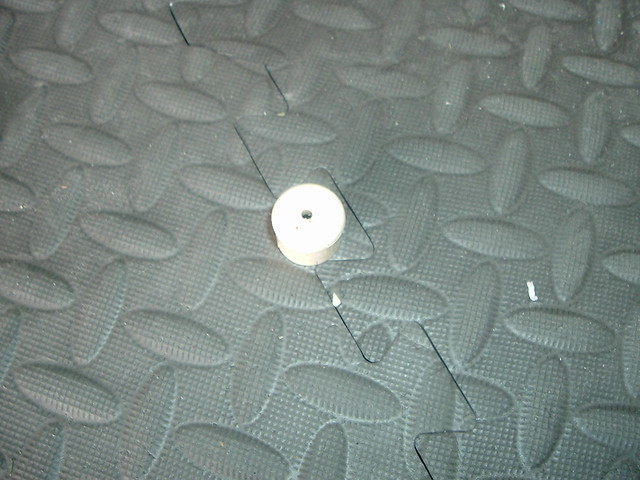
AAbow (17) by Naturalman_7, on Flickr


After drilling a hole in the CPVC endcap, attach it to the end of the CPVC pipe and drill 1/8" pilot holes for a #6 machine screw or two. Then add the screws.

14527866173_c2b1611536_z.jpgAAbow (14) by Naturalman_7, on Flickr

14506625892_d8856944a7_z.jpgAAbow (15) by Naturalman_7, on Flickr

14321090710_1ab29bfa53_z.jpg
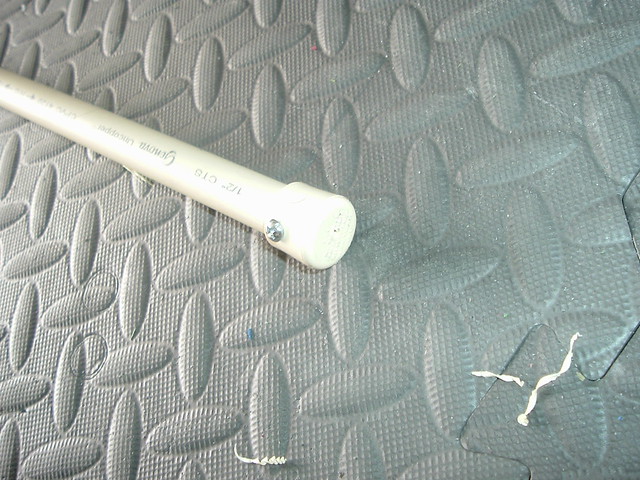
AAbow (18) by Naturalman_7, on Flickr


Place the metal fender washer, rubber washer, and finishing washer (or in this photo, #8 fender washer) on the plunger head in this order. Secure this assembly with the #8 machine screw. The rubber washer will form a slight cup shape when tightened properly.

14506407384_f0e8c8db71_z.jpg
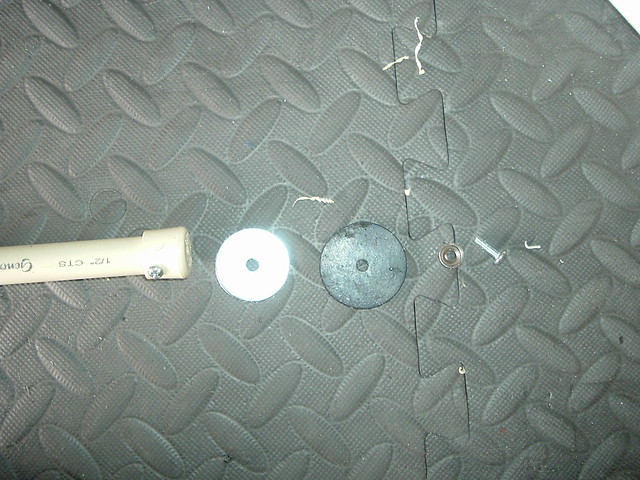
AAbow (19) by Naturalman_7, on Flickr


Lubricate this assembly and slide it into the 1-1/4" PVC so that the cup shape is maintained. The 1-1/4" PVC may have debris in it from sanding and/or cutting. You'll want to make sure everything is clean when you assemble it.

14527863913_535d07912b_z.jpg
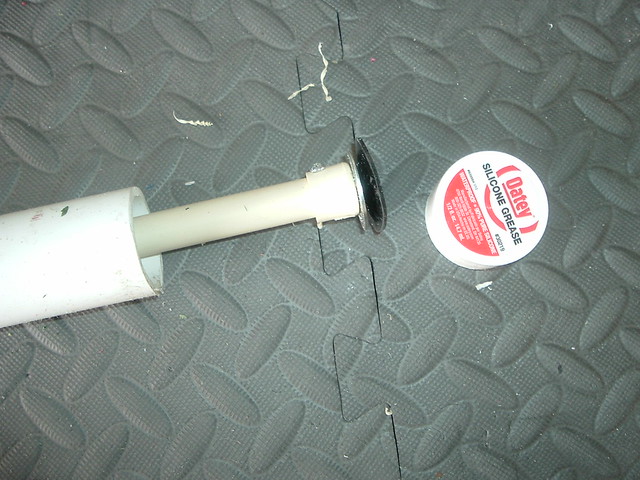
AAbow (20) by Naturalman_7, on Flickr


At this point, take the last reducer bushing, a section of PVC and the section of CPVC and assembly them together as shown.

14321309267_26c5789194_z.jpg
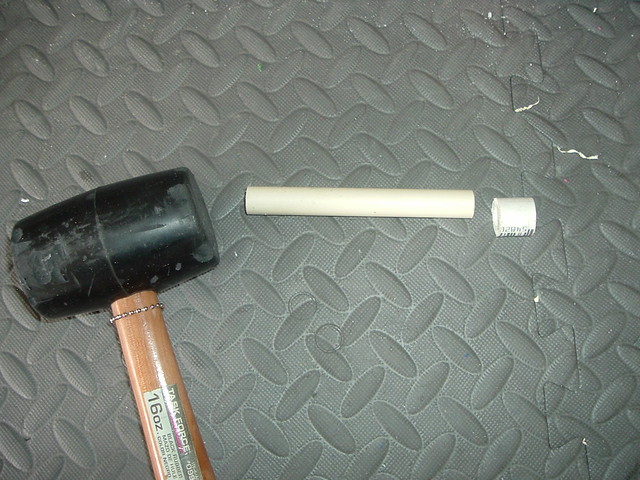
AAbow (21) by Naturalman_7, on Flickr

14504365011_948fdbf8db_z.jpgAAbow (22) by Naturalman_7, on Flickr


Place this assembly onto the front of the 1-1/4" PVC. Do this by taking a section of 3/4" PVC or another similarly sized pipe and pushing it so that it is flush with the end of the pipe. The lip of the reducer bushing will create a seal with the 1-1/4" PVC. This piece should sit flush with the PVC.

14321103420_dd057f5f51_z.jpg
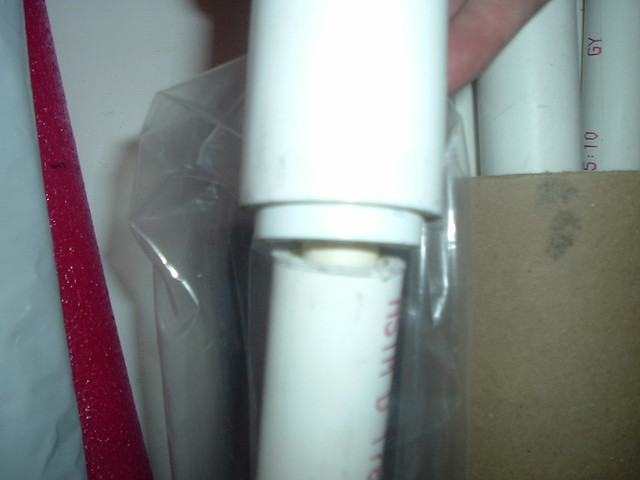
AAbow (23) by Naturalman_7, on Flickr

14527863303_b8cd142d1c_z.jpg
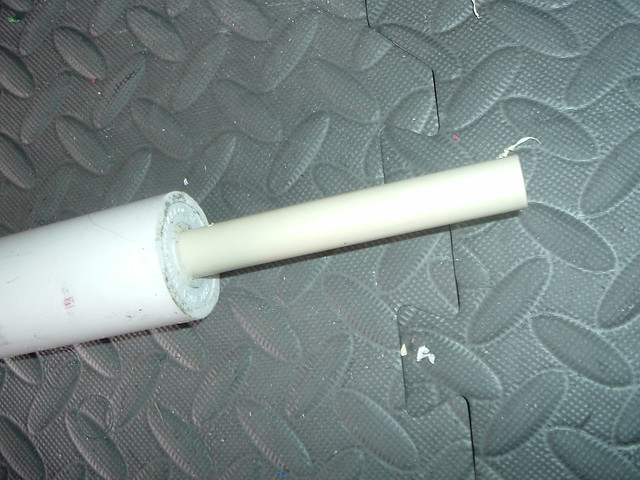
AAbow (24) by Naturalman_7, on Flickr


Take the 3/4" PVC endcap, sand the edges down so that it fits inside the 1-1/4" PVC, and drill a 5/8" hole centered in it. Sand and/or drill out the hole so that it fits loosely around the 1/2" CPVC. You can use a similar method for drilling the 5/8" hole for marking the center of the endcap.

14321152029_a36be4677c_z.jpg
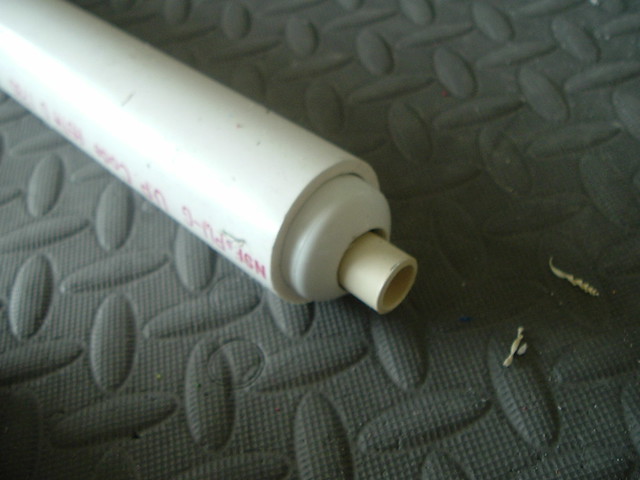
AAbow (25) by Naturalman_7, on Flickr


Drill a 1/8" pilot hole through the 1-1/4" PVC and endcap and secure it with a #6 machine screw.

14321151409_49a60201be_z.jpg
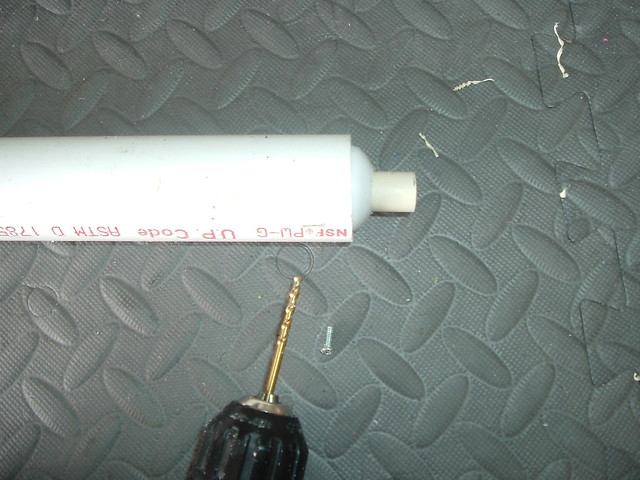
AAbow (26) by Naturalman_7, on Flickr


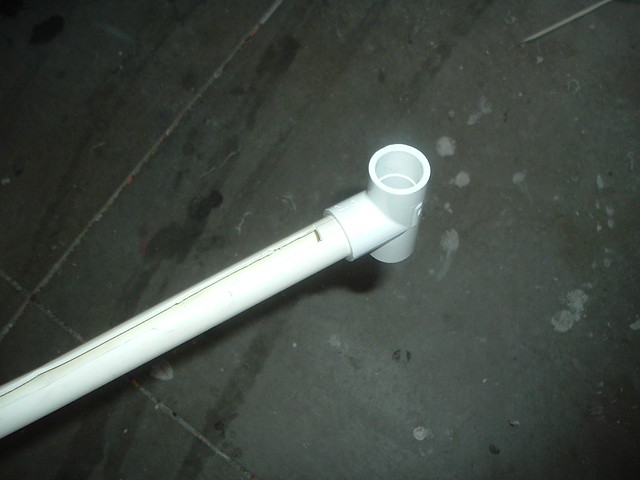
Place the CPVC tee on the other end of the CPVC, drill a 1/8" pilot hole, and attach the tee with a #6 screw.

14504362811_13591f6c8b_z.jpg
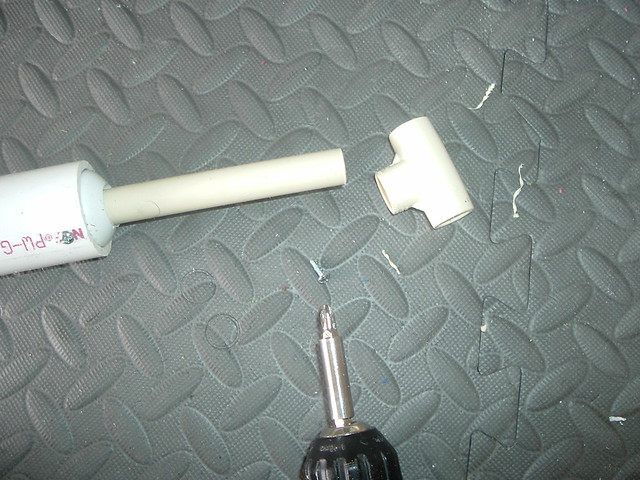
AAbow (27) by Naturalman_7, on Flickr


With the arms and mainbody assemblies done, attach the two together by pushing/hammering the arms onto the top of the 1-1/4" PVC.

14507756125_46d65428d3_z.jpgAAbow (28) by Naturalman_7, on Flickr

14527860383_bfb6408db4_z.jpgAAbow (29) by Naturalman_7, on Flickr


After these two parts are attached, take the last little stub of PVC, measure where the excess CPVC is, cut it, and hammer it onto the end of the CPVC by the arms. This step isn't necessary if you use an exact sized piece of CPVC, but I find that it works pretty much just as well this way and saves me the hassle of finding or cutting an exact piece of CPVC and makes it so I can just use a scrap piece of CPVC and not worry about the length.

14504361261_1bd93a7572_z.jpgAAbow (30) by Naturalman_7, on Flickr

14506401604_4bd1790a5e_z.jpgAAbow (31) by Naturalman_7, on Flickr


Drill 3/16" holes on both ends of the arms and cut wide notches for the bow string. The string will be pushed through the notches and the knots in the string will sit on the holes. You can optionally only cut notches on one end of the arms and just thread the string through the holes on the side without notches. I've done both ways, and I prefer to be able to completely un-string both ends if desired.

14321305227_1090f0a291_z.jpg
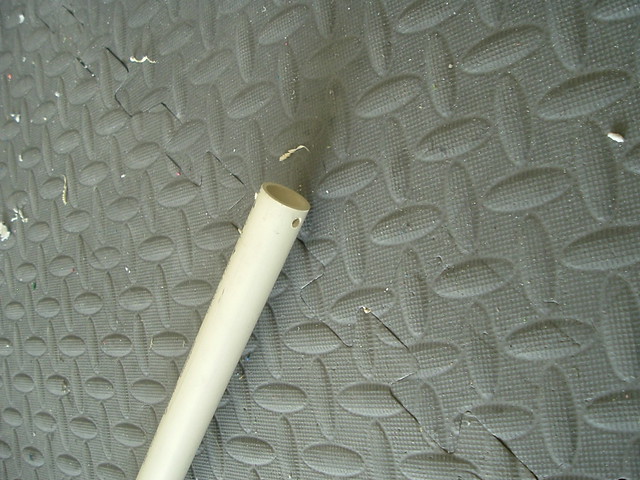
AAbow (32) by Naturalman_7, on Flickr

14484652196_c70e7868c2_z.jpg
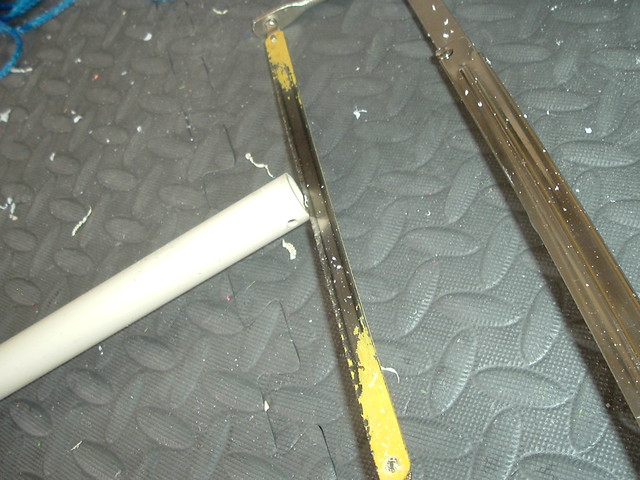
AAbow (33) by Naturalman_7, on Flickr


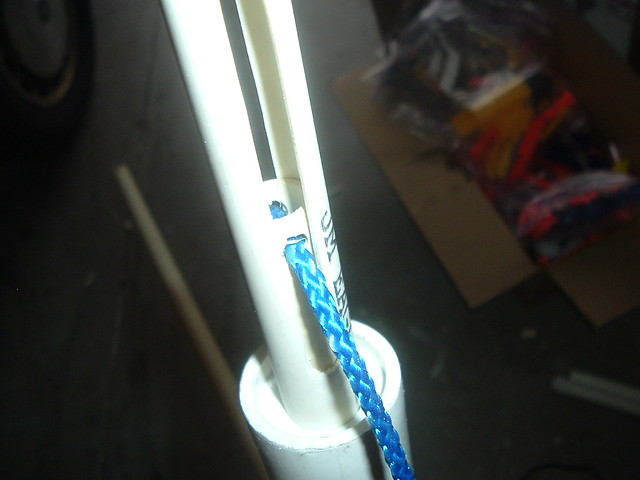
Next, string the bow. Tie a knot in one end of the string and place it in one of the ends of the arms. Thread the other end of the string through the hole by the tee, tie a knot in the other end of the string and place it on the end of the arm. Place the second knot so that when strung, the bow arms are a little before the end of the 1-1/4" PVC. With the plunger assembly pushed all the way to the front, mark and drill a 1/4" hole in the end of the plunger rod. The hole should be parallel with to the tee and perpendicular to the CPVC. Place the hole just in front of the endcap so that the bow string stops the plunger before the front of the plunger impacts the front of the bow.

14506399714_dabf30e783_z.jpg
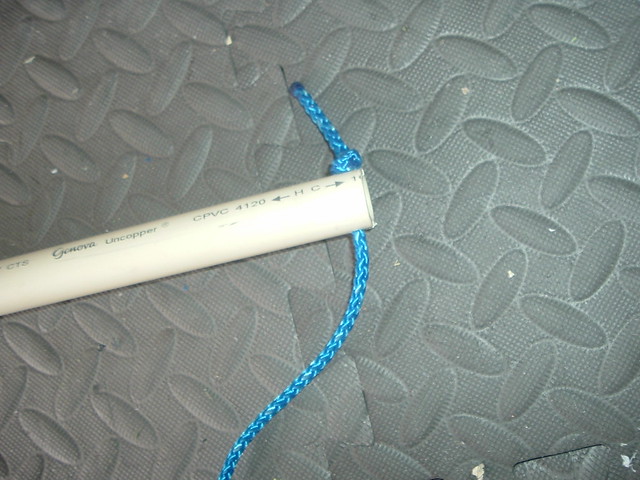
AAbow (34) by Naturalman_7, on Flickr

14507751125_200fc2b9d5_z.jpg
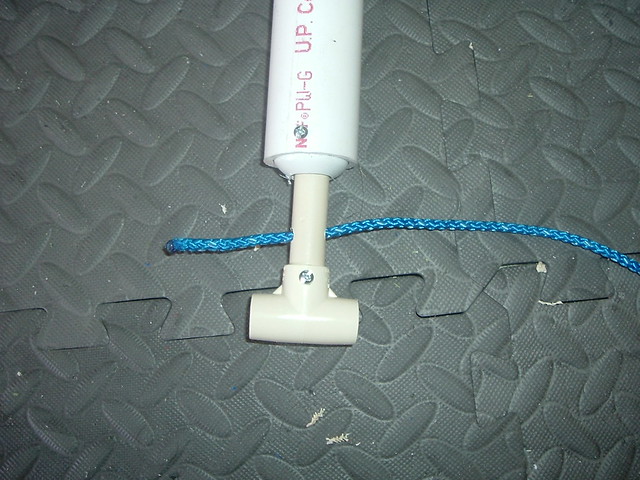
AAbow (35) by Naturalman_7, on Flickr


One optional step at this point, is to add something to protect the string from wearing out from impact. I found this vinyl tubing works well.

14504357421_565d6f60c9_z.jpg
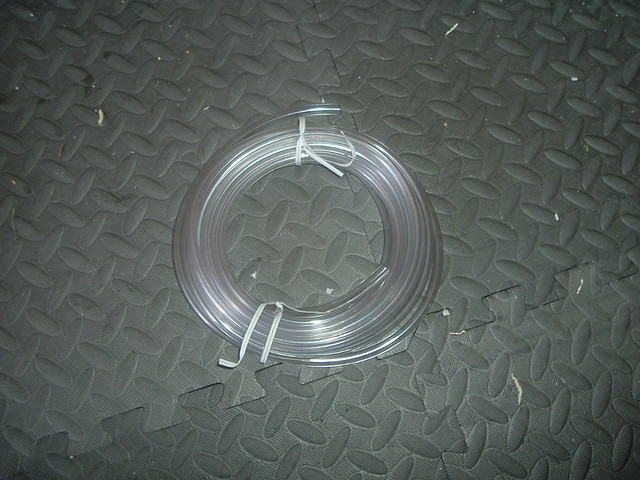
AAbow (36) by Naturalman_7, on Flickr


Cut a section of the tubing, and push the rope through. I use a drill bit because it's small and pointy.

14506398724_70827f1b14_z.jpg
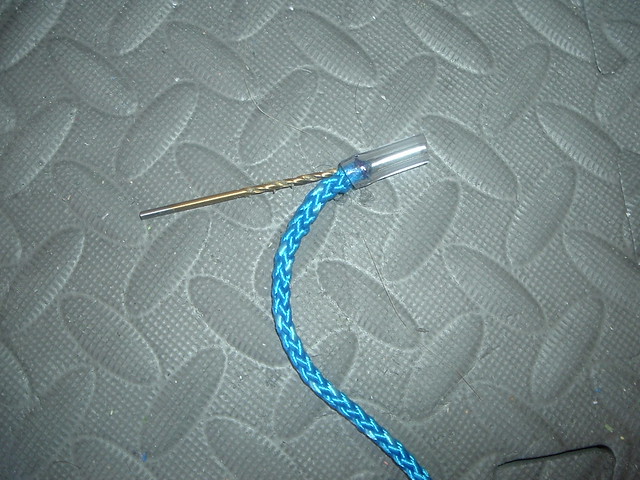
AAbow (37) by Naturalman_7, on Flickr


String the bow like normal but drill the hole in the CPVC slightly larger. If you drill a perfectly sized hole, the tubing will be able to sit snug and stay there.

14321152008_f016f63e8e_z.jpg
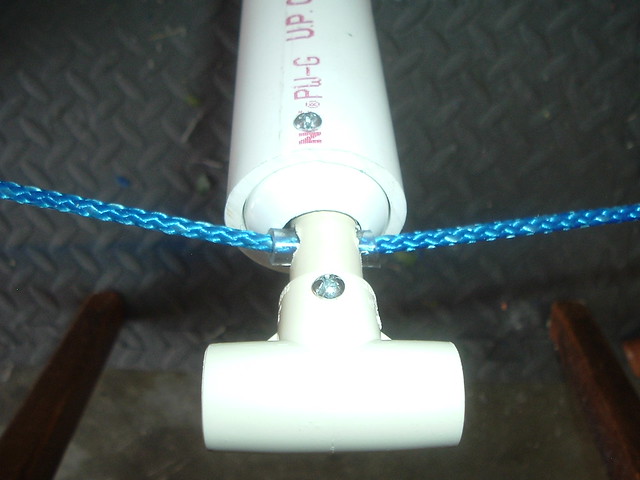
AAbow (38) by Naturalman_7, on Flickr


If you don't have a perfect sized drill bit, applying a little bit of glue like hot glue will keep it in place.

14527857323_dfc2d5523d_z.jpgAAbow (39) by Naturalman_7, on Flickr


Finished.


There it is, A completed AABow writeup that can be found on Nerfhaven.

14321300497_d1f7f88ac3_z.jpg
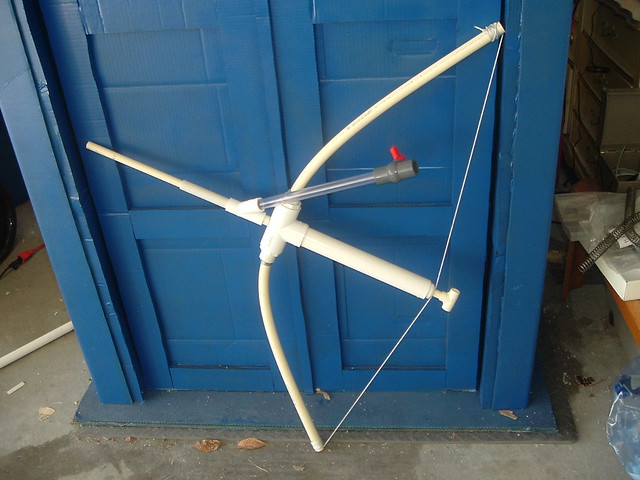
AAbow (40) by Naturalman_7, on Flickr


I apologize for the brevity of this write-up; time does not allow me to create as lengthy write-ups as I would like. I will, of course, continue to lengthen and edit my write-ups continually in the future. Expect at least 3 more write-ups soon (a twist on the original Rainbow Pump, a competitive war-worthy sidearm, and a non-expensive Pump-action Crossbow).


Edited by Aeromech, 23 November 2015 - 01:20 AM.

  • 0

#2 cheerios

cheerios

    Member

  • Members
  • 396 posts

Posted 01 June 2014 - 05:44 PM

Why did you decide to eliminate the firing stabilizer from Kane's AABow write-up? It is the only thing that makes AABows actually usable blasters in NIC wars and is by far the best feature of any homemade bow blaster created.
  • 0
22:46- jakejagan :Ryan, did you hear that Zeke's BBBB made N9 bleed?
22:47- Zorn :BONUS

#3 Exo

Exo

    Member

  • Members
  • 391 posts

Posted 01 June 2014 - 07:30 PM

Why did you decide to eliminate the firing stabilizer from Kane's AABow write-up? It is the only thing that makes AABows actually usable blasters in NIC wars and is by far the best feature of any homemade bow blaster created.

I'm betting for ease of construction and design. Slots are a bitch, regardless of what tools you have.
  • 0

#4 Naturalman7

Naturalman7

    Member

  • Contributors
  • 158 posts

Posted 01 June 2014 - 11:24 PM

Why did you decide to eliminate the firing stabilizer from Kane's AABow write-up? It is the only thing that makes AABows actually usable blasters in NIC wars and is by far the best feature of any homemade bow blaster created.


Ease of construction mostly. The only readily available material I could find to make it would be 1/2" TW PVC which buckles under even relatively weak torquing (sheathing 1/2" CPVC in 1/2" TW]. Also, slots are annoying. The only AABow I have currently actually has that stabilizer. I've found the slots to be a little painful on the fingers. Maybe I didn't sand the edges down enough. Perhaps I'll add to the write-up the fact that a stabilizer can easily be added by replacing the 3/4" endcap with a reducer bushing, cutting the end of the handle, and adding the stabilizer. I don't see many NIC wars here in Idaho, but from a couple of wars I almost think the stabilizer reduces rate of fire a little and the RoF is the main reason I think anyone would actually use a bow. I mostly use a pump-action blaster. The ones I made and sold were bought solely because of ease of use. 1/2" TW PVC with a slot in it is very weak and torquing it even a little bends it, making use not as easy - especially for the target audience of younger Nerfers due to the strength of operator being typically lower for bow powered blasters.

Pic of bow family with 'stabilized' bow experiment:

Posted ImageDSCF1117 by derrikk.sun, on Flickr

Edited by Naturalman7, 01 June 2014 - 11:27 PM.

  • 0

#5 KaneTheMediocre

KaneTheMediocre

    Belligerent Asshole

  • Members
  • 613 posts

Posted 02 June 2014 - 12:30 AM

Ease of construction mostly. The only readily available material I could find to make it would be 1/2" TW PVC which buckles under even relatively weak torquing (sheathing 1/2" CPVC in 1/2" TW]. Also, slots are annoying. The only AABow I have currently actually has that stabilizer. I've found the slots to be a little painful on the fingers. Maybe I didn't sand the edges down enough.


Yeah, I'd agree that thinwall 1/2" PVC is too weak. My first used sch80 1/2" PVC, and all future versions used sch40 1/2" PVC which was still sufficient, and allowed for a lot more misalignment. My plunger rods are 1/2" nylon rod, so I have a lot more options than you do with 5/8" CPVC. It's a perk of living near McMaster. It's also a lot easier to smooth out the slots if you have more thickness available. I actually use scissors rather than sandpaper, which with care can leave a smoother finish.

While I'm with Cheerios in thinking that the rear grip makes a world of difference in terms of usefulness, I'm also with you in thinking that it doubles or triples the total amount of labor needed to produce the blaster. Even if you can quickly and easily make slots, you have to deburr and smooth those slots. And you need to do a REALLY good job, or you're going to make tiny cuts and abrasions on your fingers when you draw the bow repeatedly. I've been hoping to find an easier solution for a long time, but nothing yet. Anyways, it's definitely a process I wouldn't trust to a first-time-homemade guy, so I see why everyone leaves off the rear grip.

Also, I updated the original Aabow writeup so it at least has a link to the current version. I've been meaning to post it, but I can't find a reasonable way to copy it in from my website.

Edited by KaneTheMediocre, 02 June 2014 - 12:41 AM.

  • 0
RAINBOW CLAN FTW
I'm Purple

My Half-Baked MHA Site

#6 azrael

azrael

    Member

  • Members
  • 393 posts

Posted 02 June 2014 - 11:17 AM

Why did you decide to eliminate the firing stabilizer from Kane's AABow write-up? It is the only thing that makes AABows actually usable blasters in NIC wars and is by far the best feature of any homemade bow blaster created.

What exactly does the stabilizer do? It just keeps the plunger moving forward in a linear fashion, right?
  • 0
Better Nerf By Science!
http://nerfscience.blogspot.com/

#7 Exo

Exo

    Member

  • Members
  • 391 posts

Posted 02 June 2014 - 12:42 PM

What exactly does the stabilizer do? It just keeps the plunger moving forward in a linear fashion, right?

No, it makes it so you have a rear grip, making it easier to aim and release.
  • 0

#8 Langley

Langley

    LGLF - Since 2002

  • Administrators
  • 2,997 posts

Posted 02 June 2014 - 02:13 PM

No, it makes it so you have a rear grip, making it easier to aim and release.


So it just gives you someplace to brace your hand against while you're holding the string, so you don't have to bear the tension of the bow arms while you aim? How hard could it be to do that with this design using 3/4" PVC? You could probably attach something offset from the plunger rod that wouldn't need slots, and brace against that.
  • 0

You can poop in my toilet anytime champ.

2016 Nerf War Schedule
Bless you, my son. Now recite 3 New Members Guides and 5 Code of Conducts for your sins.


#9 azrael

azrael

    Member

  • Members
  • 393 posts

Posted 02 June 2014 - 05:26 PM

No, it makes it so you have a rear grip, making it easier to aim and release.

Ah, are you guys using the PVC tee as a brace?

I haven't had much difficulty in aiming mine, although I do admit it is less accurate than a conventional blaster.
  • 0
Better Nerf By Science!
http://nerfscience.blogspot.com/

#10 KaneTheMediocre

KaneTheMediocre

    Belligerent Asshole

  • Members
  • 613 posts

Posted 02 June 2014 - 05:37 PM

So it just gives you someplace to brace your hand against while you're holding the string, so you don't have to bear the tension of the bow arms while you aim? How hard could it be to do that with this design using 3/4" PVC? You could probably attach something offset from the plunger rod that wouldn't need slots, and brace against that.


1/2" PVC is uncomfortable for some nerfers to get their fingers around, 3/4" PVC would probably be uncomfortable for many more. A non-slotted-tube widget like you describe could work, but finding an easy way to build and attach it with sufficient rigidity isn't a trivial task. I could probably figure something out using some 3d printed parts, but working with PVC and basic tools I don't know how to do it any more easily than the slotted PVC method.
  • 0
RAINBOW CLAN FTW
I'm Purple

My Half-Baked MHA Site

#11 Langley

Langley

    LGLF - Since 2002

  • Administrators
  • 2,997 posts

Posted 02 June 2014 - 06:19 PM

1/2" PVC is uncomfortable for some nerfers to get their fingers around, 3/4" PVC would probably be uncomfortable for many more. A non-slotted-tube widget like you describe could work, but finding an easy way to build and attach it with sufficient rigidity isn't a trivial task. I could probably figure something out using some 3d printed parts, but working with PVC and basic tools I don't know how to do it any more easily than the slotted PVC method.


Why not just screw a length of 1/2" pvc into the underside of the rear end of the plunger tube? In this design there's plenty of plastic to thread into if you also screw into the endcap/bushing. It's not going to be the most sturdy thing but it probably won't wobble or flex too much to be useful. Put an elbow and a tee on the back and you've got nearly the same thing. You could also try using 1/2" oak dowel for the plunger rod, and use slotted 1/2" cpvc just like the original. Meaker keeps saying slots can be cut with mason's twine.

Overall I like the idea of really simple builds that have optional improvements you can make if you have the time/resources to do it.
  • 0

You can poop in my toilet anytime champ.

2016 Nerf War Schedule
Bless you, my son. Now recite 3 New Members Guides and 5 Code of Conducts for your sins.


#12 KaneTheMediocre

KaneTheMediocre

    Belligerent Asshole

  • Members
  • 613 posts

Posted 03 June 2014 - 02:13 AM

Why not just screw a length of 1/2" pvc into the underside of the rear end of the plunger tube? In this design there's plenty of plastic to thread into if you also screw into the endcap/bushing. It's not going to be the most sturdy thing but it probably won't wobble or flex too much to be useful. Put an elbow and a tee on the back and you've got nearly the same thing. You could also try using 1/2" oak dowel for the plunger rod, and use slotted 1/2" cpvc just like the original. Meaker keeps saying slots can be cut with mason's twine.

Overall I like the idea of really simple builds that have optional improvements you can make if you have the time/resources to do it.


I don't think this would quite do the job. The rear grip needs to be very rigidly attached to the rest of the blaster to be of any use in aiming/stabilizing. You'd still be able to hold the string without taking the load of the draw, but firing it would probably be similar in accuracy to a gripless Aabow.

Maybe if you did this on the top AND bottom and connected the rods at the back, or better yet some 3 rod triangle magic. I never did the two rod thing because I liked that my thumb could pass over the grip on the way back, but if you had an extra thumbs-length of draw (which many Aabows do) you could get around that. It seems worth trying. If I had an 8+ inch Aabow I'd see for myself.

Edited by KaneTheMediocre, 03 June 2014 - 02:15 AM.

  • 0
RAINBOW CLAN FTW
I'm Purple

My Half-Baked MHA Site

#13 Naturalman7

Naturalman7

    Member

  • Contributors
  • 158 posts

Posted 25 June 2014 - 04:46 PM

Super overhauled this write up - added better pictures, stayed within the 40 picture limit, changed the photo hosting website I use and changed my online name and username for said site. Also, here's a brief section for those who are wondering about all the talk of a stabilizer. It's brief because I haven't found a good, cheap, easily obtained, material for it yet. But here it is:

What exactly does the stabilizer do? It just keeps the plunger moving forward in a linear fashion, right?


The stabilizer creates a place to rest the drawing hand so that, when released, the bow doesn't wobble every which way. Without the stabilizer, accuracy is much more difficult to maintain and the stabilizer helps to hold the bow tight. However, I've heard and have seen people use AABows without a stabilizer and they find the bow without a stabilizer to be usable and not totally horrendous to use effectively.


Instead of using a 3/4" PVC endcap, use a 1" x 1/2" PVC bushing and get rid of the CPVC tee. The end will look like this:

Posted ImageAAbow (41) by Naturalman_7, on Flickr


Then, take a section of 1/2" thinwall PVC that is two inches longer than your draw length, stick it in the bushing over the CPVC, and mark where is comfortable for you to start the draw. Don't mark too far forward or your fingers will run into the 1-1/4" PVC body.

Posted ImageAAbow (42) by Naturalman_7, on Flickr


Cut a slot with a Dremel for the string. Then, add a PVC tee to the end. This tee will be what your priming hand will rest on. You can't put too much weight on this handle though, because thinwall PVC isn't strong enough. If someone finds something better to use, do tell.

Posted ImageAAbow (43) by Naturalman_7, on Flickr


Finally, just drill a hole in the CPVC for the string as done previously and restring the bow.

Posted ImageAAbow (44) by Naturalman_7, on Flickr

Edited by Naturalman7, 25 June 2014 - 04:50 PM.

  • 0

#14 TheNerfZilla

TheNerfZilla

    Member

  • Members
  • 99 posts

Posted 17 March 2015 - 11:12 AM

Super overhauled this write up - added better pictures, stayed within the 40 picture limit, changed the photo hosting website I use and changed my online name and username for said site. Also, here's a brief section for those who are wondering about all the talk of a stabilizer. It's brief because I haven't found a good, cheap, easily obtained, material for it yet. But here it is:


The stabilizer creates a place to rest the drawing hand so that, when released, the bow doesn't wobble every which way. Without the stabilizer, accuracy is much more difficult to maintain and the stabilizer helps to hold the bow tight. However, I've heard and have seen people use AABows without a stabilizer and they find the bow without a stabilizer to be usable and not totally horrendous to use effectively.


Instead of using a 3/4" PVC endcap, use a 1" x 1/2" PVC bushing and get rid of the CPVC tee. The end will look like this:

Posted ImageAAbow (41) by Naturalman_7, on Flickr


Then, take a section of 1/2" thinwall PVC that is two inches longer than your draw length, stick it in the bushing over the CPVC, and mark where is comfortable for you to start the draw. Don't mark too far forward or your fingers will run into the 1-1/4" PVC body.

Posted ImageAAbow (42) by Naturalman_7, on Flickr


Cut a slot with a Dremel for the string. Then, add a PVC tee to the end. This tee will be what your priming hand will rest on. You can't put too much weight on this handle though, because thinwall PVC isn't strong enough. If someone finds something better to use, do tell.

Posted ImageAAbow (43) by Naturalman_7, on Flickr


Finally, just drill a hole in the CPVC for the string as done previously and restring the bow.

Posted ImageAAbow (44) by Naturalman_7, on Flickr


I am not sure that this could work, but could you not just extend the plunger tube back the whole length of the draw, and put a reducer bushing on the end leading into the tee? This would certainly be stronger than the thinwall you were using.

Edited by TheNerfZilla, 17 March 2015 - 11:15 AM.

  • 0
I have a blog now!
How to Get Started Nerfing Pt. 1
Eat spaghetti to forgetti your regretti 

#15 KaneTheMediocre

KaneTheMediocre

    Belligerent Asshole

  • Members
  • 613 posts

Posted 18 March 2015 - 08:02 PM

I am not sure that this could work, but could you not just extend the plunger tube back the whole length of the draw, and put a reducer bushing on the end leading into the tee? This would certainly be stronger than the thinwall you were using.

For users who can fit 1 1/4" PVC comfortably between two fingers, this would work great. But for normal human sized hands it doesn't work well.
  • 0
RAINBOW CLAN FTW
I'm Purple

My Half-Baked MHA Site

#16 TheNerfZilla

TheNerfZilla

    Member

  • Members
  • 99 posts

Posted 19 March 2015 - 07:51 AM

For users who can fit 1 1/4" PVC comfortably between two fingers, this would work great. But for normal human sized hands it doesn't work well.


I see what you mean, I forgot that you put your fingers around the whole pipe, not just the end tee.

Edited by TheNerfZilla, 20 March 2015 - 09:27 AM.

  • 0
I have a blog now!
How to Get Started Nerfing Pt. 1
Eat spaghetti to forgetti your regretti 


Also tagged with one or more of these keywords: homemade, writeup, bow

0 user(s) are reading this topic

0 members, 0 guests, 0 anonymous users