Jump to content


Photo

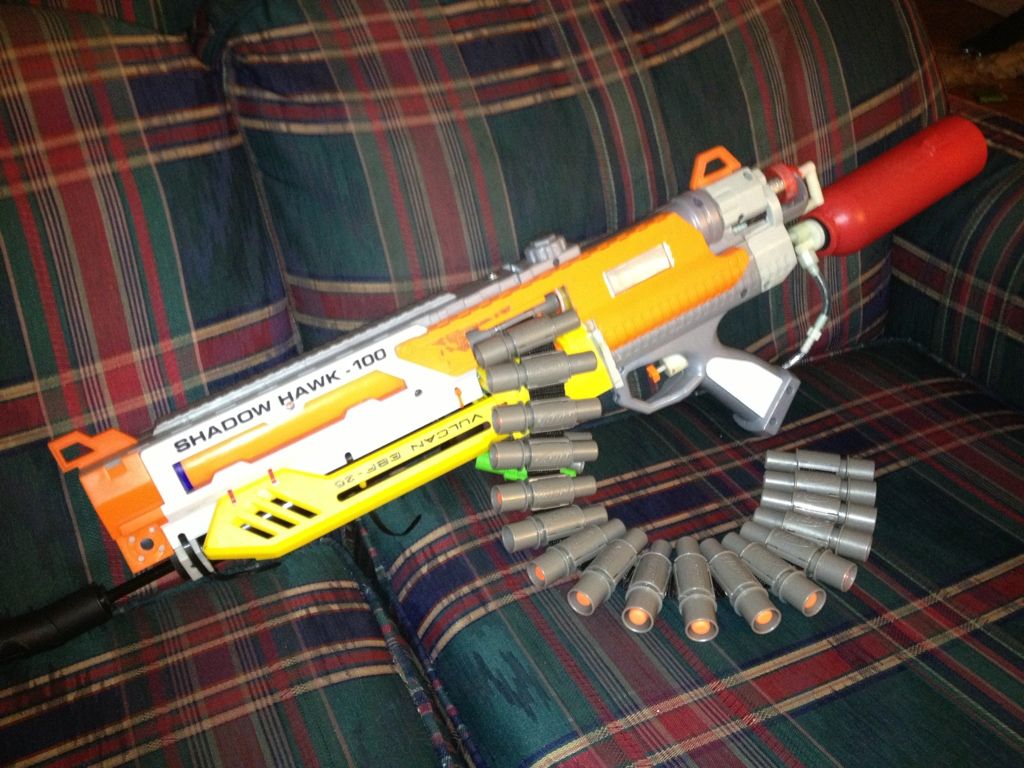
RF20 powered Vulcan

Crammed into a Shadow hawk (PICTURE HEAVY)

16 replies to this topic

#1 zx532

zx532

    Member

  • Members
  • 216 posts

Posted 19 August 2013 - 12:09 AM

It has been more than a year in the making but I have finally finished my belt fed RF-20 blaster. Most of the actual construction process in undocumented (Because frankly it was primarily trial and error). I will, however be going over the general function of the blaster itself, and if anyone is interested, I can draw up some actual plans to build it (and will probably be doing so for a MKII design anyway)

First a (probably incomplete) list of things used:
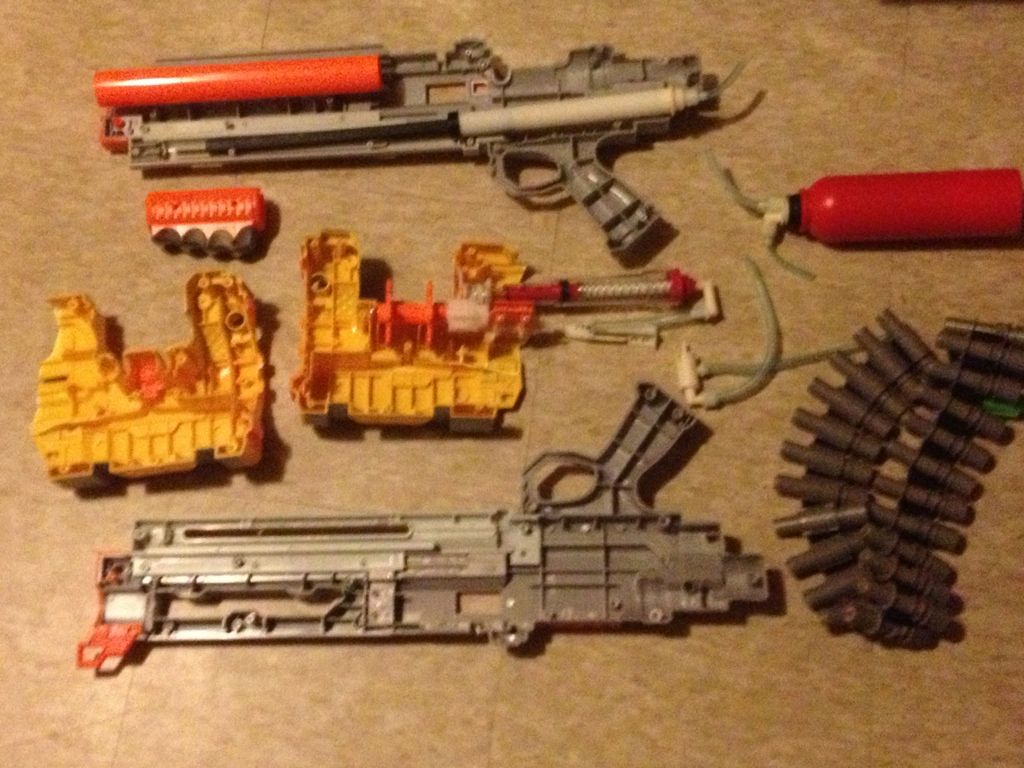
Posted Image
Shadow hawk shell
RF-20 (almost all of it)
Vulcan (the rotation mech, and associated shell pieces, and some other parts from other areas)
Zip ties (small and medium sized)
Random pieces of plastic/polycarb/whatever
Spare screws
Bell Airstrike 1000 pump, or whatever your pump of choice is (not pictured above)
Some nuts, bolts, and washers
Plastic welder (the epoxy stuff)
Tools, lots of them

First the shell:
Posted Image
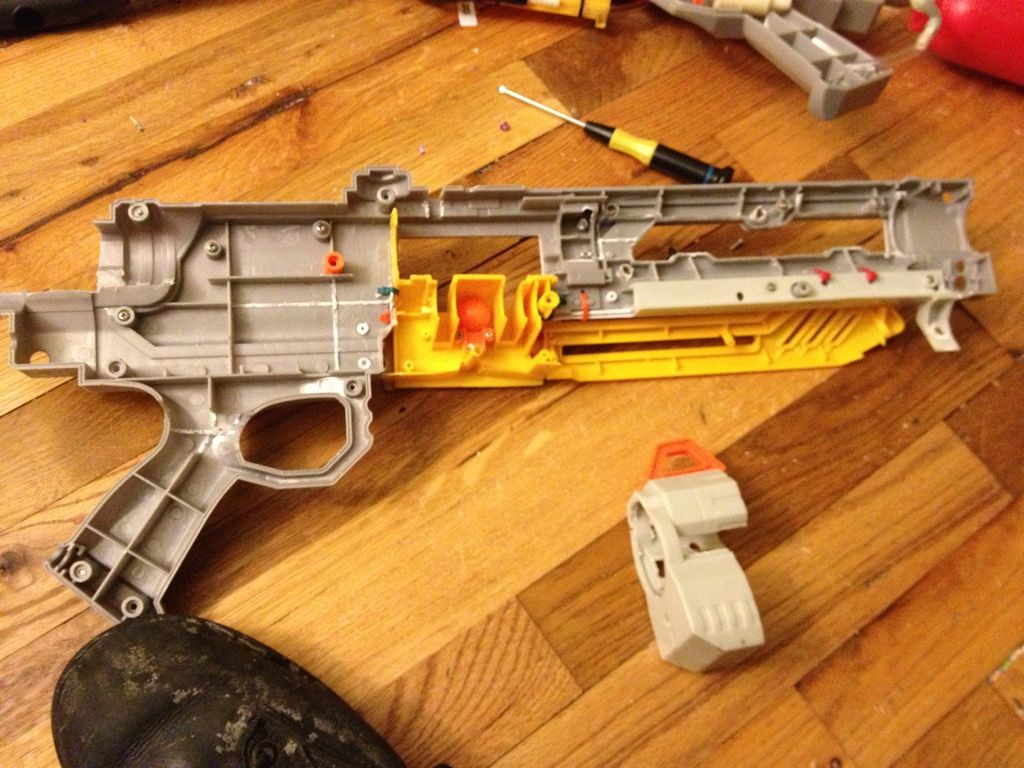
The shadow hawk shell is actually made of more rigid plastic than most Nerf brand blasters, it is also assembled in sections (each half is actually six pieces) this is both easier to work with because you don’t have to deal with the whole thing at once, and a pain because a lot of material has to be removed from certain areas, and the thing still has to hold together, lots of screw ports will be omitted.
The only parts of the Vulcan shell needed are the barrel insert, and the area where the chain goes. You don’t want the front wall, but the back one is very important for lining things up (more on that later)
the front part of the Shadow hawk shell gets lots of attention from the Dremel. Its original bore is around .25 inches, and the Vulcan barrel is a lot closer to 1.5 inches, so go crazy, but make sure it is straight. To accommodate your hand pump of choice, just cut the existing pump grip slide out (I left a part of the stop from the original grip on for aesthetic purposes.)
For the middle part of the shell, all you have to do is cut a section out of the shell wide enough to fit the part of the shell from the Vulcan. When epoxying this in place however, it is crucial that it is centered as perfectly as possible (I mechanically fastened it with zip ties and then used the epoxy, just to be sure). I attached pieces from the front of the Vulcan for structural reasons (also because I thought that they looked cool)
The rear section is relatively simple, some holes need to be drilled for air lines, and the space around where the RF-20 piston needs to move needs to be cleared up (you will probably have to go back and clear some more out later, I had to go back in there three or four times due to the piston rubbing on things and wasting energy

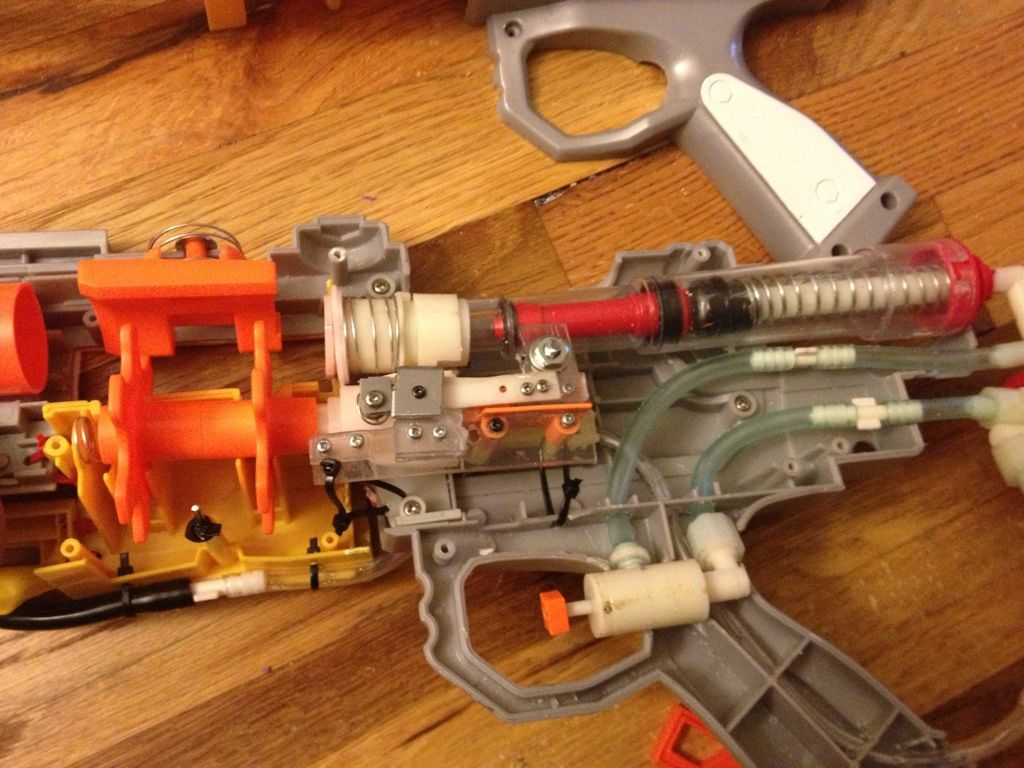
Next for the piston and related parts (pretty much everything but the rotation mechanism)
Posted Image
This is also around the point where documentation and specific dimensions is almost nonexistent (not that there has been much of it up to this point) so I apologize for that
The piston is secured to the rearmost part of the Shadow hawk shell (as it turns out it is the same thickness as the gap in the mount on the back of the piston)
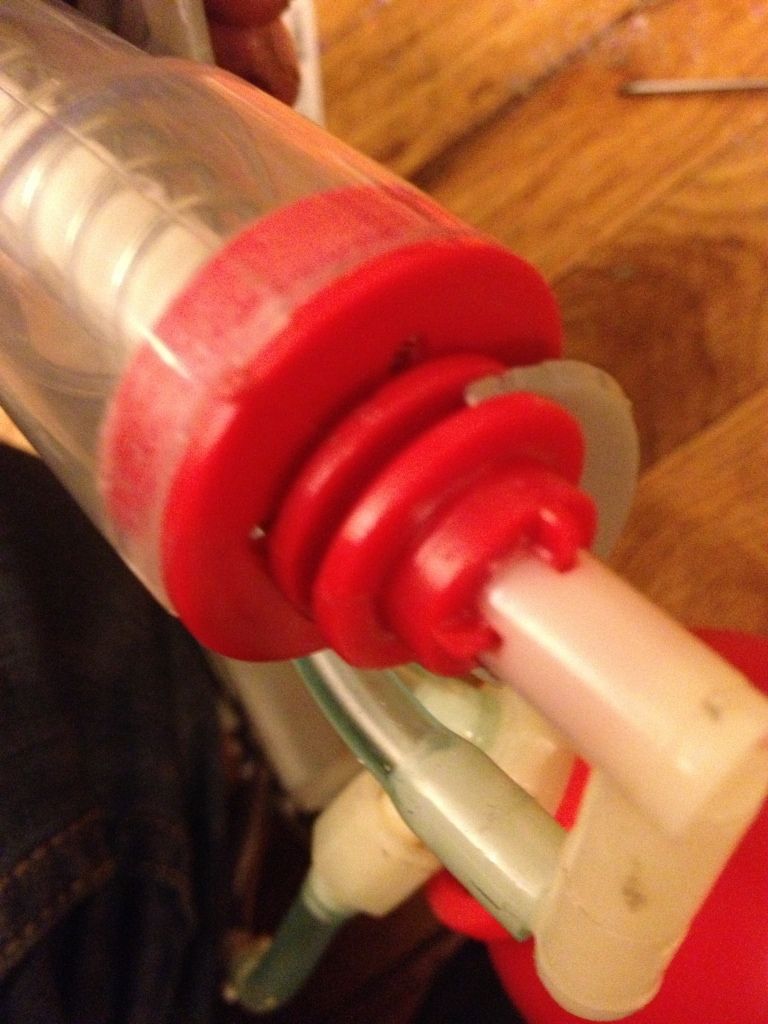
Posted Image
when supplied with air (using the stock RF20 trigger valve)
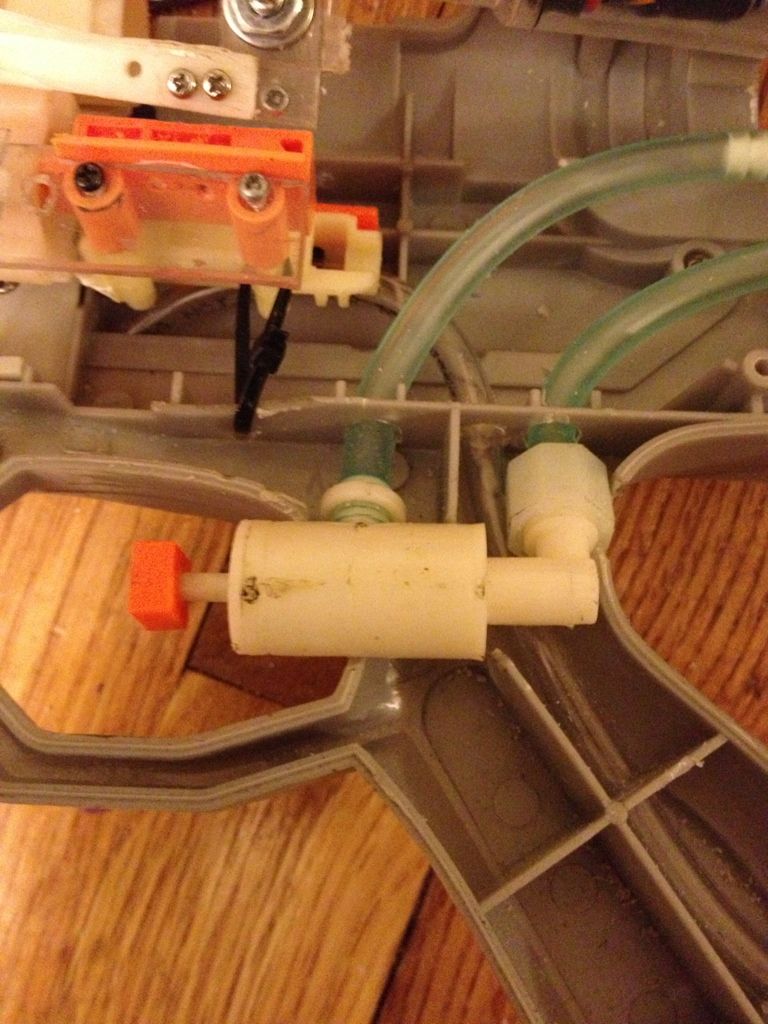
Posted Image
It moves forward until it meets up with and then pushes the part that seals against the Vulcan chain. The front RF20 seal has been super glued to the back of it, and part of the Vulcan plunger tube has been used to prevent the return spring from pulling the whole assembly out (another part of the plunger tube has been used as a guide)
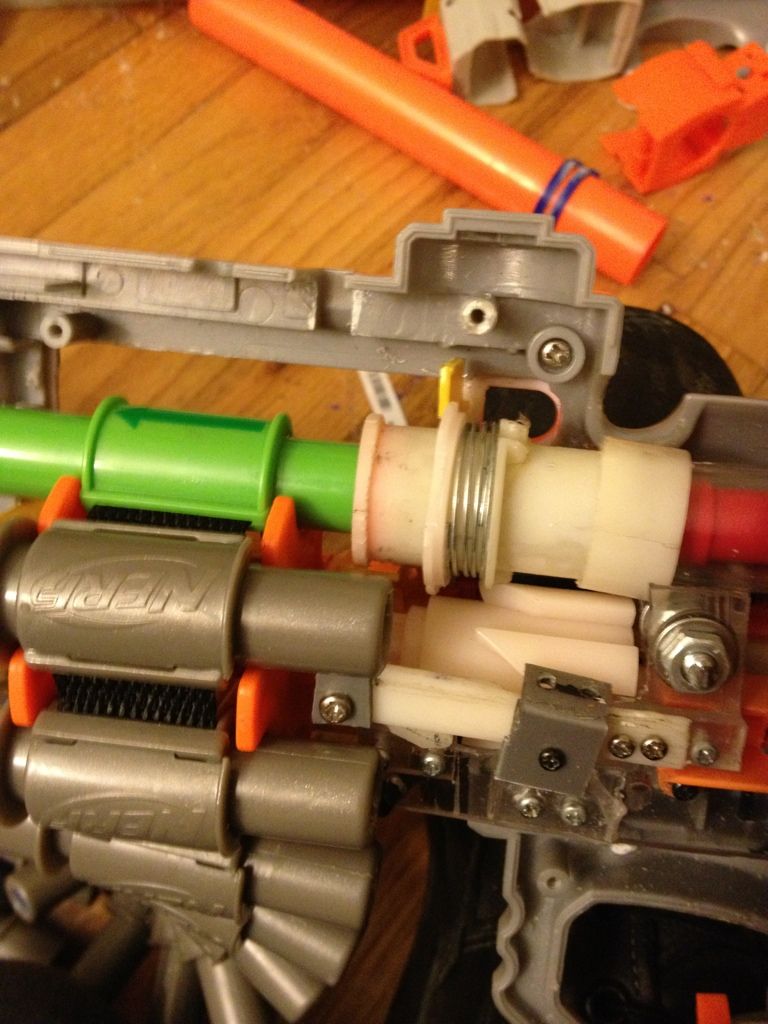
Posted Image
Posted Image

And now for the rotation mech:
Posted Image
Posted Image
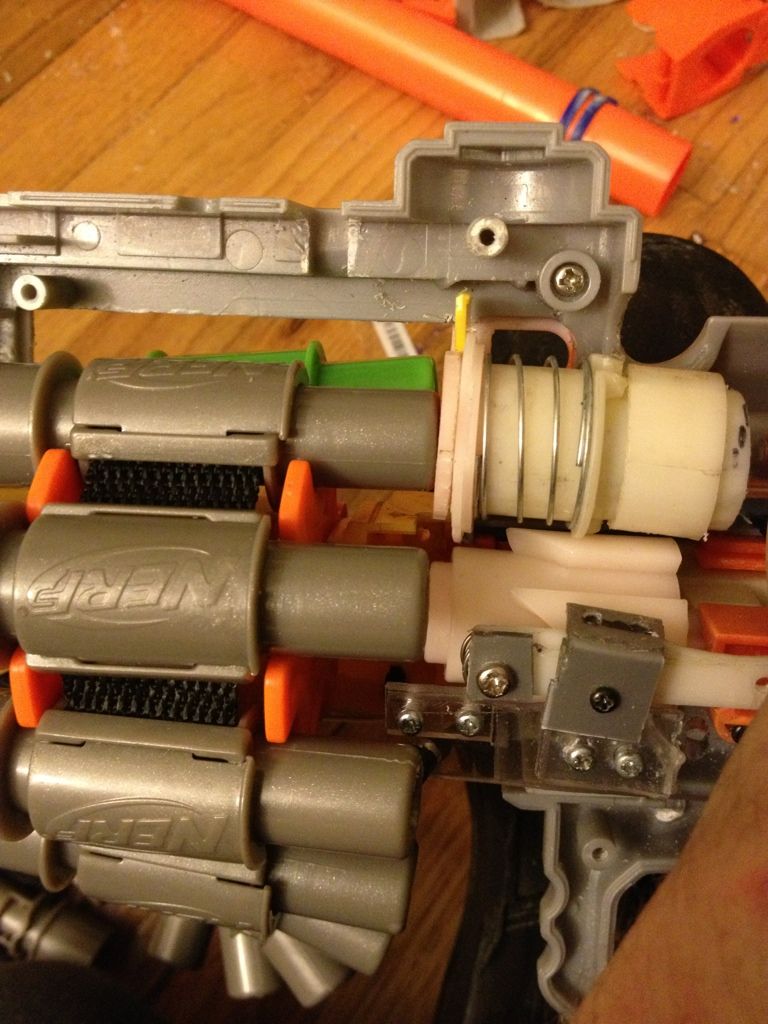
First off the stock mech in the Vulcan was actually broken in the one I found at the thrift store and the RF20 is a push-type rotation mechanism whereas the Vulcan is a pull-type. Anyone who has used a maverick will tell you how unreliable it is when the firing chamber advances at the same time as firing, so I had to start completely from scratch. The other important thing here is the location of the part that actually does the pulling, it has to be on the side in the same place as the Vulcan otherwise the rest state of the Vulcan belt won’t be lined up with the barrel and piston (and it won’t fire). Since this is the only part being attached to the Shadow hawk shell, I just made fine adjustments on the angle with zip ties so the belt sat in the correct place.
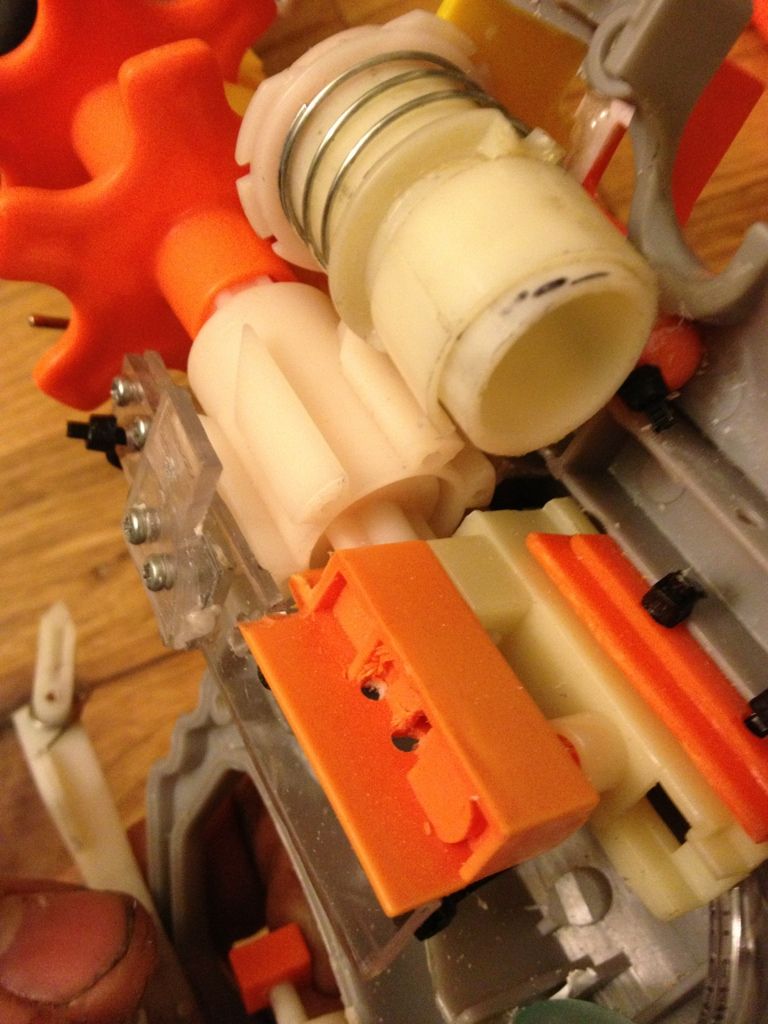
Posted Image
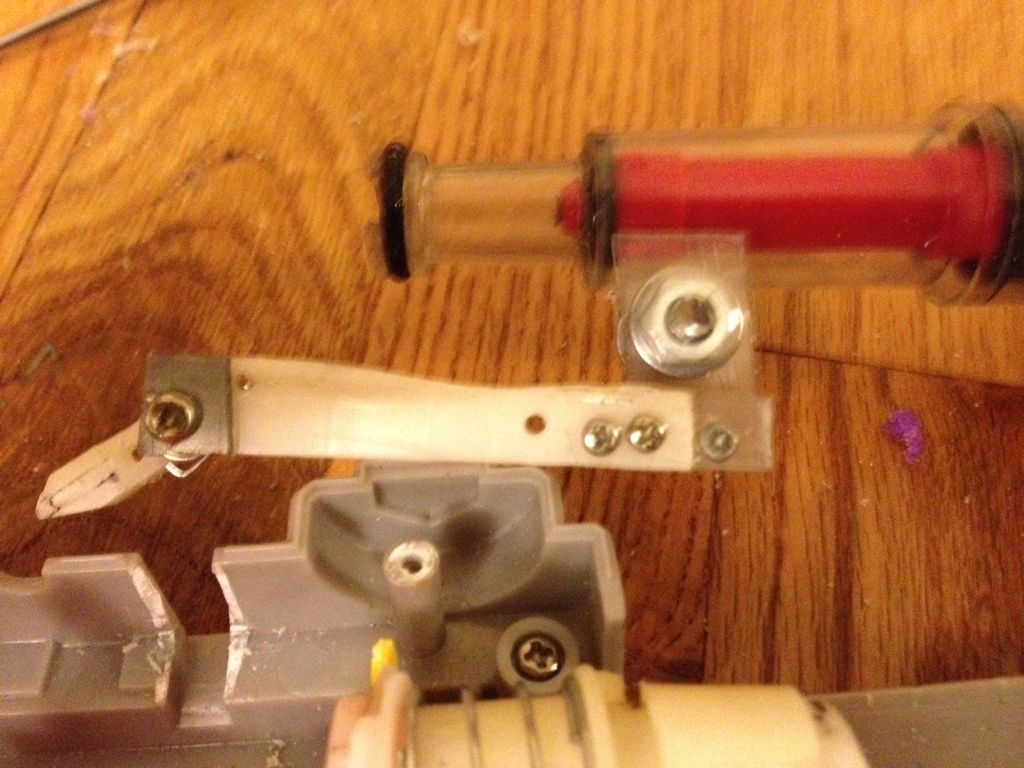
To get the spacing right between the rotation mech tab on the piston (which needs to be trimmed a bit to allow for full travel) and where the puller arm is just used a bolt, some washers and some nuts. That way it can be finely tuned and adjusted, when you get it right, use some blue or red Loctite on the threads to prevent the nuts from moving.
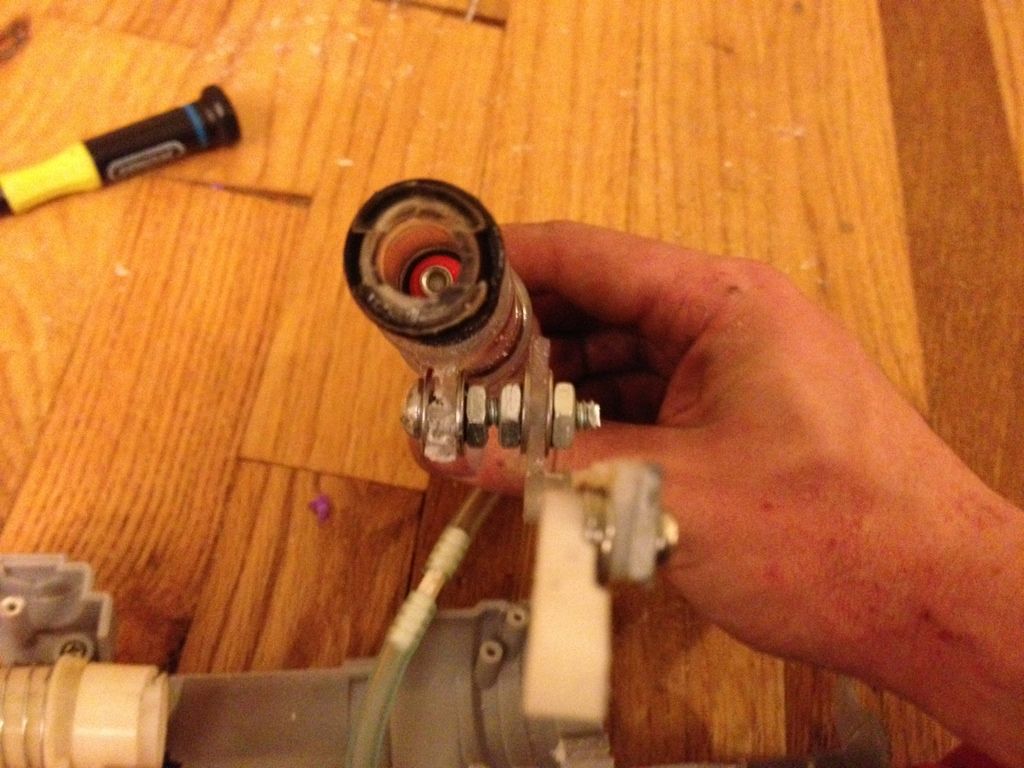
Posted Image
The other important part of the rotation mech is the chain tensioner (that little spring loaded piece in the big orange part that goes over the Vulcan chain) I just screwed a bolt and washer down through the center piece, a small amount also needs to be trimmed from the sides of the spring retaining circle just so that it fits in the Shadow hawk shell and can travel up and down freely. This part is important because it keeps pressure on the top of the chain so that it only moves when the rotation mech pulls on it (or when you are pulling it through)
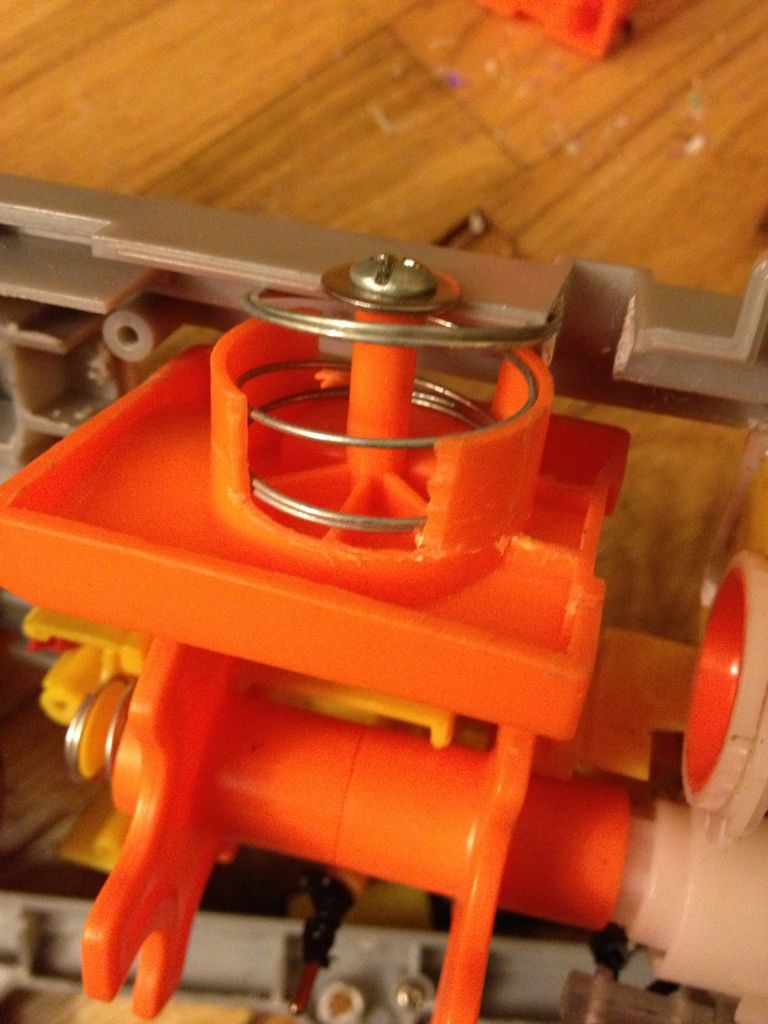
Posted Image

I probably missed some stuff (as I have said before documentation wasn’t very good) if you have any questions, ask me. And if you want plans, PM me and I’ll get them to you when they exist.
Also I can’t get a firing video as of right now (or rather, I can, but you would only get a few shots before it stopped) the piston needs a higher pressure than the stock RF20 due to the fact that it is doing more things.
Posted Image
  • 0
Progress: Just a long line of people saying "See? I told you it could be done"

#2 ultranewt

ultranewt

    Member

  • Members
  • 35 posts

Posted 19 August 2013 - 12:42 AM

Insanity at its finest! Its awesome to see a crazy idea work, whether its useful or not.
  • 0

#3 xXhunter47Xx

xXhunter47Xx

    Member

  • Members
  • 80 posts

Posted 19 August 2013 - 01:01 AM

I love it man.
Where and how did you come up with this idea?
  • 0

#4 andtheherois

andtheherois

    Member

  • Banned
  • 821 posts

Posted 19 August 2013 - 01:15 AM

Have you tried this with a lower ID pump? (such as a magstrike pump)? Larger pumps are better for volume, but don't work as well when the area being filled is less.

Edited by andtheherois, 19 August 2013 - 01:15 AM.

The YooToobz
Photobucket

Winning rounds is rewarding, deal with it. We don't play fucking patty cake over here.


#5 zx532

zx532

    Member

  • Members
  • 216 posts

Posted 19 August 2013 - 06:31 AM

I love it man.
Where and how did you come up with this idea?

Ever tried reloading an RF20? It's called 20 because that's how long it takes

Have you tried this with a lower ID pump? (such as a magstrike pump)? Larger pumps are better for volume, but don't work as well when the area being filled is less.

That makes no sense to me, isn't volume the only important factor when referring to performance of a pump?
  • 0
Progress: Just a long line of people saying "See? I told you it could be done"

#6 shmmee

shmmee

    Member

  • Members
  • 467 posts

Posted 19 August 2013 - 07:35 AM

That makes no sense to me, isn't volume the only important factor when referring to performance of a pump?

Volume is certainly one of the most important. The only bonus a smaller ID gives is that its easier for them to reach higher pressures at the cost of volume. You trade volume for potential psi as you get smaller. It's pneumatics. If you can fully pump your rf20 bladder without being fatigued I'd keep the pump you have.

Any chance we could see a firing vid? I'd love to see it working.
  • 0
"and we should respect the people who make our blasters. Even if we do molest the hell out of them..."
~BritNerfMogul


#7 zx532

zx532

    Member

  • Members
  • 216 posts

Posted 19 August 2013 - 07:48 AM

Volume is certainly one of the most important. The only bonus a smaller ID gives is that its easier for them to reach higher pressures at the cost of volume. You trade volume for potential psi as you get smaller. It's pneumatics. If you can fully pump your rf20 bladder without being fatigued I'd keep the pump you have.

Any chance we could see a firing vid? I'd love to see it working.

Ahh, that makes sense now

As far as the firing vid, there will be one, eventually right now it only fires a few times before stopping (RF20 bladder can't hold enough pressure for long enough) so I'm working on it, and will get back to you with that
  • 0
Progress: Just a long line of people saying "See? I told you it could be done"

#8 Exo

Exo

    Member

  • Members
  • 391 posts

Posted 19 August 2013 - 07:56 AM

Hehe, turducken.
  • 0

#9 NerfOfSteel

NerfOfSteel

    Member

  • Members
  • 31 posts

Posted 19 August 2013 - 08:03 AM

Of course, it's most important if it functions well, but that plus making it so nice and clean? That's even better.
  • 0
Do all those other toy blaster companies really need to exist? Think, people. think.

#10 Steampunkzombie

Steampunkzombie

    Member

  • Members
  • 53 posts

Posted 19 August 2013 - 10:20 AM

When the plans come out, I would love to get one. Nice work, I can't believe this works!!

Edited by Steampunkzombie, 19 August 2013 - 10:21 AM.

  • 0
My Youtube
My deviantART profile
Good things come to those who drink Pepsi
Your stupidity offends me

#11 shmmee

shmmee

    Member

  • Members
  • 467 posts

Posted 19 August 2013 - 11:07 AM

It may help to sleeve 2 sections of 1 1/2" bike inner tube over the bladder. I had to do that to mine on my semi-auto DTG. Wow that was tough but worth the PSI boost. I had to lube the tubes with dish soap, ditch the stock clamps and put a base layer of e-tape down before switching to hose clamps (the inner tube was being crushed through the clamp slots without the e-tape). It boosted the pressure from 30ish psi to 45ish psi (if memory serves). It will help with pressure, but not capacity.

Just make sure you don't get a thorn proof inner-tube. They're thicker on the OD of the tube, thinner on the ID.
  • 0
"and we should respect the people who make our blasters. Even if we do molest the hell out of them..."
~BritNerfMogul


#12 zx532

zx532

    Member

  • Members
  • 216 posts

Posted 19 August 2013 - 11:52 AM

It may help to sleeve 2 sections of 1 1/2" bike inner tube over the bladder. I had to do that to mine on my semi-auto DTG. Wow that was tough but worth the PSI boost. I had to lube the tubes with dish soap, ditch the stock clamps and put a base layer of e-tape down before switching to hose clamps (the inner tube was being crushed through the clamp slots without the e-tape). It boosted the pressure from 30ish psi to 45ish psi (if memory serves). It will help with pressure, but not capacity.

Just make sure you don't get a thorn proof inner-tube. They're thicker on the OD of the tube, thinner on the ID.

Good idea, I'll be sure to try that
Capacity isn't really an issue, it's pressure. The RF20 bladder clearly has the capacity for 20+ shots)
I just need to increase the pressure on that amount of air. And I'm sure that this isn't quite how pneumatics work, bit it's a step in the right direction.
  • 0
Progress: Just a long line of people saying "See? I told you it could be done"

#13 nine

nine

    Member

  • Members
  • 132 posts

Posted 19 August 2013 - 12:00 PM

Does this thing fire as fast as a stock RF20, or does the belt advancement slow it down? Also, if you ever find a Magstrike or something similar, you could take that bladder and add a second air resivoir. Doing that, along with the bike inner tube mod, may allow for a full belt to be fired.
  • 0

Everyone hates engineers because they listen to what you say and then think about it.


Check out my YouTube!


#14 Blue

Blue

    Member

  • Members
  • 2,222 posts

Posted 19 August 2013 - 12:23 PM

I like the creativity you used here. Keep up the great work!
  • 0

#15 zx532

zx532

    Member

  • Members
  • 216 posts

Posted 19 August 2013 - 01:28 PM

Does this thing fire as fast as a stock RF20, or does the belt advancement slow it down?

It is slower than an RF20, but faster than a Vulcan. The belt slows it down, and moving the belt rear seal also slows things down (because the seal has a return spring, that spring is also the reason for the pressure related problems)
  • 0
Progress: Just a long line of people saying "See? I told you it could be done"

#16 FeFish

FeFish

    Member

  • Members
  • 14 posts

Posted 21 August 2013 - 07:01 PM

How about a firing test video?
  • 0
It's Fe Ferris as in Iron the element

Selling pair of steampunk hand painted Mavericks 40$ and Steampunk Barricade with stock and scope 50$ PM me if interested. get them while you can

#17 Datum

Datum

    Member

  • Members
  • 21 posts

Posted 21 August 2013 - 07:40 PM

That's just beautiful! I've been wanting to do something like this for a while, I love it!

You should attach an external tank to this and really chew through some darts!
  • 0


0 user(s) are reading this topic

0 members, 0 guests, 0 anonymous users