Jump to content


Photo

Nite Finder Ppk W/maglite


35 replies to this topic

#1 Hunter

Hunter

    Member

  • Members
  • 312 posts

Posted 25 June 2004 - 08:07 PM

I present you, the Nite Finder PPK w/Maglite.

I wanted to do a PPK downsizing inspired by Zero's, which was sleek, sexy, and compact, but I didn't want the light to go to waste. I believed it had... potential. I rewired it to a downsized maglite, great for indoor and night wars. This idea for an LED was brought to me by this thread and Grinch (who recently impressed me with his airbrush skills).
Here is my creation. I still need to add a barrel to it, but I wanted to stick it together and see if the wiring worked. More information on request, and finished pictures soon to come.
Posted Image
Posted Image
Posted Image
Hunter

Edited by Hunter, 25 June 2004 - 08:12 PM.

  • 0
Hunter
Organizer Vancouver Area Nerf Series

#2 CheeseNerfer

CheeseNerfer

    Member

  • Members
  • 246 posts

Posted 25 June 2004 - 09:01 PM

shweeeet!

I was thinking about that but decided against it, what you want is a small maglight with red lense and a laser pointer so you can be acurate and blinding at the same time.
  • 0
"Ahh The Power Of Cheese"


#3 Jangadance

Jangadance

    Member

  • Members
  • 676 posts

Posted 25 June 2004 - 09:28 PM

Uhh what are you gonna do with the barrel though? For some reason, I think the stock barrel works just fine. 60' with my mods, and quick reload time.

If you took a flashlight and hacked off the back that stored the batteries, then wired it to the battery compartment in the handle, I commend you on the good work. That will really look cool with a new barrel and possibly paintjob on it too. Nice job.
  • 0
"The 'dance goes on..."

#4 Hunter

Hunter

    Member

  • Members
  • 312 posts

Posted 26 June 2004 - 01:24 PM

No, Cheese, I don't think I'll stick on a lazer sight, also.

Janga, I know the stock barrel works decently, but ranges on Rag's PETG seem higher than what I am achieving now. Also, I wanted to do the PPK downsizing, which rids the gun of the stock barrel. And, yes, I opened the maglite, downsized it, rewired it. But please note, it really wasn't just a matter of "hacking".

Currently I am applying a 4" brass barrel. I have also made a "silencer" (totally fake, looks good) which will also support the brass. Due to the addition of 1/2" CPVC, I will need to dremel a bit more of the case.

I will try to have more pictures up during the day. One with finished barrel and silencer. Then I'll start painting it, so finished pictures should be up in about 2/3 days. I'm trying to make the deadline for the NHQ Paint Job Contest.
I'm thinking of Flat Black. I dont know weather to leave the "knobs" as is or also paint them black. Black "silencer", and you will be able to see the brass through it. I'll leave the trigger (and maybe plunger) orange, for safety. What do you guys think? Oh, ya, I also got some Fine Detail Metalic Silver paint... maybe I can find something to make Silver... like the "guiding pin" at the top part of the plunger shaft.

I just want to hear people's opinions on this mod and future paint job. Thanks.

Update: Plumber's Goop is drying (brass barrel), "Silencer" just been primed.
Comming Soon: In 24 hours I will dremel the rest of the casing to house the new barrel, paint the "silencer" black, and prime the casing.

Edited by Hunter, 26 June 2004 - 07:57 PM.

  • 0
Hunter
Organizer Vancouver Area Nerf Series

#5 Hunter

Hunter

    Member

  • Members
  • 312 posts

Posted 27 June 2004 - 12:14 PM

Ah-Buh-Bup! *bump*

Sorry for the bump. Frankly, I couldn't stand to see my creation go to waste so I wanted to bring it back to the top.

Update: I have primed the shell (black paint tomorrow morning), the barrel is Gooped to the plunger tube, and the silencer is Gooped onto it for support.

Still hoping for input/opinion on this mod and paintjob.

Edited by Hunter, 28 June 2004 - 12:47 AM.

  • 0
Hunter
Organizer Vancouver Area Nerf Series

#6 Katachi

Katachi

    Member

  • Members
  • 138 posts

Posted 27 June 2004 - 03:50 PM

Ah-Buh-Bup! *bump*

Sorry for the bump. Frankly, I couldn't stand to see my creation go to waste so I wanted to bring it back to the top.

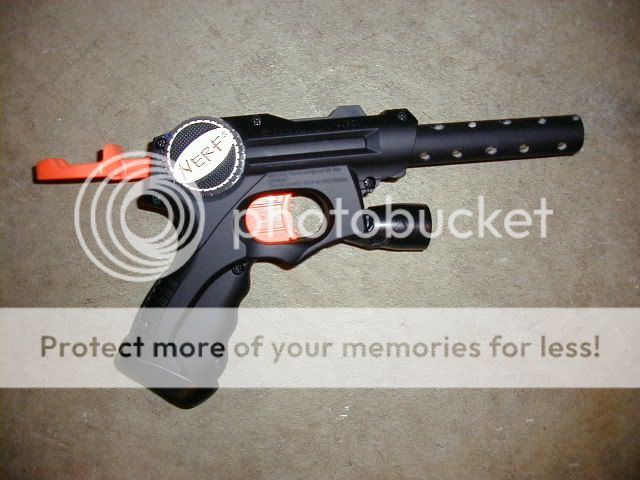
Update: I have primed the shell (2nd coat in 45 minutes), and painted the silencer black. I've also gooped 1/8" of FBR on the inside of the plunger tube, inside the cap piece. Hopefully it will silence it a bit.

Still hoping for input/opinion on this mod and paintjob.

PS. Like my signature? I found that while reading DBF. Damn, thats good. Props to Cxwq for that. Hilarious.

Yeah here's some input:

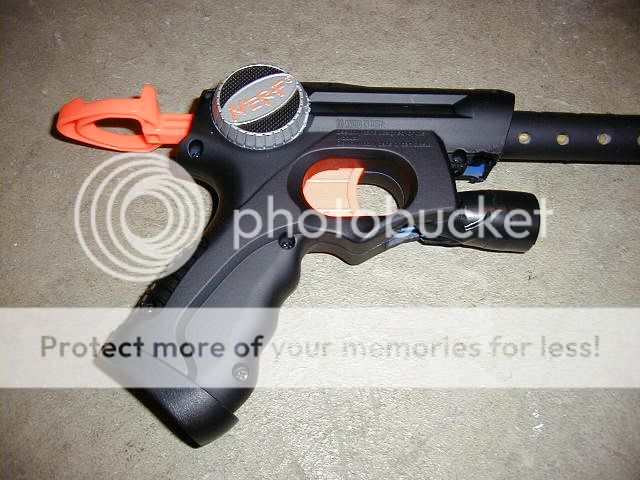
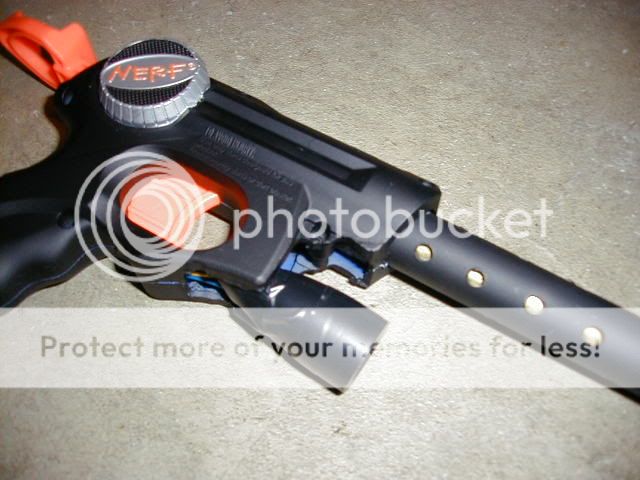
Get rid of the damn electrical tape.
Clean up those rough edges.
Fill in those holes with some putty.
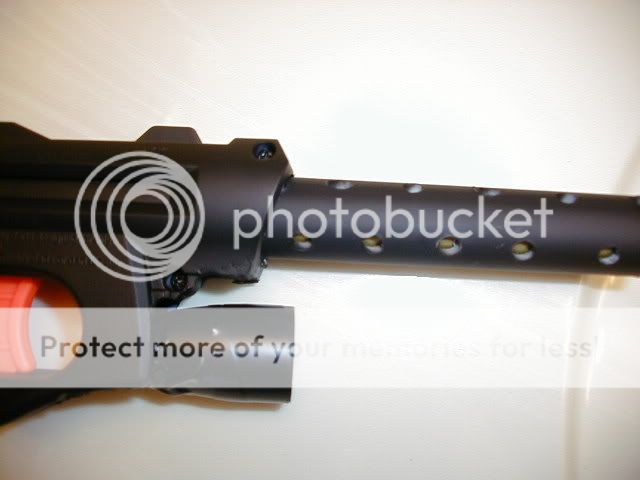
Put a barrel on it.

----------------------------------------------------------------------------------------------
EDIT:

Hey, it's four simple things you could do to keep it from looking like such a hack job. But it did occur to me after you PMed me that you might actually in fact BE 10 or 12 years old and not so experienced in working with the tools/materials needed, in which case, I apoligize and great job! That's a good start! Here's how you can make it look better :) :

SANDPAPER! GET SOME!
Start with about a 130 grit and get those nasty chunks off! Take about 4 different sheets between 130 and 220 and clean those edges up.

TAPE ON THE OUTSIDE OF A GUN IS FOR 9 YEAR OLDS!
If you REALLY want to attach that mag light tip to the gun, there's plenty of other things to use. First off, you probably just unscrewed it from the mag light. Try finding another threaded piece, or cut the first 3/4 inch off the rest of the mag light and permanently attach that. This way, you can still unscrew the light and lens. Other alternatives include Gorilla Glue, hot glue, or bondo. Just gob that stuff in the hole and when it's dry, sand it!

YOUR WIRES ARE SHOWING!
Those holes are just downright nasty looking! Fill em in! All you need is some bondo. I use the stuff all the time on my resin work, it's amazing. It's like clay you can sand. Just gob some in the hole, let it dry, and sand it smooth. Then you can paint it and NO ONE WILL KNOW THERE WAS A HOLE THERE! If you still want to have gun halves instead of sealing it up with one big ol gob of Bondo here's what you can do:
Take the two gun shell halves. Put masking tape sticky side down over the gun shell where the holes are. Do this on both halves so that when you put them together, you have a masking tape seam running down the crack between the two halves. Now you can fill in both halves, and there will still be a division between them in case you need to take the gun apart again.

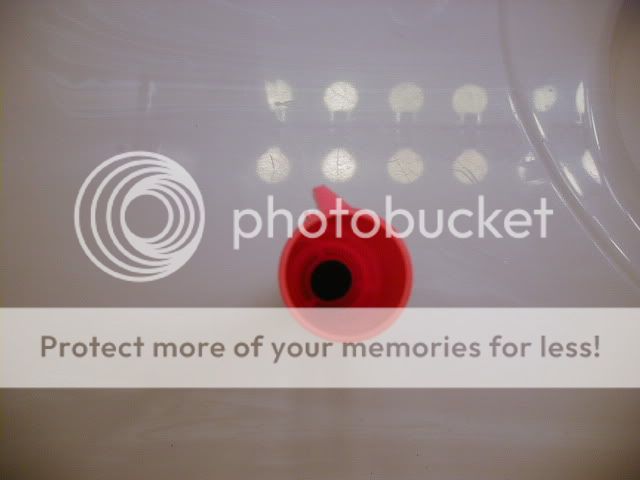
WHERE'S THE DART GOING TO GO??
I know you're already working on a barrel, and I can't wait to see it! Great idea, making the rifled barrels and "silencer" style barrels on the guns. Defnately adds a personal touch.

Edited by Katachi, 27 June 2004 - 09:25 PM.

  • 0
"If I want something pretty, Ill paint a picuture. Courtesy of Shortshit" -THIRST

#7 Hunter

Hunter

    Member

  • Members
  • 312 posts

Posted 28 June 2004 - 12:19 AM

Ok...
Lets address this one at a time:
1: I'm 15. I'm no idiot. As long as you don't talk to me like a small child, I'll listen. So, if I'm a little kid I did great, but if I'm older I suck? Harsh, man. For that I stick my tongue out at you.
:huh:
2: It looked a bit hacked up. Please realize I had accomplished something that no one else had so I was excited to stick up pictures. Since then I've made it look much nicer.
3: The light was not taped on. There was tape around the light to prevent in from falling apart, but it was not taped on the gun. Again, I was anxious and pround.
4: I really like the putty idea.. may use that.
5: I addressed the barrel issue. Yet again, I wanted to stick pictures up. I was happy. Forgive me for my haste.

It will blow u away when it's done. :D

Edited by Hunter, 28 June 2004 - 12:46 AM.

  • 0
Hunter
Organizer Vancouver Area Nerf Series

#8 Katachi

Katachi

    Member

  • Members
  • 138 posts

Posted 28 June 2004 - 01:25 AM

Ok...
Lets address this one at a time:
1: I'm 15. I'm no idiot. As long as you don't talk to me like a small child, I'll listen. So, if I'm a little kid I did great, but if I'm older I suck? Harsh, man. For that I stick my tongue out at you.
:P
2: It looked a bit hacked up. Please realize I had accomplished something that no one else had so I was excited to stick up pictures. Since then I've made it look much nicer.
3: The light was not taped on. There was tape around the light to prevent in from falling apart, but it was not taped on the gun. Again, I was anxious and pround.
4: I really like the putty idea.. may use that.
5: I addressed the barrel issue. Yet again, I wanted to stick pictures up. I was happy. Forgive me for my haste.

It will blow u away when it's done. :D

1. You're doing an awesome job. I just pulled a couple numbers out of my butt, since from looking at the war pics on this board, most people here pretty young. What I meant was, If you're old and have been doing this for a long time and that's the best you can do, try harder. If you're new at it and are working hard, great job! Some people don't have the skills to finish the job and just leave a gun at that stage.

After seeing the "snow camo" paintjob, I have faith in your painting skills, but if you were to leave the gun like that, it would be like putting a $1000 paintjob on a $200 car... >_<. Your PPK is a brilliant idea for that little gun, and the "silencer" excuse for having a long barrel on it is perfect. I'd hate to see you screw it up by not cleaning up those ROUGH edges, and leaving big ol gaps in the gun. You said you were adding the barrel, but didn't say the gun was 60% or 80% complete. Seriously, do it right, and people will sit up and take notice. That's gonna be a great little gun when it's done. And hell, if you have the sanding tools and the bondo, why not just take those goofy "knobs" off the gun too? These things are so cheap that if you screw it up, you can always get another one and use the messed up shell one for parts.

Edited by Katachi, 28 June 2004 - 01:28 AM.

  • 0
"If I want something pretty, Ill paint a picuture. Courtesy of Shortshit" -THIRST

#9 Hunter

Hunter

    Member

  • Members
  • 312 posts

Posted 28 June 2004 - 01:41 PM

I already PMed you about the Snow Camo, I think you have me confused with the almighty Grinch and his painting skills.

Well, if you weren't sure about the barrel before, look at her now.
Posted Image
Posted Image
This last pictures shows inside the plunger tube. As you can see, I Gooped 1/8" or 1/2" FBR to hopefully silence some of the noise. It's a wierd looking picture, and those who are not familiar with the NF's internals will not understand it, so don't bother asking.
Posted Image
I think I should have finished pics up for tomorrow.
Hunter

PS. You can't really tell from the pictures, but you can see the brass barrel through the silencer's holes. In the words of a superior, "Ah, the unholy glow of brass." It does look pretty sweet.
Also, I gooped all of the seperate pieces of the plunger tube together to ensure nothing falls apart and no air leaks out.

Edited by Hunter, 28 June 2004 - 01:44 PM.

  • 0
Hunter
Organizer Vancouver Area Nerf Series

#10 Katachi

Katachi

    Member

  • Members
  • 138 posts

Posted 28 June 2004 - 04:08 PM

I already PMed you about the Snow Camo, I think you have me confused with the almighty Grinch and his painting skills.

Well, if you weren't sure about the barrel before, look at her now.This last pictures shows inside the plunger tube. As you can see, I Gooped 1/8" or 1/2" FBR to hopefully silence some of the noise. It's a wierd looking picture, and those who are not familiar with the NF's internals will not understand it, so don't bother asking.

I think I should have finished pics up for tomorrow.
Hunter

PS. You can't really tell from the pictures, but you can see the brass barrel through the silencer's holes. In the words of a superior, "Ah, the unholy glow of brass." It does look pretty sweet.
Also, I gooped all of the seperate pieces of the plunger tube together to ensure nothing falls apart and no air leaks out.

Yeah that's what it is. NHQ's forum makes posts quoting people look like the orignal posts...

Anyway, lookin good! How's the rest of the gun coming? Are you going to keep it or sell it? These guns are cheap enough were you could probably mod and sell them. I'm going to range test mine and put it up on Ebay just to see what happens.

Edited by Katachi, 28 June 2004 - 04:09 PM.

  • 0
"If I want something pretty, Ill paint a picuture. Courtesy of Shortshit" -THIRST

#11 NinjZ

NinjZ

    Member

  • Members
  • 1,005 posts

Posted 28 June 2004 - 05:58 PM

Cant wait to see it all assembled dude.
  • 0

#12 Hunter

Hunter

    Member

  • Members
  • 312 posts

Posted 28 June 2004 - 08:03 PM

It's a beauty.

Here we go:
4" of 9/16" K&S brass barrel
3/4" of 17/32" K&S brass nested
4" of 1/2" CPVC "silencer" for support
PPK downsizing (remove barrel support, light housing, and ammo holders)
Elastic banded
Rewired to fit Maglite on trigger pressure
Flat black, plunger and trigger orange for safety.

It almost looks a bit more.. USPish than PPKish, no? Well, it's a PPK downsizing mod...

The only thing I have left to do is take Katachi's advice and pick up some Bondo. I'll be hoping to finish that within the week. Right now, just ignore the gaps around the front. They will be bondoed (sp.. lol) and painted flat black. Electricians tape will be taken off when bondo is applied, right now it's the only thing holding the pieces of the light together.

Ranges soon to come. I've only shot it once, without bands, and I'd say it was getting around 50'. With bands, I'm hoping for around 70'...

Also, the bit of FBR I had hoped would silence it... ya.. it doesn't. Don't bother.

Enjoy.

Posted Image
Posted Image
Posted Image
Here are the gaps. Imagine these filled with Bondo and flat black. It will really finish off the front nicely. Katachi, I will ask for some help with the bondo when I get it.
Posted Image
Posted Image

Edited by Hunter, 28 June 2004 - 10:11 PM.

  • 0
Hunter
Organizer Vancouver Area Nerf Series

#13 NinjZ

NinjZ

    Member

  • Members
  • 1,005 posts

Posted 28 June 2004 - 08:11 PM

I like it man, very nice job.

Take a fe wmore pics and try lighting it differently to get some good shots. More light can never hurt.
  • 0

#14 Hunter

Hunter

    Member

  • Members
  • 312 posts

Posted 28 June 2004 - 08:20 PM

Alright, a bit better lighting.

Posted Image
Posted Image
Posted Image
  • 0
Hunter
Organizer Vancouver Area Nerf Series

#15 NinjZ

NinjZ

    Member

  • Members
  • 1,005 posts

Posted 28 June 2004 - 08:24 PM

Their ya go dude, shows it in all its glory and detail. Good job dude. Submit that over to NHQ contest quik. In my opinion youve got the best NF so far.
  • 0

#16 Katachi

Katachi

    Member

  • Members
  • 138 posts

Posted 28 June 2004 - 10:57 PM

very nice!you can hardly tell it was a Night Finder now!
  • 0
"If I want something pretty, Ill paint a picuture. Courtesy of Shortshit" -THIRST

#17 Techno-Dann

Techno-Dann

    Member

  • Members
  • 120 posts

Posted 29 June 2004 - 01:58 PM

I hate you, Hunter. Now I'm going to have to repaint all of my Nite Finders. ^_^
That is one sweet looking gun.
  • 0
Do not mess with CXWQ, for he has Admin powers and will bann your flaming little a**.

Techno-Dann of the Seattle Tactical Nerf Team

#18 ompa

ompa

    Introductinator

  • Moderators
  • 2,368 posts

Posted 29 June 2004 - 02:01 PM

Nicely done Hunter.. I think I'll do something similar with mine, except replace the light with a small LED I have. Nice job, looks great, now I just have to get my other NF back from my friend so I can mod it...

~ompa
  • 0

#19 blink 182

blink 182

    Member

  • Members
  • 421 posts

Posted 29 June 2004 - 03:45 PM

If it’s not too much trouble I would be interested in knowing about the internals. How you hooked up the flashlight into the trigger. Thank you

<Blink>
  • 0
New Price On Freedom, Buy Into It While Supplies Last...


#20 Techno-Dann

Techno-Dann

    Member

  • Members
  • 120 posts

Posted 29 June 2004 - 07:19 PM

I'd guess that Hunter used the built-in switch and wiring, and put the flashlight bulb and reflector assembly on the front. I'm not familiar with how maglites work, but I'd guess that he opened it up as if to replace the batteries, and then put the bulb part onto the gun.

It's sort of like what I'm planning to do to my NFs, but I'm planning to put the bulb and reflector inside the old light housing, and add an override switch on the side of the gun.
  • 0
Do not mess with CXWQ, for he has Admin powers and will bann your flaming little a**.

Techno-Dann of the Seattle Tactical Nerf Team

#21 Nerfman2222

Nerfman2222

    Member

  • Members
  • 109 posts

Posted 29 June 2004 - 07:33 PM

You know what would really look cool......... If some how you could chop off that circle that says nerf on it.

Just a thought
  • 0

#22 Hunter

Hunter

    Member

  • Members
  • 312 posts

Posted 29 June 2004 - 07:49 PM

Blink, I've PMed you detailed instructions.
Techno, you've almost got it. I took off the battery casing, but I also cut down the middle section, between the battery casing and the reflector. It's just a matter of cutting and downsizing. What I like about the Maglite head is that it's signifigantly smaller than the original light housing unit, remember this when your doing your mod. How big can the gun be? It's needs to be an easily hosterable pistol, in my case.
Nerfman, The casing doesn't really allow for that, although I might try it when I get my hands on some Bondo. My only hesitation is that I only have this 1 Nite Finder... so if a mess it up it will make me cry.
  • 0
Hunter
Organizer Vancouver Area Nerf Series

#23 Katachi

Katachi

    Member

  • Members
  • 138 posts

Posted 29 June 2004 - 08:15 PM

Nerfman, The casing doesn't really allow for that, although I might try it when I get my hands on some Bondo. My only hesitation is that I only have this 1 Nite Finder... so if a mess it up it will make me cry.

They're 7 bucks. I might get another one this weekend. I have a friend who is going to strip it down to the core of the gun, kinda like yours, but he's taking the knobs off. It's just a matter of sanding and filling proper. ^_^ Just comes with practice.
  • 0
"If I want something pretty, Ill paint a picuture. Courtesy of Shortshit" -THIRST

#24 Hunter

Hunter

    Member

  • Members
  • 312 posts

Posted 29 June 2004 - 08:20 PM

It's not that easy. I got my NF from Zero who picked up a few from California. See my problem? They don't sell them near me to the best of my knowledge.

Edited by Hunter, 29 June 2004 - 08:43 PM.

  • 0
Hunter
Organizer Vancouver Area Nerf Series

#25 Katachi

Katachi

    Member

  • Members
  • 138 posts

Posted 29 June 2004 - 08:40 PM

It's not that easy. I got my NF from Zero who picked up a few from California. See my problem?

Not really ^_^ don't they sell them by you? If not, I could always pick you up one and ship it to you.
  • 0
"If I want something pretty, Ill paint a picuture. Courtesy of Shortshit" -THIRST


0 user(s) are reading this topic

0 members, 0 guests, 0 anonymous users