Jump to content


Photo

Warhammer 40k Bolter


6 replies to this topic

#1 hummer

hummer

    Member

  • Members
  • 217 posts

Posted 28 May 2013 - 11:36 PM

+++ Incoming Transmission +++

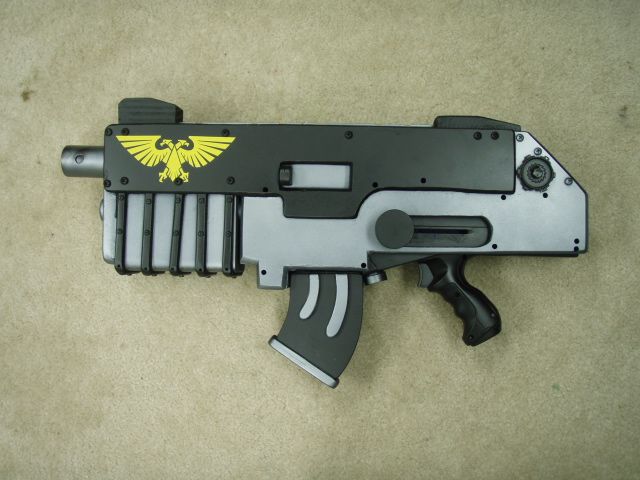
Hello, fellow forgers, this is Hummer. I have crafted a Bolter that fires nerf rounds and has more special features than you can swing a chainsword at.

First, have some photos of the finished product:
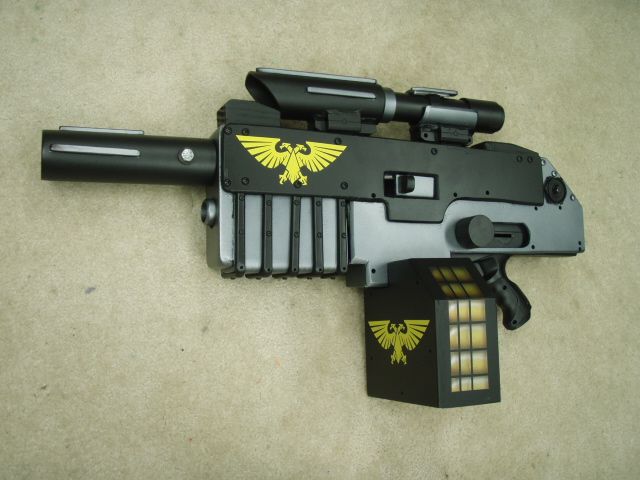
Posted Image

Posted Image

“Zion” Pattern Bolter Specs Without Stalker addons:

- 9 Pounds

- 27” Long (Barrel to end)

- 3 1/4” Wide (Side to Side)

- 12” Tall (Iron Sight to bottom of grip)

- 60ft Range

- 2/3 scale of a space marine bolter (Roughly)

- Awesome level: Off the charts

Now I know you're all here to see how I did it, but before we get into the how-to section, I'd like to pause for a moment to emphasize the importance of safety. Demonstrated by Louiec3:

Posted Image

Take careful note of the Buzz Lightyear safety gloves along with the old man glasses. The Wiggles poster reminds us to be safe at all times...

+++ Forging Preparations +++

Special note: Anything with an *Astrix* around it means it not necessary to use/make the most basic form of this bolter.

+++ Tools +++

Scroll saw

Hacksaw

*Band Saw*

Dremel tool

Drill

File

Sandpaper

Hot Glue gun

*Belt Sander*

*Adjustable wrench*

*Lathe*

*Popsicle Stick*

*Lighter*

+++ Materials +++

Nerf Longshot……………………………………..……….……………………………..….........................……($30)

*(2) Nerf Longshot scopes*

*(2) Small Nerf Big Bad Bow Wheels*

*(1) Recon Barrel*

*Bandoleer*……………………………………………….……………………………….........................…..…*($15)

Hot Glue

Wood Glue

*Wood Putty*

Plastic epoxy

(1) 8" wide, 3/4" thick piece of wood…………………….………………………………................….……($3)

(3) Polycarbonate 12" x 24", Clear, 1/4" thick …………..…………………………........……..…....($70)

I got mine on and then searched with this number: 8574K43. If this number does not work, I used 0.125” thick Polycarb.

Resin……………………………………………………………………………………….............................…...….($10)

I got mine at Klockit and then searched with this number: 8574K43. If this number does not work, I used 0.125” thick Polycarb.

Resin……………………………………………………………………………………….............................…...….($10)

I got mine at Klockit and got the smallest bottle set

Aluminum piece for boltsled reinforcement……….…………………………………………........(Freebie)

(1) 9 1/2" Length of 1 1/4" PVC……………………...………………………………...............……………..($2)

(1) 8" Length of 3/4" PVC……………………………...…………………………………...................…………($1)

*(2) 8" Length of 2" PVC*………………………………...………………………………...............…….*($3.50)

*(2) 1 1/4" PVC couplers*………………………………...……………………………………................*($0.80)

*(1) 1/2" length of 1/2" PVC………………...………………………………………………...............……..*($1)

Screws........................................................................................................................(Freebie)

Bolts...........................................................................................................................(Freebie)

Washers.....................................................................................................................(Freebie)

*Flashlight*…………………………………………………………………………….......................…………..*($15)

*Sound Card*…………………………………………………………………………………......................…..*($10)

I got mine on ebay, try searching "Recording module with push button"

*(2) 1/2" Wire Rope Clip* (Suitable substitute: U-Bolts)...............................(Freebies)

*(2) 2” Length of 1 ¾” PvC rod*...............................................(Courtesy of Louiec3)

*(1) 4” Length of 5/32" K&S Music Wire*...................................(Courtesy of Louiec3)

*(1) 2 1/2" dia. Magnet*………………………………………………...............………………………..*($7.50)

*Green stuff* ………………………………………....................……………………………………………...*($10)

I got mine at The War Store

*Parchment-esque Paper*..........................................................................(Freebie)

*Acrylic Red paint*……………………………………...................…………………………………………….*($3)

*Mud-colored wash*…………………………………..................…………………………………………..…*($3)

Base Cost total…….………….....……………...................……………………………………………….$116.00

With all addons total.…….……………...................………………………………………………………$184.80

+++ Forging +++

+++ The Longshot +++

(tl;dr of this section: USE. RESIN.)


You can modify your longshot to your liking, but I highly recommend you do the first on this list:

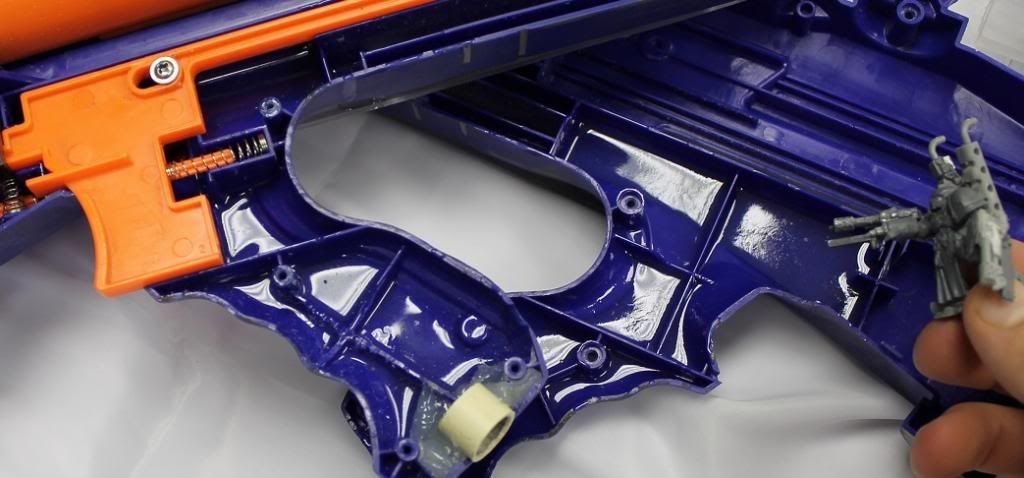
~ Reinforce the handle with resin; the stock longshot handle is meant to only handle the longshot weight, not all of the weight you will be adding in this project.

Step 1: Acquire the Resin from here or similar product.

Step 2: Follow the directions that come with your resin kit for mixing.

Step 3: Apply the resin to the areas shiny in the picture below: (remember; it's better to use more resin than less)

(Writeup assisted by angry marine Sargant !@#*PUNCHER)
Posted Image

~ If you're doing ANY spring upgrades, do a Boltsled reinforcement. An excellent write-up exists on Oznerf.

(Don't be a cop-out and do the wire hanger thing, it doesn't work as well)

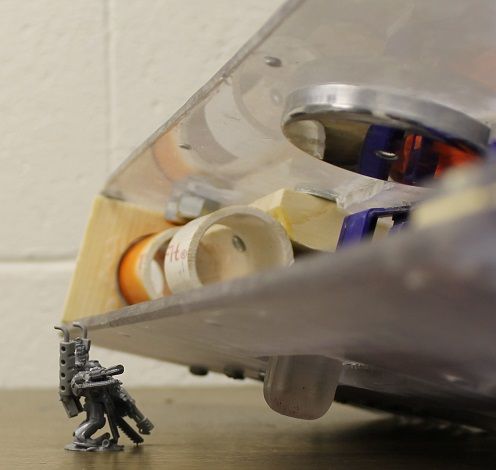
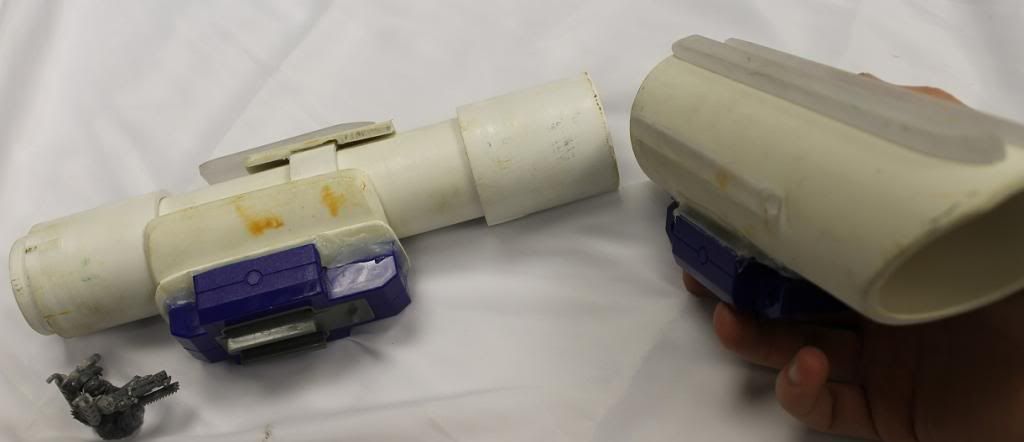
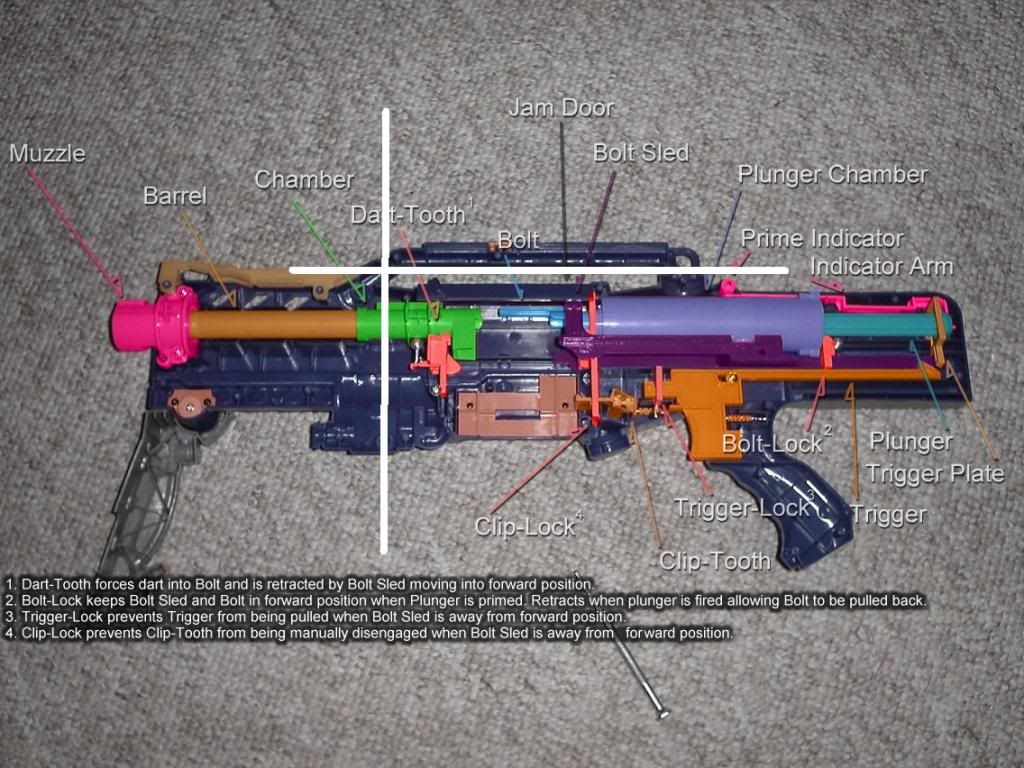
~ How I minimized mine is I simply took the Longshot to a bandsaw and hacked it down to its bare essentials. Take out your internals to avoid cutting them and cut off the front and tactical rail off like so:
Posted Image

+++ Auxiliary modifications +++


~Grip dart storage

Step 1: Cut about a 1/2 inch off of a 1/2 inch pvc piece to hold your dart

Step 2: Open your longshot and pre-mark how much you will need to take out, it is better to undercut.

Step 3: Dremel until half of your pvc piece can rest in the groove. Repeat steps 2 and 3 until this is achieved.

Step 4: Hot glue the PVC into the right side of your longshot, leaving room for the other half to close upon it.
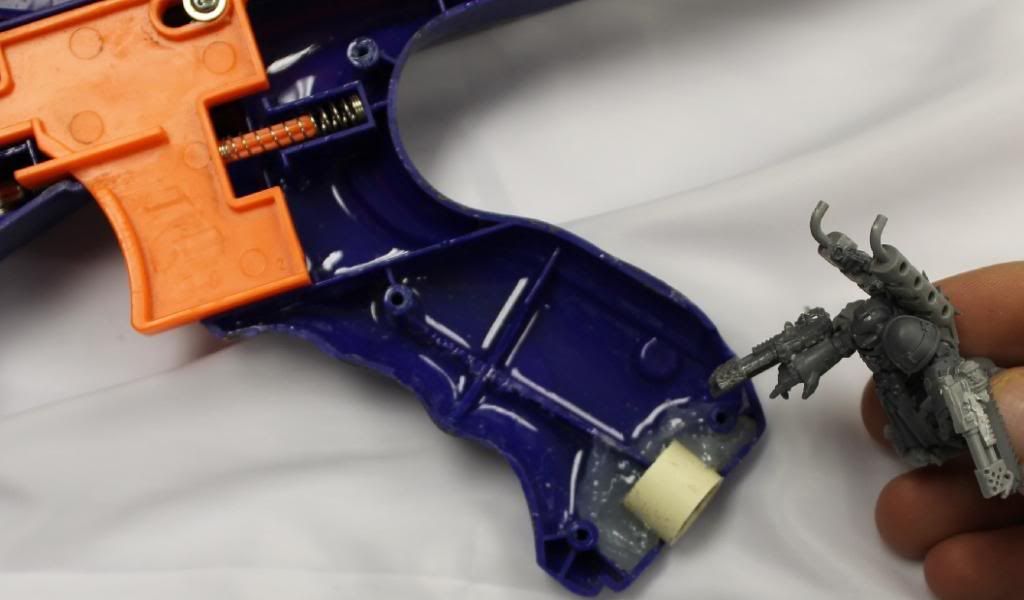
Posted Image

~ Make yourself a new priming handle, it will look better cosmetically.

Step 1: Take your 2” Length of 1 ¾” PvC rod and take it to a lathe and remove a ¼” deep by ½” long section. Repeat for the other side. They should look like this:
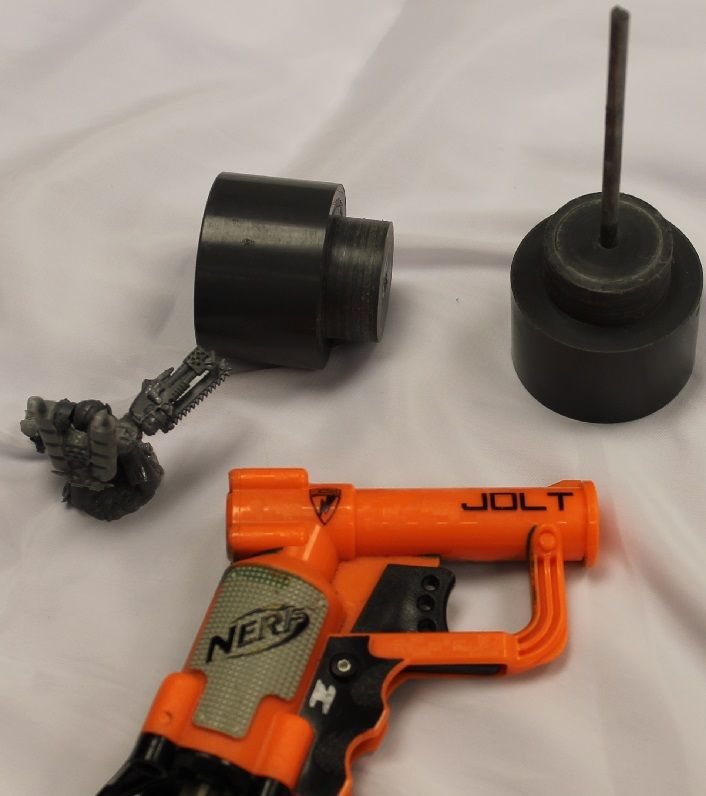
Posted Image

Step 2: Take a 5/32 drill bit and drill in the center of both pieces of PVC 1” deep. Take your 4” Length of 5/32" K&S Music Wire and coat one end in super glue and stick it into one of the PVC pieces. Apply less to the other side when you’re finished with your blaster.

~ Make your Bolter roar even when it’s not loaded by adding a sound card.

Step 1: Load a suiting sound onto the sound card. I just recorded the sound of the Stalker bolter from the space marine game. If you’re using the model of sound card I used, here is the video the manufacturer provides: [url]

Step 2: Find some form of spacer to put behind the button. I used a small nut.

Step 3: Cut along the back with a dremel tool to run the wires through like so:
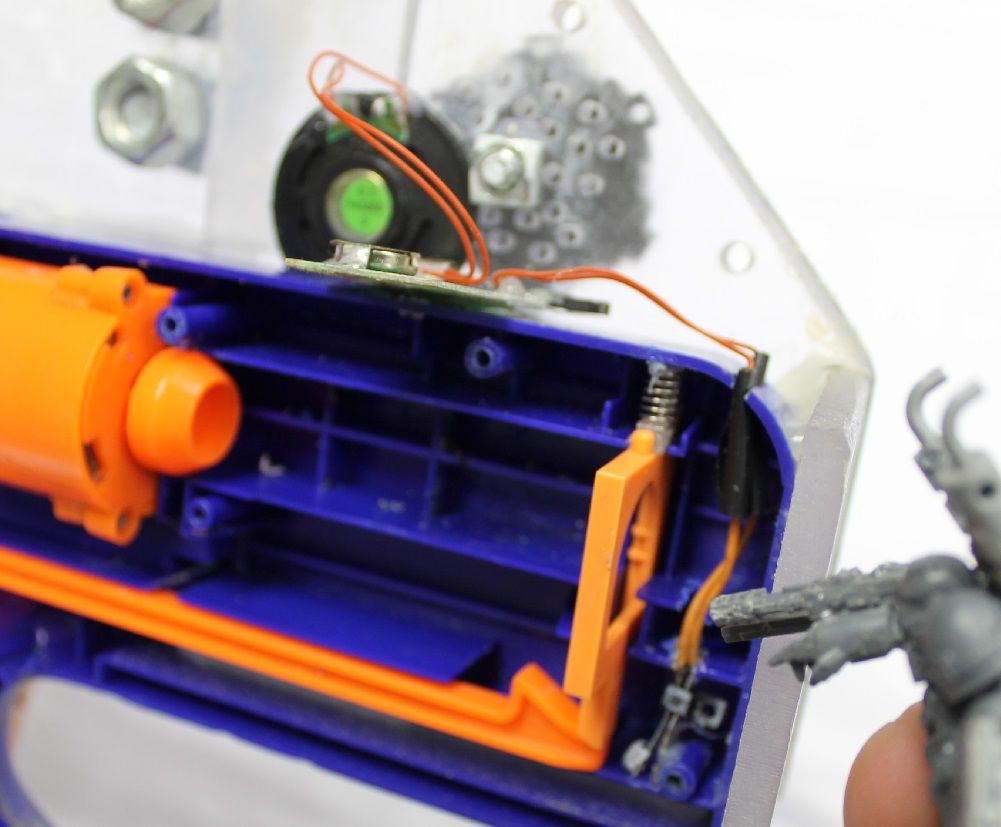
Posted Image

Tip: To help the sound project better, I drilled holes in the polycarb on the side and covered that with a Big Bad Bow wheel. The magnetic field from the speaker allows it to just stick to the bolt I ran through the BBB wheel.

Step 4: After checking to see that the longshot trigger will set off the sound card, attach it with superglue and/or hot glue.

+++ Polycarbonate +++

(tl;dr of this section: cut some polycarb, slap it on the sides and back with super glue)

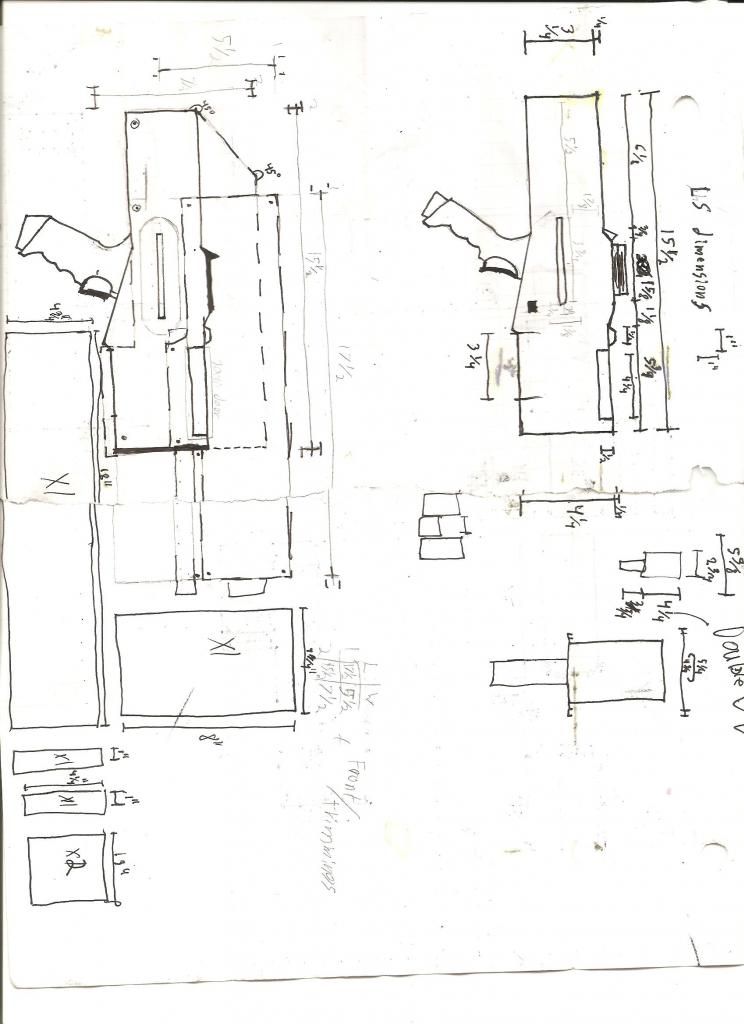
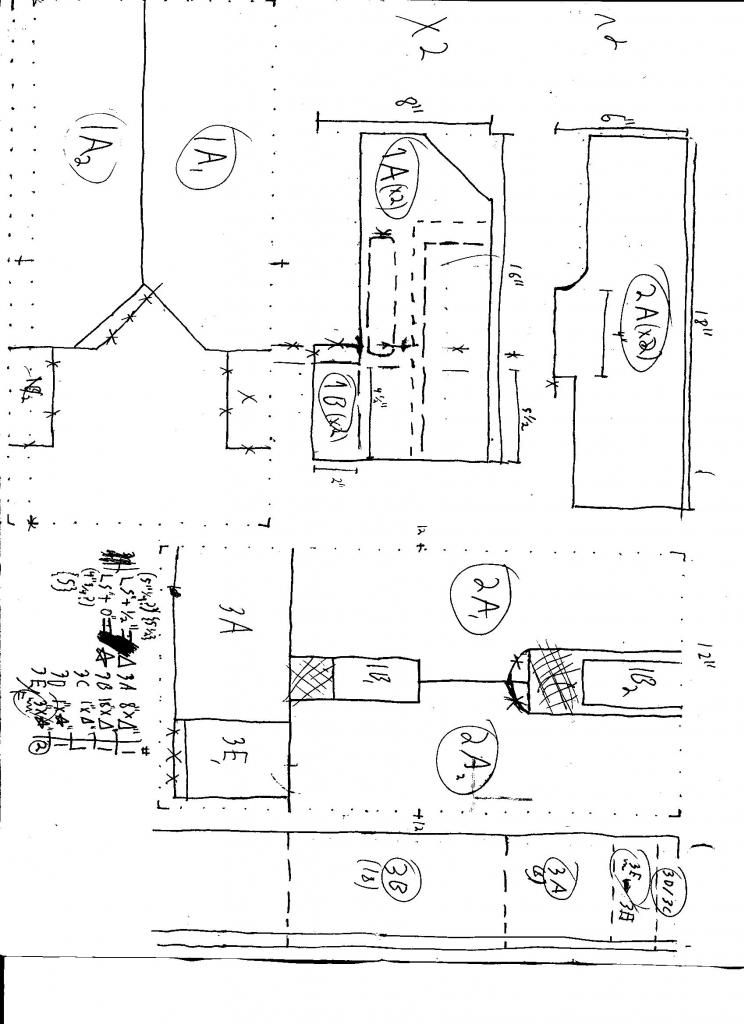
Here is a rough drawing of what I cut out and how they go together on the sides:
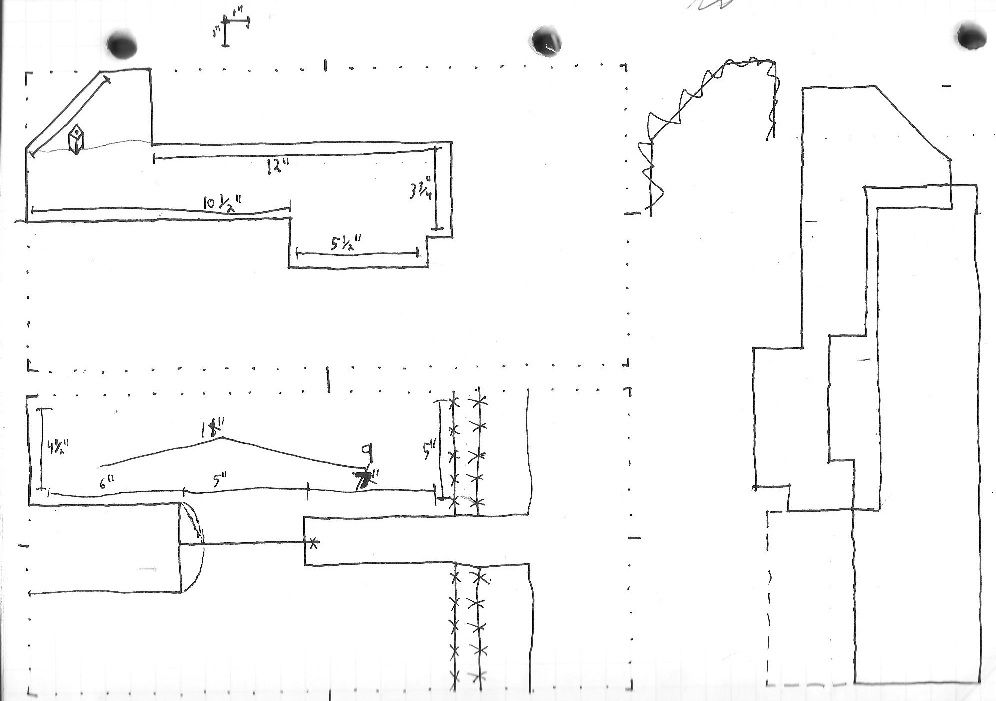


Posted Image

Once you print out the templates, glue them to the Polycarbonate (make sure you didn't take the shielding on the polycarbonate off)

Once they have dried, take it to the scroll saw and cut it out. Once that is done, double check to make sure you have the shape you want.

Once you have that figured out, cut out some medium sized pieces for spacers between the Polycarbonate and the deeper part of the longshot, like these:
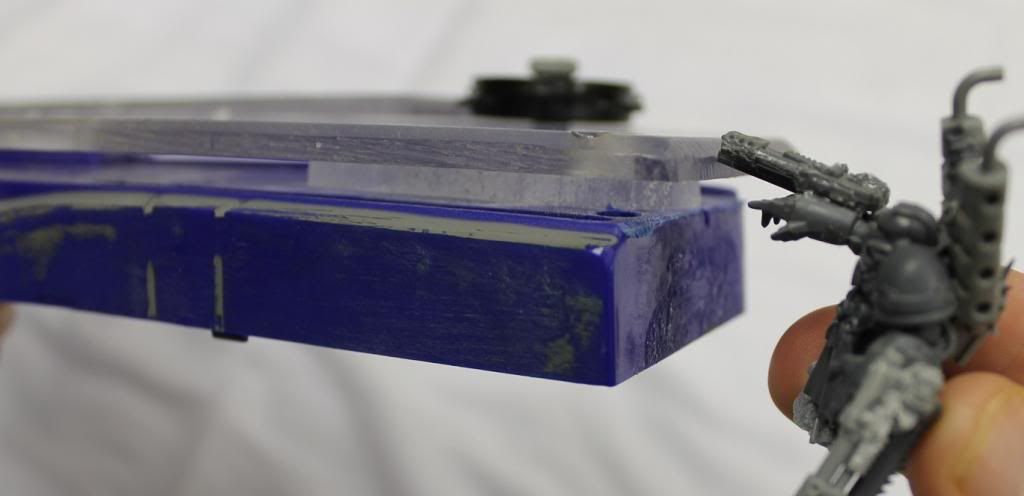
Posted Image

Remove the shielding from both sides of the medium-sized pieces and sand both the pieces and the areas they will be attached to for greater adhesion. Once sanded, apply Super glue and apply the medium pieces. Once that is completed, start to position the Polycarbonate on the side(s) of the longshot (you should be imagining it like the following pictures)
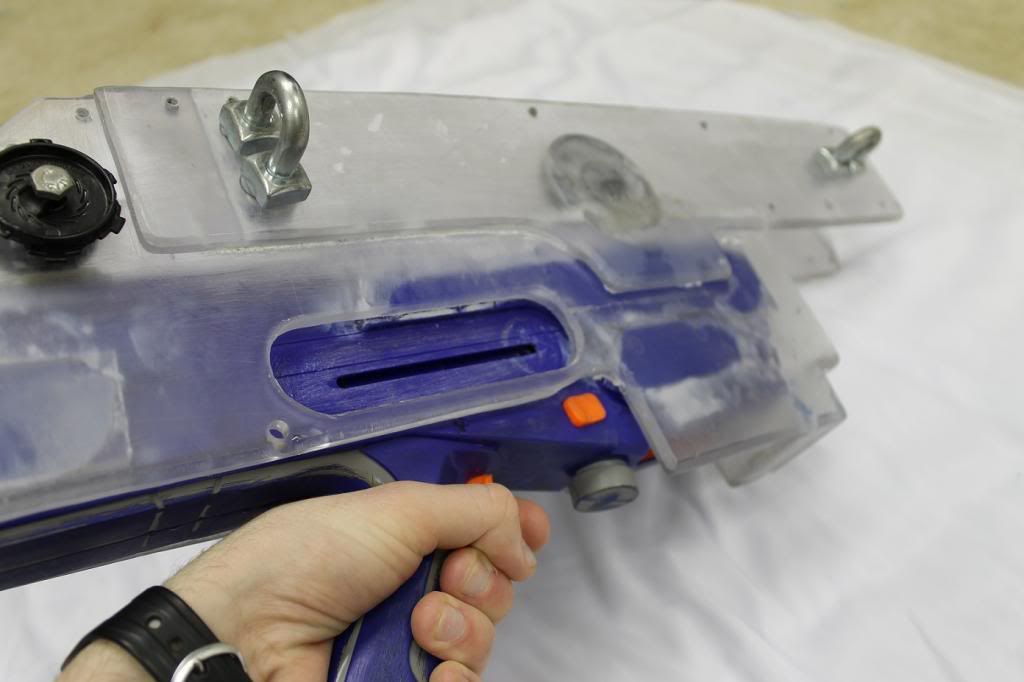
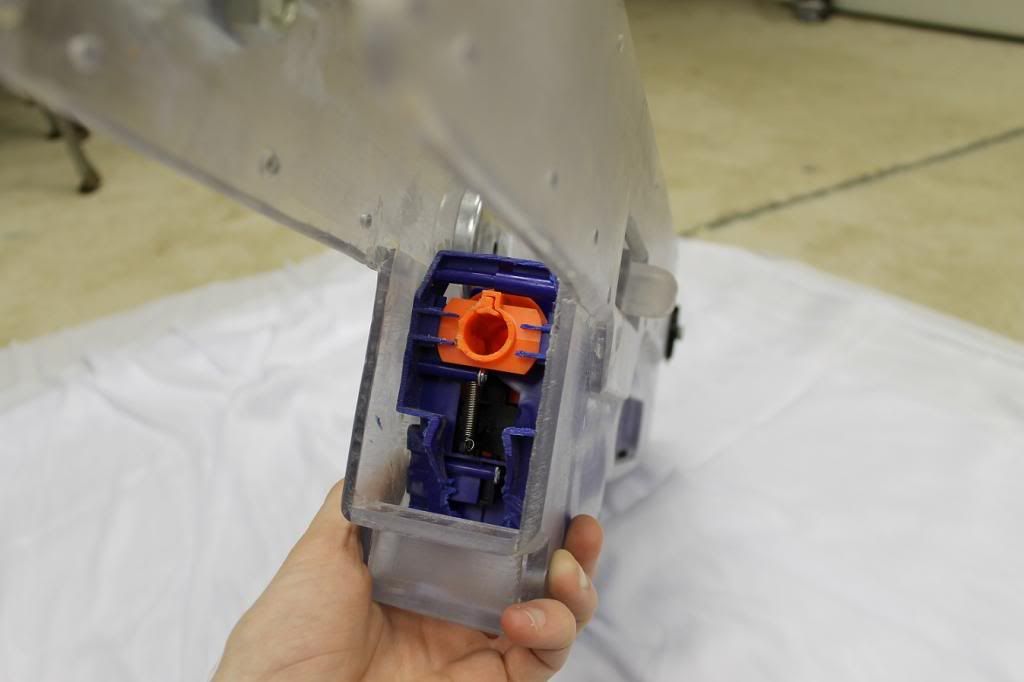
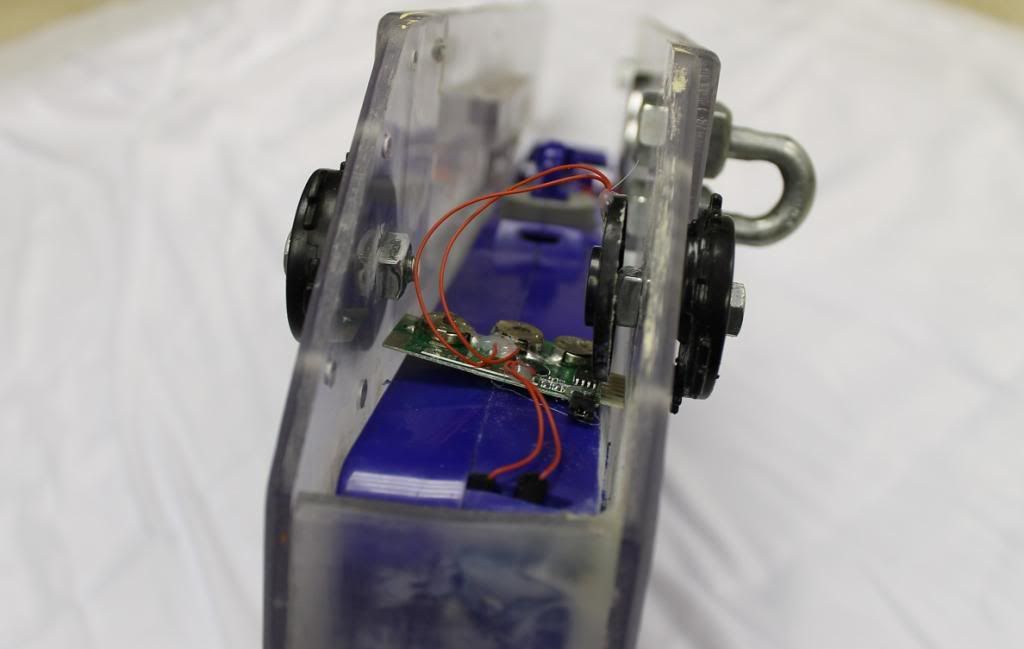
Posted Image

Posted Image

Posted Image

Once you're sure where you want the pieces, remove the shielding, sand where they'll be attaching to each other, pre-assemble the 2 pieces with super glue, let that dry, then attach the side to your longshot. When attaching to your longshot, MAKE SURE it's level or at least make sure both sides are both equally on a slant. The end result should look something like the above pictures.

After that is completed, cut a piece that covers the back of your longshot. Make sure you only apply superglue to just the right or left side of your longshot so you can open it again.

Once the super glue has dried, reassemble your longshot. You should run into a problem of not being able to access the longshot screws. Just note on the Polycarbonate where to drill and do so.

[Continued in part 2]

Edited by hummer, 29 May 2013 - 10:16 PM.

  • 0
Into the fires of battle!
Onto the anvil of war!
QUOTE(BustaNinja @ Nov 23 2010, 04:09 PM) View Post

He parkours over flat land while yelling tactical orders at no one. Demon Lord is the most legit ballsy nerfer of all time.

#2 hummer

hummer

    Member

  • Members
  • 217 posts

Posted 28 May 2013 - 11:39 PM

[Part 2]
+++ Lumbershaping +++

Step 1: You need the top parts to fill in between the polycarbonate with wood. Cut these parts out of the wood, sanding and cutting as needed. Once you have the pieces to a point where they can fit, Drill holes every 6”.

Tip: You could cut the top piece into 2 parts and make it simpler to attach.

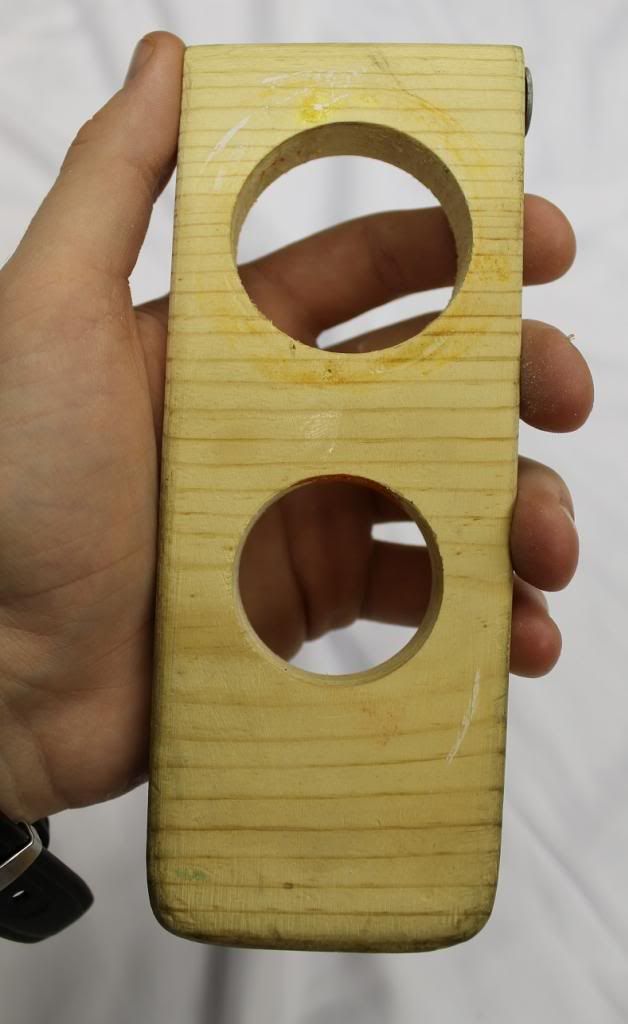
Step 2: To make the front plate, take a 2 ½” x 7” piece and mark the vertical center. Measure and mark 1 ½” and 4 ¼” from the top of the plate. It should look like this:

Posted Image

Step 3: Drill a 2” hole in the top and a 1 ½” hole in the bottom.

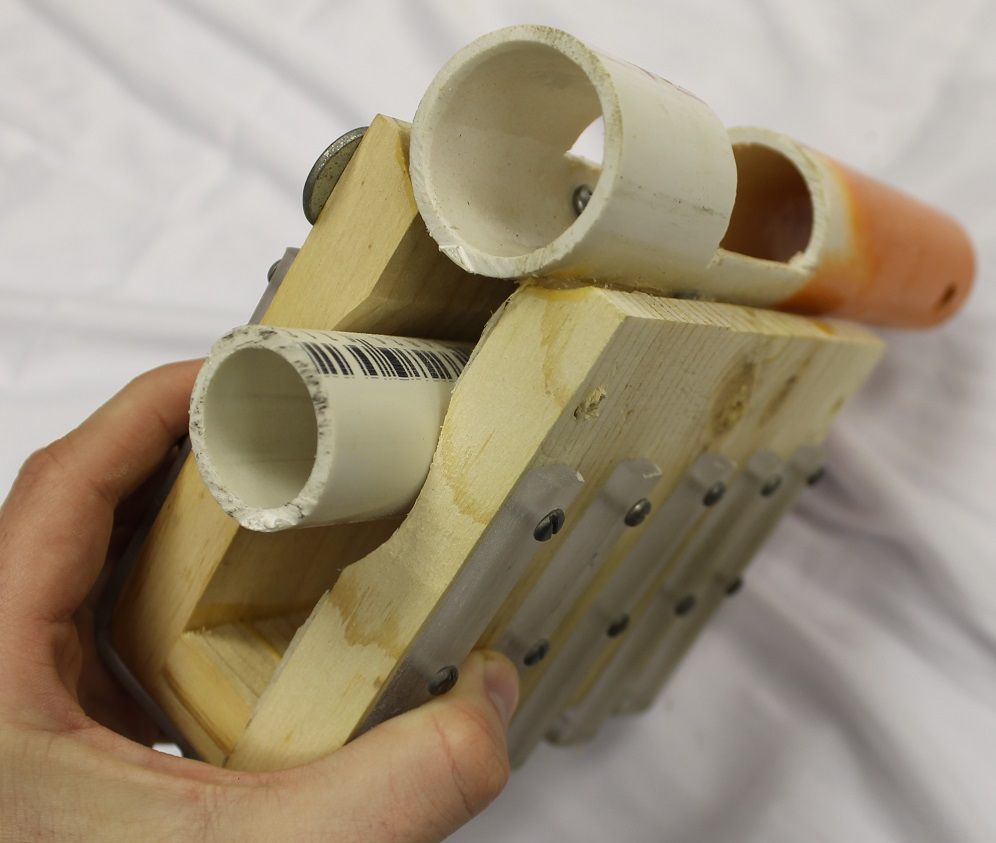
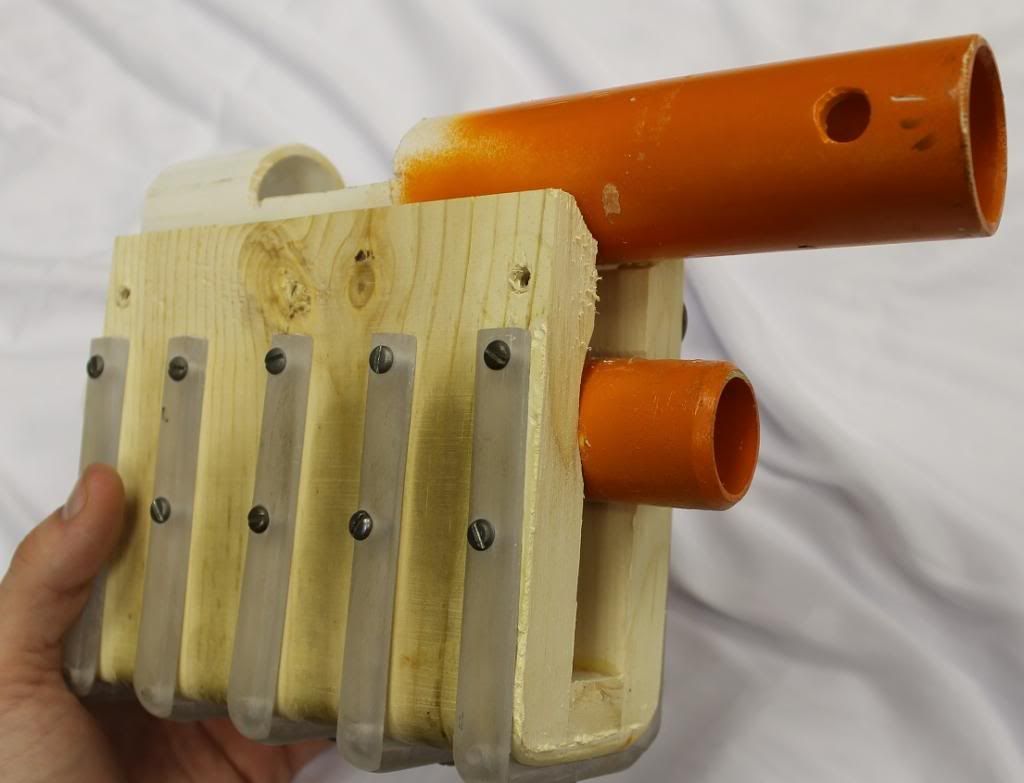
Step 4: Take both 5” x 6” Pieces and take them to a belt sander to sand them down. These grooves should line up with your longshots barrel, as the 1” PVC (cut it to 9”, it should hang ½” out the back of the handle and 1” out the front) will run through this part of the handle.

Step 5: Now take your 1” x 6” and make sure your PVC and side grips can look like this:

Posted Image

Posted Image


And still line up with your longshot. Once that’s squared away, glue the wood together with wood glue and the pvc with epoxy. I cannot stress enough how the PVC has to line up with your longshot.

Step 6: Smooth the grip out with fine (I used 180 grit) sand paper.

Step 7: Attach all the pieces, except for the top piece, as the “main” barrel still needs to be inserted.

Step 8: Speaking of the top, take your recon barrel and cut off the tactical rails with a band saw. Once you’ve sanded the bottom of the tactical rails, set them aside and craft the front iron sight and back stopper part. Now find the center of the top of your top wood piece. Attach all parts like so with wood glue and/or screws:

Posted Image

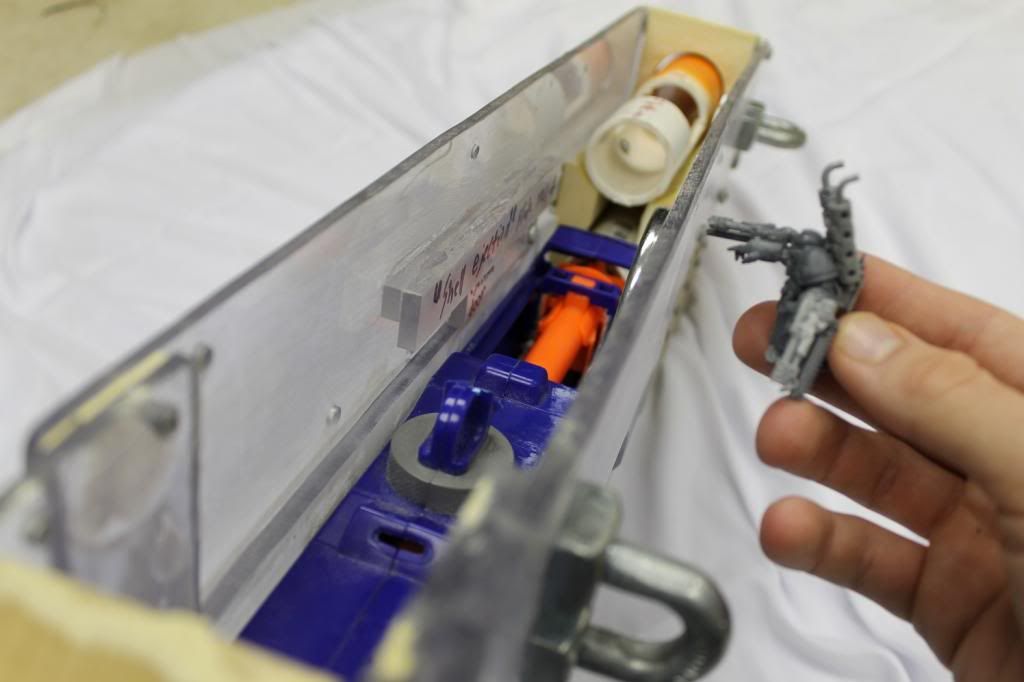
+++ Shell Ejection Port +++

(I am aware that a bolter is actually a shell-less gun, this just looks cool/allows breech access)

(Also, this will make your bolter unable to be set down on the side that you put this port into, plan wisely)

Step 1: Mark out a rectangle about 3 ¼” x 1 ¼” on the polycarbonate, lined up with the longshot breach inside.


Tip: line up your hole so that the breech door can use the under layer of polycarbonate as the bottom slide rail

Posted Image

Step 2: Drill holes at the corners of the marked rectangle and cut out the in-betweens with a dremel. File/sand the opening until desired cosmetic effect is acquired.

Step 3: Cut out a 3 ½” x 1 ½” piece of polycarbonate, this will be the actual door.

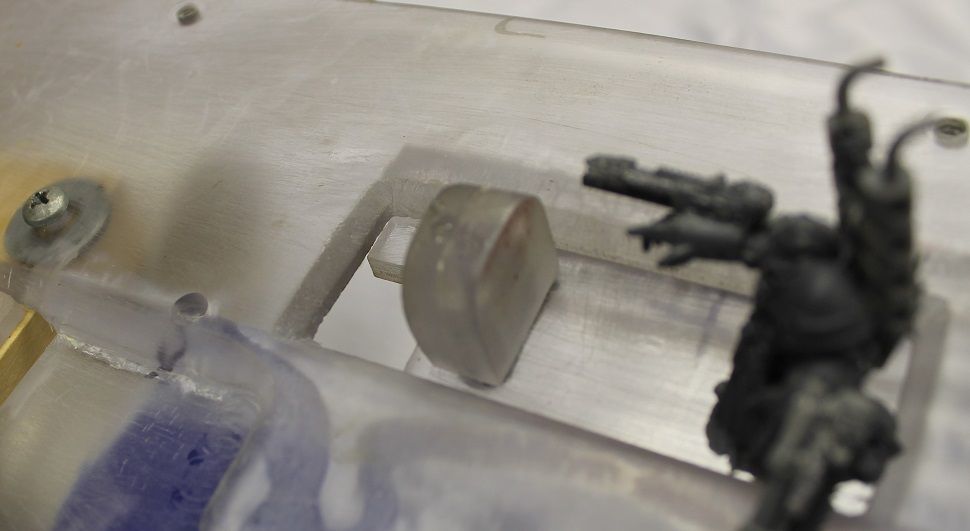
Step 4: Cut out 2 1” x 1” pieces and super glue them together. After this piece has dried, file and sand it to the shape you want, leaving one side completely flat for attachment to the door.

Posted Image

Step 5: Drill 2 holes in the flat side of the new 1” x 1” piece. Only drill about ½ way through Then, drill 2 similar holes in the breech door where you want the nub to go.

Step 6: Put 2 screws in and dremel the top part of the top screw down to make room for the slide rail


Posted Image

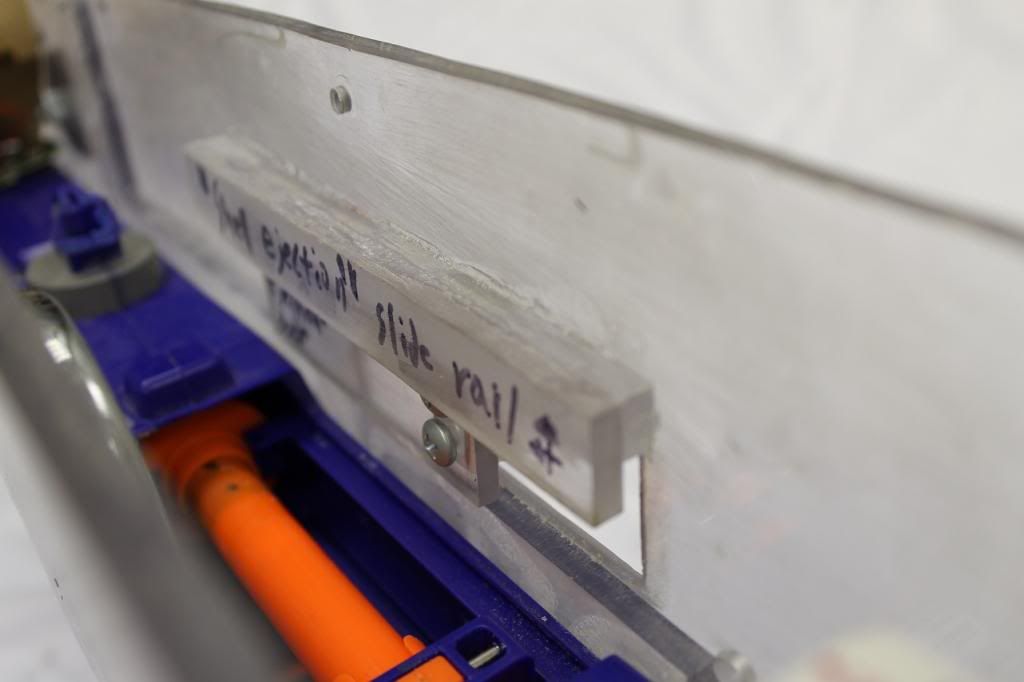
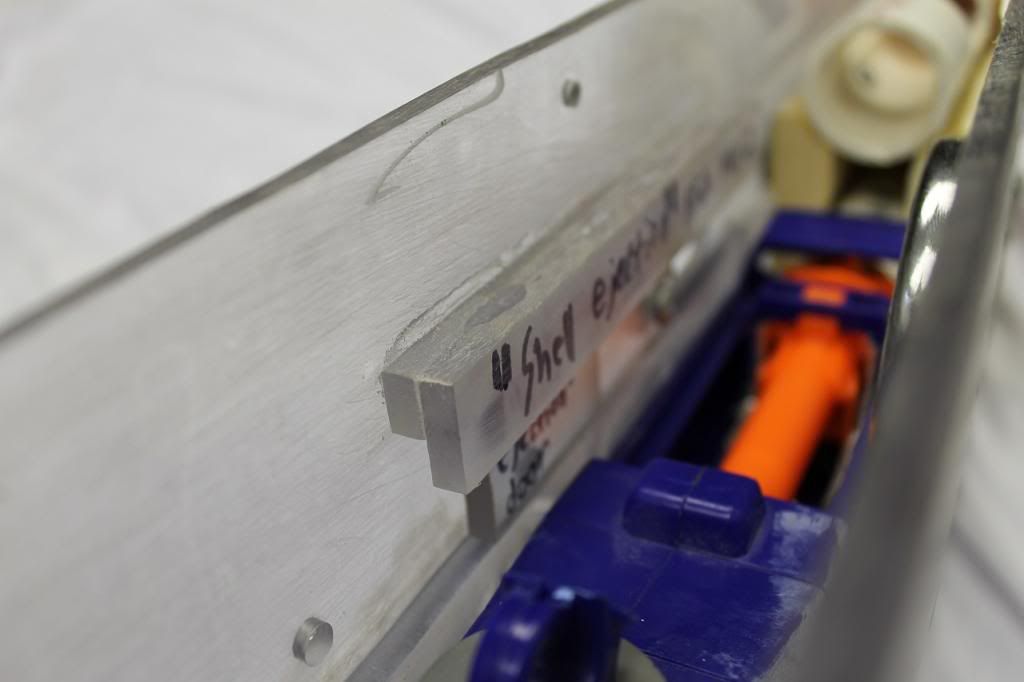
Step 7: Cut 2 pieces of polycarbonate to make the slide rail. Super glue them together as shown:

Posted Image

Step 8: Now put the breech door in place and then super glue the rail on as shown:

Tip: Make sure the super glue doesn't glue your breech door in place

Tip: You could put this assembly on both sides, but you won't be able to set it down without all the weight going to the breech door.

Posted Image

+++Main Barrel Flashlight+++

Cut a 1 ½” piece of PVC to 9 ½”. Then cut it like pictured above out of the main barrel. (or however you want to so that your flashlight will fit in the barrel without falling out.)

+++ M41 targeting system and M4 suppressor +++

(Optional Scope and Silencer)

~ Scope

Step 1: Take 2 N-Strike tactical rail attachments and cut them down so that the part that grips to the rail remains. If you cannot acquire these through your collection/trading, here is a link to buy just what you need: &Link

Step 2: For the front part, cut a 2" piece of pvc to about 7 inches and then cut one of the ends on an angle (45 degree is recommended)

Step 3: Attach the piece to the tactical rail with epoxy, longest side at the top

Step 4: For the back, cut a piece of 2" pvc to around 5 inches and then cut it in half length-wise. Attach one of these pieces to the tactical rail with epoxy.

Posted Image

Step 5: Attach half of a 1 1/4" coupler to the middle of the assembly

Step 6: Cut a 1 1/4" piece of PVC to about 7”. Then attach a 1 1/4" coupler to one end via pvc cement and attach a hex end into the coupler

Step 7: Insert the tube into the coupler that's cut in half, then glue a coupler to the other side

Step 8: Attach random bits to make it look cooler.

~ Silencer

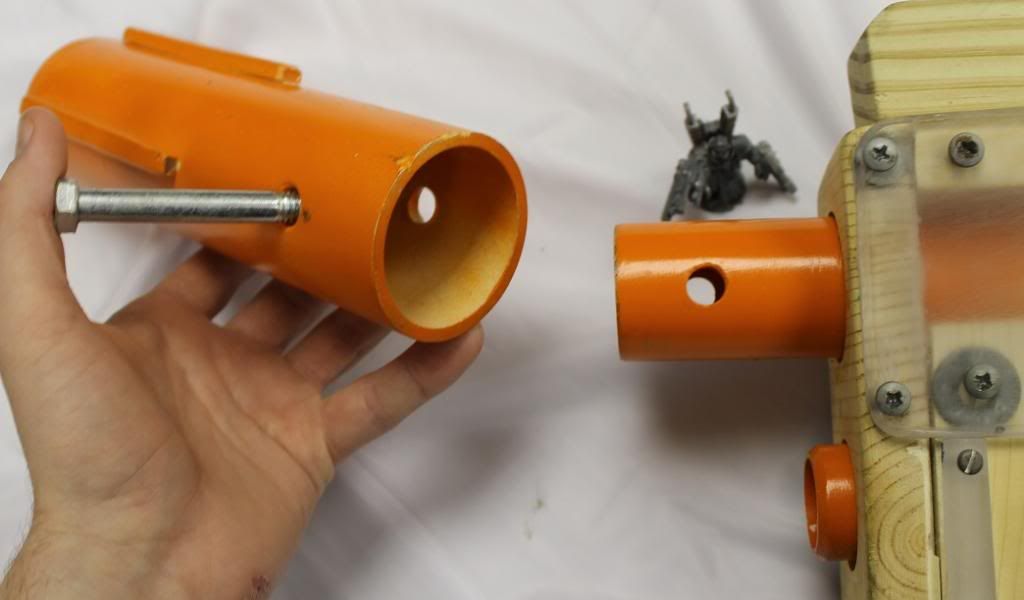
Step 1: Cut a piece of 2" PVC to around 9 inches

Step 2: Drill 2 holes ½” wide on opposite sides for the bolt to go through:

Posted Image

Step 3: Insert the Bolt and secure it.

Tip: This is made to be removable, if you want it to be permanent, insert a 1 1/4" coupler into the 2" pvc and apply glue where needed.

+++ Clip Conversion +++

(Optional)

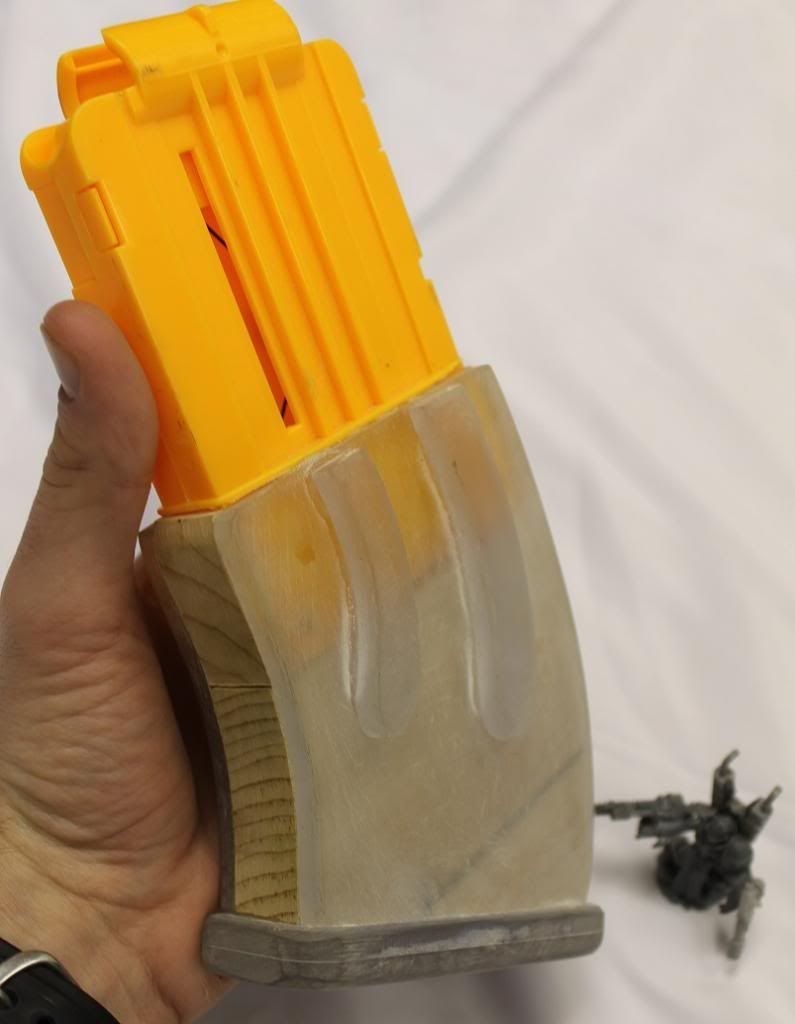
Step 1: Cut out a template similar to this out of polycarbonate:

(Contact me for the template if you are interested.)

Step 2: Sand down a 6 shot clips’ bottom to accept the 2 sides of Polycarbonate. After that, cut a “filler” piece, I used wood:

Posted Image

Step 3: Cut a bottom for the clip to desired size out of Polycarbonate (I cut mine to 1 ½” x 4” ). Next, cut some more filler part(s) to reach desired form.

Step 4: Mock-assemble everything you have so far. once desired form is finally reached, use Super-adhesive to adhere the form together. Make sure to clamp it.

+++ Bandoleer Attachment Points +++

(Optional)

Step 1: Mark holes at the front and back where you find it most suiting for your 1/2" Wire Rope Clips (or u-bolts) to be attached, mark those holes.

Step 2: Drill ½” or other appropriate-sized-holes at your marks and insert your Wire Rope Clips. Make sure you put the outer nuts on before you make the final attachment.

Step 3: Screw on the inner nuts and once you double-check your result, super-glue to make sure the nuts don’t come loose.

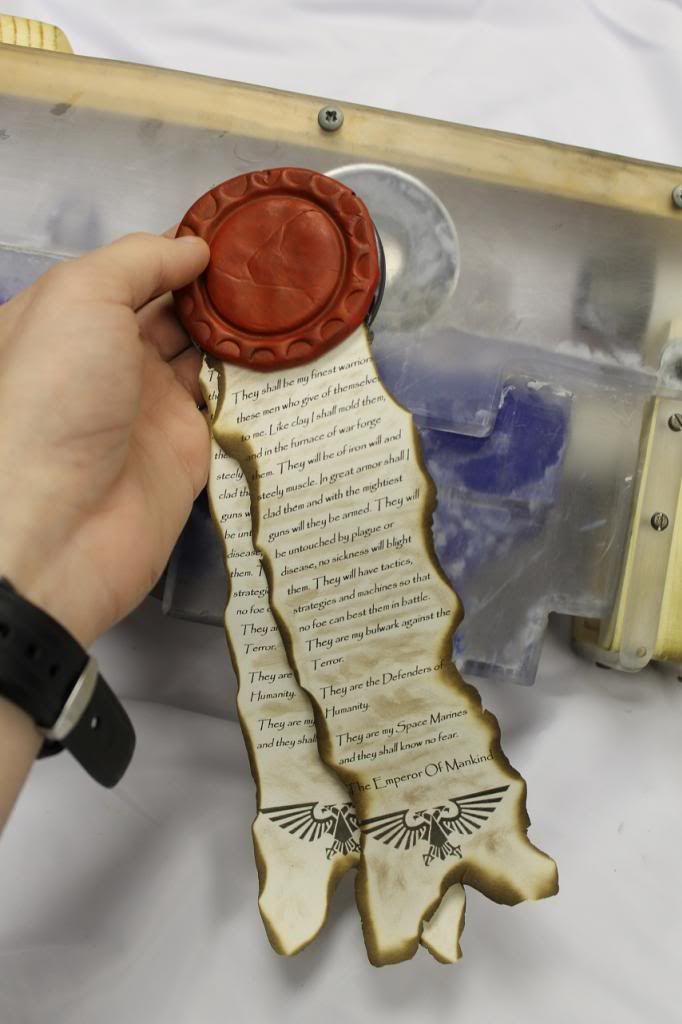
+++ Purity Seal +++

(Optional)

Posted Image

I can claim no mastery of this forging, the best instructions I can provide you lie within this video:

One thing I do was attach a magnet to the back of the seal and to the inside of the bolter. This makes for easy removal. (and makes a pretty awesome ‘fridge magnet)

+++ The Last Turn +++

(Closing statements)

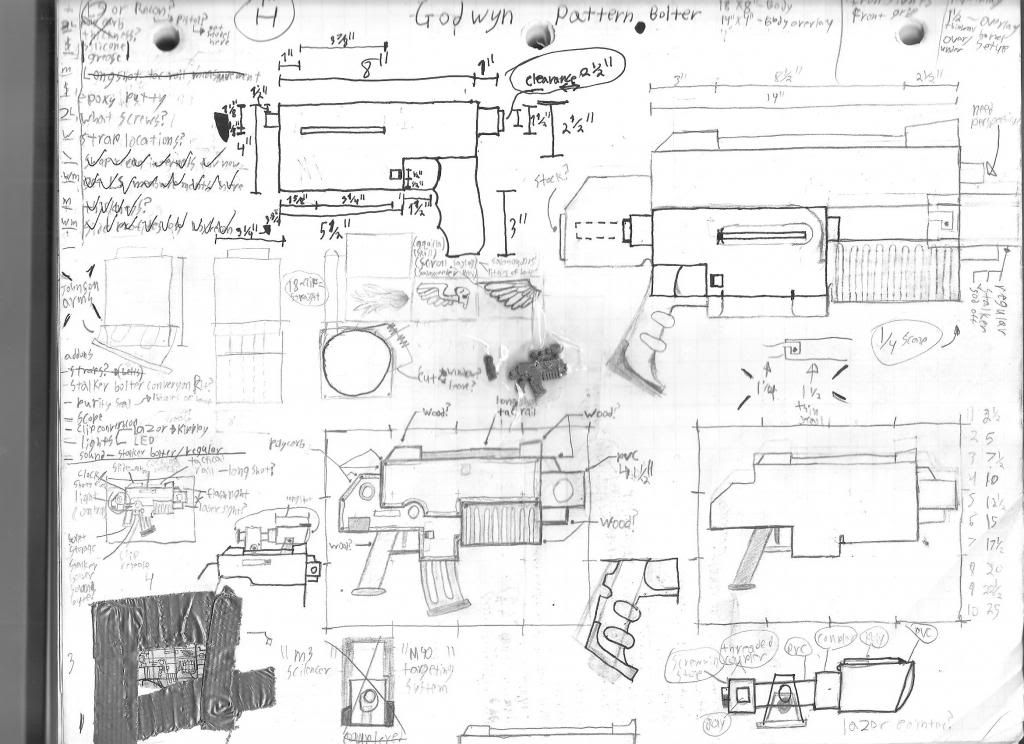
Here are some concept sketches of this project: (yes, that is a model bolter taped in)

Posted Image

Posted Image

Posted Image

Now what I’ve created here is just what I think it should look like, interpret these directions how you see fit and try some ideas I haven’t tried;

~ Find a way to make the “Shell ejection port” close on its own

~ Make a different pattern bolter

~ Make a bolt pistol out of a recon/retaliator

~ Make a terminator Assault Cannon out of a Vulcan

~ Make a stock

~ Make it pump action from the grip

~ Make the top on a hinge for on-the-fly access

~ Add Tacticool attachments to yours

~ Add the Kraken Bolts perk addon from the Space Marine game:

Posted Image

If you’re looking for more inspiration, here are some links to other Nerf Bolters I know of:

http://protagonist4h...build-part.html

http://z6.invisionfr...de/ar/t1278.htm

http://www.thingiverse.com/thing:15155

http://www.faustus70.com/

http://johnsonarms.d...37153?offset=10

If you do make a Bolter, make sure you show me! I would love to see how I’ve inspired you!

Or if you have a specific question post it in the comments/thread below.

“Honour Your Wargear”

+++ End Transmission +++


+++ Special Thanks For Aid +++

Louiec3 - For all the help. This would not have been possible without you.

Wenzel Designs - For my Uncle commissioning the awesome paint job.

Vas The Stampede & Snake51886 - For editing and support.

Volpin Props - For being my main inspiration behind this project

Lt. E Watts - For inspiration and continuing to make awesome Warhammmer 40,000 props

Protagonist4hire - For inspiration and jealousy of not having a vacuum former.

MarneusAugustaCalgar - For your wonderful video on purity seals, making your own is much more fun than just buying them.

Relic/Games Workshop - For making the Warhammer 40,000 games.
  • 0
Into the fires of battle!
Onto the anvil of war!
QUOTE(BustaNinja @ Nov 23 2010, 04:09 PM) View Post

He parkours over flat land while yelling tactical orders at no one. Demon Lord is the most legit ballsy nerfer of all time.

#3 Hammy

Hammy

    Member

  • Members
  • 104 posts

Posted 29 May 2013 - 02:21 AM

Nice job :thumbs
  • 0

#4 hummer

hummer

    Member

  • Members
  • 217 posts

Posted 29 May 2013 - 10:17 PM

Fixed photos (Thanks Dartslinger)
  • 0
Into the fires of battle!
Onto the anvil of war!
QUOTE(BustaNinja @ Nov 23 2010, 04:09 PM) View Post

He parkours over flat land while yelling tactical orders at no one. Demon Lord is the most legit ballsy nerfer of all time.

#5 Demon Lord

Demon Lord

    Member

  • Members
  • 304 posts

Posted 29 May 2013 - 11:32 PM

I remember seeing this in person prior to the paint job and it looked good then. Seeing it finished, it looks awesome and intimidating to boot. I look forward to the Lascannon build and other Warhammer 40k builds.
  • 0
QUOTE(VACC @ Mar 7 2011, 09:03 AM) View Post

Don't worry so much about what other people will allow. Throw your own wars and kick your friends' asses until they all want one.

#6 NerfOfSteel

NerfOfSteel

    Member

  • Members
  • 31 posts

Posted 03 July 2013 - 05:20 PM

Dude, that thing's sweet! Nice workmanship on the homemade parts. Like the safety warning. :)
-Steel
USER WAS WARNED FOR THIS POST

Edited by Zorn's Lemma, 03 July 2013 - 07:08 PM.

  • 0
Do all those other toy blaster companies really need to exist? Think, people. think.

#7 cmeej

cmeej

    Member

  • Members
  • 107 posts

Posted 06 July 2013 - 12:54 AM

Nice modification! Great final project, good pictures and clear instructions. Thanks for sharing.

Edit: Apologies, just came back from hiatus, looked at the date from the last post and assumed the warning was related to him adding a superfluous signature. Didn't look two posts back: my bad.

Edited by cmeej, 06 July 2013 - 01:03 AM.

  • 0
Qualified Ginger
Deal affectionado and photo nazi.
"If at first the idea is not absurd, then there is no hope for it" -Albert Einstein


2 user(s) are reading this topic

0 members, 2 guests, 0 anonymous users