Jump to content


Photo

Nerf N-Strike Elite Retaliator - Mod Guide!

AR Removal, Spring Replacement, Locks Removal.

24 replies to this topic

#1 SgNerf

SgNerf

    Member

  • Members
  • 204 posts

Posted 02 August 2012 - 01:59 AM

There have been a number of mod guides and threads for the new Elite Retaliator/Rampage already posted up by modders, so i'll just post my mod guide here to contribute as additional reference.

--

This Mod Guide will cover various performance mods for the Nerf Retaliator.

Mods covered:
- Air Restrictor (AR) Removal
- Spring Replacement
- Locks Removal

Note: These mods are also applicable to the Nerf Rampage as they both share similar internal bolt and plunger mechanisms.

Disclaimer: Modify at your own risk. Modifications may wear out or damage your blaster. Please be careful when using hobby tools!


:: AR Removal ::

Step 1: Disassemble your Retaliator. Make sure to remove all the screws before detaching the casing.
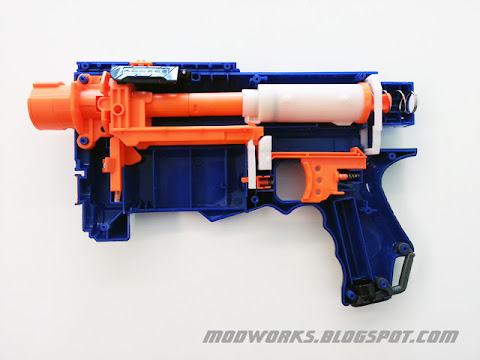
Posted Image


Step 2: Take out the bolt sled assembly. Disassemble the plunger mechanism components and remove the plunger casing from the bolt system.
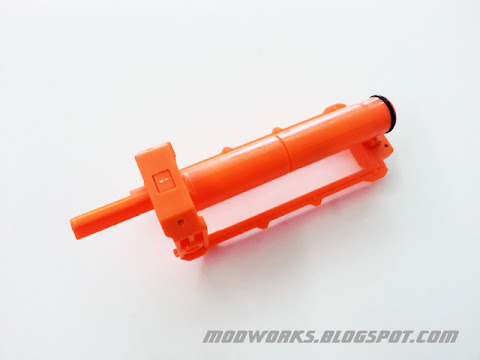
Posted Image

This is what the bolt looks like with the air restrictors still intact.
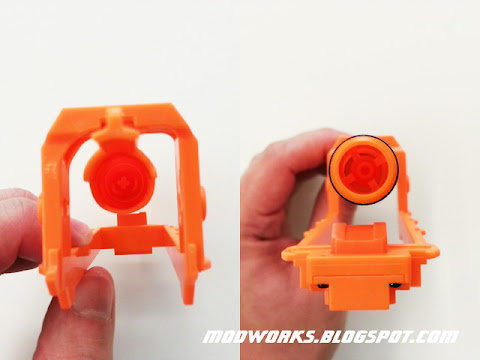
Posted Image


Step 3: Use a long screwdriver and a hammer, carefully knock out the air restrictor assembly though the back of the bolt.
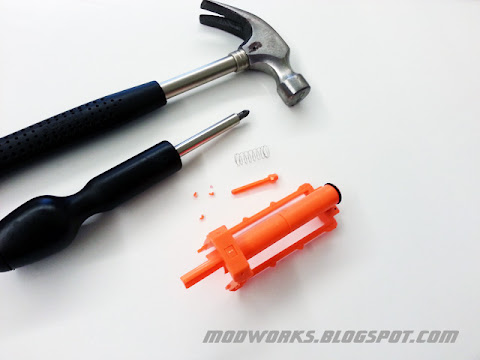
Posted Image

You can also use other tools (ie. power drills) to remove the air restrictors too. Just be careful not to damage the bolt in the process.

This is what the bolt looks like with the air restrictors removed.

Posted Image

At this point in the process, you will probably notice that a leftover part of the air restrictor (the 3 pronged piece) is still inside the bolt, and it will tend to rattle loosely back and forth. Simply apply a drop of glue inside the rear section of the bolt and let that loose piece adhere to the back so that it doesn't move anymore.


:: Spring Replacement ::

One of the ways to increase the speed of air delivery through the bolt is to replace the stock spring with a stronger aftermarket spring.

There are many different springs with different sizes and spring force ratings. Spring choice will depend on your usage.

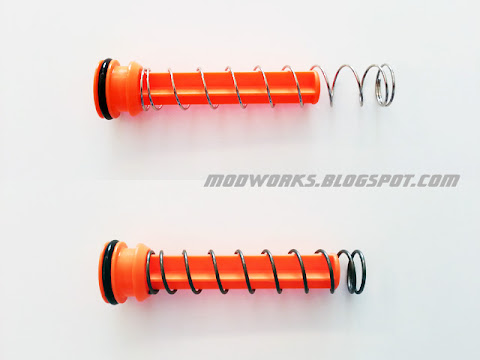
This example below shows a stock spring (top photo) vs. an aftermarket 8kg load spring (bottom photo).
Posted Image

Notice that the stronger aftermarket spring i use is made shorter than the stock spring, this is because the spring wire is thicker, hence it takes up more space when compressed.

The reduction in spring length allows the plunger system to accommodate the extra space required by the aftermarket spring (or else the plunger will not be able to catch properly).

Note that when using shorter aftermarket springs, the bolt lock should also be removed to ensure that the bolt does not get stuck during usage (see below for more information on bolt lock removal).

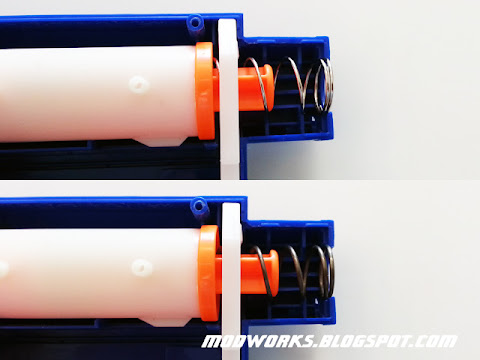
Here is what they look like installed within the plunger system.
Posted Image

Note that in this plunger design, the spring has to be kept within the catch system dimensions to work.


:: Special Notes ::

Generally for blasters with air restrictors removed, padding is usually recommended to be installed on the plunger. This is because without the AR, there is no air buffering system to cushion the plunger on bolt impact.

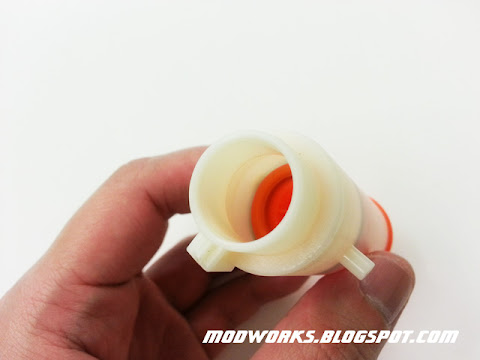
But in the Retaliator plunger system, the plunger itself features a narrowed internal area at the front section, this creates a sort of "buffer" effect and prevents the plunger from striking the bolt.
Posted Image

During modding tests, it turns out that plunger padding wasn't necessary in this blaster. Even without any plunger padding, when the blaster was fired, there was only a muffled impact sound (instead of the loud cracking noise common in previous blaster designs).

In addition, the stock o-ring already has an excellent seal, so there was no need to replace it. Note that if the plunger seal is too tight, it may create excessive resistance and slow down the plunger, resulting in noticeably reduced performance.


:: Locks Removal ::

Remove the bolt and trigger locks. This is an optional modding step, but it is highly recommended (especially in blasters with air restrictors removed and using shorter aftermarket springs).
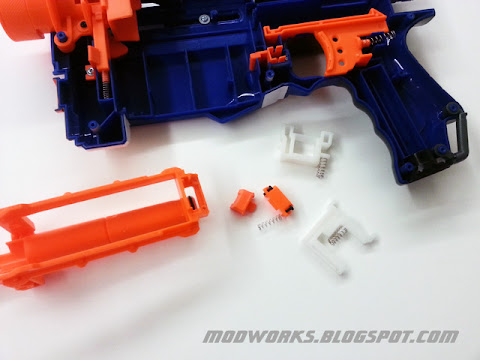
Posted Image

With the locks removed, it allows users to be able to release a primed blaster in a controlled manner. This is more convenient than having to fire an extra shot just to de-prime the blaster and helps prevent dry firing.

The user can simply push back the bolt anytime, pull the trigger to release the catch, then ease the plunger forward under support with the priming grip.

In addition, as mentioned earlier, the bolt lock removal mod is also required when using shorter aftermarket springs, to ensure that the bolt does not get stuck during usage.

Important Note: With the bolt and trigger locks removed, users have to ensure that the bolt sled is pushed all the way forward before firing (do not fire when the breech is partially or fully open).

For additional reference, here is the bolt lock removal procedure for the Nerf Rampage (photo shows the left side of the Rampage casing):
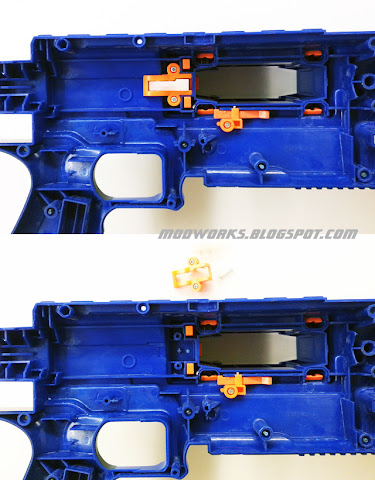
Posted Image


:: Final Step ::

Assemble everything back together and its all done!

Posted Image


:: Modified Nerf N-Strike Elite Retaliator - Range Test Video ::

http://www.youtube.com/watch?v=7fokL5j3hNs


:: Sample Test Fire Data ::

PTG: Parallel-To-Ground (Shoulder height, no elevation)
ATG: Angled-To-Ground (Aimed higher, 30 degrees elevation)

Distance is measured at where the dart lands (Average of 6 darts).

Stock Elite Retaliator
Ammo: Elite foam darts
PTG = 45-55ft
ATG = 65-75ft

Modified Elite Retaliator (AR Removed Only)
Ammo: Customized foam darts + 1.0 gram soft silicone tip weight
PTG = 55-65ft
ATG = 75-85ft

Modified Elite Retaliator (AR Removed + 8kg Load Spring)
Ammo: Customized foam darts + 1.0 gram soft silicone tip weight
PTG = 70-80ft
ATG = 90-100ft

Note that Elite foam darts can achieve similar ranges too, but their overall performance and accuracy tend to be rather erratic when used in modded blasters (ie. they still curve and swerve in flight), so their results are less consistent.

The tests were done under controlled conditions and the results are sample estimates for reference (your results may differ depending on materials and mod techniques used).


:: Additional Notes ::

For modding reference, i've also tested the brass breech mod on one of my other Retaliator units and its ranges improved further by another 10-15ft.

Note that although an improved breech system with 100% air seal does help increase power efficiency and range, the overall performance improvements are still based on their existing plunger air volumes (compared to larger direct plunger blasters like Longshots or Stampedes).


:: Modding Materials ::

Due to popular requests, i currently have the aftermarket springs made available at my site too (if anyone is keen on them).

Link: Elite Retaliator/Rampage Mod Upgrade Spring

:)

Edited by SgNerf, 15 August 2012 - 10:12 AM.

  • 0
Nerf News & Reviews! >> http://www.sgnerf.blogspot.com
Nerf Mod Guides! >> http://www.modworks.blogspot.com

#2 SgNerf

SgNerf

    Member

  • Members
  • 204 posts

Posted 02 August 2012 - 02:03 AM

Update! (15th August 2012)

I bought a Buzz Bee Double Shot to check out its springs (as i've been hearing that modders have been using them for their mods too). Took them out and compared them to my aftermarket ones.

Buzz Bee Double Shot Spring (left) vs. Aftermarket 8kg Load Spring (right).

Posted Image

They indeed have similar dimensions, though the double shot springs have abit more coils, they can still compress flat enough to fit within the space behind the Retaliator/Rampage catch area. I tested them and they work well in those blasters.

The double shot springs are noticeably lighter load though, they require around 30% less effort to compress... i compared them with another 5-6kg load spring which i custom made for my other modding projects and their loads felt similar. So i guess the double shot spring could be considered around 5-6kg load too.

They are stronger than the stock Retaliator/Rampage springs (which are estimated to be around 2.5-3kg), so they can be an alternative for those who prefer a lighter version of the 8kg load aftermarket springs that i use.

I did some ranges tests with the double shot springs and the shots averaged around just 10-15% less distance (compared to the 8kg load springs). Overall the range improvements are still quite decent, so they can be useful springs for those who have spare double shots to get them from. :)

Edited by SgNerf, 22 August 2012 - 10:55 AM.

  • 0
Nerf News & Reviews! >> http://www.sgnerf.blogspot.com
Nerf Mod Guides! >> http://www.modworks.blogspot.com

#3 Ozymandias

Ozymandias

    Member

  • Members
  • 201 posts

Posted 02 August 2012 - 03:52 AM

Those are Xplorer darts and not your usual calibrated darts, right?

Also, a mod guide on the brass breech would be awesome.

Awe inspiring photo quality as always.
  • 0
If you wish to post anything HvZ related, here ya go.

"...if you've ever suffered the effects of a fucking faggot retard overpopulation, you'll understand what devistaiting effects it can have on one's psyche." - Talio

#4 SgNerf

SgNerf

    Member

  • Members
  • 204 posts

Posted 02 August 2012 - 04:20 AM

Those are Xplorer darts and not your usual calibrated darts, right?

Awe inspiring photo quality as always.

Thanks!

The calibrated foam darts i used are actually based on the black silicone tips sourced from inform3r at the OzNerf forum. The black silicone tips are around 1.3-1.5 grams (depending on batch), generally too heavy for most modded springers, so i basically trim them to reduce their overall weight to around 1.0 grams and this process also helps shift the weight balance further forward for better performance.

I do this silicone tip weight "calibration" on all my foam darts and stefans nowadays, so i get to customize different tip weight setups to match different blasters.

Here are the steps:

Posted Image

Depending on game rules, i sometimes also attach 10mm diameter foam padding on the flat tip to help reduce hit impact too. :)

So far, these calibrated foam darts have been getting very consistent ranges and accuracy, no swerving or curving in flight at all.


Also, a mod guide on the brass breech would be awesome.

Yup, i'm in the process of doing up another brass breeched unit to document the process (the current brass breech design is basically the same as in my Recon Brass Breech mod guide)... though i have a new simpler method in mind which i might try instead.

Edited by SgNerf, 02 August 2012 - 11:48 AM.

  • 0
Nerf News & Reviews! >> http://www.sgnerf.blogspot.com
Nerf Mod Guides! >> http://www.modworks.blogspot.com

#5 Seprest

Seprest

    Member

  • Members
  • 41 posts

Posted 02 August 2012 - 05:14 AM

I am interested in the spring upgrade. Why do you say the bolt lock must be removed when you use the 8kg spring? I prefer to leave the bolt lock in my blasters, how does it interfere with the spring?
  • 0
4 - HvZ Games Played

22- Mods completed

#6 Daniel Beaver

Daniel Beaver

    HQRSE CQCK

  • Moderators
  • 2,099 posts

Posted 02 August 2012 - 07:29 AM

Looks good, and straight-forward to mod. Looks like this will be competitive against homemade blasters, even without a brass breech. And they'll surely be even more formidable with a new breech.
  • 0

#7 proplus

proplus

    Member

  • Members
  • 85 posts

Posted 02 August 2012 - 08:21 AM

Awesome writeup :lol: ,

Hopefully this will be a standard secondary or primary in the NIC.

This question might be old, but, is the plunger tube compairable to a nite finder's plunger tube?
  • 0
"the peinus itself is a handle"

- Kane the medeocre

#8 SgNerf

SgNerf

    Member

  • Members
  • 204 posts

Posted 02 August 2012 - 11:15 AM

I am interested in the spring upgrade. Why do you say the bolt lock must be removed when you use the 8kg spring? I prefer to leave the bolt lock in my blasters, how does it interfere with the spring?

Good question!

Okay, the Retaliator uses a unique system whereby the plunger tube itself actually moves to and fro 5-6mm during the priming and firing process (different from the fixed plunger tube systems like in the Longshot).... and the bolt lock is only released when the plunger tube is in its most forward position.

Because the stronger aftermarket spring has to be shorter (in order for the thicker spring wires to fit within the limited space between the catch and back of the blaster when compressed), it doesn't have the overall extra length like the stock spring to keep the plunger tube constantly pushed forward when at rest, hence the bolt locks are sometimes left unreleased after the blaster is fired.

Most of the time when the blaster is fired, the plunger propels forward and pushes the plunger tube forward too, so the bolt locks are pushed down and released, but sometimes the plunger bounces back or just misses the bolt lock by 1-2mm, without a longer spring to keep the bolt constantly pushed forward at rest, the whole system gets stuck. It can be solved easily on the spot though, just open the rear grey attachment cap and then manually nudge the plunger rod to assist the plunger tube forward to release the bolt lock, but that's quite a hassle, especially during games.

In case anyone is also curious why the Retaliator's plunger tube needs to move (i was also puzzled why the design required a moving plunger tube too, since the Longshot didn't need it), i tested permanently holding down the plunger tube and pushing back the bolt, then i discovered why... its initial plunger draw is not long enough to push the plunger rod far enough to catch, so the entire plunger tube also has to move further back to create that extra bit of draw travel for the plunger to catch. It works kinda like those retractable telescopes.

I guess part of its design was to use the plunger tube to control the bolt lock system.

Hopefully my explanation wasn't too confusing. ^_^

Edited by SgNerf, 02 August 2012 - 01:51 PM.

  • 0
Nerf News & Reviews! >> http://www.sgnerf.blogspot.com
Nerf Mod Guides! >> http://www.modworks.blogspot.com

#9 Seprest

Seprest

    Member

  • Members
  • 41 posts

Posted 02 August 2012 - 11:33 AM

No, I saw that, I was th inking of filling the grooves with a dab of glue to stop the movement. Thank you for finding exactly what the movement does, I will definitely hold off on doing this.
  • 0
4 - HvZ Games Played

22- Mods completed

#10 SgNerf

SgNerf

    Member

  • Members
  • 204 posts

Posted 02 August 2012 - 11:38 AM

Awesome writeup ,

Hopefully this will be a standard secondary or primary in the NIC.

This question might be old, but, is the plunger tube compairable to a nite finder's plunger tube?

Thanks!

Here are some approximated plunger dimensions i worked out for comparison:

Nite Finder Plunger
Inner diameter (ID) = 2.4cm
Plunger draw = 4.5cm
Total effective air volume = 20.37 cubic cm

Elite Retaliator Plunger
Inner diameter (ID) = 2.5cm
Plunger draw = 6.0cm
Total effective air volume = 29.46 cubic cm

The Elite Retaliator plunger has a larger air volume, but its offset by the added deadspace within the bolt system (air needs to travel 2"+ through the bolt before it propels the foam dart)... while the Nite Finder has very little deadspace 'cos the barrel is right in front of the plunger.

Overall, i would expect both blasters getting similar ranges if modded with equivalent spring loads (which is actually what i'm already seeing when i compare the performance of my modded Retaliators and Nite Finders).

I guess the significance here is that users can now have a clip-fed pistol sidearm (ie. just using the Retaliator main blaster only), that can easily get modded Nite Finder ranges with just a few simple and quick mods. :D

Edited by SgNerf, 02 August 2012 - 12:59 PM.

  • 0
Nerf News & Reviews! >> http://www.sgnerf.blogspot.com
Nerf Mod Guides! >> http://www.modworks.blogspot.com

#11 Frant1c

Frant1c

    Member

  • Members
  • 52 posts

Posted 02 August 2012 - 12:35 PM

Thank you for this excellent mod guide and explanation of the new Elite internals. I find your mod guides incredibly well-detailed, with the internal pictures clear and thorough. I always hold off modding my blasters until I see what you've done. I haven't had a blaster break yet when I follow your guides.
  • 0

#12 Roger Explosion

Roger Explosion

    Member

  • Members
  • 32 posts

Posted 02 August 2012 - 12:41 PM

Is that aftermarket spring you used from a Buzzbee Doubleshot? Because it looks quite alot like it. I have used a Doubleshot spring in my Retaliator and it fits quite nicely.
  • 0

#13 SgNerf

SgNerf

    Member

  • Members
  • 204 posts

Posted 02 August 2012 - 12:53 PM

Is that aftermarket spring you used from a Buzzbee Doubleshot? Because it looks quite alot like it. I have used a Doubleshot spring in my Retaliator and it fits quite nicely.

The aftermarket spring i used wasn't from a Doubleshot, i custom ordered them.

But it's good that you've highlighted that the Doubleshot spring can fit it too, can be a suitable alternative for modders who happen to have spare Doubleshots to salvage springs from. :)
  • 0
Nerf News & Reviews! >> http://www.sgnerf.blogspot.com
Nerf Mod Guides! >> http://www.modworks.blogspot.com

#14 Seprest

Seprest

    Member

  • Members
  • 41 posts

Posted 02 August 2012 - 02:44 PM

Is that aftermarket spring you used from a Buzzbee Doubleshot? Because it looks quite alot like it. I have used a Doubleshot spring in my Retaliator and it fits quite nicely.

The doubleshot spring was the smallest diameter spring I had on hand when I got this blaster.  It unfortunately was much too small for the draw of the plunger, and would rattle heavily inside.  I am surprised that you found a performance upgrade with it, maybe I should have just taken out the bolt lock and used it.  Either way, saving mine for jolt upgrades which people pay $ for on campus.  Surprised you had success with it.

Edited by Seprest, 02 August 2012 - 02:45 PM.

  • 0
4 - HvZ Games Played

22- Mods completed

#15 proplus

proplus

    Member

  • Members
  • 85 posts

Posted 02 August 2012 - 10:56 PM

Thanks!

Here are some approximated plunger dimensions i worked out for comparison:

Nite Finder Plunger
Inner diameter (ID) = 2.4cm
Plunger draw = 4.5cm
Total effective air volume = 20.37 cubic cm

Elite Retaliator Plunger
Inner diameter (ID) = 2.5cm
Plunger draw = 6.0cm
Total effective air volume = 29.46 cubic cm

The Elite Retaliator plunger has a larger air volume, but its offset by the added deadspace within the bolt system (air needs to travel 2"+ through the bolt before it propels the foam dart)... while the Nite Finder has very little deadspace 'cos the barrel is right in front of the plunger.


Overall, i would expect both blasters getting similar ranges if modded with equivalent spring loads (which is actually what i'm already seeing when i compare the performance of my modded Retaliators and Nite Finders).

I guess the significance here is that users can now have a clip-fed pistol sidearm (ie. just using the Retaliator main blaster only), that can easily get modded Nite Finder ranges with just a few simple and quick mods. :D


THIS is why I love you.

Edited by proplus, 02 August 2012 - 10:56 PM.

  • 0
"the peinus itself is a handle"

- Kane the medeocre

#16 SgNerf

SgNerf

    Member

  • Members
  • 204 posts

Posted 13 August 2012 - 01:14 PM

Just a quick update... i've discovered that there are new modders who may not be familiar with the bolt lock removal process for the Elite Rampage (which is similar to the Raider).

So instead of creating a whole new Mod Guide just for the Rampage (since it'll mostly be the same process as modding an Elite Retaliator), i've updated this Mod Guide with the Rampage bolt lock removal procedure:

Look on the left side of the Rampage casing, then remove the 2 machine screws and simply detach the bolt lock assembly.

Posted Image

Yes... the Rampage can still slam-fire even with the bolt lock removed. :)

Edited by SgNerf, 13 August 2012 - 01:14 PM.

  • 0
Nerf News & Reviews! >> http://www.sgnerf.blogspot.com
Nerf Mod Guides! >> http://www.modworks.blogspot.com

#17 ZoMbIe HuNtEr

ZoMbIe HuNtEr

    Member

  • Members
  • 62 posts

Posted 13 August 2012 - 01:33 PM

Just a quick update... i've discovered that there are new modders who may not be familiar with the bolt lock removal process for the Elite Rampage (which is similar to the Raider).

So instead of creating a whole new Mod Guide just for the Rampage (since it'll mostly be the same process as modding an Elite Retaliator), i've updated this Mod Guide with the Rampage bolt lock removal procedure:

Look on the left side of the Rampage casing, then remove the 2 machine screws and simply detach the bolt lock assembly.

Posted Image

Yes... the Rampage can still slam-fire even with the bolt lock removed. :)


You never stated where you get your silicone tips and foam...care to share?
  • 0
PHILIPPIANS 4:6
Check out my youtube channel for great reviews and modifications:
www.youtube.com/titanreceiver88
For even more detailed Nerf info, check out my blog
www.titanreceiver88.wordpress.com

#18 SgNerf

SgNerf

    Member

  • Members
  • 204 posts

Posted 13 August 2012 - 03:02 PM

You never stated where you get your silicone tips and foam...care to share?

The silicone tips i use are from inform3r at the OzNerf forum (i actually mentioned it in the 4th post).

For my stefans, the red hollow foam i use are also from inform3r too.

For my full length calibrated foam darts (as used in my modded Retaliator range test video), they are converted from normal streamline foam. :)

Edited by SgNerf, 13 August 2012 - 03:14 PM.

  • 0
Nerf News & Reviews! >> http://www.sgnerf.blogspot.com
Nerf Mod Guides! >> http://www.modworks.blogspot.com

#19 Jeo

Jeo

    Red Team: HooRah!

  • Members
  • 93 posts

Posted 14 August 2012 - 05:52 AM

Dimensions on the aftermarket spring you used?
  • 0

#20 SgNerf

SgNerf

    Member

  • Members
  • 204 posts

Posted 15 August 2012 - 09:51 AM

Dimensions on the aftermarket spring you used?

The aftermarket springs i use are around 83mm in length, 17.2mm OD with a 1.4mm wire thickness.
  • 0
Nerf News & Reviews! >> http://www.sgnerf.blogspot.com
Nerf Mod Guides! >> http://www.modworks.blogspot.com

#21 SgNerf

SgNerf

    Member

  • Members
  • 204 posts

Posted 15 August 2012 - 09:58 AM

Another Update!

I just bought a Buzz Bee Double Shot today to check out its springs (as i've been hearing that modders have been using them for their mods too). Took them out and compared them to my aftermarket ones.

Buzz Bee Double Shot Spring (left) vs. Aftermarket 8kg Load Spring (right).

Posted Image

They indeed have similar dimensions, though the double shot springs have abit more coils, they can still compress flat enough to fit within the space behind the Retaliator/Rampage catch area. I tested them and they work well in those blasters.

The double shot springs are noticeably lighter load though, they require around 30% less effort to compress... i compared them with another 5-6kg load spring which i custom made for my other modding projects and their loads felt similar. So i guess the double shot spring could be considered around 5-6kg load too.

They are stronger than the stock Retaliator/Rampage springs (which are estimated to be around 2.5-3kg), so they can be an alternative for those who prefer a lighter version of the 8kg load aftermarket springs that i use.

I did some ranges tests with the double shot springs and the shots averaged around just 10-15% less distance (compared to the 8kg load springs). Overall the range improvements are still quite decent, so they can be useful springs for those who have spare double shots to get them from. :)

Edited by SgNerf, 22 August 2012 - 10:55 AM.

  • 0
Nerf News & Reviews! >> http://www.sgnerf.blogspot.com
Nerf Mod Guides! >> http://www.modworks.blogspot.com

#22 Zorns Lemma

Zorns Lemma

    Sir Scrt

  • Moderators
  • 1,277 posts

Posted 15 August 2012 - 10:17 AM

The double shot springs are noticeably lighter load though, they require around 30% less effort to compress... i compared them with another 5-6kg load spring which i custom made for my other modding tests and their loads felt similar. So i guess the double shot spring can be considered around 5-6kg load too.


For future reference, all other factors equal (material, wire thickness, diameter), the spring with more coils with be weaker by precisely the % more coils.
  • 0
"In short, the same knowledge that underlies the ability to produce correct judgement is also the knowledge that underlies the ability to recognize correct judgement. To lack the former is to be deficient in the latter."
Kruger and Dunning (1999)

#23 Seprest

Seprest

    Member

  • Members
  • 41 posts

Posted 16 August 2012 - 07:30 AM

Very nice guide!

I can corroborate the ranges in this guide. Even with normal elite darts, these mods allow the blaster to hit 60-75ft flat. However, the 8kg load spring is very hard to prime, and I suggest that anyone who plans to upgrade the spring on the Retaliator to use a priming proxy, or you will not be able to rapid fire the blaster.


  • 0
4 - HvZ Games Played

22- Mods completed

#24 SgNerf

SgNerf

    Member

  • Members
  • 204 posts

Posted 20 August 2012 - 09:26 AM

More Updates!

For Rampage users, the metal priming bar connecting the pump action grip and the bolt sled on some units may bend slightly due to heavier spring loads (ie. 8kg load springs or heavier), therefore this could cause the plunger not to catch by just 1-2mm

This is already a known issue when modding Raider units, and consequently it could also affect Rampage units too, as they both share similar priming systems. Experienced modders will already be familiar with it, but new modders should take note.

If this occurs, the solution is to either apply a layer of foam padding on the plunger head as a spacer or epoxy the priming bar to make it stiffer. Another alternative is to cut a ring of PVC pipe and epoxy it to the back of the bolt as a spacer too. These various methods will help to add abit more distance to the plunger rod moving backwards to enable it to catch properly.

Edited by SgNerf, 20 August 2012 - 09:33 AM.

  • 0
Nerf News & Reviews! >> http://www.sgnerf.blogspot.com
Nerf Mod Guides! >> http://www.modworks.blogspot.com

#25 Darkdragon

Darkdragon

    Member

  • Members
  • 112 posts

Posted 27 August 2012 - 11:39 AM

Ill be picking up two of these, as toys r us has these on for buy one, get one free!! Thanks SGnerf, im suprised at the simplicity of these mods.
  • 0
Please visit my youtube:
https://www.youtube....d61VYhVvhEfeqGA


1 user(s) are reading this topic

0 members, 1 guests, 0 anonymous users