Jump to content


Photo

Homemade Rocket Launcher Contest Submission Thread

or, How we giggled like girls and gave away rockets

17 replies to this topic

#1 Draconis

Draconis

    I am not Lord Draconical

  • Members
  • 2,712 posts

Posted 26 July 2012 - 02:24 AM

Gentlemen, we beseech thee submit thine offerings upon this electronic altar, that they be judged and exalted as weapons (not really) of mass (not very much, really, because they are 90% foam) distraction (oh hey, a butterfly!).

Seriously, though, please post up pictures and descriptions of your entries here, and include your parts list, complete with costs, ranges, difficulties encountered, etc. Thanks for participating and good luck to you all!

Edited by Draconis, 26 July 2012 - 12:42 PM.

  • 0
[15:51] <+Noodle> titties
[15:51] <+Rhadamanthys> titties
[15:51] <+jakejagan> titties
[15:51] <+Lucian> boobs
[15:51] <+Gears> titties
[15:51] <@Draconis> Titties.
[15:52] <+Noodle> why is this so hard?

#2 KoRnEd

KoRnEd

    Member

  • Members
  • 209 posts

Posted 03 August 2012 - 10:56 PM

Posted Image

(First entry yay!)

The Retard Cannon
I took a 4B tank, gutted the pump(including the check valve), solvent welded it onto a 3 foot length of 1-1/4" PVC. That is connected to a 1/2" Check valve, which is opened by pushing the button on the pvc tee. The 1/2" PVC Tee has a hole drilled into it for a screw driver to open the check valve. The Tee was used rather than a 90 degree coupler because the amount of air flowing is very large, so I introduced a small bit of dead space to ensure that I don't blow my hand off. The Tee is connected to a 90 degree coupler, which is attached to the Rocket barrel (a length of 1/2" PVC with two rings of e-tape at 1" OD. The pump, being a 4B pump, maintains the OPRV
TL;DR: A JSPB with a huge-ass tank with a rocket barrel.
  • 0

20:07 tiredKitty living in NYC, you could spend a lot of time in Chinatown and only speak the mother tongue
20:07 tiredKitty Not a good idea, btw.

I have identified the problem: "maverick"


#3 the mod man

the mod man

    Member

  • Members
  • 79 posts

Posted 06 August 2012 - 11:43 AM

Posted Image

I present the PSAL (Pneumatic Solenoid Air Launcher). As the name states it's a solenoid release valve launcher. The solenoid valve was modified to run like a back pressure tank instead of it being operated by electricity. The trigger is a brass fill valve I sourced from a past rig. The air tank is a simple 2" PVC tank with a schrader valve for filling.
The parts list is as follows.

A 1.5' length of 2" PVC $3.00
3/4" IPS electronic control valve $12.58
2"x1-1/2" DVW reducer $1.47
1-1/2"x 3/4" bushing $.37
3/4" Black steel nipple $1.24
2" end cap $2.57
3/4" male adaptor threaded $.37
Brass release valve can be substituted with any release valve.
So can the brass nipple.


At the moment it's getting ranges of +70'at 20psi so I'm satisfied. It's deceivingly comfortable and is quite lightweight. Video will be up after my go pro finishes charging.
firing
range measurement
P.s. At NJW9 I shot it angled outranged every other blaster.

Edited by the mod man, 16 August 2012 - 04:18 PM.

  • 0
Draconis:"Youtube is a cesspool of coagulated troll urine, created by the inane electronic babble of people with no better use of time than to comment on videos silly people post."

#4 Demon Lord

Demon Lord

    Member

  • Members
  • 304 posts

Posted 08 August 2012 - 08:44 PM

So here I present to you an attachment to boost ranges: The Rupture Assisted Device System (R.A.D.S.)

Posted Image


You will need:
1" or 3/4" PVC union
Barrel Assembly (in this case the 3/4" PVC Venom has)
Reducing bushing to 1/2" PVC (to attach to the front your blaster)
Stub of 1/2" PVC
Saren Wrap

Insert rocket onto the end of the barrel.
Unscrew the union and insert the saren wrap between the two halves.
Attach the device to the front of your favorite blaster and fire!

The idea is that with a springer air pressure requires friction of the dart in the barrel to maintain pressure to fling the dart. With a rocket that's not possible, so what happens is the spring compresses the air behind the rupture disk and when the PSI is high enough the disk ruptures, creating an airgun like effect with the blaster. Initial testing with my plusbow and a Titan rocket resulted in an increase of 2 feet to the range of the missile. Without it it went 4 feet, with the rupture disk it went six feet. When attached to my 4B it went from 60ish to around 100+ when tin foil is used as a rupture disk. Best with high volume blasters.

EDIT: Now that the weather is clear I was able to test the system with my plus bow and rocket assembly. Without the disk, the rocket flew 30 to 35 feet and with the saren wrap it flew to 40 to 45 feet. Wind may have been a factor as it did start to rain, but we've got baselines now to play around with.

Edited by Demon Lord, 09 August 2012 - 01:12 PM.

  • 0
QUOTE(VACC @ Mar 7 2011, 09:03 AM) View Post

Don't worry so much about what other people will allow. Throw your own wars and kick your friends' asses until they all want one.

#5 Carbon

Carbon

    Contriberator

  • Moderators
  • 1,894 posts

Posted 11 August 2012 - 06:27 PM

The SNAP-7 Megabow with FlipFire®


Posted Image


Background:
It all stems from the fact that I love Defend the Core. My loadout for the game has always been something with pump action to clear the way, and then something to dump a huge amount of darts in when I got close. Recently, midwest rules for the game have changed to allow for scoring differences for large ammo. When the rocket contest came up, I saw it as a great opportunity to finally build the dual-ammo blaster I've always wanted.

My plan had to build a pump-action blaster with valve selectable barrels, but I didn't like that...like I was gonna take the time to flip valves while rushing the core. So, this blaster makes barrel selection as easy as possible: whichever barrel is on top is the one that will fire. I got the concept from the original Mad Scientist of NH, 3DBBQ: the tee directly in front of the plunger has a large metal bearing inside. It naturally seats against the pipe at the bottom of the tee, sealing off that barrel. Flip over the bow, and it moves to the other side. A bow is a natural for this kind of valve, as it doesn't matter which side is up.

Parts List:

Plunger tube:
~3' 2" PVC
2" coupler
2" -> .5" reducing bushing

Plunger rod:
.5" CPVC
.5" CPVC tee
1.25" endcaps
Small section of 1.25" PVC
Cotter pins
2.5" rubber washer
Bolt, nut and and finishing washer

Bow arms:
2x 3/4" 45 degree bends
3/4" PVC
1" PVC
1.25" tee
3/4" coupler
Bowstring

Barrels:
2x 3/4" tee
hopper barrel setup
2x 3/4" elbows
Rocket barrel material (I used Venom's "defective" .75" PVC)
~.75" ball bearing
Check valve
.5" of half inch copper tubing.

Cost:
~$35. (This is an estimate, as I largely build the blaster from scraps and on-hand parts...I spent $9 to get a few additional parts, most of which was a chunk of 2" PVC. My apologies if I missed a part or two in this list. I rounded high, at any rate.)
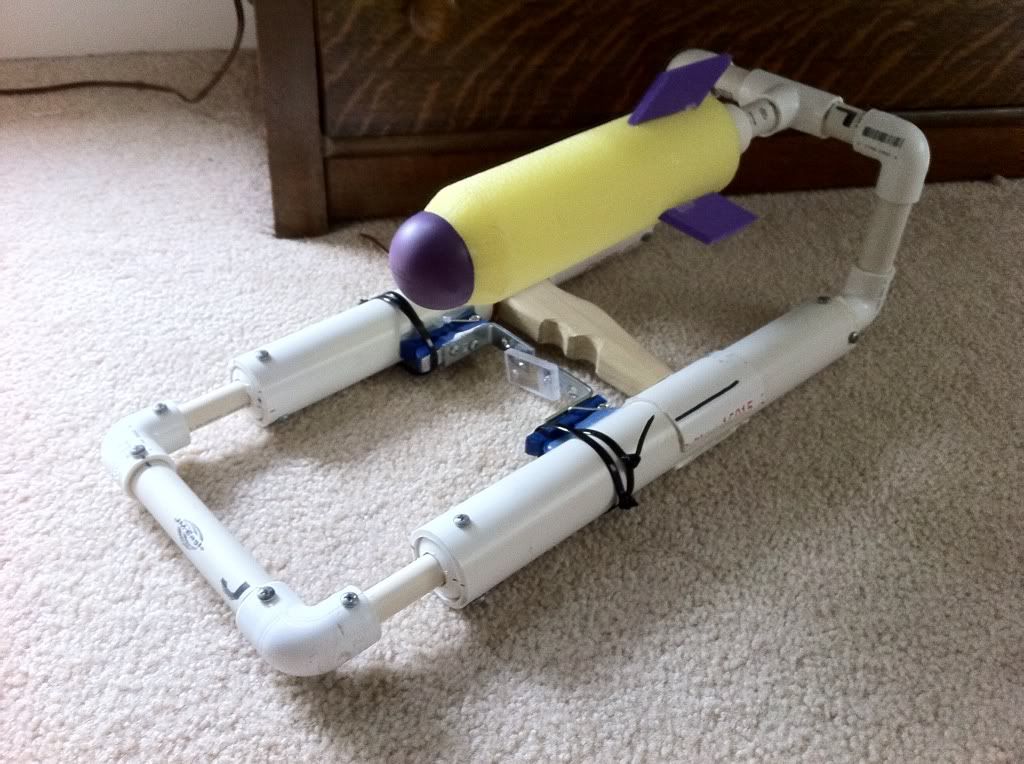
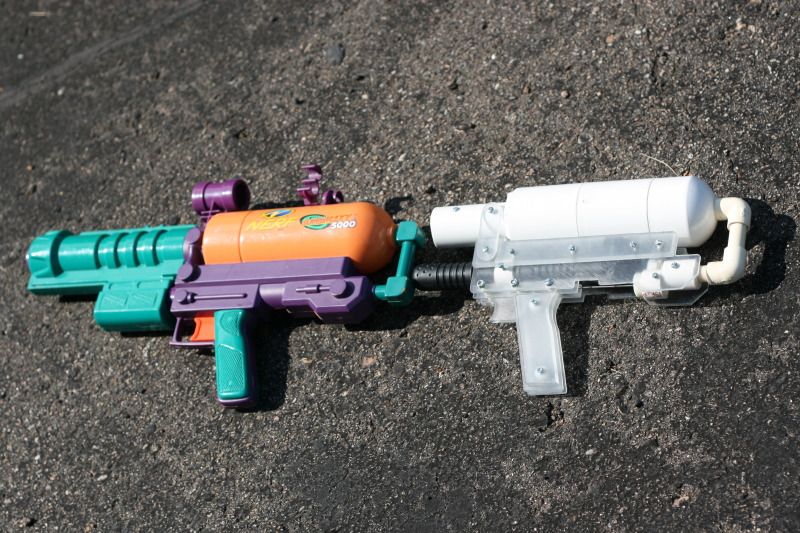
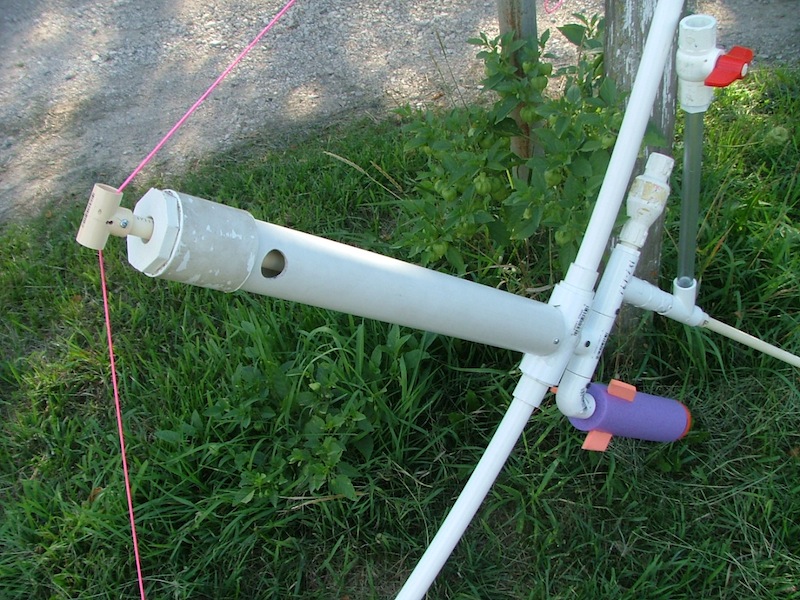
Description:
All around, this is pretty much a bow similar to the original SNAP-7 bow I posted (the big one, not the little one), except that the plunger tube is based off of 2" PVC with a 1.25" endcap plunger head. (The bow arm assembly is actually literally from that blaster, as I reclaimed those parts.) A 1.25" tee seats nicely inside 2" PVC with some tape to pad it out. The bushing for the end of the plunger tube is built into the 1.25" tee: 1.25" tee + 1.25" PVC + .75" coupler wrapped in tape, shoved in place. I drilled a 1" hole in the other side of the tee and filed it out slightly to allow .75" PVC to shove through, which then seated into the .75" coupler at the other side of the tee.

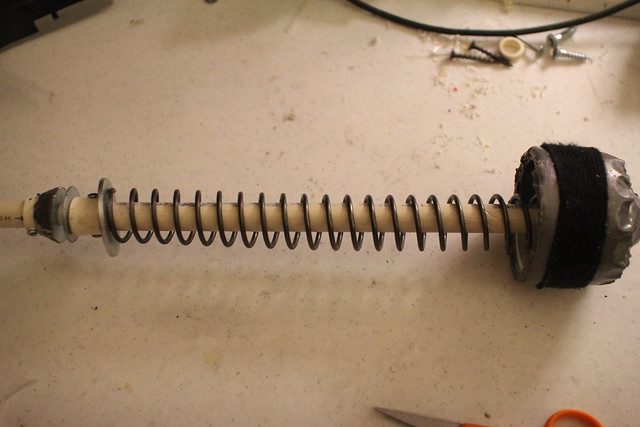
The plunger is essentially a SNAP-1 plungerhead: two endcaps with a chunk of PVC holding them together, a rubber washer bolted to the front, then the CPVC cotter pinned to it.

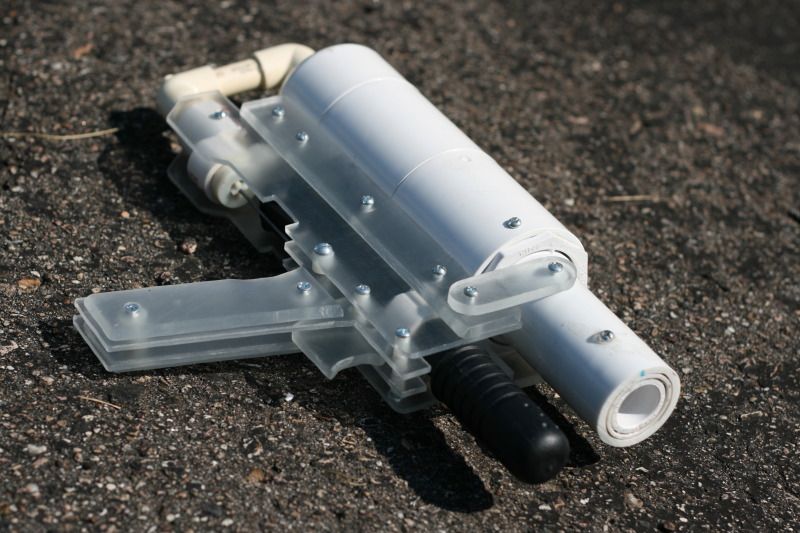
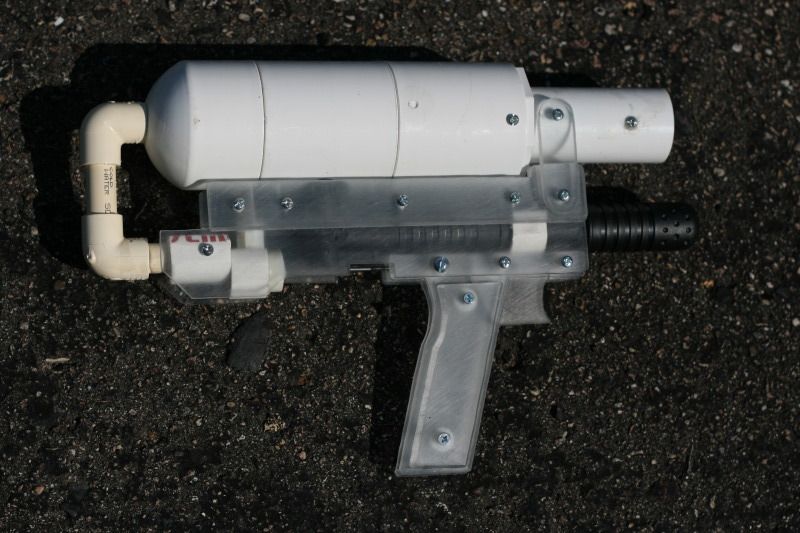
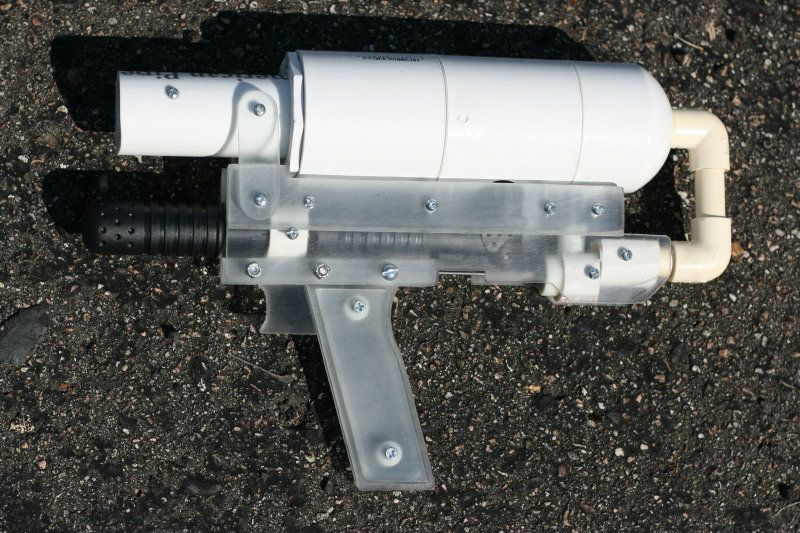
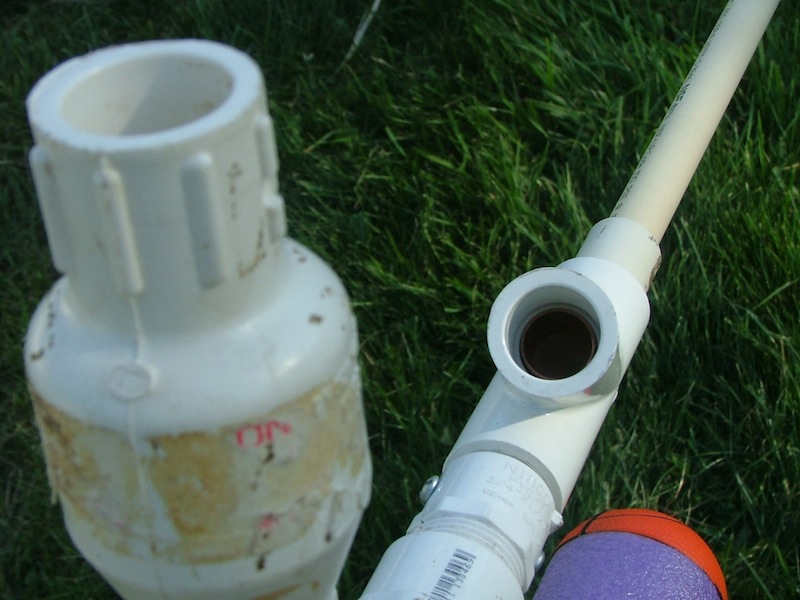
The FlipFire valve is a .75" tee with a large ball bearing trapped inside. The stubs of PVC used to connect the elbows serve as the valve seats: they must be cut flat and smooth. Extra credit for beveling the edges or glueing in an o-ring, but I haven't found it to be necessary.

The 2" plunger is big. I mean, it's BIG. As such, plunger suck is a major problem. So, I installed a check valve, and installed a small antisuck mechanism in the wye: a small ring of .5" copper slides snugly in the wye, allows the next dart to feed, and keeps the dart from sucking backwards upon draw.
Posted Image

Also, SpeedHoles are vital, due to the huge air draw. (The hole in the back of the plunger tube are 1" in diameter.
Posted Image

Ranges:
Ranges are currently in a state of tweak, as barrel length needs to be adjusted.

Darts:
It's currently firing about 110' feet with a 19" barrel. Crazy big. However, there's still enough airflow that I'm still getting double shots. (The barrel was longer, but didn't shoot well).

Rockets:
Rockets are firing 46' (measured). The amusing thing is that the bow arms don't provide quite enough "oomph" to fire the rocket with range: it goes about 15 feet that way. I get best results by treating it like a ramrocket and manually pushing the plunger forward. Whether this is a function of my bowarms or plunger length is still up for question. It's possible that the blaster would do better with a narrower, faster plunger, rather than monstrous air volume.

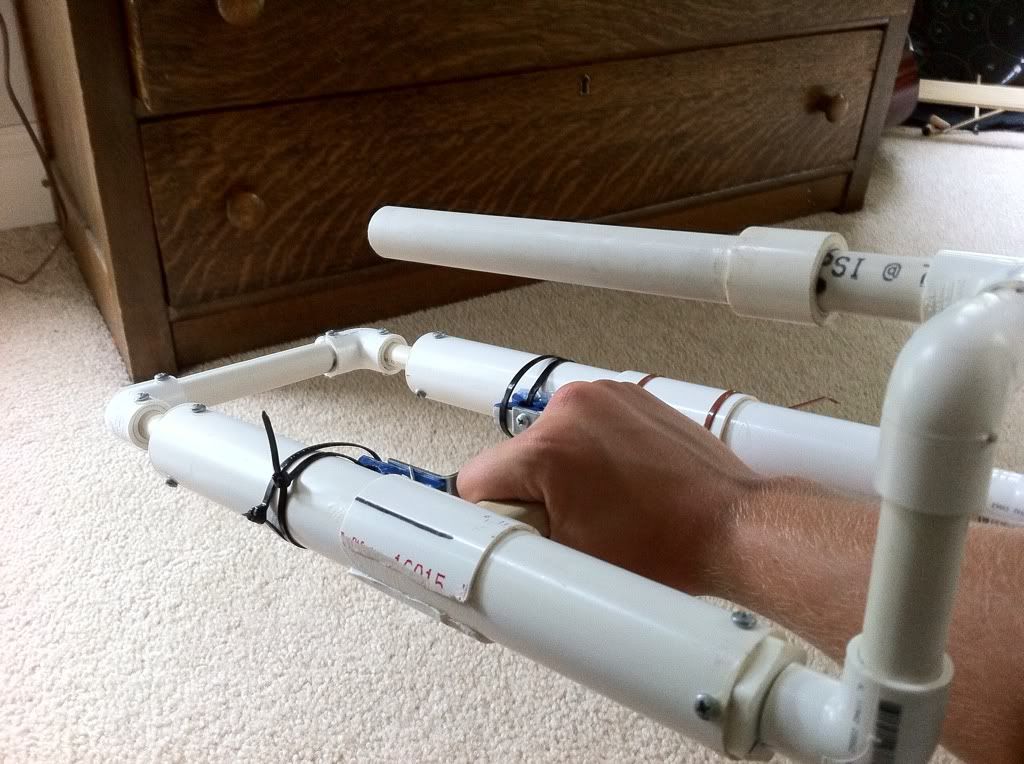
It's also worth noting that the draw isn't too hard. I could probably increase power by shprtening the bow arms and making a harder pull.

8-12-12 Edit
Turns out part of the range and power issues I was having was due to my rubber washer: too big, and causing too much friction. I replaced it with the one I used on the Big SNAP, and had a gain of 5' on the bow powered rocket fire (so it's shooting about 20' by bow now).

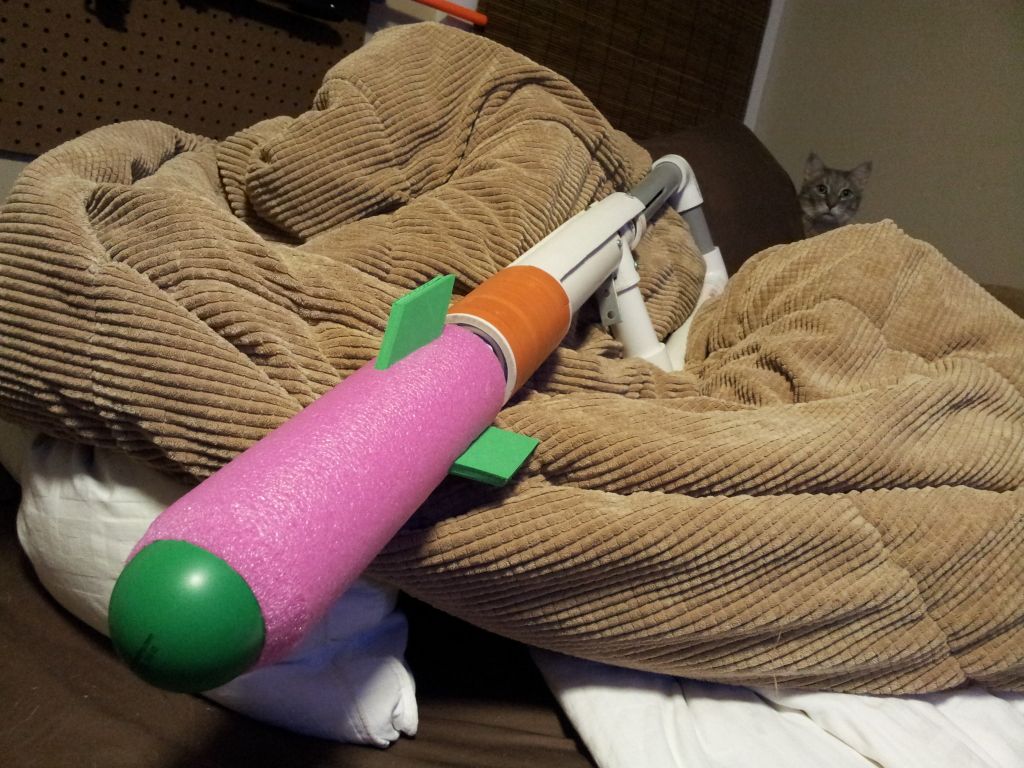
For science, I tried removing the arms, and using it just as a ramrocket/HAMP style blaster. The barrel, as you might expect, wobbled all over the place, making it wildly inaccurate. The bow arms are unwieldy (yes, it's a 6' longbow), but it adds accuracy.


Stuff to fix:
Obviously, it'd be nice to make rockets fire futher by bow power.
My plunger currently overdraws into the speed holes, so the rubber washer gets caught. Fixed with a 1" section of .75" PVC on the plunger rod. Once again, not elegant, but easy.
Screwing down the rest of the PVC joints so nothing wiggles.
Gooping the front 1.25" tee would be nice, but my seal is already pretty decent with duct tape and screws.
The elegant way to attach the check valve would have been to use a cross directly in front of the plunger tube, but I was all out of elegant. As such, I used another tee.
Every so often, the rocket will poop out about three feet while firing darts. This is probably from shaking the bow too much while firing, and breaking the bearing seal. This could be fixed by beveling the inner edge of the PVC inside the tee, to give the bearing a larger surface to seat against.

Overall, this is something I would use to rush the core in a rounds of DTC...spam a hopper of darts, then shoot a rocket when I'm within 40'. My goal was to get the rocket to fly over 40' (quite far enough for a round of DTC), so I'm quite pleased with the results.

Edited by Carbon, 19 April 2015 - 04:30 PM.

  • 0
Hello. I am Indigo of the Rainbow Clan. You Nerfed my father. Prepare to die.

#6 zx532

zx532

    Member

  • Members
  • 216 posts

Posted 14 August 2012 - 01:27 PM

My original design was for a nerf replica of the M1 bazooka, but (predictably) that project is behind schedule, and over budget. So here is just the stuff needed for it to shoot.

Posted Image

It is just a 2" SNAP
the plunger head needed some redesigning though, since almost none of the parts scale up properly.
Posted Image
Posted Image

from left to right, or top to bottom (depending on whether or not Photobucket decides to work...)
Starting after the catch, which is the standard 1 1/4" catch
-A small washer out of my Random Box O Washers
-1" fender washer
-2" washer
-2" neoprene fender washer
-1 1/2" neoprene fender washer
-1" fender washer
Total cost (for the whole plunger head/catch assembly): $5.92

Plunger tube is 1' of 2" PVC (with end caps)
Barrel is the defective PVC from Venom
Standard clothespin catch/trigger (except that the nail isn't cut)
Powered by a [k26]
There are two 5/8" air vents in the back (this is to allow the plunger head to move forward without creating a vacuum behind it, slowing it down)
Plunger rod is 1/2 CPVC
Total cost: $8.74

Overall Cost: $14.66 (I have not included the 6% CT sales tax, due to the fact that it varies greatly depending on location)

Ranges kind of suck (compared to the 60' goal)
40-45 feet
  • 0
Progress: Just a long line of people saying "See? I told you it could be done"

#7 JPRoth1980

JPRoth1980

    Member

  • Members
  • 56 posts

Posted 14 August 2012 - 07:33 PM

Homemade PulseStrike a la Buff. Nothing terribly original here:

Posted Image

Sorry for the kind of crappy pics. Pump is a bit leaky but fills to 60 PSI in about 40-50 pumps (which is ridiculous, but hey, I'm new). Ranges are around 80-100' feet at that point. So basically, it's a great big piston-and-pump rocket launcher. Useful for flinging a single piece of foam upfield, but that's about it. Which is why I included the couplers up top. Behold!

Posted Image

That's the PulseStrike attached way off the front of a fugly SnapBow. Great for things like DtC where you need an ordinary primary and a nice rocket to dump in the core. Heavy? Yes. Awkward? Of course. Fun? Oh hell yes.

Plans for the future include a total rebuild with a shorter body (I'm wasting air as it is here) and adding a compressor and turret for more rocket-firing fun.

Parts List:
1 1/4" PVC
3/4" PVC
1 1/4" x 3/4" PVC Reducing Bushing
1 1/4" PVC Endcap
1 1/4" PVC Male Threaded Adapter
1 1/4" PVC Female Threaded Adapter
3/4" PVC Tee
3/4" PVC Ball Valve
3x 3/4" CPVC Couplers
2x Ace 49 Springs
3/4" PVC Endcap
3x 1/2" PVC Couplers
Superlative Plunger Head
Pump

Minus the pump, the total cost is about $20.00. Including the pump, it gets more expensive.


Oh, and for the record, I pretty much suck at getting purple primer to stay still. ;)

[Edited for Parts List]

Edited by JPRoth1980, 16 August 2012 - 11:13 AM.

  • 0

#8 Ivan S

Ivan S

    Member

  • Members
  • 123 posts

Posted 14 August 2012 - 11:51 PM

3", two section snap.
Posted Image

Plunger showing:
Posted Image

Close up of interesting parts of the plunger:
Posted Image

The back half is a standard snap body, but the plunger rod extends into a 12" long 3" plunger tube. This allows a k12 spring, which is too big for a normal snap, because it catches on the nail, to be used with the normal snap trigger set up. The catch is behind the spring, and catches at the handle while the spring is kept inside the 3" pipe by a large washer "floating" on the plunger rod. It has 6 3/4" vent holes in the plunger tube, and uses 1" polycarbonate tube as a barrel.

It uses a hamp-like 2" endcap wrapped in duct tape and yarn as a punger head. To my knowledge, rubber washers aren't made big enough for 3" pvc.

The 9637k12 spring is immensely powerful. With 68 pounds of draw force, it's the strongest 11" spring big enough to fit cpvc that Mcmaster sells. Using this spring, I thought that decent range would be basically guaranteed, so long as the gun didn't explode from the force, but ranges are actually kind of disappointing, at around 30'.

There are several things that could be improved. Deadspace and plunger head mass could both be reduced, and adding another inch of compression(currently 6") would probably help a lot. I'll give updates if I make any progress, but that is what I have for now! Update below.

Total cost was about $25. the main cost is the 3"x2" couplers. But apart from that and the other large pvc parts, everything is pretty cheap and is stuff you'll have laying around if you've built a snap before.

(maybe a bit too comprehensive)Parts list:

Body:
12" 1 1/4" pvc
1 1/4" - 2" pvc bushing
2" - 3" reducing coupling
12" 3" foam core pvc
2" - 3" reducing coupling
2" - 1" pvc bushing
1" - 3/4" pvc bushing
12" 1" OD polycarbonate tube

Trigger:
Clothespin
7/8" nail
1 1/2" angle iron

Plunger rod/head:
1/2" cpvc tee
12" 1/2" cpvc
Epoxy putty ramp
#6 bolt(holds next 5 parts together)
1/2" cpvc endcap
1" fender washer
nylon spacer
another 1" fender washer
another 1/2" cpvc endcap
large fender washer (ID larger than cpvc, OD larger than 1 1/4" pvc)
9637k12 spring
2" pvc endcap
duct tape
yarn
1/2" x 1/2" carriage bolt cpvc endcap (to attach head to rod)
1/2" machine screws to hold the whole thing together

EDIT: I hope it's not too late for a quick update.
I shortened the plunger rod so the spring is pretensioned and gets full compression. I also shortened the plunger tube to match and remove some deadspace. Finally, to reduce plunger head mass, I got rid of the carriage bolt screwed into the plunger rod, and replaced it with an endcap machine screwed on. It now gets a respectable 45 feet.
It takes some muscle to prime, but is still totally doable. The full compression is just barely visible through the vent holes.
Posted Image

Edited by Ivan S, 16 August 2012 - 03:45 PM.

  • 0
You can never take nerf too seriously, but you can easily take yourself too seriously.
~Talio

#9 TheSilentRebel

TheSilentRebel

    Member

  • Members
  • 172 posts

Posted 15 August 2012 - 10:16 AM

MantaSnap! (Snapray?)

Posted Image

Intial cost was $26. Materials cost no more than $17. Uses a Venom Barrel. Primes like a trombone. Kicks like a horse.

x6 1/2" PVC elbow
x1 1/2" PVC tee
x2 1"-1/2" reducer bushing
26" of 1 1/4" PVC
x2 Superlative snap plunger heads (1/4 20 bolt, 1/2 cpvc end cap, 1 1/4" steel washer, nylon spacer, washer, 1 1/2" rubber washer, 1" rubber washer, #8 finishing washer, 1/4 20 locknut, epoxy putty)
x2 clothespin triggers (clothespin, roofing nail, epoxy putty, angle bracket, #8 screws)
x2 3/4"PVC end caps
x2 full [k26] springs
30" 1/2" cpvc
Hot glue
Epoxy putty
Various lengths of 1/2" PVC
#8 screws
Wood

Posted Image

I still need to find a way to mount the launcher onto my arm better but it is functional as of now. Shoots rockets between 55' and 65' consistently (measured).

Posted Image

Also, using wyes and 45 degree elbows to increase airflow would probably increase my range.

Edited by TheSilentRebel, 15 August 2012 - 10:22 AM.

  • 0
We are men of action, lies do not become us.

#10 venom213

venom213

    Member

  • Validating
  • 1,294 posts

Posted 15 August 2012 - 04:19 PM

VenoMaxx: Homemade SuperMaxx 5000

Posted Image

Posted Image

Posted Image

Posted Image

Posted Image

This is a project that I had in the works long before this contest came around. This contest proved to be the motivation I needed to finally finish this project, however. It is by no means "done", in a sense of finality, but it is fully functional as of now.

The VenoMaxx is constructed in a similar style to a +bow. The main body and handle are made out of polycarbonate, held together with mechanical fasteners. The only adhesives used on this gun were used to connect vinyl tubing to the pump and blast button as well as gluing together the air tank. The tank is an expanded hornet tank, with roughly 3-4 times the volume of the stock tank. I just used one of those because they've been reliable in the past, but really you could use virtually any backpressure tank. I have an updated version of my OPRV inside of it to make sure the pressure stays within reason. The trigger is a sliding trigger that connects to a hornet blast button via a piece of music wire. The fake tank portion of the blaster is made out of a rounded 2" PVC cap (Home Depot kind) and two 2" PVC coupler. This assembly reduces down to 1 1/4" PVC, which the expanded hornet tank is nested into and secured with screws. The tubes sticking out of the back of the gun are made out of 1/2" CPVC and 2 CPVC elbows. This assembly in conjunction with the two plates at the front of the blaster are what keep the tank assembly secured to the blaster frame. The pump, blast button, and CPVC coupler at the rear of the blaster are in snap on piece of 3/4" PVC with squared off sides. This makes them very easy to secure in the shell as well as more snug.

Part list:
-4x 3/8" 6-32 flat head screws $.32
-2x 1" 6-32 pan head screws $.20
-2x 3/8" pan head screws $.18
-5x 3/4" 6-32 pan head screws $.50
-2x 1.5" 6-32 pan head screws $.22
-9x .5" 6-32 pan head screws $.45
-2x 6-32 lock nuts $.22
-3x 1" Long 1/4" OD 6-32 Thread Aluminum Spacers $2.40
-2x 1/4" ID 1/2" OD Nylon Spacers $.60
-2x 1/2" Long 1/4" OD 6-32 Thread Aluminum Spacers $1.20
-2x .5" 10-24 screws $.40
-2x 3/16" ID 3/8" OD 1/4" thick nylon spacers $.40
-6x #6 1/4" OD 1/4" thick nylon spacers $.78
-5/64" Music Wire $.43
-1x Hornet tank
-1x Hornet Blast Button
-1/4" Polycarbonate ~$2
-1/8" Polycarbonate ~$2
-1x Small Bike Pump $4.89
-2x 2" PVC Couplers $1.94
-1x 2" PVC PVC Cap $1.56
-2x 1/2" CPVC 90 Degree Elbows
-1x 1/2" CPVC Coupler
-1x 1/2" CPVC Cap
-1x 1/2" PVC Coupler $.36
-1x 1" PVC Cap $.66
-1/4" Vinyl Tubing NA (scrap)
-1x Barbed Tee or quick connect tee $1.25
-2" PVC NA (scrap)
-1 1/4" PVC NA (scrap)
-1" Thinwall PVC NA (scrap)
-3/4" PVC NA (scrap)

Ranges:
My Draconis Missile is a lemon. It doesn't shoot more than about 10 feet from my Roto Rocket, which I know for sure works well. This blaster is definitely less powerful, so it's no surprise that the ranges with the Draconis Missile are pitiful. I'm going to be getting some fresh missiles soon, so I'll post ranges then. For now, all that I know is that it shoots an Air Zone Missile 40-50 feet flat.

Cost:
I certainly did not pay over $30 for this project. It helped that a lot of the materials and parts were purchased in bulk, as well as a lot of the parts/materials were scrap or just random things I had sitting around. If you have NOTHING and want to build one of these, yeah, you'll probably pay over $30, but then you'll extra parts/materials for more builds.

Watch the video below:

http://www.youtube.com/watch?v=iZEgxT1-HKs

Edited by venom213, 16 August 2012 - 05:04 PM.

  • 0

#11 snickers

snickers

    Member

  • Members
  • 241 posts

Posted 15 August 2012 - 08:30 PM

My homeade rocket launcher contest entry.


Part list
1 tire valve- I get mine free
1 3/4in sprinkler valve- $12
1 pvc endcap- 20c
4 pvc elbows-20c ea.
2 pvc t's-20c ea.
2 threaded 3/4in to 1/2in adapters-25c ea.
1 light switch-35c
6 AA's- They come in bulk from costco. 10c ea.
3ft of 1/2in pvc- I buy it in 10' lengths for $1.99 so roughly 75c for 3ft.
70PSI of air- Free

Total cost: $14.85


Edited by snickers, 17 August 2012 - 03:27 PM.

  • 0

#12 SlightlySane813

SlightlySane813

    Member

  • Members
  • 213 posts

Posted 15 August 2012 - 09:10 PM

After having 2 missiles fail and many mishaps with the blaster that almost broke a window with its plunger rod I glad that I at least have something to submit.

I made a Par55 style blaster with american parts.

Posted Image
I've been Photobombed!
Posted Image

Not the most original thing in the world (literally, credit to SGNerf) But with my limited time I repurposed some parts like the 2" PVC pump slide, and the slotted bar at the back. The barrel is 3/4" PVC that has been shrunk by heating it and forcing it into a piece of 1" PVC followed by a thorough sanding to get just the right fit

Total cost was minimal as I had most supplies already but similar to the R2Ls I've contracted I would say that total cost would be ~$35

Parts list:

1 - 1" PVC tee
1 - L bracket
a lot - 1/2" #6 screws
a lot - 1/3" #6 screws
1" CPVC
1.5" PVC
duct tape
1" PVC
2 springs
#6 nuts
1/2" PVC
1/2" rod (I used solid core for more strength)
#8 or bigger screws
1/2" PVC tee
1.5" PVC
1" PVC coupler
1" to 1/2" reducer
1" PVC
2 - 1" elbows

Ranges unfortunately top at about 47ft.

I'll add ranges and a detailed parts list tomorrow when I get a chance.

Edited by SlightlySane813, 21 August 2012 - 06:03 AM.

  • 0
Also known as the French Canadian eh!

#13 Pointman9

Pointman9

    Member

  • Members
  • 131 posts

Posted 15 August 2012 - 10:00 PM

My contribution: the Mega Combobow.

Made with 2 [k26]'s in line, and 3/4 in CPVC bow arms adding power. Parts list is identical to a SNAPBOW mk 5 with the addition of the tee and the bow arms.

Fires darts about 150 feet, and fires the rockets 58-65 feet.

Posted Image

Overall cost was about $40

Edited by Pointman9, 16 August 2012 - 02:22 PM.

  • 0
There is no such thing as overkill. There is only cost efficiency.

#14 Buffdaddy

Buffdaddy

    Do not buy from this member

  • DO NOT TRADE
  • 824 posts

Posted 15 August 2012 - 10:51 PM

I hereby introduce the Homemade Roto Rocket!

Posted Image

It's a backpressure system, using an airflow-modded air nozzle (the one I had on hand is from Lowes; the ones at Harbor Freight work better) to trigger the tank.

Since I didn't take pictures during assembly, enjoy this 3D model/internals I did up today:
Posted Image

The pump and nozzle are omitted in this pic. You fill up the air in the rear, pushing the skirt seal forward. A check valve in the center of the plunger head lets air into the main tank. 1/2" CPVC runs all the way to the front, with a large hole in the middle for air to flow in and out of the tank. A ring of 1/2" PVC inside the barrel keeps the entire assembly straight. To improve airflow, more holes are drilled at the front of the CPVC. The front end of the CPVC is capped off, with a sealing surface glued in place (I used craft foam for the prototype). This presses against the front of the barrel.

Basic Parts list, future models may vary:

Dual-action bike pump
1 1/4" PVC pipe
1 1/4" PVC coupling
1 1/4" PVC tee
1 1/4" to 3/4" PVC bushings
1/2" CPVC
McMaster skirt seal
1/2" to 3/4" CPVC coupling and bushings
3/4" CPVC
3/4" CPVC to 3/4" PVC transition coupling
Aquarium check valve
Air nozzle
3/8" air tubing
1" OD metal tubing (Aluminum would be first choice, but I had stainless steel on hand)

Overall, including $10 for the bike pump, the total spent was about $22.

Of course, ranges: I'm getting 60' easily with this thing, at about 15 pumps. The barrel needs polished a bit, as the bits of adhesive on it from construction make the rocket stick longer than it should. That, combined with a wider air nozzle or other valve could probably result in getting the same results in 10-12 pumps.
  • 0

#15 cheyner

cheyner

    Member

  • Members
  • 240 posts

Posted 15 August 2012 - 11:18 PM

Cobra Commander.

Posted Image

I know Cobras are one of the examples of what not to enter into this contest, however, I asked Draconis about a tank expanded one firing multiple rockets. He said that if I could get it to fire two rockets he would include it.

Posted Image

I went for three.
Posted Image

As you can see, I used a 2" ABS tee with a 4" long chunk of ABS and an end cap, all the ABS was solvent welded together. This is where it got interesting, 2" ABS fittings are the only fitting, or anything for that matter, that I had access to that fit the Cobra tank even close. I ended up having a several mm gap between the walls of the tank and the fitting once I cut the tank. I used several wraps of e-tape to make up the gap, leaving the end bare of tape, I also cut a 3/16ths wide gap into the tape down to the plastic. I used Pl Premium in generous amounts on the the rings of bare plastic I was left with on either end of the tee. After sitting for 48 hours before testing it has held air tight and strong at the joints.

To extend the inner barrel dealy I cut it leaving enough room for the stabilizer to still be used, then press fitted on 1/2" CPVC couplers to either end. I am unsure of the length of CPVC I used to connect the 2 coupler together, but it would be different depending on how far the ABS tee is inserted into the tank, I do know when all is said and done the end with the rubber grommet needs to be 1 1/2" in from the end of the tank.

To attach the pressure gauge I got lucky at first, as 1/8" threaded fittings will screw onto where the red cap is on a stock Cobra. However, the plastic will not take much stress before it breaks off, I ended up drilling it out and tapping it for a 1/8" fitting. I followed that up with a galvanized 1/8" elbow and a 100 psi pressure gauge.

I replaced the pump with a bike pump that only needed a few wraps of tape and a good push to fit in where the stock pump was. The PVC on the grip is to patch up a leak my pump replacement caused.

Ranges.
The First number is the average for the purple and pink rockets, which flew the same distance give or take a inch or two every shot. The second number is for the blue rocket, which for some reason or another just refuses to fire as far as the other 2.

3 at a time:
30psi- 55', 40'. 40psi- 60', 46'.

2 rockets at a time:
30psi- 69', 62'. 40psi- 85', 69'.

1 at a time:
30psi- 118', 115. 40psi- 128', 125'. 50psi- 145', too much pumping for a second shot at this point when I was testing.

Parts:
Cobra- $30
Pressure gauge- $4
Bike pump- $2
2" ABS Tee
4" of 2" ABS
2" ABS end cap
2x 1/2" CPVC coupler
Random length of CPVC
1/8" male threaded fitting
1/8" female threaded elbow fitting
All parts without prices I have gotten at work sites over the years.

I am using 1" aluminum tube from Lowes as my rocket barrels.
  • 0

Beaver's post claiming Kane's post claiming Demon Lord's post is correct is correct is correct.


Canadian Nerfers-R.I.P.

#16 Righteous Fondue

Righteous Fondue

    Member

  • Members
  • 110 posts

Posted 15 August 2012 - 11:36 PM

My entry:
Posted Image
Posted Image
Essentially a Madghost/CVAB/Pulsestrike blaster
I've got a video uploading ATM, and in it I showcase the blaster.
Ranges, sadly, are only 30' since there's too much friction and the trigger pull is intense, so if you were going to do it, MAKE SURE YOU GET THE RIGHT O-RINGS AND SPRINGS
Parts list:
2'-ish of 1.25" PVC $1
1.25" coupler $.50
1.25" X 3/4" PVC bushing $.50
3/4" Checkvalve $10
3/4" PVC >$1
1/2" PVC 4-way tee $.50
1/2" PVC >$1
3/4" PVC Endcap $.50
Spring $3-$7 depending on what you used, I went with a [k26]
1/2" CPVC >$1
Screws to hold in endcap $>1
O-rings (1.25" OD, 1" ID, and a 5/8" ID, 3/4" OD one) $2
3 3/4" x 1/2" bushings $2 (I used the round kind, didn't need to dremel them at all)
2 1/2" CPVC endcaps $1(For plugging the 3/4" x 1/2" bushings in the piston)
1/2" Elbow $.50
Pump $1-$10
Barrel $1-$5
Tearing your hair out over a blaster that gets 40'? Priceless.
Cost is about $30 depending on what type of pump and barrel you use.

EDIT: Weeeeeeeeeeeeeeeeeeeeeeeeeeeeeeeeeeeee
http://www.youtube.com/watch?v=G6PxMDOcY2A

Edited by Righteous_Fondue, 16 August 2012 - 12:03 AM.

  • 0
They don't think it be like it is, but it do.

#17 Draconis

Draconis

    I am not Lord Draconical

  • Members
  • 2,712 posts

Posted 16 August 2012 - 12:01 PM

Okay folks, thanks for all of your hard work! Now comes the difficult part... the grading. Give me a few days to go through it all and I will post up the results.
  • 0
[15:51] <+Noodle> titties
[15:51] <+Rhadamanthys> titties
[15:51] <+jakejagan> titties
[15:51] <+Lucian> boobs
[15:51] <+Gears> titties
[15:51] <@Draconis> Titties.
[15:52] <+Noodle> why is this so hard?

#18 Draconis

Draconis

    I am not Lord Draconical

  • Members
  • 2,712 posts

Posted 14 September 2012 - 08:32 PM

Okay, sorry about the delay, folks. This has been more difficult to wade through than I had anticipated. On to the results!


Air Pressure Category:

First Place: Buffdaddy
Second Place: Venom213
Third Place: Korned

Sprung Plunger Category:

First Place: The SilentRebel
Second Place: Carbon (by a narrow margin!)
Third Place: Pointman9

Thank you all for your participation! I will be sending out the prizes as soon as possible. There were some really great entries this year, and I hope to make this an annual contest.
  • 0
[15:51] <+Noodle> titties
[15:51] <+Rhadamanthys> titties
[15:51] <+jakejagan> titties
[15:51] <+Lucian> boobs
[15:51] <+Gears> titties
[15:51] <@Draconis> Titties.
[15:52] <+Noodle> why is this so hard?


0 user(s) are reading this topic

0 members, 0 guests, 0 anonymous users