Jump to content


Photo

SanchoPanza

An ultra compact pump-action SNAP

20 replies to this topic

#1 Daniel Beaver

Daniel Beaver

    HQRSE CQCK

  • Moderators
  • 2,099 posts

Posted 23 November 2011 - 11:01 PM

Introduction

My SNAP-2 style of blasters have proven themselves very effective over the last year of nerfing, but they have always suffered from "gigantic and unweidly" syndrome. There are ways of making compact pumpSNAPs, but I wanted something radically short. I'm never one to pass up stealing a good idea, so I built a prototype blaster based on the SNAP-4. That was sort of a one-off project which I didn't have much hope for, but it ended up performing very well at the first Puerto Rican war I held. In some of the tight corridors at the school we played at, the compact reverse layout proved to be very handy. I set out to improve that blaster, and the result proved to be quite practical in the following war.

I present Quixote's punchy sidekick, SanchoPanza:

Posted Image


What makes this blaster special? The entire blaster, barrel included, is 21" long. For comparison, Quixote is 50" long. Even a "small" SNAP, such as a SNAPbow mk5, is significantly longer - about 27" when you use a footlong barrel. That compact size comes at zero cost to performance. With a draw length of 6.5" and a barrel length of 16", this blaster matches the performance of top-tier springers.
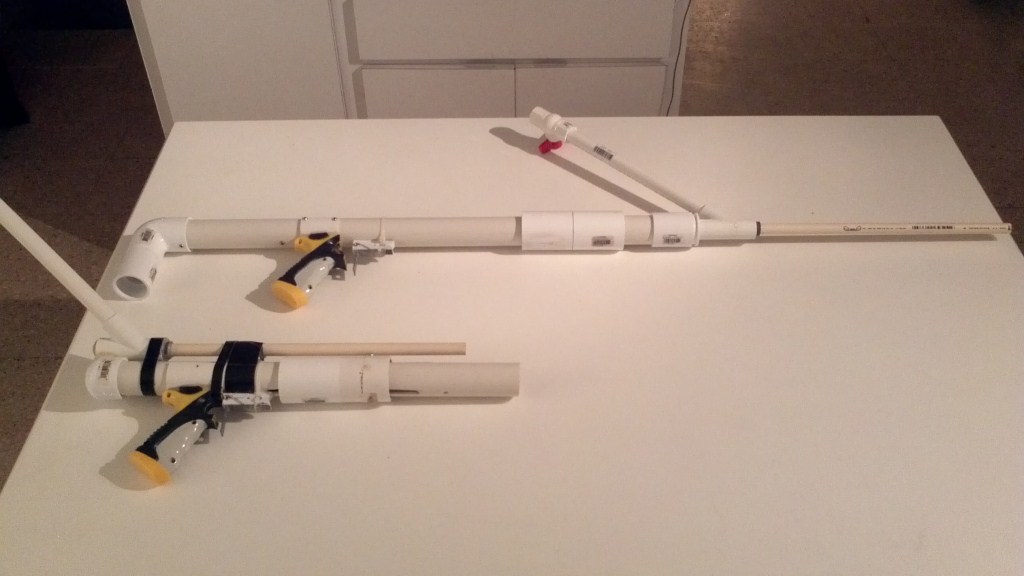
Posted Image


Materials

- Required
* Optional, but recommended

Tools
- Power drill
- Drill bits to go with it (1/16", 1/4", 1/2", etc)
* Tapping bits
- Rotary tool (dremel)
- Reinforced cutting disk
- Sanding bit
* Diamond cutting wheel (better for cutting plastics)
- Pipe cutter
* Three-sided drafter's ruler

Plunger rod
- 1/2" cpvc
- 1/2" cpvc cap
- 1-1/4" OD 1/4" ID washers
- 1/4" screw
- PVC cement OR superglue
- [k26] spring

Plunger head <- don't feel obligated to follow this exact design
- 1-1/2" OD 1/4" ID (or smaller) rubber washer
- 1-1/4" OD 1/4" ID (or smaller) rubber washer
- 5/6" OD 1/4" ID (or smaller) rubber washer
- 2x 1-1/4" OD 1/4" ID washers
- Spacer (can be any size you want, as long as the nail fits)
- 1/4" bolt, 5/8" long
- 1/2" CPVC cap
- epoxy putty
- Silicone grease

Plunger tube and stock
- 1-1/4" sch40 PVC
- 1-1/4" PVC cap
- 3/4" PVC endcap
- 4x 10-24 set screws, 1/2" long (5/8" and 3/4" also works)

Trigger
- Heavy-duty clothespin
- 1-3/4" roofing nail
- Metal L bracket
- zip-ties
- Epoxy putty
- Hot glue

Priming handle
- 2x 1-1/2" PVC coupler
- 1/4" bolt, 5/8" long <- DO NOT USE BRASS OR ALUMINUM
- Tape or glue

Handle
- Donation blaster
- 1-1/2" PVC
- 1/4" set screws,
- 4x 6-32 screws, 1/2" long (3/8" or 1/4" are be better, but sort of difficult to find)
- Epoxy putty
- Hot glue


Construction

Since this is a sister blaster to the Quixote, many of the construction techniques and materials are identical. If I neglect to describe certain features (e.g., the handle, spring rest) it is because those features were described in great detail in the Quixote writeup. Here is an overview of the internals.

Posted Image


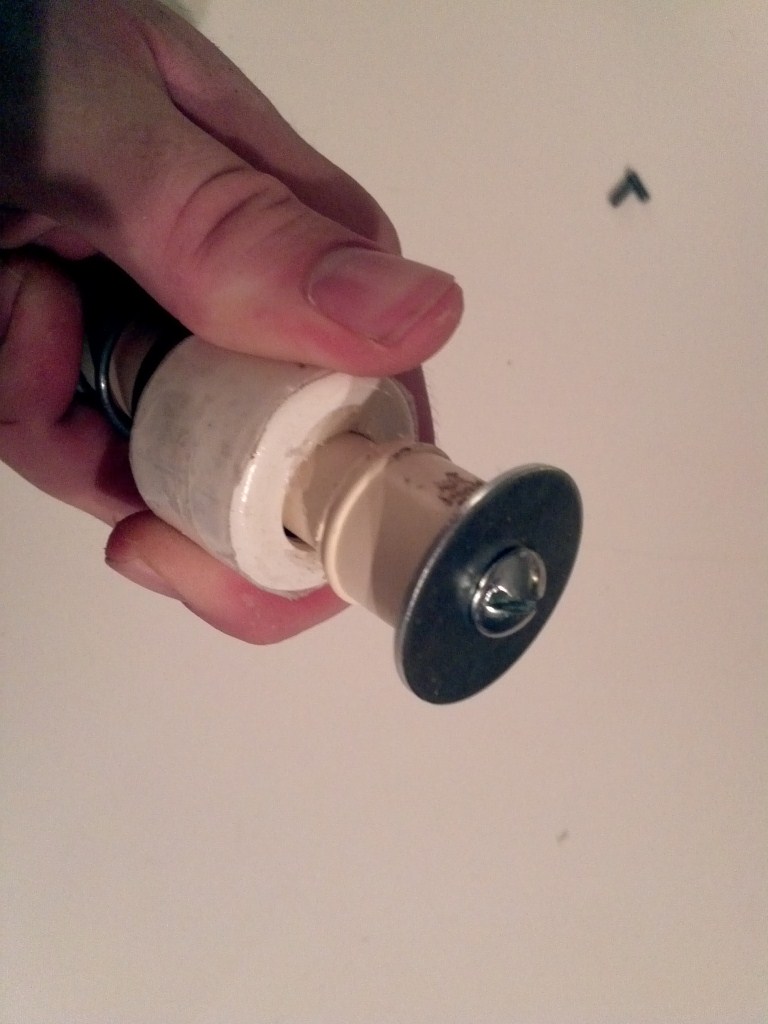
Start with the plunger rod. The plunger head is a standard superlative plunger head. Follow the link to Rork's guide if you don't know how to build these. I use 1/4" bolts for SNAP plunger heads, and my materials list reflects that. The Quixote writeup includes some more tips and tricks.

Don't feel obligated to use this design, there are all sorts of ways to build plunger heads.

Posted Image


Slide a [k26] onto your plunger rod, along with a spring rest. Past the spring rest, place another endcap, drill and tap a 1/4" hole into it, and fasten a 1-1/4" washer. This will act as a priming surface for the priming bolt. Make sure the plunger rod extends a bit past the spring rest, so that the endcap doesn't collide with it. Eventually, you need to glue or mechanically fasten this to the plunger rod, but wait until you have the rest of the blaster built before you do that.
Posted Image


Set screws are required to hold the spring rest in place, since the priming handle slides over this section. I would recommend using four 10-24" set screws. I originally just used two 6-32 set screws, but they began to deform the plastic (normally, the heads of the screws would provide a lot more support).

Posted Image

Posted Image


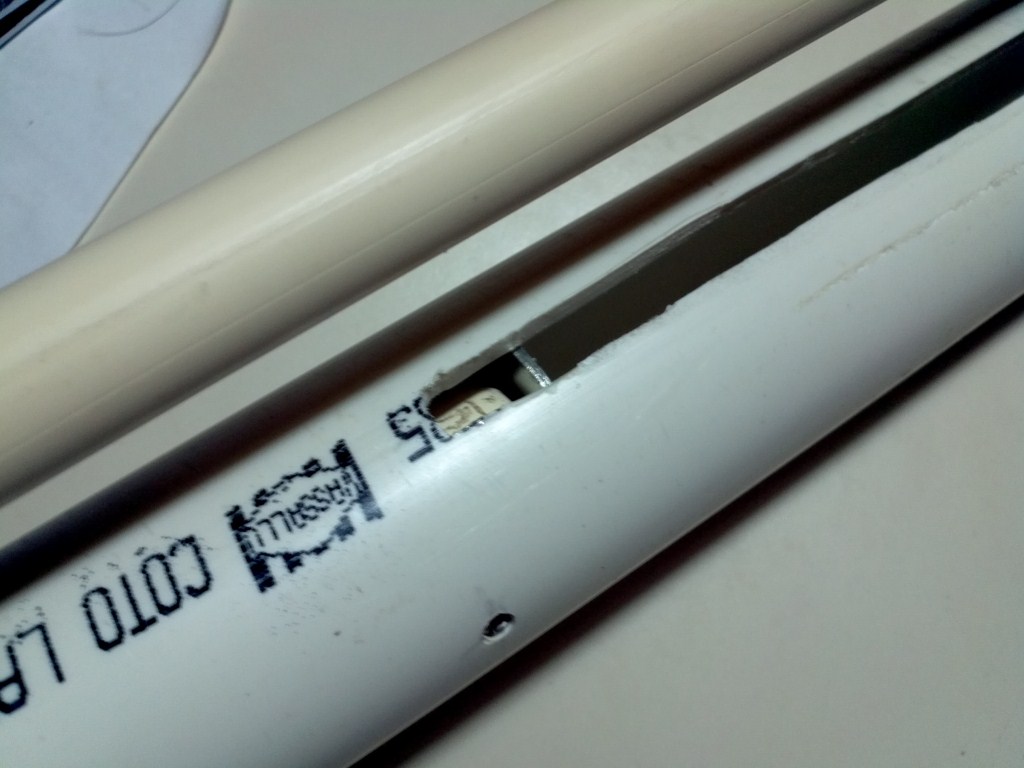
The priming handle is mostly identical to what I used in Quixote, but with a twist: you can position the screw such that the ridge in the coupler provides some extra support.

Posted Image


Cut the slot. If you have 6.5" of draw, the slot needs to be at least 7" long (due to the width of the bolt). Start right at the edge of the spring rest.

Posted Image


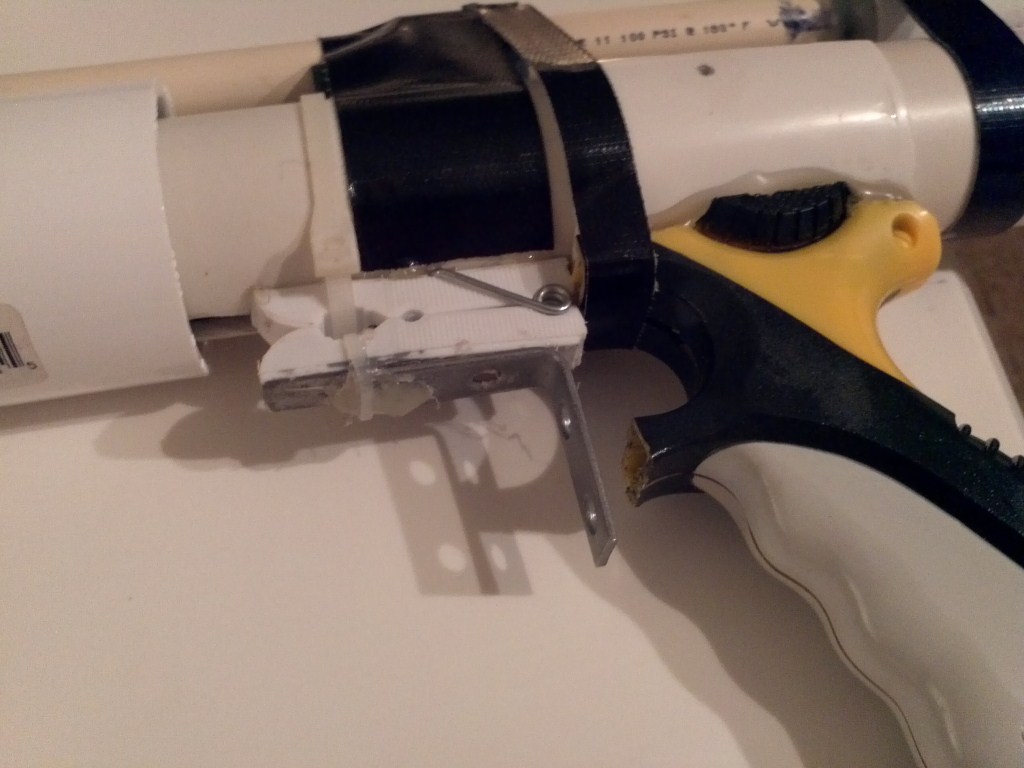
Attach the trigger and handle. You can use a zip-tie to hold the trigger. Note that you cannot use thru holes to hold the handle - you would be poking holes in your plunger tube! Instead, use a snap-on handle and a ton of hot glue. Hot glue is deceptively strong when applied liberally.

At this point, you should install the plunger rod, spring and priming handle. Test to make sure the blaster primes and fires.
Posted Image


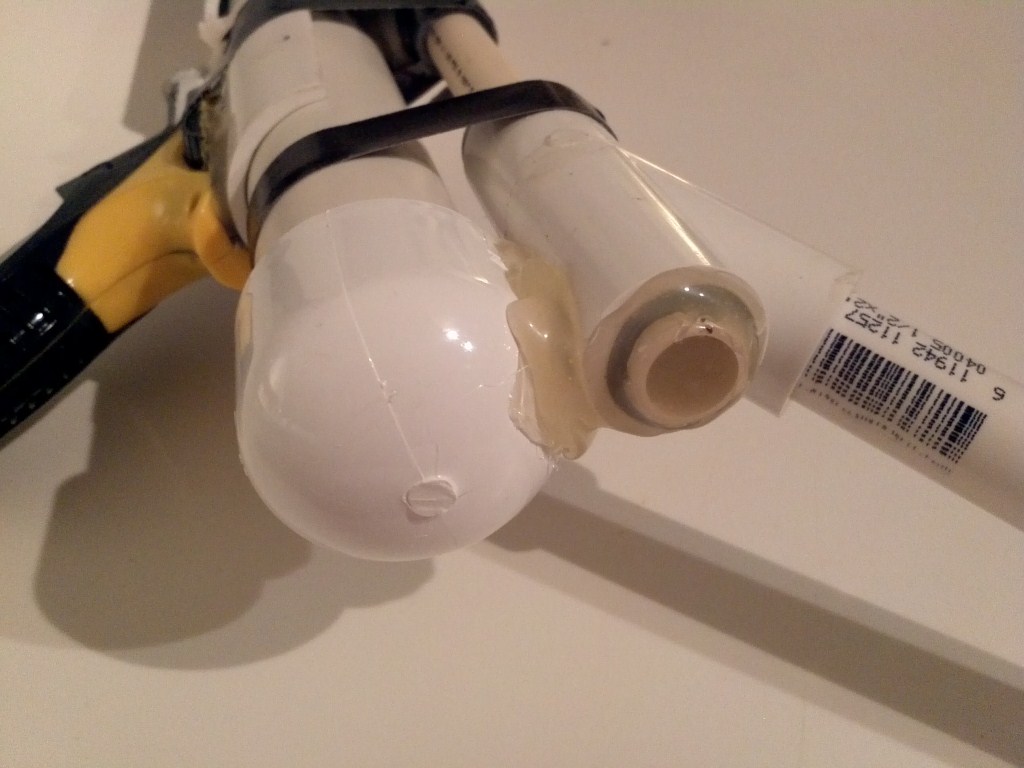
Now comes the tricky part: you need to mount the hopper and barrel. Glue an endcap onto the back, and then cut a 1/2" hole into the top of it. Cut another 1/2" hole into the underside back end of a hopper, at a 45 degree angle. This is important: the hopper must lean outwards from you, or else it gets in the way of your face.

I sealed everything together using a gigantic blob of hot glue. The rear opening of the hopper was sealed using a plug and even more hot glue. Some of you may erotically massage this, but I find it quite servicable. Everything seals perfectly, and it is very strong (so strong that I couldn't even pry it apart to get internal pictures for this writeup).

One last thing: you should put a dart stop into the back of the hopper. A couple darts got sucked into the plunger tube during the couple hours this blaster was used at the war.
Posted Image


Add a support for the barrel - it flops around otherwise. Use whatever is laying around the shop.

Posted Image


Lubricate the plunger head with silicone grease - accept no substitute. Run the plunger head through the blaster a few times to get it lubed up, adding a little bit each time. I would recommend using some tape to secure the barrel and hopper.

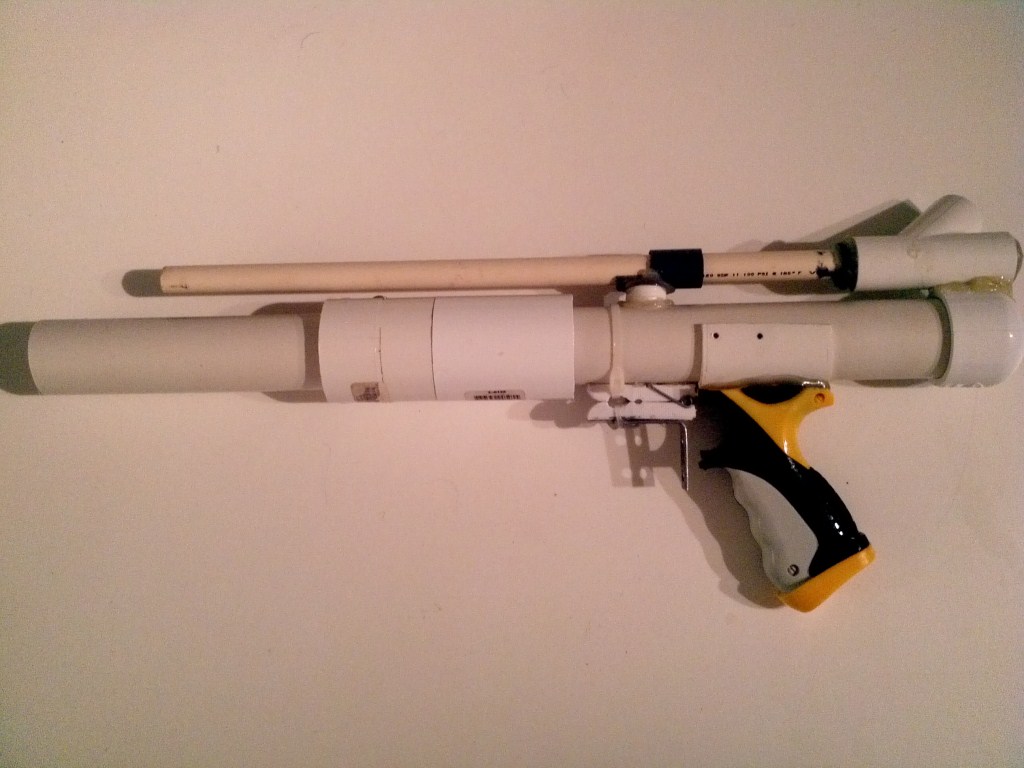
Done. It clocks in at 230fps on my chrono. Push to prime. It is a surprisingly accurate blaster, partly due to the lack of "kick" inherent in this layout.
Posted Image
  • 0

#2 snakerbot

snakerbot

    Maker of Things

  • Members
  • 310 posts

Posted 24 November 2011 - 12:07 AM

Holy moly, that is seriously awesome. Props, dude. I'm not a fan of the push-to-prime, but even so...
  • 0

#3 snakerbot

snakerbot

    Maker of Things

  • Members
  • 310 posts

Posted 24 November 2011 - 12:07 AM

Edit: My bad on the double post. Something went wrong here.

Edited by snakerbot, 24 November 2011 - 12:08 AM.

  • 0

#4 Cannonball

Cannonball

    Member

  • Members
  • 357 posts

Posted 24 November 2011 - 05:52 AM

Wow. You really took my quote and ran with it! This thing looks awesome! I like the idea of being able to actually sight down your barrel now. I'll have to get all my materials together and build one of these ASAP! Nice job, man. Keep up the good work.
  • 0

#5 veto

veto

    Member

  • Members
  • 40 posts

Posted 24 November 2011 - 12:25 PM

Isn't it difficult to prime if you are pushing forwards?
  • 0

#6 ChaosPropel

ChaosPropel

    Member

  • Members
  • 586 posts

Posted 24 November 2011 - 12:29 PM

I love it Beaver! I'll be building one as soon as I get some more 1.25" PVC.
  • 0
Preheat oven to 350 degrees F (175 degrees C).

#7 lionhawk

lionhawk

    Member

  • Members
  • 218 posts

Posted 24 November 2011 - 02:10 PM

I like it, but I have to raise up a question. I don't see a comfortable place to grip with your priming hand, because if you grip on the primer, when you shoot, it could be dangerous.
  • 0

#8 ChaosPropel

ChaosPropel

    Member

  • Members
  • 586 posts

Posted 24 November 2011 - 03:03 PM

I like it, but I have to raise up a question. I don't see a comfortable place to grip with your priming hand, because if you grip on the primer, when you shoot, it could be dangerous.

The priming handle returns to the original position after priming.
  • 0
Preheat oven to 350 degrees F (175 degrees C).

#9 ChaosPropel

ChaosPropel

    Member

  • Members
  • 586 posts

Posted 24 November 2011 - 03:04 PM

I like it, but I have to raise up a question. I don't see a comfortable place to grip with your priming hand, because if you grip on the primer, when you shoot, it could be dangerous.

The priming handle returns to the original position after priming.
  • 0
Preheat oven to 350 degrees F (175 degrees C).

#10 lionhawk

lionhawk

    Member

  • Members
  • 218 posts

Posted 24 November 2011 - 03:18 PM

I know that it returns to the position, I just don't like the idea of one handing the blaster when I shoot.
  • 0

#11 ChaosPropel

ChaosPropel

    Member

  • Members
  • 586 posts

Posted 24 November 2011 - 07:05 PM

Is the trigger nail on this the same as in a normal pullback or pump action snap? No change in length requirement?
  • 0
Preheat oven to 350 degrees F (175 degrees C).

#12 Daniel Beaver

Daniel Beaver

    HQRSE CQCK

  • Moderators
  • 2,099 posts

Posted 24 November 2011 - 09:01 PM

Is the trigger nail on this the same as in a normal pullback or pump action snap? No change in length requirement?


Yes, it is a very standard SNAP catch.


I know that it returns to the position, I just don't like the idea of one handing the blaster when I shoot.


You don't need to one-hand it. Check out the firing video I posted for my old prototype blaster - the priming motion is the same on this gun.


I'm toying around with a pump-action version of this right now, based on that 1" PVC nesting blaster I posted yesterday. The ring catch I built for it isn't working right now, so I need to fiddle with it some more before I post anything.

Edited by Daniel Beaver, 24 November 2011 - 09:03 PM.

  • 0

#13 ChaosPropel

ChaosPropel

    Member

  • Members
  • 586 posts

Posted 24 November 2011 - 09:30 PM

How long was your PT? Plunger rod? I'll hopefully be getting the materials for one of these tomorrow....very excited for the product!
  • 0
Preheat oven to 350 degrees F (175 degrees C).

#14 jolt

jolt

    Member

  • Members
  • 30 posts

Posted 25 November 2011 - 09:40 AM

Nice job, I love how it resembles a HAMP.
  • 0

#15 bennorco

bennorco

    Member

  • Members
  • 126 posts

Posted 25 November 2011 - 05:05 PM

Snaps are starting to get on my nerves, but its a very nice writeup and gun.
  • 0
Buy this stuff^

#16 gehaga

gehaga

    Member

  • Members
  • 62 posts

Posted 25 November 2011 - 07:17 PM

Push priming blasters may be unorthodox, but you can't argue with it's compact size. Adding this to my list of things I need to try. Well done.
  • 0

Send me a PM with your address, credit card info, a scandalous picture of your mother, and your social security number. Okay, I'm kidding about the social. And the credit card.


#17 Daniel Beaver

Daniel Beaver

    HQRSE CQCK

  • Moderators
  • 2,099 posts

Posted 25 November 2011 - 08:33 PM

Those of you who aren't enamored the method I'm using to attach the barrel and hopper might want to give this method a try. Plug the end of the plunger tube with a standard SNAP coupler, and then attach the hopper using two elbows. You can cover that connection using a 1-1/4" Tee, which can then double as a stock. No crazy hot glue blobs required.

Posted Image

Posted Image

Edited by Daniel Beaver, 25 November 2011 - 08:35 PM.

  • 0

#18 Carbon

Carbon

    Contriberator

  • Moderators
  • 1,894 posts

Posted 26 November 2011 - 06:16 PM

Great job, Beaver...reverse plunger SNAP built for the Hopper era! I've always liked using the SNAP-4, but to say that it was unreliable is an understatement. I designed it using liberal amounts of Stupid, which even subsequent rebuilds could never entirely remove. I just never had luck using it for extended periods, even though I liked the general ergonomics.

A couple thoughts about barrel/hopper attachment:

1) I actually like the first method you used for attaching the hopper (aside from the glue blob), as it allows you to get the barrel very close to the line of the plunger...something that's a lot harder to do with two elbows (I cut down the junction area between my two elbows, and it's still not as close as your direct attachment method). In place of the Blob, I'd probably use a half inch of .5" PVC filled with glue and another endcap (more removable and subjectively better aesthetics).

2) The specter of Dead Space always gets raised, since adding two elbows adds a few inches of it.Did you test for/see a difference in chrono when you made the change?

Snaps are starting to get on my nerves

This amuses me.
  • 0
Hello. I am Indigo of the Rainbow Clan. You Nerfed my father. Prepare to die.

#19 Daniel Beaver

Daniel Beaver

    HQRSE CQCK

  • Moderators
  • 2,099 posts

Posted 26 November 2011 - 08:25 PM

Snaps are starting to get on my nerves

I build SNAPs for these writeups because I think nerf should be accessible to everyone. Few have the skills to fabricate, or the money to buy custom built diddle cannons, and it sucks to be on the receiving end of their non-consensual love. Pump-action SNAPs are the vaginal dentata of nerf - they level the playing field, so that the better nerfer can win, rather than the one who can afford to buy a pump-action rainbow from Ryan. I've used pump-action SNAPs against some of the best nerfers and best blasters, and I think they work quite well.

That said... I use pump-action rainbows when I have the option. Fuck these chickenshit peasant weapons.


Great job, Beaver...reverse plunger SNAP built for the Hopper era! I've always liked using the SNAP-4, but to say that it was unreliable is an understatement. I designed it using liberal amounts of Stupid, which even subsequent rebuilds could never entirely remove. I just never had luck using it for extended periods, even though I liked the general ergonomics.

I seem to recall that you mostly had issues with the inline clip - those things were laughably unreliable.


1) I actually like the first method you used for attaching the hopper (aside from the glue blob), as it allows you to get the barrel very close to the line of the plunger...something that's a lot harder to do with two elbows (I cut down the junction area between my two elbows, and it's still not as close as your direct attachment method). In place of the Blob, I'd probably use a half inch of .5" PVC filled with glue and another endcap (more removable and subjectively better aesthetics).

The first method is highly superior, IMO, but requires more work. It's how I used to connect hoppers onto HAMPs. I also like how close it brings the barrel to the plunger tube - it makes it very easy to stabilize the barrel (which is a must!).

Your endcap plug suggestion is a good idea, and I'll try that on any future versions of this blaster.


2) The specter of Dead Space always gets raised, since adding two elbows adds a few inches of it.Did you test for/see a difference in chrono when you made the change?

I did not test the difference - the picture is actually from a different blaster. I'm not sure how much of a difference it would really make, given that it only increases the total plunger volume by 10%. While that might seem like a lot, consider that the volume between the dart loading area of a hopper and the plunger tube in a very standard hopper setup adds about 5% to the volume of the plunger tube, and results in only a very small drop in velocity (from 240 to 230fps on my SNAPs, for example). I'll test it in January, but school will keep me away from nerf projects until then.


Some people have been wondering which side to cut the slot. While you can place it on any side of the blaster you want, the top makes the most sense. The head of the 1/4" bolt sticks out into your hand or fingers otherwise. I actually screwed up the first slot I cut, so I had to cut a second one. I tried to hide that in the pictures, but some of you figured it out.
  • 0

#20 Bchamp22795

Bchamp22795

    Member

  • Members
  • 209 posts

Posted 26 November 2011 - 10:48 PM

Some people have been wondering which side to cut the slot. While you can place it on any side of the blaster you want, the top makes the most sense. The head of the 1/4" bolt sticks out into your hand or fingers otherwise. I actually screwed up the first slot I cut, so I had to cut a second one. I tried to hide that in the pictures, but some of you figured it out.


I just built one today. My screw is on bottom and is actually covered and supported by a 3/4" PVC "rail" (as mentioned in rork's SNAP mk V) with a foregrip. I highly suggest the vertical grip. I made mine with 7" of draw to compensate for deadspace and its too difficult to do without the grip.

Instead of the blob or 2 elbows, I drilled a 5/8" hole on the top as if I were doing the "blob" method. Then stuck a small nub of CPVC in it, partly nested in 1/2" PVC. Then an elbow went on top with epoxy putty to seal it up and keep in steady. I then added the Wye and found that 1/2" CPVC worked very well in the small gap between the wye and the PT when I used the elbow joint method described above. I used that to stabilize my barrel.

Excellent build! I absolutely LOVE this push action SNAP. Keep it up!

Edit: I also sealed up the rear (front?) of the plunger tube with an 3/4" PVC end cap wrapped in e-tape and gooped in. So the elbow is flush with the 1.25" pvc when attached. Also, you must put in the end cap and then drill the 5/8" hole through both the 1.25" PVC and part of the end cap. Or else you have a ton of dead space.

Edited by Bchamp22795, 26 November 2011 - 10:51 PM.

  • 0

#21 ChaosPropel

ChaosPropel

    Member

  • Members
  • 586 posts

Posted 27 November 2011 - 08:50 PM

Just finished up mine. It's great! Materials only coated about $20-25, and it was pretty easy to build. I used a Nf handle similar to how Beaver did in the OP, and used the two-elbows method, but I cut down the tees so that I have as little deadspace as possible. I still need to glue the wye on, though. So far, just shooting around the house, it works really well, especially since it has an almost perfect seal. I really love this thing, and building it was actually quite pleasant (VERY unusual for me, haha) until the end, when the fine tuning came in.

I will have pics and some more specs up tomorrow.
  • 0
Preheat oven to 350 degrees F (175 degrees C).


2 user(s) are reading this topic

0 members, 2 guests, 0 anonymous users