Jump to content


Photo

Quixote

A super-simple pump-action SNAP

24 replies to this topic

#1 Daniel Beaver

Daniel Beaver

    HQRSE CQCK

  • Moderators
  • 2,096 posts

Posted 12 November 2011 - 07:17 PM

This thing is so ungodly long and unwieldy I was referring to it as my Lance the whole day. Because of this, I decided to name it Don Quixote.


Introduction

This blaster is a refinement of a refinement of a refinement of a refinement. At it's core, it is a derivative of Carbon's SNAP 7.5 Pump Crossbow, which is itself a refinement of his SNAP 2. I took the idea and ran with it. What sets the SNAP 7.5 style blasters apart from Stark's style (of which Nerfomania's design is a derivative) is that the priming action is in front of the catch, rather than behind. Though behind-catch-priming-blasters are much shorter, they are more complicated to build, requiring a lot of dremel cuts. The design I'm presenting in this writeup is very simple to build, requires no specialized parts, and delivers absolutely top-tier performance.


Posted Image


A couple of things to note before you start building one:
- This blaster is very long - the main body is 32", and the total length is 50" if you add a hopper and 16" barrel. If you are very short you will have trouble operating this blaster.
- This blaster has 6.5" of draw. This is detrimental to the long-term health of the spring, so you'll need to replace it every so often.

FYI, you can click on any of these pictures to get a full-sized view.


Materials

- Required
* Optional, but recommended

Tools
- Power drill
- Drill bits to go with it (1/16", 1/4", 1/2", etc)
* Tapping bits
- Rotary tool (dremel)
- Reinforced cutting disk
- Sanding bit
* Diamond cutting wheel (better for cutting plastics)
- Pipe cutter
* Three-sided drafter's ruler

Plunger rod
- 1/2" cpvc
- 3x 1/2" cpvc couplers
- 2x 1-1/4" OD 5/8" ID SAE washers
- epoxy putty
- PVC cement OR superglue
- [k26] spring

Plunger head <- don't feel obligated to follow this exact design
- 1-1/2" OD 1/4" ID (or smaller) rubber washer
- 1-1/4" OD 1/4" ID (or smaller) rubber washer
- 5/6" OD 1/4" ID (or smaller) rubber washer
- 1/4" bolt, 5/8" long
- 1/2" CPVC cap
- Silicone grease

Plunger tube and stock
- 1-1/4" sch40 PVC
- 2x 1-1/4" coupler
- 1/2" to 1-1/4" bushing
- 1-1/4" elbow
- 3/4" PVC endcap
- 3x 6-32 screw, 1/2" long (5/8" and 3/4" also works)

Trigger
- Heavy-duty clothespin
- 1-3/4" roofing nail
- Metal L bracket
- zip-ties
- Epoxy putty
- Hot glue

Priming handle
- 2x 1-1/2" PVC coupler
- 1/4" bolt, 5/8" long <- DO NOT USE BRASS OR ALUMINUM
- Tape or glue

Handle
- Donation blaster
- 1-1/2" PVC
- 1/4" set screws,
- 4x 6-32 screws, 1/2" long (3/8" or 1/4" are be better, but sort of difficult to find)
- Epoxy putty
- Hot glue


Construction

Here's an overview of the internals.

Posted Image


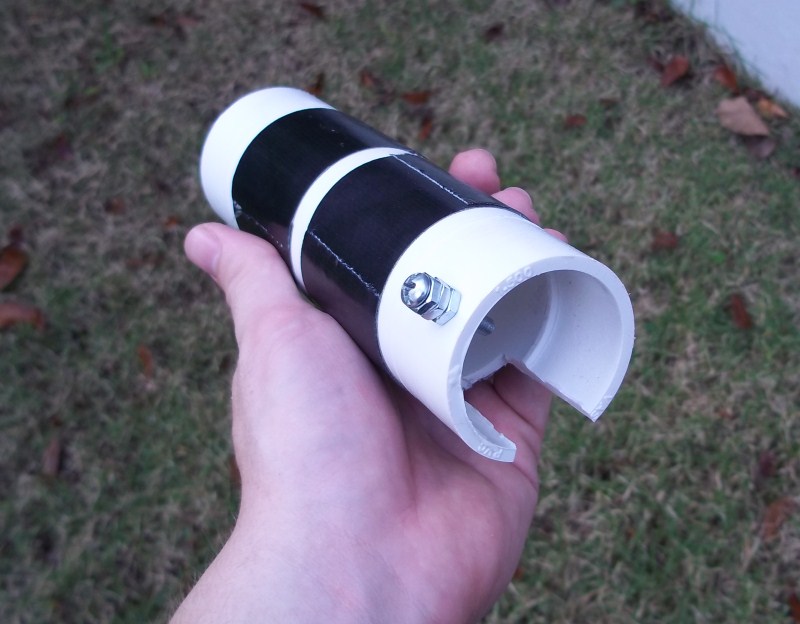
The key design feature of this blaster is the way the priming bolt works. Here's how it looks from the outside.

Posted Image


The bolt in the priming handle sticks into the slot, and catches on the front washer, allowing you to push back the entire mechanism. The clothespin trigger then catches on the rear washer. You may ask: why do it this way? After all, in my previous writeup, the priming bolt just pushed directly against the catch face, instead of this extra washer. There are several reasons I think this system is superior:
1) You don't have to cut a slot into the priming grip. This slot was doubly annoying because it neccessitated a 3rd 1-1/2" coupler to be added to the grip in order to give you enough space for your hand.
2) It gives you enough clearance to use a zip-tie to hold the clothespin in place. Mechanical fastening is far superior to adhesives.

Posted Image


We're going to start with the plunger rod, since it's dimensions dictate the geometry of the blaster.

Posted Image


The catch faces are built from 5/8" SAE washers sandwiched between 1/2" couplers. Fit them together, and then use super glue or PVC cement to securely fasten them. There should be no "give" at all. Once you've glued them, build up your ramp using epoxy putty. You can also use a PVC ramp if you prefer.

Posted Image


SAE washers are sometimes difficult to find, so there's an alternate way to do this. Use endcaps insead, and dril and tap 1/4" holes in them. You can then use any old 1-1/4" washer.

Posted Image

Posted Image

Posted Image

Might have to widen the washer hole first.

Posted Image


For a plunger head, I use a sandwhich of rubber washers, with a 1-1/4" metal washer to act as support. A 1-1/2" rubber washer acts as the main seal, and a 1-1/4" rubber washer sits behind that to prevent it from shearing against the metal support washer. In front of the 1-1/2" rubber washer, I use a small 5/8" washer, and I bind everything together using a 1/4" bolt. Most people use a second metal washer on the front, but I don't - I think the diameter of the bolt head is plenty wide. All this screws directly into a CPVC cap, and I usually add goop for support and seal. I use a 1/4" tap on the CPVC, and no nut. But if you don't have a tap, you can just drill a 1/4" hole through the CPVC cap, and then secure it using a nut. If you DO use a nut, consider flipping the direction of the bolt, so that the nut faces outward. This will let you adjust the tightness easily once the blaster is assembled. I couldn't find 1-1/4" metal washers with a 1/4" ID, so I just put them in a vice and drilled out the center. EZ PZ. Properly lubricated, this plunger head will give you a 100% seal.

There are lots of ways to build plunger heads, so don't feel obligated to use this design. Build whatever you're familiar with.

Posted Image


Next up is the spring rest. Use a 3/4" endcap, and drill out a 5/8" hole. That's problematically large, but there are serveral ways to do it. Most people just drill a 1/2" hole, and then widen it with a dremel. I acutally use a 5/8" drill bit, but it's too large to use in my drill. So I... improvise.

Posted Image


Let's get the measurements right before we glue anything together. The distance between the priming face and the plunger head coupler should be 7.5". All the shell cuts are going to depend on that presumption, and also the presumption that we are using a 1/4" bolt for priming (you can't ignore the width of the bold when making measurements!).

Posted Image


I'm also assuming the distance between the front of the plunger head (remember, the washer flares forward in the tube) and the rear of the plunger head coupler is 1.5". If your plunger head is significantly shorter or longer, it might screw up some of the dimensions. I have very loose tolerances built into all of these measurements, so it probably won't be an issue.

Posted Image


Let's take a look at the plunger tube. I highly suggest using a three-sided ruler for these, since you can lay it flat against the curve of the tube and make very straight lines. First, draw a centerline all the way down the side of the tube.

Posted Image


Next, mark the spot where the spot where the back of the coupler meets the plunger tube. For my design, I'm using a bushing and an external coupler, so that spot is just the very end of the plunger tube. But...
Posted Image


...if you use an internal coupler, such as with rork's SNAPbow mk5, that spot will be an 1.25" or so into the plunger tube. Set the coupler next to the plunger tube, and mark the plunger tube where the back edge of the coupler lies. All futher measurments are based on this mark, so get it right!

Posted Image


First, mark a spot 8" away from your front point. Then make another mark at 7.75". Make a third mark between those two - this is where you will drill with a 1/4" bit, to make the front of the slot. We're going through this rigamarol to ensure that the 1/4" bolt fits, and is properly positioned.

Posted Image


Next, we mark the rearmost point of the priming slot. It will be 7" away from the rearmost front slot mark. Make a second mark at the 6.75" mark, and then a third inbetween those. Finally, use your ruler to connect the outer edges of the hole marks to act as a guide for our dremel.

Posted Image

Posted Image


Next we mark the hole for the trigger. Grab your plunger rod, and place it up against the rearmost mark on the slots, and make a mark in front of the catchface.

Posted Image


The actually trigger hole is going to be on the opposite side. You COULD put it on this side, if you wanted. I initially wanted to do that, but the bolt head presses against your palm in that configuration.

In order to mark the other side accurately, I made a little guide tool. I cut off an edge of a 1-1/4" coupler, and then made marks on all the compass points. This slips snuggly onto the plunger tube, and allows me to accurately mark the opposite edge.

Posted Image

Posted Image

Posted Image

Edited by Daniel Beaver, 12 November 2011 - 09:05 PM.

  • 0

#2 Daniel Beaver

Daniel Beaver

    HQRSE CQCK

  • Moderators
  • 2,096 posts

Posted 12 November 2011 - 07:18 PM

Slip the spring onto the plugner rod, and stick the spring rest on the back. Place the front of the plunger head at the "front mark" (where the coupler meets the plunger head), and then make a mark behind the spring rest. This will be one of the spring rest holes. Use the guide tool to make a mark on the opposite side as well.

Posted Image

Posted Image

Posted Image


We're done measuring, time to cut.

Posted Image


Use one of the roofing nails to make marks where you're going to dril. Start with a 1/16" drill bit, and work your way up. For the slots, make 1/4" holes as the end, and then use a dremel to cut the slots. When your finished, run a 1/4" along the slot to make sure there are no tight areas. I recommend a diamond cutting wheel for this job, as it works a lot better than other cutting wheels.

Posted Image

Posted Image

Posted Image

Posted Image


Next is the priming handle. Simply glue together two 1-1/2" PVC couplers, and then stick a 1/4" wide 5/8" long bolt. You can't use any other length - 3/4" is too long, 1/2" is too short. Drill the hole fairly close to the edge, and then tap it. Try it with the slot to make sure it slides freely. You don't need to glue the couplers if you don't want - wrapping some gorilla tape around it works just as well. If you have access to 1-1/2" thinwall, you can use a short section of it between the couplers.

You need to use a steel bolt here - aluminum or brass will begin bending in no time. You also need to use 1/4" or larger - don't skimp on this part.

Posted Image


Make a trigger and attach it. If you are unsure of how to do this, check out the SNAPbow mk5 writeup - my triggers are identical to his. SNAP triggers are, of course, a total bitch to get working correctly, but are very reliable once you do. There's no need to use anything more extravagant than hot glue. The zip-ties do most of the work.

Posted Image


One thing I do differently is that I drill a double-long hole for the nail, and then set it against the rear of the hole. The clothespin ends up supporting all of the force of the plunger, but the priming action and trigger pull is much smoother as a result. Carbon has gone into great detail as to why this is a stupid way of doing it, but I think he's full of shit. Who ya gonna believe, Carbon or Me?

(Be sure to drill it a little more straight than I did in this picture. I also drilled this hole on the wrong side of the blaster. Durrr)

Posted Image


For the handle, I used a donor nitefinder handle. After cutting it off, fill the open end with epoxy putty (being sure to wedge it into little nooks and crannies). Once that has set, attach a piece of 1-1/2" PVC is using 1/4" set screws. I fill the sides with hot glue to provide lateral support. The 1-1/2" PVC clips onto the main body of the blaster, and the screws hold it in place. This type of handles is comfortable, and rock-solid. It is also easily removable, so you can use your use your favorite handle on your next blaster.

Ultimately, handles are a very personal thing, and you should use whatever style you are most comfortable with.

Posted Image


The last bit to make is the stock. I used an elbow and a coupler, stuck a short section of 1-1/4" PVC between them, and then glued them together. The stock is secured to the blaster via a single screw on the bottom.

Posted Image


Time to assemble everything. Lubricate the plunger head with silicone grease - accept no substitute. Run the plunger head through the blaster a few times to get it lubed up, adding a little bit each time. Add a hopper and barrel - 16" of CPVC is what I would recommend.

Done. With the hopper it clocks in at 230 fps on my chrono, about on par with +bows.

Posted Image

Edited by Daniel Beaver, 12 November 2011 - 09:06 PM.

  • 0

#3 Ice Nine

Ice Nine

    Prince Dangus

  • Administrators
  • 1,460 posts

Posted 12 November 2011 - 07:25 PM

With the hopper, it shoots about 230 fps, which is about on part with +bows.


On part with +bows? What are you, some kind of retard?

Also, JLego's suggestion for the name was FAR superior.

Edited by Ice Nine, 12 November 2011 - 07:26 PM.

  • 0

Unholy Three: DUPLUM SCRTA, DUPLUM PROBLEMA (2009)

But Zeke guns tend to be like proofs by contradiction

Theoretically solid but actually non-constructive

Rnbw Cln


#4 Daniel Beaver

Daniel Beaver

    HQRSE CQCK

  • Moderators
  • 2,096 posts

Posted 12 November 2011 - 07:28 PM

14:54 DanBeaver: I should just call it a SNAP 7.6
14:54 DanBeaver: Or maybe the Quixote
14:55 DanBeaver: (Because of how fucking long and unweidly they are
15:06 JLego: if that's the discerning feature, you should call it "zeke's penis"
15:06 JLego: obviously


"Zeke's Penis" does have a ring to it.

Edited by Daniel Beaver, 12 November 2011 - 07:31 PM.

  • 0

#5 snakerbot

snakerbot

    Maker of Things

  • Members
  • 310 posts

Posted 12 November 2011 - 08:13 PM

I'm astonished that single-screw-coupler priming grip works. I fully expected that to just deform the hole it's in and fold over. Obviously it works for you though. Very nice design. Super-simple, like you said.
  • 0

#6 Daniel Beaver

Daniel Beaver

    HQRSE CQCK

  • Moderators
  • 2,096 posts

Posted 12 November 2011 - 08:20 PM

I'm astonished that single-screw-coupler priming grip works. I fully expected that to just deform the hole it's in and fold over. Obviously it works for you though. Very nice design. Super-simple, like you said.


Yeah, you wouldn't think it would be enough. But I had a war with two of these last night, and neither seems worse for wear after hours of use. You can also use the old bar-style priming rod with this design, if that makes you feel better.

Edited by Daniel Beaver, 12 November 2011 - 08:46 PM.

  • 0

#7 Langley

Langley

    LGLF - Since 2002

  • Administrators
  • 2,997 posts

Posted 13 November 2011 - 09:11 PM

Yeah, you wouldn't think it would be enough. But I had a war with two of these last night, and neither seems worse for wear after hours of use. You can also use the old bar-style priming rod with this design, if that makes you feel better.


Before you posted, I was thinking of trying the same thing with a nail. If it works in the trigger, it should work in the pump grip. I really like the engineer's ruler. I usually use a piece of aluminum u-channel, but I still have to use a regular rule for measuring.
  • 0

You can poop in my toilet anytime champ.

2016 Nerf War Schedule
Bless you, my son. Now recite 3 New Members Guides and 5 Code of Conducts for your sins.


#8 spencerak

spencerak

    Member

  • Members
  • 172 posts

Posted 14 November 2011 - 12:08 AM

Nice build and write up, I will have to try to build one myself when I get a new cutting disk for my dremel (the old one came unscrewed from the piece that holds it into the dremel the screw snapped about 5 seconds after using it when I put the screw back in, I think it was too tight). Also, an admin posting in a thread and not closing it? I think my 11/11/11 at 11:11 wish came true, and yes I did make a wish at 11:11 Friday morning because were doing nothing and that came to my mind.

Edited by spencerak, 14 November 2011 - 12:11 AM.

  • 0

Holy shit it's Captain Slug.


#9 Daniel Beaver

Daniel Beaver

    HQRSE CQCK

  • Moderators
  • 2,096 posts

Posted 14 November 2011 - 02:29 PM

Also, an admin posting in a thread and not closing it?

Admins don't close good threads.


(the old one came unscrewed from the piece that holds it into the dremel the screw snapped about 5 seconds after using it when I put the screw back in, I think it was too tight)

Dremel-brand stuff has durability issues, IMO. in the meantime, if you take a look at Carbon's SNAP 7.5 thread, he has an example of how to make these slots without using a cutting wheel:

I used a new slot making method this time: I drilled out holes, and then connected them with a sanding drum.

Posted Image

Posted Image


  • 0

#10 spencerak

spencerak

    Member

  • Members
  • 172 posts

Posted 14 November 2011 - 11:02 PM

Thanks for the info about drilling and then sanding to make the slots that should help a lot.
  • 0

Holy shit it's Captain Slug.


#11 Carbon

Carbon

    Contriberator

  • Moderators
  • 1,894 posts

Posted 15 November 2011 - 12:39 AM

This writeup is full of win. I like the tools you're using...like Langley said, the engineering ruler is great, but I particularly like your tool for getting your slots marked exactly opposite of each other. Nice.

I'm particularly impressed that an asymmetric bolt on the priming handle works. I always had the feeling that it would cause binding on the priming action and make the action less smooth, but I'm glad to see that's not the case. Excellent discovery.

One thing I do differently is that I drill a double-long hole for the nail, and then set it against the rear of the hole. The clothespin ends up supporting all of the force of the plunger, but the priming action and trigger pull is much smoother as a result. Carbon has gone into great detail as to why this is a stupid way of doing it, but I think he's full of shit. Who ya gonna believe, Carbon or Me?


LOL.

My explanation is true if you're using standard size clothespins. That's mostly what led to that writeup, because it was what I saw people doing wrong 90% of the time. Also it's because that's what I use, because I still have a huge bag of them and they work fine, but also because I refuse to set foot in Wal-Mart. However, if you're using rork's method and filling the cavity of the clothespin with putty, the job that is normally taken by the wall of the PVC can be taken over by the hole in the clothespin...so yeah, in this construction method, you're right: the clothespin is keeping the nail perpendicular to plunger travel.* I just think it's overbuilding, and that it's far simpler and more efficient to just drill a proper size hole, use a standard CP and be done with it. Now get off my lawn.

*Something to keep in mind, though: if the hole in the plunger tube is too big, it means that you're applying shear force to the connection between the clothespin and the plunger tube. If you're just using hot glue, you're increasing the chances of your trigger popping off. A properly sized hole doesn't rely upon adhesives at all, and is more durable.

And, something that only I would care about: as far as nomenclature and morphology, this would still be a SNAP-2. Sevens use bow arms and have the catchface at the end of the plunger rod. The SNAP-8 was internally sprung, but still had a terminal catchface. It also sucked, so that's not really important.

Edited by Carbon, 15 November 2011 - 01:19 AM.

  • 0
Hello. I am Indigo of the Rainbow Clan. You Nerfed my father. Prepare to die.

#12 Daniel Beaver

Daniel Beaver

    HQRSE CQCK

  • Moderators
  • 2,096 posts

Posted 15 November 2011 - 07:37 AM

My explanation is true if you're using standard size clothespins. That's mostly what led to that writeup, because it was what I saw people doing wrong 90% of the time. Also it's because that's what I use, because I still have a huge bag of them and they work fine, but also because I refuse to set foot in Wal-Mart. However, if you're using rork's method and filling the cavity of the clothespin with putty, the job that is normally taken by the wall of the PVC can be taken over by the hole in the clothespin...so yeah, in this construction method, you're right: the clothespin is keeping the nail perpendicular to plunger travel.* I just think it's overbuilding, and that it's far simpler and more efficient to just drill a proper size hole, use a standard CP and be done with it. Now get off my lawn.


One thing I might try is to make a small hole, and then purposely use weak adhesives to hold the nail to the clothespin (something like goop). That way, the nail sort of pivots within the clothespin, and the wall of the plunger tube does all the work of supporting it. That actually might be what's going on in your triggers. When you use the epoxy putty, such as how I did (same as Rork's writeup), it forces the nail to move upwards and forwards slightly, which causes it to bind a bit on the plunger tube (hence the double-wide hole). Your method might be a little more forgiving, so I'll give it a whirl.


And, something that only I would care about: as far as nomenclature and morphology, this would still be a SNAP-2. Sevens use bow arms and have the catchface at the end of the plunger rod. The SNAP-8 was internally sprung, but still had a terminal catchface. It also sucked, so that's not really important.


I'll correct it in the post. I would make the argument that the SNAP-7.5 is misnamed - it really ought to be the SNAP-2.5. We are arguing about semantics after all.


but I particularly like your tool for getting your slots marked exactly opposite of each other.


I wonder if I should make a separate thread for that. It has a lot of applications, but I fear that people may not notice it buried in the writeup.

Edited by Daniel Beaver, 15 November 2011 - 07:41 AM.

  • 0

#13 Carbon

Carbon

    Contriberator

  • Moderators
  • 1,894 posts

Posted 15 November 2011 - 09:03 AM

One thing I might try is to make a small hole, and then purposely use weak adhesives to hold the nail to the clothespin (something like goop). That way, the nail sort of pivots within the clothespin, and the wall of the plunger tube does all the work of supporting it. That actually might be what's going on in your triggers. When you use the epoxy putty, such as how I did (same as Rork's writeup), it forces the nail to move upwards and forwards slightly, which causes it to bind a bit on the plunger tube (hence the double-wide hole). Your method might be a little more forgiving, so I'll give it a whirl.


Yup. The nail wants to move straight up and down, but the CP has a pivot motion. What I do is make the hole in the CP bigger, and don't glue down the nail...I just hold it in place with the angle iron (which I screw and ziptie to the clothespin). This allows the nail some wiggle as it's lifted, and allows the PVC wall to keep it moving a little more straight up and down (I think I addressed this in the link you mentioned, but not sure. Not gonna go back and read it right now,anyway).

EDIT: Yup, just how Langley does it.

I'll correct it in the post. I would make the argument that the SNAP-7.5 is misnamed - it really ought to be the SNAP-2.5. We are arguing about semantics after all.

That would also work. I was more focusing on the different power plant for naming (bow arms=7) as opposed to the catch. The .5 came in because I had been planning using the terminal catchface on the 8, but used it in a crossbow first. Tomato, tomahto :)

I wonder if I should make a separate thread for that. It has a lot of applications, but I fear that people may not notice it buried in the writeup.

Do. Making slots is a bitch, and anything that makes it easier to measure out is a welcome improvement. The engineering ruler/measuring ring/diamond wheel is a pretty killer combo.

Edited by Carbon, 15 November 2011 - 09:10 AM.

  • 0
Hello. I am Indigo of the Rainbow Clan. You Nerfed my father. Prepare to die.

#14 Langley

Langley

    LGLF - Since 2002

  • Administrators
  • 2,997 posts

Posted 15 November 2011 - 09:06 AM

For the SLAP trigger, I've been using a pin that is just zip-tied to the clothespin, that pivots in the way that you mentioned above. Sorry I don't have a better photo on hand:
Posted Image
  • 0

You can poop in my toilet anytime champ.

2016 Nerf War Schedule
Bless you, my son. Now recite 3 New Members Guides and 5 Code of Conducts for your sins.


#15 Curly

Curly

    Member

  • Members
  • 201 posts

Posted 15 November 2011 - 08:09 PM

Vereh Nice!

Pivoting triggers seem much better, I'll try that. (Sentence removed due to dippshittery) I've been trying to locally source appropriate rubber washers for awhile, but I question that setup's durability. Does the pounding of the plunger deform the washers without a string stop? How is the plunger speed compared to a couple O-rings with teflon tape?

If I wasn't such a bitch about long blasters I'd make one.

Edited by Curly, 17 November 2011 - 06:13 PM.

  • 0

#16 Daniel Beaver

Daniel Beaver

    HQRSE CQCK

  • Moderators
  • 2,096 posts

Posted 15 November 2011 - 08:59 PM

Does the pounding of the plunger deform the washers without a string stop? How is the plunger speed compared to a couple O-rings with teflon tape?

The plunger head will probably require rebuilding every year or so, even with a string stop. The friction will eventually wear down these sorts of seals, and causes leaks. And to be honest: I've never had a SNAP plunger head break, nor have I ever heard of that. We really worry about it far too much. Of course, there's no reason you couldn't build a string catch into this blaster, but I left it out for the sake of simplicity.

I have no way to compare plunger speeds to an O-Ring based plunger head. But I would venture that these sorts of flaring plunger heads produce far less friction with less lubrication than O-Ring plunger heads. O-Rings rely on sideways compression against the wall of the plunger tube, and so necessarily push out with more force (and hence, experience more friction). There's a reason that +bows migrated from O-Rings to skirt seals. In any case, there's little enough friction acting against this plunger tube that it's own weight will make it fall out of the blaster if you take the spring out. I think that's about as good as it needs to be.


Very intuitive take on the pump-grip, even though it's not entirely your own.

It sort of is entirely my own... unless I re-invented something by accident.

Edited by Daniel Beaver, 15 November 2011 - 09:01 PM.

  • 0

#17 Curly

Curly

    Member

  • Members
  • 201 posts

Posted 15 November 2011 - 11:41 PM

It sort of is entirely my own... unless I re-invented something by accident.

EDIT:Read through the thread a couple times and missed it at first, it happens.

Edited by Curly, 17 November 2011 - 06:11 PM.

  • 0

#18 Ice Nine

Ice Nine

    Prince Dangus

  • Administrators
  • 1,460 posts

Posted 16 November 2011 - 11:39 PM

straight-through bolt


Posted Image


I hate you. I hate you. I hate you. I hate you. I hate you. I hate you. I hate you. I hate you. I hate you. I hate you. I hate you. I hate you. I hate you. I hate you. I hate you. I hate you. I hate you. I hate you. I hate you. I hate you. I hate you. I hate you. I hate you. I hate you. I hate you. I hate you. I hate you. I hate you. I hate you. I hate you. I hate you. I hate you. I hate you. I hate you. I hate you. I hate you. I hate you. I hate you. I hate you. I hate you. I hate you. I hate you. I hate you. I hate you. I hate you. I hate you. I hate you. I hate you. I hate you. I hate you. I hate you. I hate you. I hate you. I hate you. I hate you. I hate you. I hate you. I hate you. I hate you. I hate you. I hate you. I hate you. I hate you. I hate you. I hate you. I hate you. I hate you. I hate you. I hate you. I hate you. I hate you. I hate you. I hate you. I hate you. I hate you. I hate you. I hate you. I hate you. I hate you. I hate you. I hate you. I hate you. I hate you. I hate you. I hate you. I hate you. I hate you. I hate you. I hate you. I hate you. I hate you. I hate you. I hate you. I hate you. I hate you. I hate you. I hate you. I hate you. I hate you. I hate you. I hate you. I hate you. I hate you. I hate you. I hate you. I hate you. I hate you. I hate you. I hate you. I hate you. I hate you. I hate you. I hate you. I hate you. I hate you. I hate you. I hate you. I hate you. I hate you. I hate you. I hate you. I hate you. I hate you. I hate you. I hate you. I hate you. I hate you. I hate you. I hate you. I hate you. I hate you. I hate you. I hate you. I hate you. I hate you. I hate you. I hate you. I hate you. I hate you. I hate you. I hate you.
  • 0

Unholy Three: DUPLUM SCRTA, DUPLUM PROBLEMA (2009)

But Zeke guns tend to be like proofs by contradiction

Theoretically solid but actually non-constructive

Rnbw Cln


#19 andtheherois

andtheherois

    Member

  • Banned
  • 821 posts

Posted 16 November 2011 - 11:53 PM

I've gotta say this is awesome. It's crazy to think that the single bolt on one side of the blaster is strong enough to push back the plunger rod. Even though it is a bit long for me, the ideas and building techniques are definitely gong to be something I'd like to try in different homemades.
The YooToobz
Photobucket

Winning rounds is rewarding, deal with it. We don't play fucking patty cake over here.


#20 flamingeyes245

flamingeyes245

    Member

  • Members
  • 112 posts

Posted 17 November 2011 - 10:22 AM

A good way to make that slot on the side (and to keep it very uniform) would be to use a router. I have a router attachment for my dremel that works quite well. Has adjustable depth too.
I find the single-bolt priming to be quite an interesting concept, which holds promise for other homemades as well. Also the simple catch design seems quite effective. Overall, I'm impressed. Good job.
  • 0
Keep your friends close,
And your Nerf guns closer.

External Modification contest, check it out!


QUOTE
Using anything I write as a sig makes your penis shoot rainbows. Bitches LOVE rainbows
^^VACC

#21 panewmodder

panewmodder

    Member

  • Members
  • 25 posts

Posted 25 February 2012 - 06:27 PM

What are the ranges
  • 0

#22 Daniel Beaver

Daniel Beaver

    HQRSE CQCK

  • Moderators
  • 2,096 posts

Posted 25 February 2012 - 07:20 PM

What are the ranges


Four
  • 0

#23 makeitgo

makeitgo

    Member

  • Members
  • 216 posts

Posted 25 February 2012 - 11:46 PM

Four


That's awesome!
  • 0
"...he is one speedy bastard." ~ Cheyner

#24 Gears

Gears

    The boy who lived

  • Members
  • 848 posts

Posted 26 February 2012 - 02:27 AM

That's awesome!

Shut up.
  • 0


WoW is destroying my life.

-Groove out.


LAWN GNOME LIBERATION FRONT
 

#25 waffleman

waffleman

    Member

  • Members
  • 10 posts

Posted 20 March 2012 - 04:27 PM

Nice homemade, I got tons of zipties and im looking to make my own Nerf gun. This gun looks perfect to make for me. Original idea, keep it up.
  • 0
Rednecks carry flamingos and use their redneck shotgns to hunt wild paper IN SOVIET RUSSIA OF COURSE!


0 user(s) are reading this topic

0 members, 0 guests, 0 anonymous users