(I hope I put up the image the right way.) (why is this so hard?)
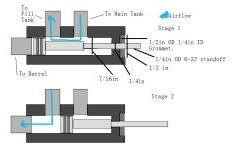
I'm having trouble with the grommet's seal on the valve I'm making. I epoxied it into place and the seal will hold up to 20 psi. After that, it leaks from the area between the standoff and the ID of the grommet. How can I fix this? I'm out of delrin so I hope to fix this without having to remachine the whole thing. Perhaps the trouble is because I made this on a drill press instead of a lathe, possibly causing a slight misalignment.
[IMG]http://i1208.photobucket.com/albums/cc374/lighthawk2/ValveDiagram.jpg[/IMG]
Copy/paste that in place of the broken image code in your post.
It would really help me if the image was bigger - I can't read the text around it.
From what you've said, your problem could stem from the grommet not being tight enough around the pin. You probably need to make the counterbore where the grommet goes slightly smaller, which means that you'll most likely have to re-make the entire thing. A lathe would be quite helpful.


