Jump to content


Photo

PumpSnap writeup.

Extremely picture heavy.
pumpaction spring SNAP writeup homemade

26 replies to this topic

#1 Nerfomania

Nerfomania

    Member

  • Members
  • 207 posts

Posted 05 June 2011 - 11:13 PM

WARNING EXTREMELY PICTURE HEAVY
Alright guys I’ve been working on this writeup for awhile. Its is extremely detailed and in depth. I hope you enjoy it.


Tools and Adhesives Recommended:
Dremel with:
-cutting wheel
-cone sanding bit
-carbide cutting bit
-sanding drum
Various size drill bits
Goop
Epoxy putty
Packing Tape
hot glue gun and a few sticks of hot glue

Ok heres your materials list.

Body and Priming slide:
-25 5/8’’ 1.25 pvc
- 1’’ to ½’’ bushing (preferably round lip)
-1.25 tee and endcap (and a short length of 1.25 pvc)
-9x #6 ½ inch sheet metal screws
-About 18 1/8 inches of 1.5 inch thin wall
-2 ¼ inch ¼-20 bolt with matching nylon locknut
1/16th acrylic or similar material
A maverick shell and slide that you are willing to repurpose.
Craft foam

Plunger rod:
-16 inches ½ cpvc
-½ cpvc endcap
- ¾ cpvc coupler
- 2x 1.25 inch OD ¼inch ID washers
-¼ inch ID nylon spacer (appropriate height)
-1.25 inch 1/4x20 bolt with matching nylon locknut
-#10 finishing washer
-1.5 inch rubber washer (1/16 thick)
-1.25 inch rubber washer
-[k26] spring
-2x ½ inch sheet metal screws

Trigger:
-clothespin (plastic ones from walmart are best for this)
-½ inch angle bracket
-roofing nail
- #6 ½ inch sheet metal screw

1. Plunger Head

Alright were going to go ahead and make our plunger head. (it’s a superlative)

First drill a pilot hole in the center of your ½ inch cpvc endcap then widen it with a ¼ inch drill bit.

Then sand the top flat with your method of choice.

SAM_0905.jpg

Then assemble the parts as shown below from left to right

SAM_0894.jpg
And you are left with this (make sure you put some epoxy putty around the base to act as your catch ramp)

SAM_0906.jpg
Then affix it to the plunger rod (the 16 inches of cpvc) with 3 of the ½ inch #6 screws

SAM_0917.jpg
2. Body
Now lets start the journey on the messiest part of the build (trust me pvc dust EVERYWHERE)

Start with your 25 5/8 inches of 1.25 pvc and draw 2 lines on opposite sides that are parallel to each other.

Then cut back 3 3/8 inches from what will become the front of our blaster (try to keep this close to 90 degrees)

SAM_0897.jpg
3. Front bushing
Then take one of your bushings and sand down the rim and wrap with packing tape until it’s a snug fit into the front of your blaster

SAM_0907.jpg(Make sure to mark around the rim with a marker to help line up the correct depth)

Slot it into the front portion (NO GOOP YET) and drill 4 5/64th inch holes (they grip the screws very well) and screw them in partially this is just to hold it in place for the next step.

SAM_0911.jpg

Then countersink the holes one by one so that the screw heads do not peek above the pvc at all. Then remove all the screws, slather the bushing in goop, and slide it in and re-insert all the screws tightly.

SAM_0913.jpg

Then slather the countersinks in epoxy putty.

SAM_0915.jpg

Once it dries sand it down so that its smooth with the pvc.

SAM_0918.jpg

6. Body cont.
Then measure 14 inches from the edge of the pvc (not the bushing) and draw a line all the way around.

14inchespumpsnapwriteup.jpg
Drill a ¼ hole in the top along that line we just drew (it will be a sight hole so we can line up our rear bushing easier)

SAM_0921.jpg
Then drill and countersink another 5/64 inch hole back enough so that it will still catch well on the bushing

SAM_0925.jpg
7. Rear Bushing
Grind down the lip of your other bushing, draw a colorful line around where the lip used to be, and wrap in some kind of tape to that it still slides easily into the rear of the body.

SAM_0927.jpg

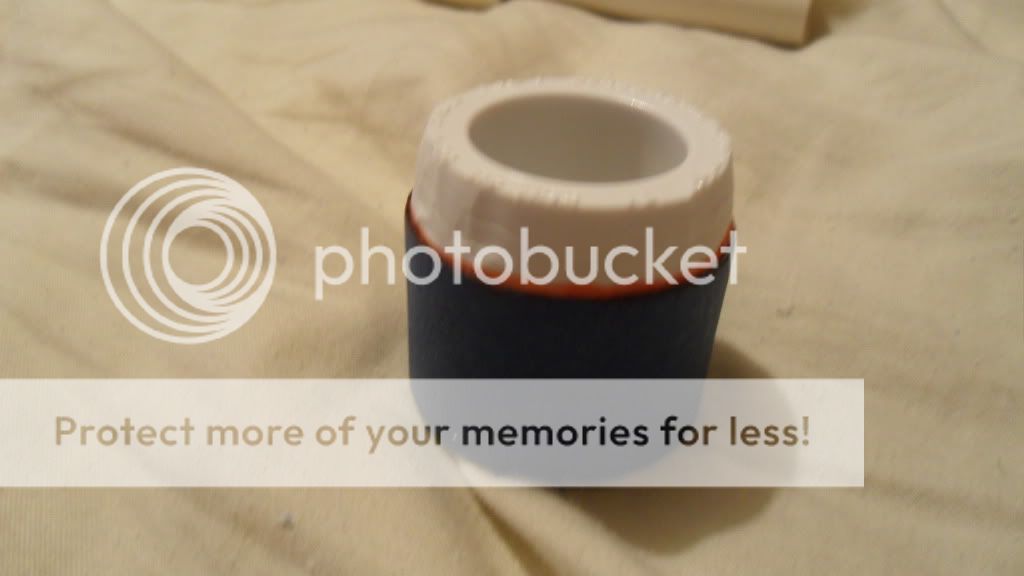
Line up that line we just drew on the bushing with the one on the body.
SAM_0928.jpg
Go ahead and screw it in (giggity)

SAM_0929.jpg

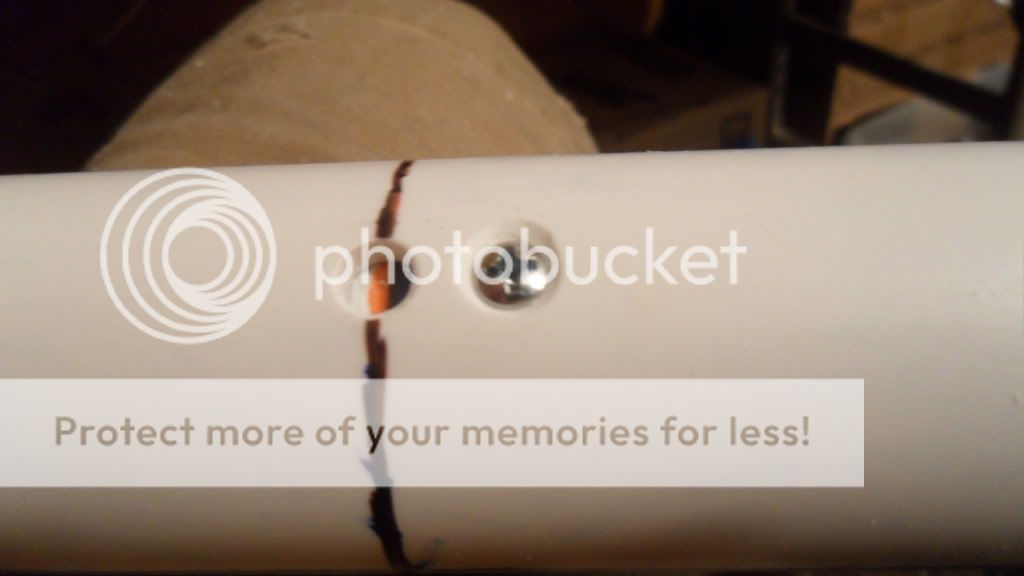
Then put 2 more screws on the bottom part of the blaster (so that they wont interfere with the pump-grip)

SAM_0930.jpg

Then drill a few small holes unstill you can get the drill bit right against the rear bushing.

SAM_0931.jpg


Lay out some tape parallel to the lines we drew down the length of the body. And draw some guide marks.

SAM_0936.jpg


This needs to be about 6.5 inches long (from the hole we drilled)

SAM_0937.jpg

Cut it out with a cutting wheel.

SAM_0940.jpg

Then expand the slots

SAM_0941.jpg

I use this kind of bit...

SAM_0938.jpg

Here they are finished

SAM_0942.jpg

Now draw a line 6.25 inches from that rear line

SAM_0943.jpg

That line will be where your trigger hole will sit (try to get it centered relative to the body), and drill it with a 1/8 inch bit

SAM_0944.jpg

10. Clothespin Trigger

Alright heres what you’ll need

SAM_0949.jpgClothespin, ½ inch by 1.5 inch angle bracket, ½ inch #6 screw, roofing nail, epoxy putty.

Lop off the rear portion of your clothespin

SAM_0958.jpg

Drill a 1/8th inch hole through your clothespin

SAM_0953.jpg

Take your clothespin into 2 halves, put a small amount of putty into the clothespin, and shove your nail through the epoxy and press it in (you may need to trim the nails head a bit)

SAM_0959.jpg

Don’t post yet picture limit.


Edited by Aeromech, 04 December 2015 - 10:48 PM.

  • 0
20:45 Talio I'll have the talk with you
20:45 Talio penis in vagina
20:45 Talio fin

#2 Nerfomania

Nerfomania

    Member

  • Members
  • 207 posts

Posted 05 June 2011 - 11:15 PM

Then fill the clothespin the rest of the way in (both halves) and drill through the half that doesn’t have the nail encased in it. (make sure to clean up the nail before you reassemble it)

Posted Image

Drill a 5/64ths hole about here

Posted Image

Plop on some putty

Posted Image

And screw in the angle bracket. And go ahead and reassemble your clothespin.

Posted Image

Hot glue it to your blaster. Then remove the angle bracket half and cut your nail to the correct length (a little more than an 1/8th of an inch jutting into the PT)

While your trigger is out for cutting un-mount your rear bushing, slide your [k26] and your ¾ cpvc coupler (spring spacer) onto the plunger rod and then reassemble.

Posted Image

11. Handle
Alright now that the main body is straightened away lets work on the handle.

Here’s my sacrifice for comfort.

Posted Image

Open and gut it.

Posted Image

Cut here on both sides

Posted Image

Here’s what you get

Posted Image

Cut here

Posted Image

It should look like this.

Posted Image

Put some hot glue on the edges and tack it to the main body (make sure its straight! You can cut a little out of the maverick handle to bring the handle in closer to the trigger), Then pump about a stick of hot glue (yes a whole stick) into the gaps. I actually have about a ¼-½ inch of hot glue throughout the handle at the end!

Posted Image

Then lay on some epoxy putty and smooth it out and trim it

Posted Image

You will want to cut the slide so that it will nestle up to the handle without scraping on it.

Posted Image

Posted Image

Like so….

Posted Image

13. Pump Grip

Take your maverick slide and cut like so…

Posted Image

Make sue you chop that thing off the front too. Then glue it on similarly to the way we did the handle (use a crapload of hot glue and then smooth the outside edges with epoxy putty.

Posted Image

You should have something like this at this point.

Posted Image

14. Slotting the plunger rod
First when your plunger rod is loaded with the spring in your blaster make a mark here
Then prime your blaster and repeat. That will be the length of your slot in the plunger rod. Basically you want your slide to have full travel when your blaster is primed.

Posted Image

Then cut and widen like we did with the body earlier.

Posted Image

Next make some marks like the blue ones above so you can figure out where you need to drill the ¼ inch holes on your priming slide and go ahead and drill those.

Posted Image

15. Stock piece
You could do this with a elbow but I like how this looks better personally. To each his own.

Take your 1.25 tee and wrap some tape like so (we basically want a flat surface to glue the acrylic too)

Posted Image

Cut and smooth out the burrs

Posted Image

Glue to your sheet of acrylic. Trim the excess glue then cut around the tee and sand smooth.

Posted Image

Like this.

Posted Image

Pop it on the end of your blaster (prime your blaster first and leave the priming slide back. It will only need to go on about ½ inch) and pop some screws in it and you should be left with this……….

Posted Image

Make yourself a hopper.

Trust me they hit very very hard when made well. And with a hopper they are almost impossible to dodge.

Questions? Comments? Flames?
  • 0
20:45 Talio I'll have the talk with you
20:45 Talio penis in vagina
20:45 Talio fin

#3 TantumBull

TantumBull

    Member

  • Moderators
  • 1,929 posts

Posted 06 June 2011 - 12:02 AM

Good write-up, but a few things worry me about your attachment methods of the handles. The priming grip probably won't pose too much of an issue as it has a lot of surface area bonded to the pump and is shorter so there's less stress on the joint (less leverage). The handle worries me a bit more. I would highly recommend utilizing some mechanical forms of attachment like screws or pins.

Otherwise looks like a nice blaster.
  • 0

#4 Nerfomania

Nerfomania

    Member

  • Members
  • 207 posts

Posted 06 June 2011 - 12:18 AM

I have literally tried to rip the handle off and have been unsuccessful. However you are correct. On the blasters I put Nf handles on I use screws. Thanks for the constructive criticism.
  • 0
20:45 Talio I'll have the talk with you
20:45 Talio penis in vagina
20:45 Talio fin

#5 Zorns Lemma

Zorns Lemma

    Sir Scrt

  • Moderators
  • 1,277 posts

Posted 06 June 2011 - 01:45 AM

Since your body is a single piece, how do you work with the rear plug/spring rest so you can remove it and install/maintain your plunger?
  • 0
"In short, the same knowledge that underlies the ability to produce correct judgement is also the knowledge that underlies the ability to recognize correct judgement. To lack the former is to be deficient in the latter."
Kruger and Dunning (1999)

#6 Nerfomania

Nerfomania

    Member

  • Members
  • 207 posts

Posted 06 June 2011 - 01:57 AM

Since your body is a single piece, how do you work with the rear plug/spring rest so you can remove it and install/maintain your plunger?


1. Remove Pump slide
2. Undo the 3 screws holding the rear bushing in place.
3. slide a screwdriver into the slotted cpvc and pull the plunger rod out which will in turn remove the rear bushing and the 3/4 cpvc coupler acting as a spring spacer.
4. Maintenace
5. slide the Plunger rod back in with the [k26] and coupler.
6. slide the rear bushing in with the assistance of a piece of 3/4 inch pvc
7. screw back in.
8. re-attach slide.

Satisfactory? Any more questions?

Thanks for the replies guys
  • 0
20:45 Talio I'll have the talk with you
20:45 Talio penis in vagina
20:45 Talio fin

#7 Geekonator

Geekonator

    Member

  • Members
  • 5 posts

Posted 06 June 2011 - 03:15 PM

This should be very helpful to me while working on my PumpShcnap. For the range on a scale of 1 to 10,
one being stock maverick and 10 being a singled titan, how does it compare?
  • 0
Unique Signature

#8 Nerfomania

Nerfomania

    Member

  • Members
  • 207 posts

Posted 06 June 2011 - 04:19 PM

@ Geekonator

It will depend on your darts of course as well as your barrel material. But with my #6 foam disk slugs and a 12 inch 17/32nd bitthopp I get a pretty consistent 100-110.

Just remember guys that this has a full 6.25 inches of draw just like any other Snap so should be hitting the same ranges as your standard Snap with hopper.

Keep the Questions coming!

Edited by _Nerfomania_, 06 June 2011 - 04:23 PM.

  • 0
20:45 Talio I'll have the talk with you
20:45 Talio penis in vagina
20:45 Talio fin

#9 aj1234119

aj1234119

    Member

  • Members
  • 29 posts

Posted 06 June 2011 - 05:08 PM

Doesn't a "normal" snap have about 7'' of draw? I know mine does.
  • 0

#10 Nerfomania

Nerfomania

    Member

  • Members
  • 207 posts

Posted 06 June 2011 - 05:33 PM

Are you using a [k26]? I may stand corrected but every Snap I have personally built has had around 6.25 inches of draw, and has the spring very very close to full compression as far as I can tell.
  • 0
20:45 Talio I'll have the talk with you
20:45 Talio penis in vagina
20:45 Talio fin

#11 aj1234119

aj1234119

    Member

  • Members
  • 29 posts

Posted 06 June 2011 - 05:39 PM

Yep, [k26] with almost no compression at rest. Are the springs in these blasters under any compression when at rest? I'm pretty sure Rork said in his write up for the mk v that he got 7'' of draw. Since this is my last post for today I'm also going to say I sent you an email this morning about possibly buying one of these blasters, did it get to you? I'm not sure if I messed up your email address.
  • 0

#12 Ozymandias

Ozymandias

    Member

  • Members
  • 201 posts

Posted 06 June 2011 - 05:57 PM

[k26] info:

Wire Size: .08 in.
Coils per inch: 3.09
Length: 11 in.

Compressed Length: 2.7192 inches
Deflection: 8.2808 inches

Of course, fully compressing a [k26] spring is a pain in the ass and ROF gos down, so most people just stick with 6-7 inches.

Just for S&Gs...

[k25] info:

Wire Size: .08 in.
Coils per inch: 2.18
Length: 11 in.

Compressed Length: 1.9184 inches
Deflection: 9.0816 inches
  • 0
If you wish to post anything HvZ related, here ya go.

"...if you've ever suffered the effects of a fucking faggot retard overpopulation, you'll understand what devistaiting effects it can have on one's psyche." - Talio

#13 Nerfomania

Nerfomania

    Member

  • Members
  • 207 posts

Posted 06 June 2011 - 06:29 PM

Thanks for the info Ozy. So I do stand corrected. But it is definitely enough power for my taste.

Also Aj I just emailed you back sorry for the delay. It is under a tiny bit of pre-compression.
  • 0
20:45 Talio I'll have the talk with you
20:45 Talio penis in vagina
20:45 Talio fin

#14 ice

ice

    Member

  • Members
  • 895 posts

Posted 13 June 2011 - 03:47 PM

You never showed what your plunger rod ended up looking like, is it just a piece of CPVC with a huge slot in it for the priming bar? Wouldn't Nylon rod but much more sturdy?


EDIT; Nice catch Y-Brik :P

Edited by ice, 13 June 2011 - 06:25 PM.

  • 0
<!--quoteo(post=206428:date=Jan 25 2009, 05:17 PM:name=Mukersman)--><div class='quotetop'>QUOTE(Mukersman @ Jan 25 2009, 05:17 PM) View Post</div><div class='quotemain'><!--quotec-->
Turd stefans. When I pulled these out of the pillow case i was just like, what... the... fuck...
Muker
<!--QuoteEnd--></div><!--QuoteEEnd-->

#15 Y-Brik

Y-Brik

    Member

  • Members
  • 199 posts

Posted 13 June 2011 - 04:13 PM

You never showed what your plunger rod ended up looking like, is it just a piece of CPVC with a huge slot in it for the priming bar? Wouldn't Nylon rob but much more sturdy?

I don't know about Rob, but nylon rod would definitely be sturdier--have fun carving a slot through it though. Also, since (common) nylon rod has a 1/8" smaller OD than CPVC, there's very little room for error. CPVC has been used in the past and I haven't heard of it failing on anybody, and it's much easier to make

tl;dr- nylon is stronger but it's not worth it. He likely used CPVC.
  • 0

As I said I have not not alot of testes yet but I will be once I finish the mod.

Why I am boycotting Hasbro

#16 Nerfomania

Nerfomania

    Member

  • Members
  • 207 posts

Posted 13 June 2011 - 05:25 PM

I will put a pic up sometime today.
  • 0
20:45 Talio I'll have the talk with you
20:45 Talio penis in vagina
20:45 Talio fin

#17 Daniel Beaver

Daniel Beaver

    HQRSE CQCK

  • Moderators
  • 2,097 posts

Posted 13 June 2011 - 07:04 PM

You never showed what your plunger rod ended up looking like, is it just a piece of CPVC with a huge slot in it for the priming bar? Wouldn't Nylon rod but much more sturdy?

He used CPVC with a slot. Nylon is certainly more durable, but cutting a long slot in it is agony. CPVC is much easier to work with by comparison.

Edited by Daniel Beaver, 13 June 2011 - 07:06 PM.

  • 0

#18 ice

ice

    Member

  • Members
  • 895 posts

Posted 17 June 2011 - 08:28 PM

Just finishing mine up, where did you buy thin wall 1.5" pvc?
  • 0
<!--quoteo(post=206428:date=Jan 25 2009, 05:17 PM:name=Mukersman)--><div class='quotetop'>QUOTE(Mukersman @ Jan 25 2009, 05:17 PM) View Post</div><div class='quotemain'><!--quotec-->
Turd stefans. When I pulled these out of the pillow case i was just like, what... the... fuck...
Muker
<!--QuoteEnd--></div><!--QuoteEEnd-->

#19 diamondbacknf1626

diamondbacknf1626

    Member

  • Members
  • 835 posts

Posted 17 June 2011 - 09:02 PM

Just finishing mine up, where did you buy thin wall 1.5" pvc?


I'm not quite sure where the OP got his, but you can purchase it online at flexpvc.com. I've also heard that you can find it at some Home Depots, I believe.

Also, this thing looks really cool. I love SNAPs in any form, and I'm really happy with this one. As sturdy as you say the grip and priming handle are, they'll always worry me...I'm a big fan of mechanical fastening...but I could imagine the glue there does just fine. Overally, supa awesome. I approve.
  • 0
QUOTE(TxNerfer @ Nov 13 2010, 12:42 PM) View Post

Hey...I got a crazy idea: how about you stop all that sigging stuff? It's not even my thread and it annoys me.

#20 Nerfomania

Nerfomania

    Member

  • Members
  • 207 posts

Posted 18 June 2011 - 12:42 AM

Thanks Diamondback! On the blasters that I use NF handles on are screwed in.
And @ ice I get mine at my local tractor supply company.
  • 0
20:45 Talio I'll have the talk with you
20:45 Talio penis in vagina
20:45 Talio fin

#21 ghost recon

ghost recon

    Member

  • Banned
  • 55 posts

Posted 26 June 2011 - 07:40 PM

im going to make one this week but instead of a maverick im using a raider i messed up and for the foregrip im using the raider priming grip would this affect it by anyway or possibly make it easier to prime?
--------------------

QUOTE
"This thread must be either pregnant or just not that time of the month cause I don't see a period anywhere."


#22 Nerfomania

Nerfomania

    Member

  • Members
  • 207 posts

Posted 26 June 2011 - 09:47 PM

No Idea. Though it might.

Also do you even know how to capitalize?
  • 0
20:45 Talio I'll have the talk with you
20:45 Talio penis in vagina
20:45 Talio fin

#23 ghost recon

ghost recon

    Member

  • Banned
  • 55 posts

Posted 27 June 2011 - 12:01 AM

No Idea. Though it might.

Also do you even know how to capitalize?

thats the whole point of my quote and i never was good at grammer
--------------------

QUOTE
"This thread must be either pregnant or just not that time of the month cause I don't see a period anywhere."


#24 XproXglassX

XproXglassX

    Member

  • Banned
  • 109 posts

Posted 11 October 2012 - 10:00 AM

What is the 3/4in CPVC coupler for on the plunger rod? Because you listed it under the plunger rod list and you don't show anything about a coupler....?

And How do you assemble the whole blaster?

Please reply soon because I'm in the middle of making one. Thanks :)

USER WAS WARNED FOR THIS POST


I know it's October, but please don't raise the dead. It'd be better to do this as a PM.

Edited by Carbon, 11 October 2012 - 11:07 AM.


#25 Nerfomania

Nerfomania

    Member

  • Members
  • 207 posts

Posted 11 October 2012 - 11:35 AM

Thanks Carbon. Dunno how many more warnings this kid needs....

The 3/4 coupler goes on the plunger rod right behind the spring and in front of the spring rest. It is a spring spacer.

If you do not know how to assemble the blaster, you should not be building one. Seriously.

I need to upload my 2.0 writeup here soon, but need to finish a couple small details on it first.
  • 0
20:45 Talio I'll have the talk with you
20:45 Talio penis in vagina
20:45 Talio fin


Also tagged with one or more of these keywords: pumpaction, spring, SNAP, writeup, homemade

0 user(s) are reading this topic

0 members, 0 guests, 0 anonymous users