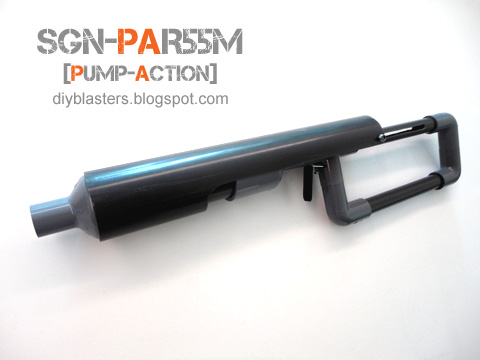
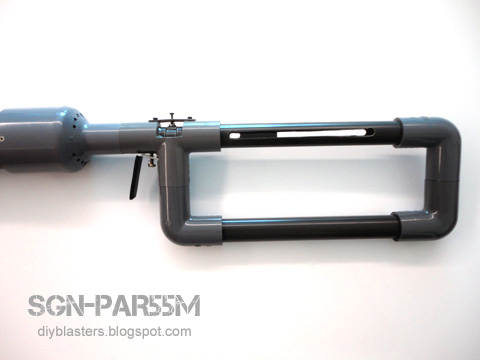
Jump to content


Photo

SGN-PAR55M Overview!

Pump-Action System

12 replies to this topic

#1 SgNerf

SgNerf

    Member

  • Members
  • 204 posts

Posted 28 April 2011 - 11:14 PM

Following up on my SGN-R3L design... introducing the SGN-PAR55M!

Model name description:

"SGN" is my maker's ID.
"PA" denotes pump-action system.
"R" is the series name.
"55" indicates the plunger internal diameter (55mm).
"M" indicates the version's length (in this case, the "Medium" variant).

As mentioned in my SGN-R3L overview, many of the R-Series blaster component designs are based on and inspired by the popular blaster designs such as the +Bow by CaptainSlug, SNAP by Carbon, Rainbow by Stark and Mod Mans End Cap Catch Plate by Mod Man.

In addition, for this particular R-Series variant, inspiration for the pump-action system also comes from the excellent Rainbowpump by Ryan201821.

For those new to such blaster concepts, do read up on how the various designs work by clicking on the highlighted info links. :)

As an evolution of the SGN-R3L, here are the additional objectives of my SGN-PAR55M design:

- Frame and parts still made only using PVC pipes & joints.
- Still requires only minimal tools and working time.
- Use the same modular PVC catch ring and trigger system.
- Larger plunger air volume.
- More compact and ergonomic form factor.
- Fully integrated pump action system.


SGN-PAR55M - Introduction

Posted Image

The PAR55M is based on a 55mm ID plunger tube with 6" plunger draw. It uses a 7" length 14kg load aftermarket spring. The Catch Ring & Trigger mechanism is the same as in the R3L design.

The pump-action grip is a single piece custom shaped pipe section linked to the plunger rod via a series of priming slots.

Here is an initial comparison between the PAR55M & R3L:

Posted Image

Note: The R3L shown above is a special "Black C/F Skin" exterior design variant. ^_^

Plunger air volume comparison:

R3L (3.0cm ID plunger tube + 22cm/9" draw) = approx. 155 cubic cm
PAR55M (5.5cm ID plunger tube + 15cm/6" draw) = approx. 356 cubic cm

Edited by SgNerf, 30 April 2011 - 01:27 PM.

  • 0
Nerf News & Reviews! >> http://www.sgnerf.blogspot.com
Nerf Mod Guides! >> http://www.modworks.blogspot.com

#2 SgNerf

SgNerf

    Member

  • Members
  • 204 posts

Posted 28 April 2011 - 11:22 PM

SGN-PAR55M - Pump Action System

The system starts with a basic plunger head build.

In my example i simply cut a circle out of a thick rubber sheet to match the 55mm ID of the plunger tube (i had to do a few test fitments with some trial & error to get the ideal circle dimensions), then sandwiched the rubber circle within 2 pieces of plastic discs (any other suitable disc shaped materials can also be used).

Posted Image

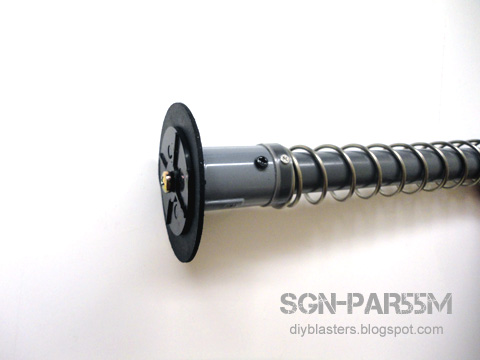
Its best to use rubber material which is thick and rigid enough not to fold when under pressure, this ensures there is no air leakage during usage.

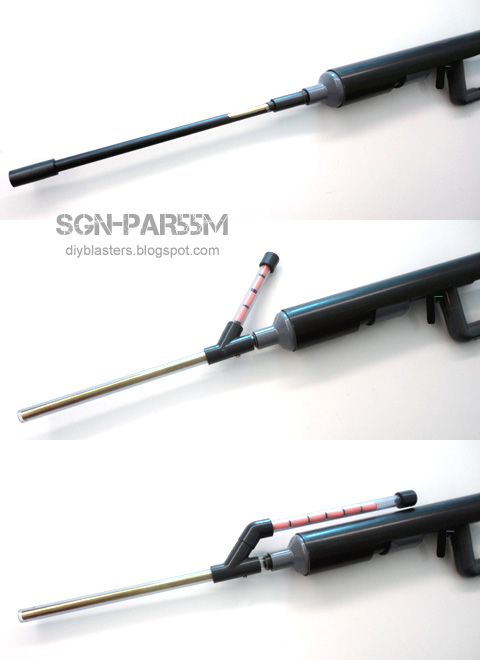
The plunger head is bolted securely onto the plunger rod and end cap with a large screw.

Yes... i know, many expert blaster builders will bemoan my use of such a rudimentary plunger head setup, it definitely isn't as sophisticated as the skirt seal plunger heads seen on other blaster designs. It was actually intended to be just a quick setup for testing purposes, but surprisingly it could still achieve 100% air seal and optimal performance with this simple plunger head configuration, so i decided to just stick with it for simplicity (watch the demo video below to check out the air seal performance). :)

To create the pump action system, i cut guide slots into a length of 20mm PVC pipe at the shoulder stock section. I used a Dremel with a cutting bit for wood/pvc (metal disc with serrated edges) to cut the slots.

Posted Image

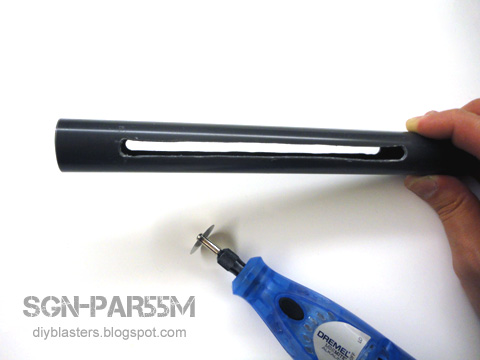
The slot length is around 15cm (approx. 6") to match my intended plunger draw. The slot height is around 5mm, to accommodate the bolt that will be used for the priming bar.

A pair of matching slots is also cut into the 13mm PVC plunger rod to facilitate the linkages within the pump action system.

Posted Image

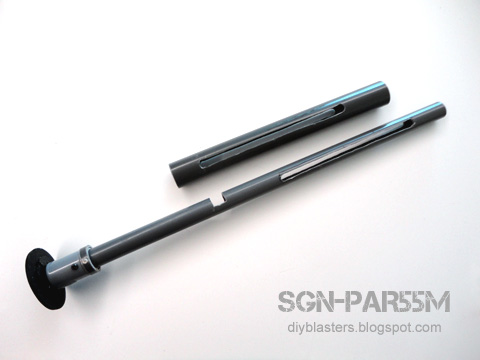
The measurements on the cut-out slots have to be accurate and aligned correctly. Just take your time and measure everything properly beforehand. With abit of steady cutting and patience, its quite a straightforward task to accomplish.

Next step...

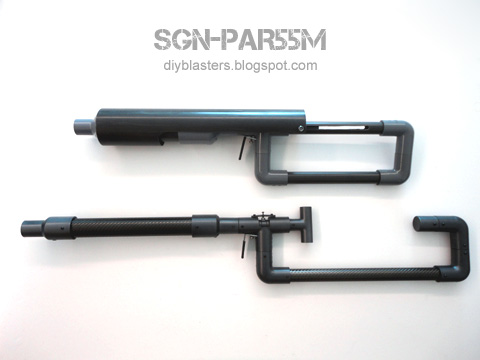
Remember the modular PVC Pipe Catch Ring & Trigger component from the SGN-R3L? If you have already built a set, then most of your work is already done! Simply take your existing catch & trigger component and just connect it up to the shoulder stock design of your choice.

The advantage of these modular components is that you can just swap them around or replace them easily. ;)

If you've not built your modular PVC pipe catch & trigger component yet, then just refer to the SGN-R3L overview to see how its made.

Posted Image

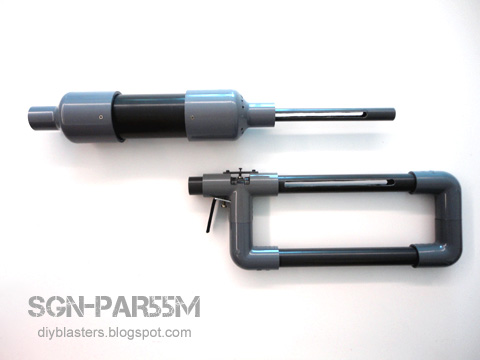
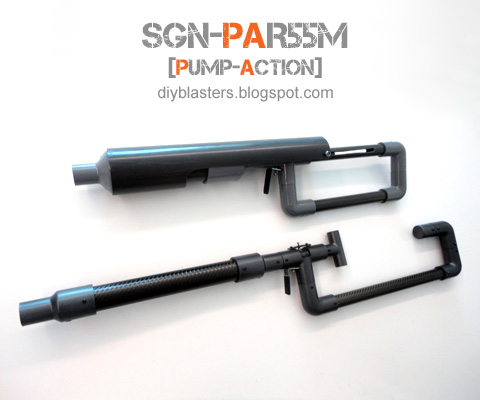
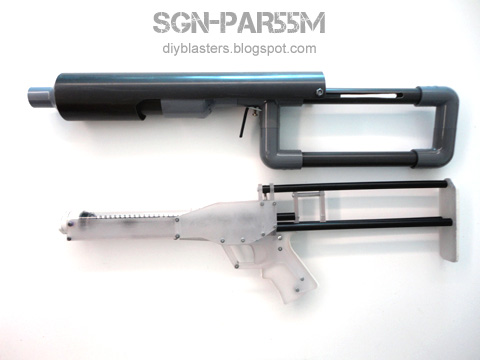
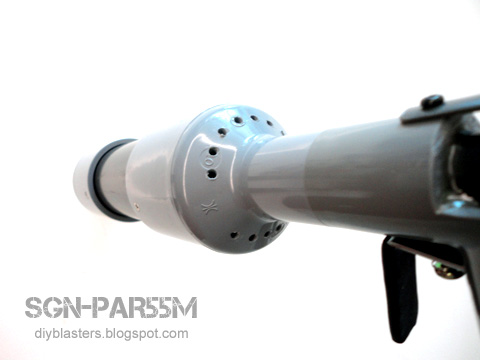
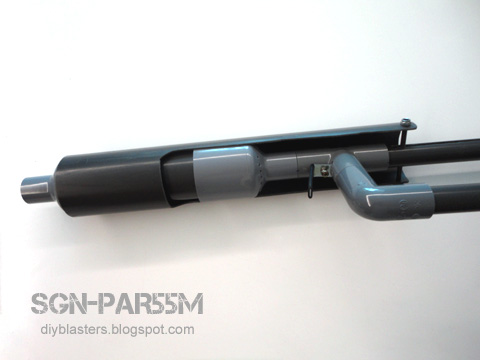
Assemble the plunger tube. I use a section of 55mm ID PVC pipe with matching front and rear pipe reducers. The plunger rod and spring are positioned inside the plunger tube.

The pipe reducers are secured with counter-sunk machine screws, this is so that the pump grip can slide over the reducers without getting blocked by any protruding screw heads.

Notice also in the above photo... other than the catch, trigger and reducer sections, there are no machine screws securing the rest of the pipes and joints?

I discovered that with this design, most of the pipe parts are connected in a set and are not load bearing sections, so the entire blaster can work perfectly even when those sections are not bolted together. This also helps to facilitate easier and quicker swapping of parts.

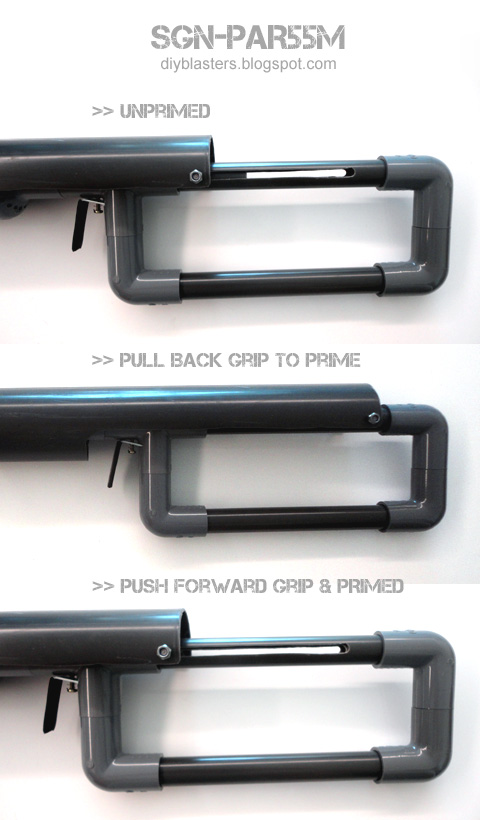
To assemble it, simply pull the trigger (to open the catch), then connect the plunger tube/rod section and the catch/trigger/shoulder stock section together. Note how the plunger rod slots are aligned with the shoulder stock slots.

Posted Image

With this modular assembly method, both the front and rear section can also be easily detached by just pulling them apart for maintainence or transportation, no tools required. :)

The large plunger volume will generate alot more vacuum draw behind the plunger head when it propels forward during firing, so make sure there are enough air relief holes drilled into the rear reducer to offset the vacuum draw (if air relief holes are not done or insufficient, the vacuum draw will slow down or even stop the plunger from moving forward).

Posted Image

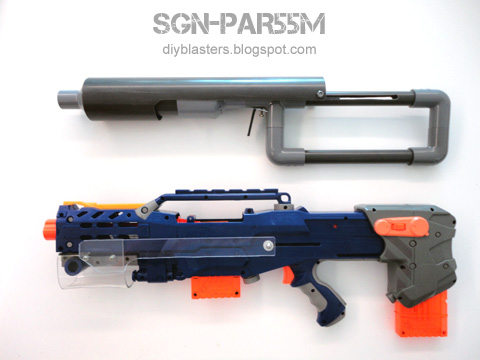
Next, we'll now proceed on to the pump grip.

Posted Image

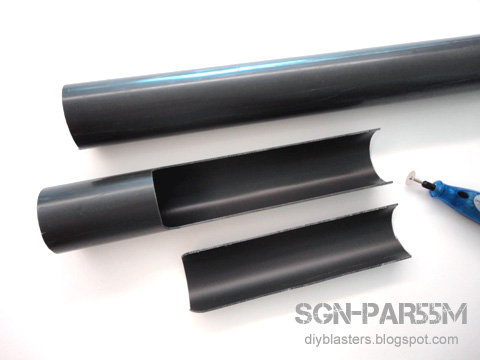
In my example, i used a section of 70mm ID PVC pipe, this particular pipe size fits smoothly over the front & rear reducers i used, therefore perfect for use as the pump grip.

Do a test fit and match the grip length required, then cut out the shape (length will depend on the overall dimensions of your particular pipes and joints).

Posted Image

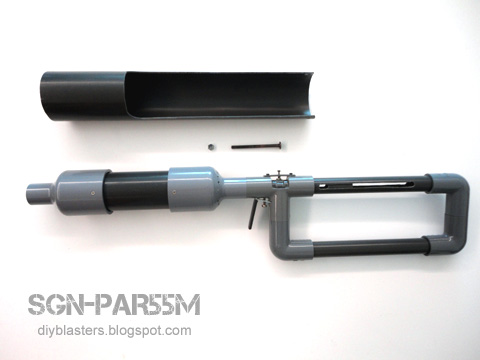
The pump grip is sleeved over the reducers and secured to the plunger rod via a long carriage bolt and nut threaded though the shoulder stock and plunger rod slots.

Posted Image

The grip section can be easily detached anytime by simply unscrewing the bolt.

Make sure the pump grip is able to move smoothly back and forth. Some additional trimming on the slots or parts in contact may be required to fine tune the fitment.
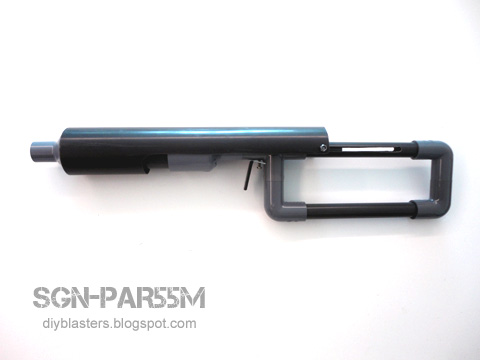
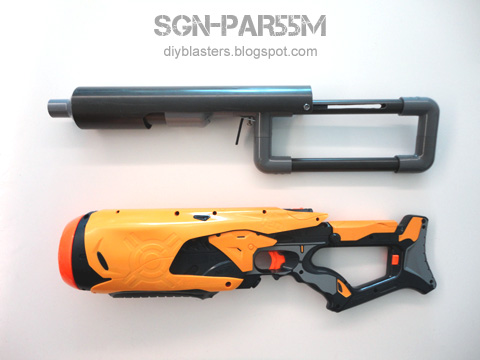
Posted Image

Its done!

The pump action grip also acts as a kind of blaster casing cover for the PAR55M, giving it a sort of "carapace" shell casing. Makes the design look abit more cohesive. ^_^

Edited by SgNerf, 29 April 2011 - 12:54 PM.

  • 0
Nerf News & Reviews! >> http://www.sgnerf.blogspot.com
Nerf Mod Guides! >> http://www.modworks.blogspot.com

#3 SgNerf

SgNerf

    Member

  • Members
  • 204 posts

Posted 28 April 2011 - 11:27 PM

SGN-PAR55M - Operation/Attachments/Comparisons

Here is how the pump action system works:

Posted Image

There are various barrel attachment options that can be fitted, i have successfully tested and used it in Nerf games with brass barrel slide breeches, hopper clips and spring-assisted chopper clips (shown from top to bottom of photo).

Posted Image

Here are some scale comparisons with other blasters...

PAR55M & R3L

Posted Image


PAR55M & +Bow

Posted Image


PAR55M & Nerf Longshot

Posted Image


PAR55M & Nerf Swarmfire


Posted Image

Notice the slight similarity in "shape"... that contributed a little bit to the PAR55M design idea too. :lol:
  • 0
Nerf News & Reviews! >> http://www.sgnerf.blogspot.com
Nerf Mod Guides! >> http://www.modworks.blogspot.com

#4 SgNerf

SgNerf

    Member

  • Members
  • 204 posts

Posted 28 April 2011 - 11:31 PM

SGN-R Series Blasters - PAR55M Demo Video

This video will provide a demonstration of how it works.

http://www.youtube.com/watch?v=qseY-DRWxSM


:: Sample Test Fire Data ::

PTG: Parallel-To-Ground (Shoulder height, no elevation)
ATG: Angled-To-Ground (Aimed higher, 30 degrees elevation)

Distance is measured at where the foam dart lands (Average of 6 shots).

SGN-PAR55M Blaster (1ft length Brass Barrel Slide Breech)
PTG = 140 ft
ATG = 155 ft

SGN-PAR55M Blaster (1ft length Brass Barrel Hopper/Chopper Clip)
PTG = 110 ft
ATG = 125 ft

Note: The tests were done under controlled conditions with custom calibrated foam darts.

Edited by SgNerf, 29 April 2011 - 04:48 AM.

  • 0
Nerf News & Reviews! >> http://www.sgnerf.blogspot.com
Nerf Mod Guides! >> http://www.modworks.blogspot.com

#5 soloz1

soloz1

    Member

  • Members
  • 87 posts

Posted 29 April 2011 - 12:10 AM

MAD props!!! That thing is BAD ASS!
  • 0

...Man, if I lived on Oahu, I would've dropped in on Pineapple by now. On Molokai. Via Kayak. ...Fuck, we're depending on you guys to defend us from 3DBBQ, get your shit together already.


#6 ChaosPropel

ChaosPropel

    Member

  • Members
  • 586 posts

Posted 29 April 2011 - 05:48 AM

Absolutely amazing! I was planning to do something like this with one of my R3Ls, but never got around to it (I've built 2 of them). I love how, in all your builds, all the cuts and pieces are so carefully planned out and made, which ensures an awesome blaster! :) I will try this out as soon as I can!

Edited by ChaosPropel, 29 April 2011 - 05:49 AM.

  • 0
Preheat oven to 350 degrees F (175 degrees C).

#7 SlightlySane813

SlightlySane813

    Member

  • Members
  • 213 posts

Posted 29 April 2011 - 02:50 PM

And I thought your SGN-R3L was genius alone.

Now i have to go change my pants because of you!

I will defiantly try to convert my R2W (1.5 tube)( the W means Wide)
  • 0
Also known as the French Canadian eh!

#8 Daniel Beaver

Daniel Beaver

    HQRSE CQCK

  • Moderators
  • 2,096 posts

Posted 29 April 2011 - 03:52 PM

Excellent as usual, with superb presentation. Looks like a solid blaster.

Yes... i know, many expert blaster builders will bemoan my use of such a rudimentary plunger head setup, it definitely isn't as sophisticated as the skirt seal plunger heads seen on other blaster designs.

If it gets a good seal, it's fine. What sort of lubrication are you using?
  • 0

#9 Ozymandias

Ozymandias

    Member

  • Members
  • 201 posts

Posted 29 April 2011 - 04:01 PM

Again, what I wouldn't do to get metric parts...
  • 0
If you wish to post anything HvZ related, here ya go.

"...if you've ever suffered the effects of a fucking faggot retard overpopulation, you'll understand what devistaiting effects it can have on one's psyche." - Talio

#10 andtheherois

andtheherois

    Member

  • Banned
  • 821 posts

Posted 29 April 2011 - 05:18 PM

I love it. That thing looks like it come right out of a videogame and looks mean as hell. Mad props to you. One thing I was wondering about though, what did you mean by "spring assisted chopper"?
The YooToobz
Photobucket

Winning rounds is rewarding, deal with it. We don't play fucking patty cake over here.


#11 ChaosPropel

ChaosPropel

    Member

  • Members
  • 586 posts

Posted 30 April 2011 - 10:25 AM

I love it. That thing looks like it come right out of a videogame and looks mean as hell. Mad props to you. One thing I was wondering about though, what did you mean by "spring assisted chopper"?

I believe he meant that the dart loading is "assisted" by a small spring in the back of the clip, which pushes darts foward, to help with feeding.
  • 0
Preheat oven to 350 degrees F (175 degrees C).

#12 SgNerf

SgNerf

    Member

  • Members
  • 204 posts

Posted 30 April 2011 - 12:31 PM

Thanks everyone for the cool feedback! :)

Excellent as usual, with superb presentation. Looks like a solid blaster.
If it gets a good seal, it's fine. What sort of lubrication are you using?

I currently use Super-Lube Synthetic Grease, it seems to have the right viscosity and its been safe for the o-rings and seals in my blasters so far.


I love it. That thing looks like it come right out of a videogame and looks mean as hell. Mad props to you. One thing I was wondering about though, what did you mean by "spring assisted chopper"?

I believe he meant that the dart loading is "assisted" by a small spring in the back of the clip, which pushes darts foward, to help with feeding.

Yes, that's correct... if you look closely at the back section of my chopper clip example, you can just see very thin springs compressed at that area in the clip, they are very light-weight custom springs (similar to the AR springs found in Nerf blasters) which when uncompressed extend to the entire length of that clip section.
  • 0
Nerf News & Reviews! >> http://www.sgnerf.blogspot.com
Nerf Mod Guides! >> http://www.modworks.blogspot.com

#13 shardbearer

shardbearer

    Member

  • Members
  • 177 posts

Posted 02 May 2011 - 07:36 PM

Wow, this is really great. I really like the bolt on the pump grip. This could be put on a Rainbow pretty easily and would be much easier to make and reduce materials as well as bulk.

Edited by shardbearer, 02 May 2011 - 07:36 PM.

  • 0


0 user(s) are reading this topic

0 members, 0 guests, 0 anonymous users