I'm plugging some hornet tanks up to a pump and the blast button out of the Hornet I'm using two of them, they're connected in parallel (they fire at the same time) and I'm using the basic design, nothing really different about it. But when I press the blast button, the majority of the air comes out of the blast button and only a tiny bit comes out of the tanks. So they are firing, and the setup is working but it's working improperly.
Has anyone else experienced this? Can anyone help me? I've never made one before, so I have no previous experience as to how they normally function.

25 replies to this topic
#1

Banshee
-
- Members
- 668 posts
Member


#2
Blue
-

- Members
- 2,222 posts
Member
Posted 17 January 2011 - 11:24 PM
Pics of how you rigged the tubing would be good.
#3
Banshee
-
- Members
- 668 posts
Member
Posted 18 January 2011 - 12:30 AM
I was going to post pictures up, but I've already built it into the gun so I didn't waste hose (this is an integration mod) so its so tightly packed in there that you wouldn't be able to tell where the hose is all going. So in the spirit of your request, I drew the design up in Paint really quick to show how I did it.
I forgot to mention before that I also have a titan tank attached the the air system. The hosing is colored, and I used different colors for each hose so you wouldn't confuse them with each other. I intend to put a check valve in the red colored hose for the larger tank, but I didn't think that not having it installed would prevent me from doing my testing. But now I'm thinking it might have something to do with my problem, but I'm not sure.
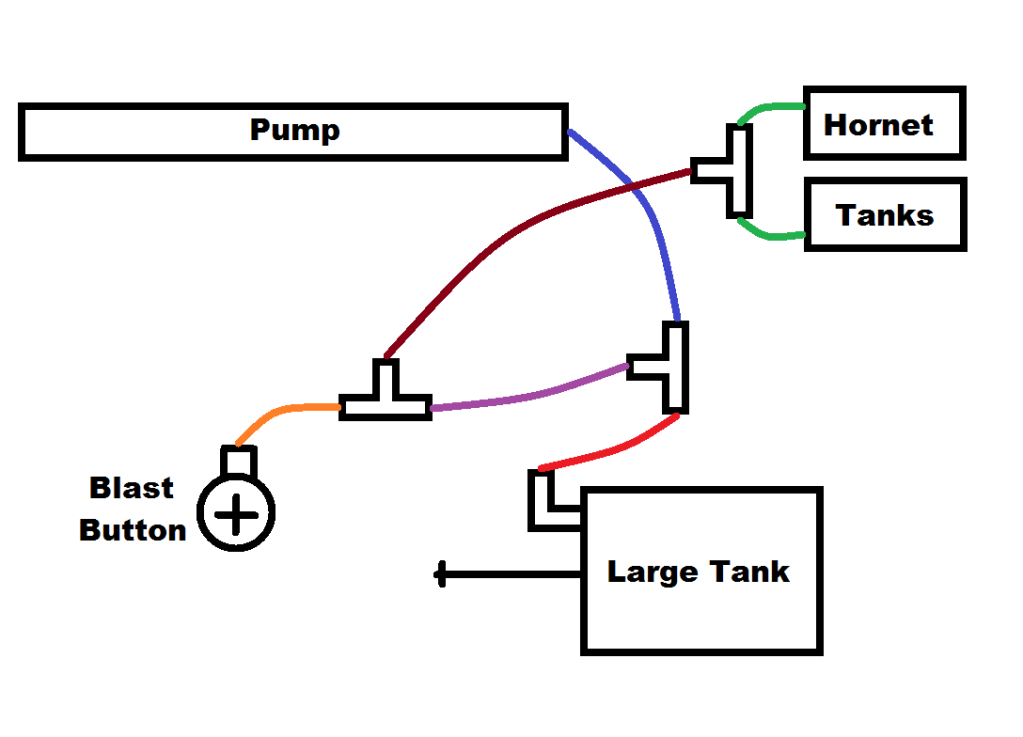
I forgot to mention before that I also have a titan tank attached the the air system. The hosing is colored, and I used different colors for each hose so you wouldn't confuse them with each other. I intend to put a check valve in the red colored hose for the larger tank, but I didn't think that not having it installed would prevent me from doing my testing. But now I'm thinking it might have something to do with my problem, but I'm not sure.
Edited by Banshee, 18 January 2011 - 12:31 AM.
Like my page on Facebook! PM me, I do commissions!
#4
snakerbot
-

- Members
- 310 posts
Maker of Things
Posted 18 January 2011 - 12:55 AM
Having the titan tank there is definitely your problem. Right now, you will need to vent all the air from the titan tank out the blast button very quickly in order for the hornet tanks to fire. If you put in a check valve so that air could flow from the pump into the titan tank, but not out, then you could fire the hornet tanks fine. This still won't completely solve your problem though. You won't be able to fire the titan without also firing the hornet tanks, since that will dump all the pressure behind them. What exactly are you planning on doing with this, anyway? We might be able to figure out how to set it up if we knew exactly what you are trying to accomplish.
#5
Banshee
-
- Members
- 668 posts
Member
Posted 18 January 2011 - 01:48 AM
Well What you see is basically the entire internals. I would like to be able to pump the gun and then fire the tanks separately. I understand that by putting a check valve in the Titan tank will help regulate the pressure and that to fire them separately, I have to fire the hornet tanks and then the Titan and I can't do it the other way around or the pressure from the Hornet tanks will just dump into the Titan tank.
The only way around that is to put check valves in the Hornet tanks. However, I don't see any room in my current setup for that. The blast valve and the tanks need to be post check valve for that to work. So I would have to redesign everything. Correct?
The only way around that is to put check valves in the Hornet tanks. However, I don't see any room in my current setup for that. The blast valve and the tanks need to be post check valve for that to work. So I would have to redesign everything. Correct?
Like my page on Facebook! PM me, I do commissions!
#6
roboman
-

- Members
- 489 posts
Member
Posted 18 January 2011 - 02:22 AM
If you place a check valve in line with the purple tube, as well as before the titan tank, you'll be able to fire both individually.
Youtube
LS and Retaliator boltsleds are currently available at https://www.facebook.com/RoboM8/
#7
Boot
-

- Members
- 90 posts
Member
Posted 18 January 2011 - 03:29 AM
All backpressure tanks fire by having low pressure in the back of the valve pull back the plunger. Without the check valve the volume of the titan tank means that a LOT of air has to be released to lower the pressure behind the hornet tanks by just a bit. What is happening is that the air release is so slow that there is not enough low pressure buildup behind the Hornet plungers to fire them (until the pressure in them is so low that the plungers can be pulled back easily, explaining the tiny air release that does occur).
Basically what all this means is that if you put the check valve in it should work great.
The tanks are fine, no worries (actually, since they are back pressure tanks they are more than fine; they are AWESOME.)
EDIT:
After looking at what you're trying to accomplish, I have a better solution. Take the pump, and create two outlets for it. Attach check valves to both of those outlets, and then attach the titan tank to one outlet, and the hornet system to the other. You will be able to fire both tanks separately, or just fire one and re prime it, while keeping the other system primed at all times. This is kind of similar to my "scrappy" build but... with the insanity of a Titan tank.
Good luck on this, i look forward to seeing the result.
Edited by Boot, 18 January 2011 - 03:34 AM.
#8
roboman
-
- Members
- 489 posts
Member
Posted 18 January 2011 - 03:48 AM
That is exactly what the tee coming from the pump does. If you hook a check valve to each "leg" of the tee, you can achieve the same effect, as stated in my previous post.After looking at what you're trying to accomplish, I have a better solution. Take the pump, and create two outlets for it. Attach check valves to both of those outlets, and then attach the titan tank to one outlet, and the hornet system to the other. You will be able to fire both tanks separately, or just fire one and re prime it, while keeping the other system primed at all times. This is kind of similar to my "scrappy" build but... with the insanity of a Titan tank.
Youtube
LS and Retaliator boltsleds are currently available at https://www.facebook.com/RoboM8/
#9
Boot
-
- Members
- 90 posts
Member
Posted 18 January 2011 - 03:55 AM
That is exactly what the tee coming from the pump does. If you hook a check valve to each "leg" of the tee, you can achieve the same effect, as stated in my previous post.
Oh ok, I didn't really understand the post because I couldn't get the diagram to load (it's probably hosted on a site blocked in China
 ).
).I certainly know what a tee does, I think think that is the most valid solution although a single check valve setup would also work if you used one set of tanks as a secondary shot, and mainly just used the Titan tank as a primary shot (or visa versa).
#10
roboman
-
- Members
- 489 posts
Member
Posted 18 January 2011 - 04:14 AM
Sorry, I constantly forget about the "Great Firewall of China," despite the fact that I just did a project for school about Net Neutrality in China.Oh ok, I didn't really understand the post because I couldn't get the diagram to load (it's probably hosted on a site blocked in China
I certainly know what a tee does, I think think that is the most valid solution although a single check valve setup would also work if you used one set of tanks as a secondary shot, and mainly just used the Titan tank as a primary shot (or visa versa).
A single check valve could work, however, it is definitely not the most efficient method of solving this problem.
Youtube
LS and Retaliator boltsleds are currently available at https://www.facebook.com/RoboM8/
#11
BrokenSVT
-

- Members
- 128 posts
Member
Posted 18 January 2011 - 05:16 AM
I'll echo[some of] the advice above to steer you back on track. Assuming the pump you're using has a good check valve built-in, and that it's up to the task of holding back air pressure for the forseeable future, that part's all good. Add a single check valve inline with the "purple" air line in your diagram. That will isolate the Hornet "system" from the Titan tank and solve all of your problems.
If you aren't willing to do that, as your above post infers, then I'm not sure why you came here to ask advice, quite frankly. It's the easiest way to fix what needs fixing.
If you aren't willing to do that, as your above post infers, then I'm not sure why you came here to ask advice, quite frankly. It's the easiest way to fix what needs fixing.
REVOLUTION Be there or be square.
#12
jaybo1996
-
- Members
- 110 posts
Member
Posted 18 January 2011 - 07:22 AM
Alternativley, just fire the titan tank, and the Hornets should fire with it. Since the titan tank is also acting as a valve on the pilot air.
01:15 N9> The problem with nerfers: We're around plastic. Plastic contains estrogenic compounds, so we're more feminine than the rest of the world.
WTF, are you in Tony Stark's basement!?'
#13
shmmee
-
- Members
- 467 posts
Member
Posted 18 January 2011 - 09:38 AM
Also, minimizing the ammount of tubing between the hornet tanks, blast button, and check valve will result in a more explosive discharge from the hornet tanks. The less air there is to vent, the quicker the internal piston moves. The quicker it moves, the better. It makes the difference between a hissing discharge, and an explosive "pop".
"and we should respect the people who make our blasters. Even if we do molest the hell out of them..."
~BritNerfMogul
~BritNerfMogul
#14
Banshee
-
- Members
- 668 posts
Member
Posted 18 January 2011 - 11:30 AM
Well I've basically concluded that I'm going to drop in two check valves because I like the idea of being able to fire both guns completely independent of each other and being able to leave one pressurized at all times. It'd be nice to leave a shotgun blast in the Titan primed and ready and use the Hornet tanks as a primary gun and when needed, unleash havoc with the Titan.
Thanks for your help guys, I'll let you all know how it goes. By the way, anyone know where to get check valves? Local hardware stores don't seem to have them.
Thanks for your help guys, I'll let you all know how it goes. By the way, anyone know where to get check valves? Local hardware stores don't seem to have them.
Like my page on Facebook! PM me, I do commissions!
#15
Blue
-
- Members
- 2,222 posts
Member
Posted 18 January 2011 - 02:10 PM
Well I've basically concluded that I'm going to drop in two check valves because I like the idea of being able to fire both guns completely independent of each other and being able to leave one pressurized at all times. It'd be nice to leave a shotgun blast in the Titan primed and ready and use the Hornet tanks as a primary gun and when needed, unleash havoc with the Titan.
Thanks for your help guys, I'll let you all know how it goes. By the way, anyone know where to get check valves? Local hardware stores don't seem to have them.
Hornets have them inside of them, they are easy enough to scrap out and attach tubing too. I think there is a way to make them using ball bearings and tubing as well, and I'm sure you can find some available for purchase if you look around online.
#16
Banshee
-
- Members
- 668 posts
Member
Posted 18 January 2011 - 02:40 PM
I'd have to take you at your word on that, but if there were check valves inside the tanks, then how is the blast button going to work? The check valve needs to be before the blast button and the tanks. Either way I'm going to do what was suggested which is basically branch the tubing off into two directions, each with their own check valve.Well I've basically concluded that I'm going to drop in two check valves because I like the idea of being able to fire both guns completely independent of each other and being able to leave one pressurized at all times. It'd be nice to leave a shotgun blast in the Titan primed and ready and use the Hornet tanks as a primary gun and when needed, unleash havoc with the Titan.
Thanks for your help guys, I'll let you all know how it goes. By the way, anyone know where to get check valves? Local hardware stores don't seem to have them.
Hornets have them inside of them, they are easy enough to scrap out and attach tubing too. I think there is a way to make them using ball bearings and tubing as well, and I'm sure you can find some available for purchase if you look around online.
I was hoping someone could save me the hassle of finding out the hard way and send me a link to a check valve that will operate at the right pressure that fits on 3/16 ID-5/16 OD tubing. I don't know much about pressure systems and I just don't want to get the wrong thing, especially when I have to order it.
Like my page on Facebook! PM me, I do commissions!
#17
Banshee
-
- Members
- 668 posts
Member
Posted 18 January 2011 - 02:49 PM
Excuse my double post, but will THESE work?
Like my page on Facebook! PM me, I do commissions!
#18
cheyner
-

- Members
- 240 posts
Member
Posted 18 January 2011 - 06:55 PM
I'd have to take you at your word on that, but if there were check valves inside the tanks, then how is the blast button going to work? The check valve needs to be before the blast button and the tanks. Either way I'm going to do what was suggested which is basically branch the tubing off into two directions, each with their own check valve.Hornets have them inside of them, they are easy enough to scrap out and attach tubing too. I think there is a way to make them using ball bearings and tubing as well, and I'm sure you can find some available for purchase if you look around online.
I was hoping someone could save me the hassle of finding out the hard way and send me a link to a check valve that will operate at the right pressure that fits on 3/16 ID-5/16 OD tubing. I don't know much about pressure systems and I just don't want to get the wrong thing, especially when I have to order it.
When Blue said Hornet, he meant the whole blaster, not the tanks. Common sence should have helped you with that one, obviously there is not check valves in the tanks themselves.
Beaver's post claiming Kane's post claiming Demon Lord's post is correct is correct is correct.
Canadian Nerfers-R.I.P.
#19
Banshee
-
- Members
- 668 posts
Member
Posted 18 January 2011 - 06:56 PM
Thanks Bob, I'll take that into consideration when I rebuild it.
Like my page on Facebook! PM me, I do commissions!
#20
Nerf Gra
-
- Members
- 145 posts
Member
Posted 19 January 2011 - 12:51 AM
Check out the second post in this thread. There inst much detail about it but its pretty straight forward and I'm sure you could make something like that. Plus its all but inline with the tube so it wouldn't take up much space.
Is there a good way to effectively fire 2 hornet tanks with one blast button without loosing too much range?
Is there a good way to effectively fire 2 hornet tanks with one blast button without loosing too much range?
QUOTE(VelveetaAvenger @ Dec 6 2010, 12:14 AM) 
Maybe there's no Mcmaster, but you could make the first coconut airtank.
#21
arfink
-

- Members
- 246 posts
Member
Posted 19 January 2011 - 02:13 PM
Check out the second post in this thread. There inst much detail about it but its pretty straight forward and I'm sure you could make something like that. Plus its all but inline with the tube so it wouldn't take up much space.
Is there a good way to effectively fire 2 hornet tanks with one blast button without loosing too much range?
The tanks should not loose range just from having two of them hooked up, assuming you keep the lines between the tanks and the blast button as short as possible. Also worth considering is modifying the fill/vent nozzle on the tanks to be wider, and use a wider ID tubing, as this would allow for faster venting though it would require a lot more work. Remember, the pilot volume of the tank needs to vent as quickly as possible in order for the piston to "snap" back and fire effectively, otherwise your chamber volume which is supposed to exit through the barrel will slowly leak back out the pilot instead.
A2GS + 4 meg RAM + 128 meg CF + 9600 Baud Lantronix = WIN
#22
Nerf Gra
-
- Members
- 145 posts
Member
Posted 19 January 2011 - 11:19 PM
...assuming you keep the lines between the tanks and the blast button as short as possible. Also worth considering is modifying the fill/vent nozzle on the tanks to be wider, and use a wider ID tubing....
Excuse my ignorance but I was under the impression that the reason for keeping the tubes between the blast button and tank as short as possible was so it fired the tank fast due to there being less volume between the tank and blast button. If that is true then it would seem to me what you said is self contradicting. Shorter tubes=less volume but greater ID= more volume.
They way I thought it worked was based on pressure differential. Basically all the blast button has to do is relieve a small amount of pressure to fire the tank. So it would stand to reason that the less volume there is between the tank and blast button the less air would have to be moved in order to reduce pressure enough to fire tanks and as I said earlier: Shorter tube=less volume and if that is true then. Less volume=faster pressure release: Faster pressure release= faster valve opening: Faster valve opening= More air to fire the shot.
QUOTE(VelveetaAvenger @ Dec 6 2010, 12:14 AM)
Maybe there's no Mcmaster, but you could make the first coconut airtank.
#23
snakerbot
-
- Members
- 310 posts
Maker of Things
Posted 19 January 2011 - 11:40 PM
It's more about flow than volume. The piston is sucked back when the pressure behind is relieved quickly. Yes, shorter tubes decrease the volume allowing the pressure to released more quickly, but increasing the ID allows for the air to flow out faster.
#24
Nerf Gra
-
- Members
- 145 posts
Member
Posted 20 January 2011 - 12:42 AM
Fair enough. I don't have a ton of experience with air power guns (a shame I know) but at this point I'm open all input as I am working on a project myself.
QUOTE(VelveetaAvenger @ Dec 6 2010, 12:14 AM)
Maybe there's no Mcmaster, but you could make the first coconut airtank.
#25
BrokenSVT
-
- Members
- 128 posts
Member
Posted 20 January 2011 - 05:24 AM
Your analogy is somewhat correct; the truth being that exhaust headers can be most any length and still produce massive power gains. The power band can be tuned via the lengths of the primary tubes(i.e. the power peak will happen in a different area of the rev range); the important thing is that the primary tubes are all as close to the same length as possible, regardless of the shape of them on the way to the secondaries...but this isn't Hot Rod Magazine's forums.
I had/have a setup just like the OP is wanting to build on my old 3B. It now belongs to someone else, he'll be picking it up next war.
It consists of two Hornet tanks, a Hornet pump, Hornet blast button, a couple of tees and tubing and works VERY well, TYVM. It fires great ranges, both tanks getting nigh identical range, and produces those distances on anywhere from 5-10 pumps. Hope this pic will give you the general idea:
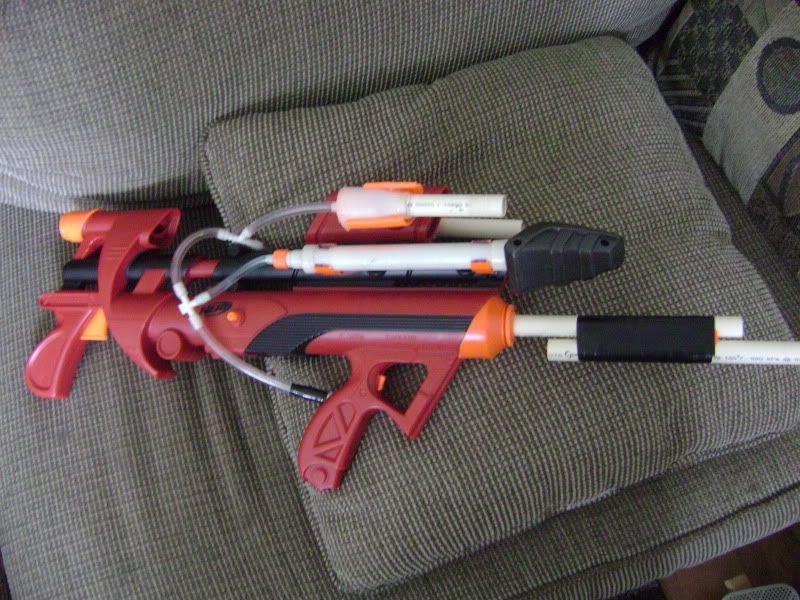
REVOLUTION Be there or be square.
0 user(s) are reading this topic
0 members, 0 guests, 0 anonymous users

