Jump to content


Photo

Easy Hornet Tank Expansion

Heat, stuff, glue, drill

7 replies to this topic

#1 shmmee

shmmee

    Member

  • Members
  • 467 posts

Posted 30 October 2010 - 08:33 PM

Easy Hornet Tank Capacity Expansion

And thus begins my first intellectual contribution to Nerfhaven...

This easy mod will expand the capacitance of a hornet back-fire tank, customizable to as much volume as needed.

Ranges are dependent on your own pressure used, and how much you choose to expand the tank. Therefore, I won't be offering any review concerning ranges, but logically more discharge capacity can support a longer barrel, and provide more acceleration.

Part I: capacity expansion (holding pressure and firing)
Part II: output expansion (not holding pressure)

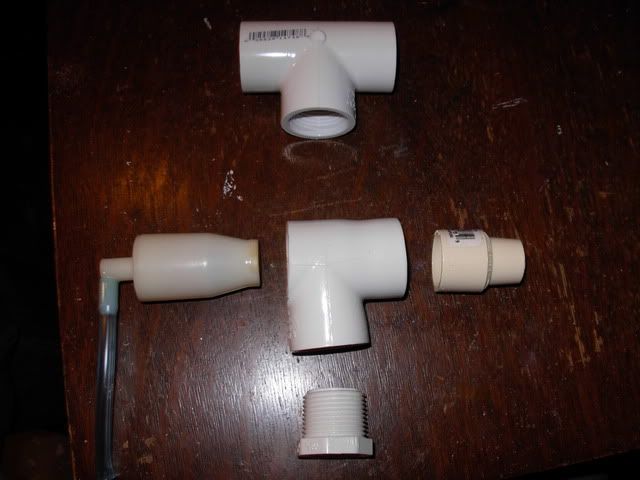
Part I materials required:

3/4” PVC threaded tee
3/4” threaded plug
Teflon tape
PVC glue and primer (epoxy might also work, but the PVC glue is nice and gooey for filling gaps and air tight proven in my prototype)
3/4”x1/2” CPVC reducer (if you are using a CPVC barrel)

Optional:
3/4” threaded nipple (optional if you want to expand it beyond what the plug will hold)
3/4” threaded cap (optional (to cap the nipple))
3/4” ball valve (very optional) (placing a valve midway down the nipple will create a third expansion usable mid war.

Part II requires a Bic pen (and cap)
3/8" drill bit (equal to a Bic pen cap outside diameter)
epoxy
pipe cutter
e-tape
1" pipe clamp
3" clamp
(clamps and tape are to form a temporary seal for testing)

Tools needed:
Heat gun (glorified hair dryer) or torch (preferably heat gun. Much more controlled) I got mine for 13$ new at Harbor Freight (a discount tool chain. Love that place!) probably 20$ish everywhere else.
Dremmel with spiral cutting bit, or drill press with 1/2” drill bit (preferably a Forestner type bit. It cuts a little more shallow)
Canned air/air compressor with spray nozzle

Time:
Less than an hour (+glue setting time)

Start by disassembling a hornet and getting to a bare tank. This is already covered in other posts, so I'll assume yourself capable of using the search function if you have questions.

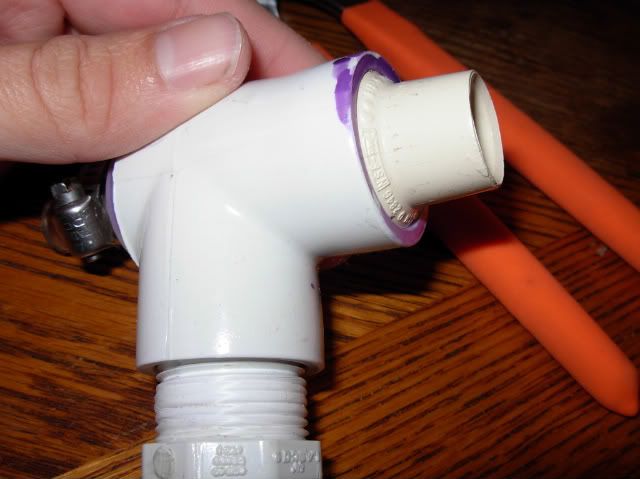
Lop off one of the side legs of your tee level with the middle leg.

Here's the exploded view of what you'll be doing.
Posted Image

Insert your threaded plug to keep it from stretching out of round. (hand tighten to snug fit. You don't want to stretch the threads once it's heated)

Heat the PVC tee with a heat gun until it becomes shiny (it will be in a slightly mailable state)
Please don't burn yourself. Heat guns put off some serious heat.

Once it's shiny, stuff your hornet tank in through the leg you shortened until about 1/8” of the tank is sticking out the back. Re-heat and stuff your CPVC reducer into the barrel end (if you're using a CPVC barrel)
You can see how it's stretched and slightly deformed.
Posted Image

Allow to cool slightly, unscrew the plug and look to make sure the shoulder of the reducing section is past the hole of the the threaded leg.

Remove the tank and reducer. I had to use a rubber mallet. If it's really tight, re-heat then remove.

Fit test the tank and CPVC reducer into the tee once cooled. If every thing looks good, apply PVC primer to the inside of the tank (not the threads) and hornet tank. I realize it might not be the perfect chemical match for the plastic of the hornet tank, but we at least know it's appropriate for the PVC. Next apply PVC glue to both the tank and tee. Goop the heck out of it. We'll need it to be completely covered and air tight. Stuff the tank in, and rotate it 360 degrees to ensure the glue makes complete contact with all sides. Don't glue the reducer in. that will probably hold on it's own, and you may want to fill dead space later. Set it down with the plug pointing up and let it dry.

Once dry, remove the plug, and Dremmel out/drill out the shell of the hornet tank visible inside the threaded tee portion.
Posted Image
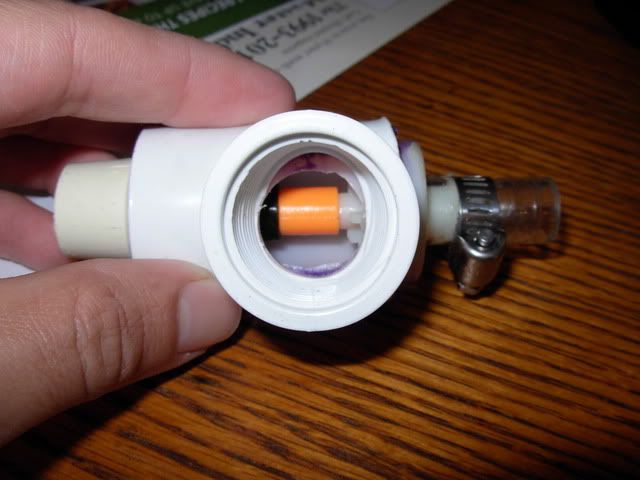
Don't drill any deeper than you absolutely need too. There is a peg with a piston on the end centered in the tank. You don't want to damage the rubber fitting on the end.

Be obsessive about cleaning out the shavings. Rinse it out with water, then use canned air or an air compressor to blow it out. Shoot air through a straw down the barrel nozzle. Get them all gone. Even one particle can hinder a seal.

Apply Teflon tape around the threads of your plug, and screw it in. You'll want a tighter than hand tight fit this time. (or until it stops leaking...)

Pump it up and test fire.

If you want more capacity than the plug holds, just screw in a nipple with a cap on the end.

If you want a mid-war expandable tank, just glue a ball valve in the middle of the nipple. Just slap on a coupled barrel extension to increase barrel length, and turn the valve to expand tank capacity to match, pump more and fire at an increased range.

Theoretically, you could create a hornet tank with more capacity than a titan if you wanted!

Part II:
My incomplete airflow expansion: (Piston won't seal and hold pressure. Grrr.)

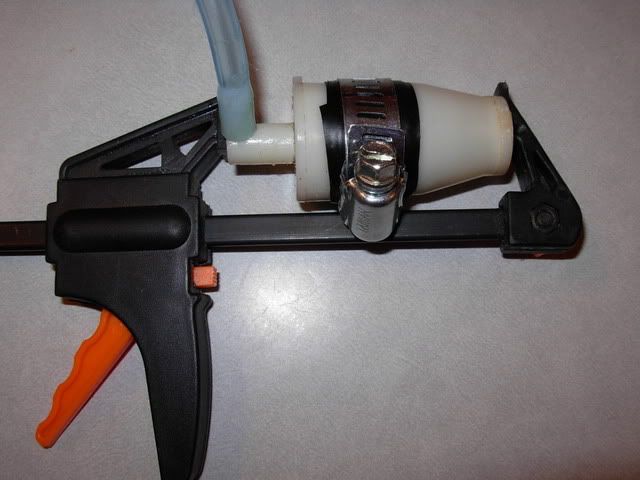
If you wanted to completely open the shell to try to enlarge the output nozzle for increased air flow, use a pipe cutter to gently get a channel set before applying pressure and cutting. This heat – stuff – glue method could be used to mate both halves back together. Though, I'm just e-taping, pipe clamping both halves together with a C clamp to hold both halves together laterally to test and trouble shoot. (E-tape and a pipe clamp didn't hold. the halves separated, and one half shot across the room. It took me 3 weeks to find the piston.) Don't glue it till you know it's capable of holding a seal. Mine still is not sealing. I drilled out the barrel side nipple, and epoxied a Bic pen cap in it's place the cap is too wide for the piston to seal on, but the cap lets you nest an adjustable Bic pen tube inside.)) If anyone else wants to give it a try, have at it. At the very least, I'm open to suggestions.

Pics of internals (because I haven't seen any on Nerfhaven)
Posted Image

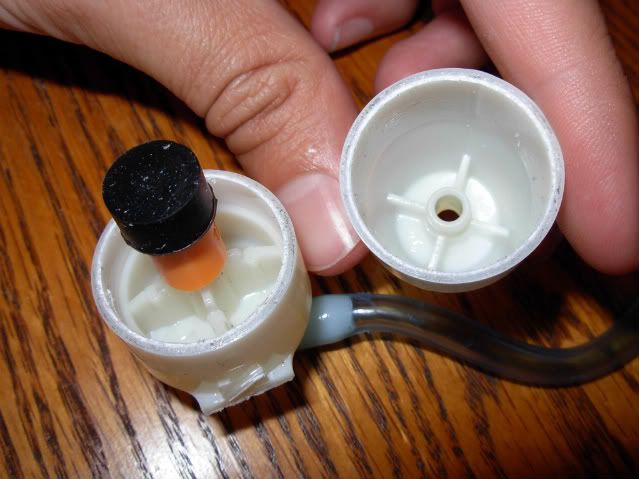
barrel side peg, and supports partially drilled out to be replaced with Bic pen cap section at right.
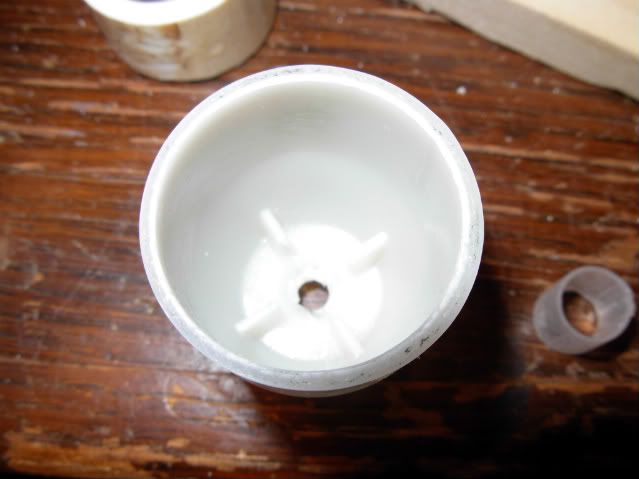
Posted Image

cap prep
Posted Image

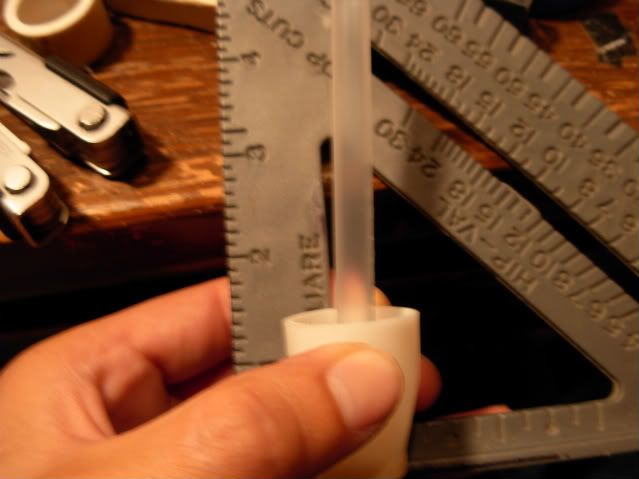
cap being epoxied into place (pen tube inserted to help make sure it's going in squarely)
Posted Image

Taped and clamped for a test fire. (leaks out barrel. still a work in progress)
Posted Image

Any thoughts?
I haven't looked into it, but I've been wondering if the same heat – stuff - glue - drill method could be applied to increase the output capacity on a RF-20 piston...

Edited by shmmee, 30 October 2010 - 08:54 PM.

  • 0
"and we should respect the people who make our blasters. Even if we do molest the hell out of them..."
~BritNerfMogul


#2 Boot

Boot

    Member

  • Members
  • 90 posts

Posted 30 October 2010 - 09:28 PM

Nicely done, I always thought a hornet tank expansion might be viable, the only issue is its small opening. Have you tested this with a barrel yet? and if so, does the relatively slow air release effect range? (or is that one of the reasons for the outlet expansion in part 2?)

I haven't looked into it, but I've been wondering if the same heat – stuff - glue - drill method could be applied to increase the output capacity on a RF-20 piston


That has definitely been done before, maybe not with the "heat – stuff - glue - drill method", but it's been done by drilling and glueing another piece on (see my sig for an example of this on a magstrike piston)

Anyway, great job on the expansion, it always takes some guts to cut open an air tank, but in this case it seems well worth it :lol: .
  • 0
QUOTE
If you try to shoot over 45 feet with a magstrike accurately you fail

I beg to differ

#3 shmmee

shmmee

    Member

  • Members
  • 467 posts

Posted 30 October 2010 - 09:49 PM

edit. goofed reply

Edited by shmmee, 30 October 2010 - 10:04 PM.

  • 0
"and we should respect the people who make our blasters. Even if we do molest the hell out of them..."
~BritNerfMogul


#4 shmmee

shmmee

    Member

  • Members
  • 467 posts

Posted 30 October 2010 - 10:03 PM

Nicely done, I always thought a hornet tank expansion might be viable, the only issue is its small opening. Have you tested this with a barrel yet? and if so, does the relatively slow air release effect range? (or is that one of the reasons for the outlet expansion in part 2?)


I haven't performed a comparative test to an un-modded tank, but when fired with a generous 16" cpvc barrel (not sure how much air pressure used at fire) The dart still fired with quite a bit of force.

I found more depends on how much tubing is connected to the tank, blast button, and pump. The less tubing used, (like in your "tiny tim" eliminator mod (very cool)) the quicker the system can vent and the quicker the piston can get out of the way. Which leads to a more explosive force applied.

Thanks for pointing me to your magstrike mod. I had actually thought about using the piston to load darts, but the output power was so low i gave up on it after testing it singled. That's an elegant solution to both problems.

Edited by shmmee, 30 October 2010 - 10:07 PM.

  • 0
"and we should respect the people who make our blasters. Even if we do molest the hell out of them..."
~BritNerfMogul


#5 phillypretzel

phillypretzel

    Member

  • Members
  • 95 posts

Posted 31 October 2010 - 11:13 AM

Very innovative, and a great use of parts- like many in the nic, I have plenty of extra hornet guts lying around just waiting to be used for something clever like this. Good luck getting the back pressure valve to seat against the larger opening :lol: have you considered the use of an o-ring or a small diameter neoprene washer on the end of the pen cap? Also, I noticed you used regular pvc cement on the tank and tee- Ace hardware sells a cement for mating pvc to abs and other plastics, it's in the can with the yellow label. Thanks for the inspiration!
  • 0

#6 shmmee

shmmee

    Member

  • Members
  • 467 posts

Posted 31 October 2010 - 01:06 PM

Very innovative, and a great use of parts- like many in the nic, I have plenty of extra hornet guts lying around just waiting to be used for something clever like this. Good luck getting the back pressure valve to seat against the larger opening :) have you considered the use of an o-ring or a small diameter neoprene washer on the end of the pen cap? Also, I noticed you used regular pvc cement on the tank and tee- Ace hardware sells a cement for mating pvc to abs and other plastics, it's in the can with the yellow label. Thanks for the inspiration!


I've tried a large rubber washer seated around the pen cap, but it wasn't thick enough to rise above the pen cap so the piston wasn't contacting the washer. I'll try raising it by placing an O ring above it on the nested Bic pen tube. thanks for the suggestions.
  • 0
"and we should respect the people who make our blasters. Even if we do molest the hell out of them..."
~BritNerfMogul


#7 shmmee

shmmee

    Member

  • Members
  • 467 posts

Posted 09 November 2010 - 02:39 PM

11/9/2010 Part II update:

Part II still isn't working. I realized the replacement Bic pen cap peg is 3.5 degrees off of, so tolerances are really tight. for my second try, Instead of replacing the center peg with a bigger center peg, i've tried resting a rubber washer level with the barrel peg, and filling the space below it with epoxy. It's now opened to .25" and holds pressure (good progress), but vents back out through the piston peg instead of shifting the peg out of the way and venting to the barrel. I'm thinking it's doing that because the piston head now sits flush on the rubber washer, so there isn't any piston head hanging over a peg for the air in the tank to get under and push against (moving the piston out of the way). Basically more surface area at piston inlet than at the piston outlet to push against.

Untill i get this last piece of the puzzle figured out you may want to hold of on this second part of the mod. (but part I still works great, and is really easy.) If i get it working i'll post the part II as a separate mod.

Edited by shmmee, 09 November 2010 - 03:04 PM.

  • 0
"and we should respect the people who make our blasters. Even if we do molest the hell out of them..."
~BritNerfMogul


#8 Zorns Lemma

Zorns Lemma

    Sir Scrt

  • Moderators
  • 1,277 posts

Posted 09 November 2010 - 03:06 PM

I'm thinking it's doing that because the piston head now sits flush on the rubber washer, so there isn't any piston head hanging over a peg for the air in the tank to get under and push against (moving the piston out of the way).


Pretty much exactly this. When you open your pilot valve and the pressure equalizes to atmosphere in your piston, the pressure differential on the poppet is actually applying a net force towards the valve opening as opposed to away from it.

That's one of the largest reasons why widening the dump valve on these tanks is so difficult (see Tantum's attempt with the BS tank). The only real way to solve this is through poppet or piston modification which are both pretty tedious processes.

Great work so far though. I'm really excited to see if you can figure out a solution.
  • 0
"In short, the same knowledge that underlies the ability to produce correct judgement is also the knowledge that underlies the ability to recognize correct judgement. To lack the former is to be deficient in the latter."
Kruger and Dunning (1999)


0 user(s) are reading this topic

0 members, 0 guests, 0 anonymous users