Jump to content


Photo

Snap Trigger Revision

a breakthrough in Nerfing????

13 replies to this topic

#1 venom213

venom213

    Member

  • Validating
  • 1,294 posts

Posted 02 September 2010 - 02:18 PM

Being a Midwest Nerfer, it's very hard to hate SNAPs. I've always liked SNAPs, but I have never been able to build one to last a decent amount of time. This was due to a number of reasons, but the most prominent of which has definitely been the trigger. I can't stand Clothespin triggers at all. I've always found it incredibly difficult to make them catch well and not break, and I've seen many others have this problem.

Taking inspiration from PVC Arsenal's suggestion of using a spring plunger, I decided to build something similar that still pertained to the "hardware store parts" idea of a SNAP. The spring plungers are not only very expensive, but must be ordered from McMaster.

Here is what I did:

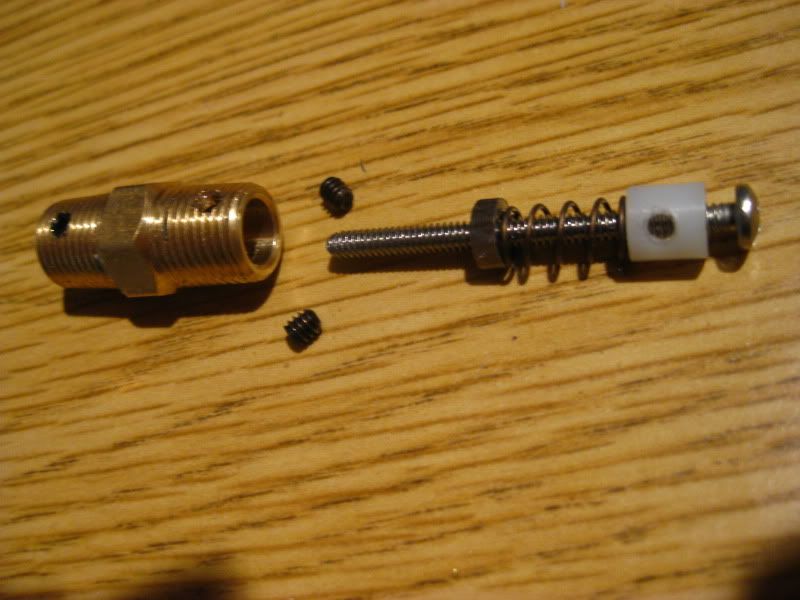
I used the following parts plus a few more:

Posted Image

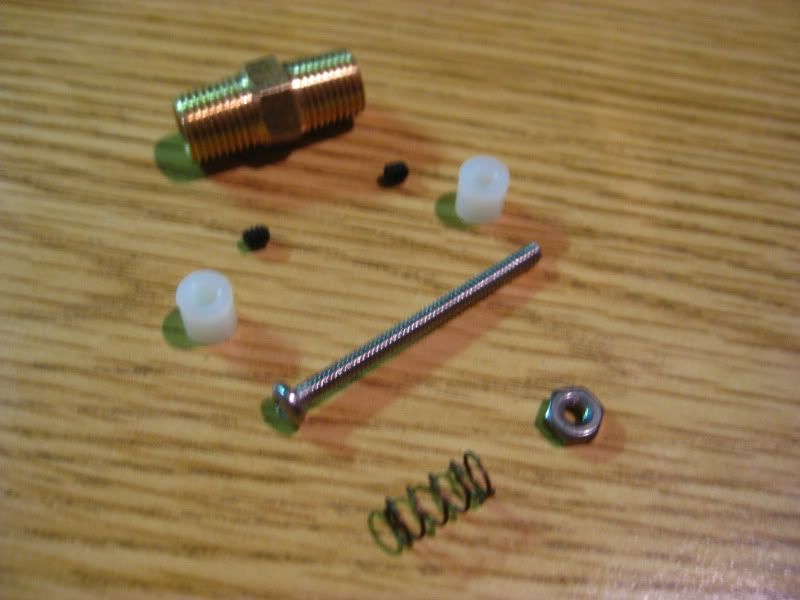
-1x 1/8" Brass Nipple
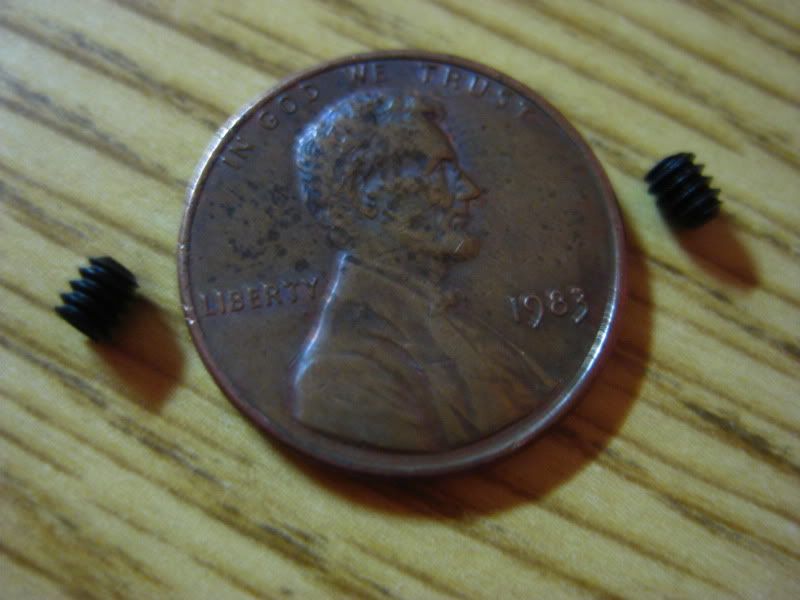
-4x 4-40 Set Screws (only 2 are pictured)
-2x Nylon Spacers (I'll edit in the exact size later)
-1x 1.5" 4-40 screw
-1x Small Spring
-1x 4-40 Nut

These 4-40 set screws were either the smallest or second smallest set screws I could find at Ace. Be careful, it's VERY easy to lose them.

Posted Image

To start off with, insert one of the nylon spacers into the end of the nipple. Make sure the end of the nipple and the end of the spacer are flush. Drill a hole (with an according bit for 4-40 screws) in the side of the nipple (about 1/8" down from the end of the nipple). Drill all the way through the nipple/spacer so that there is a hole going all the way through and exits the other side. Tap the holes with a 4-40 tapping bit.

Posted Image

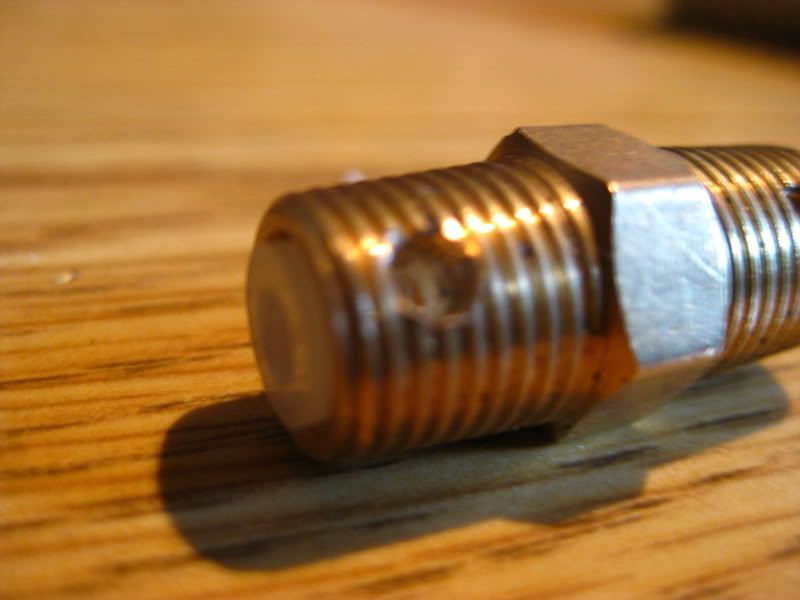
Rinse and repeat for the other end of the nipple.

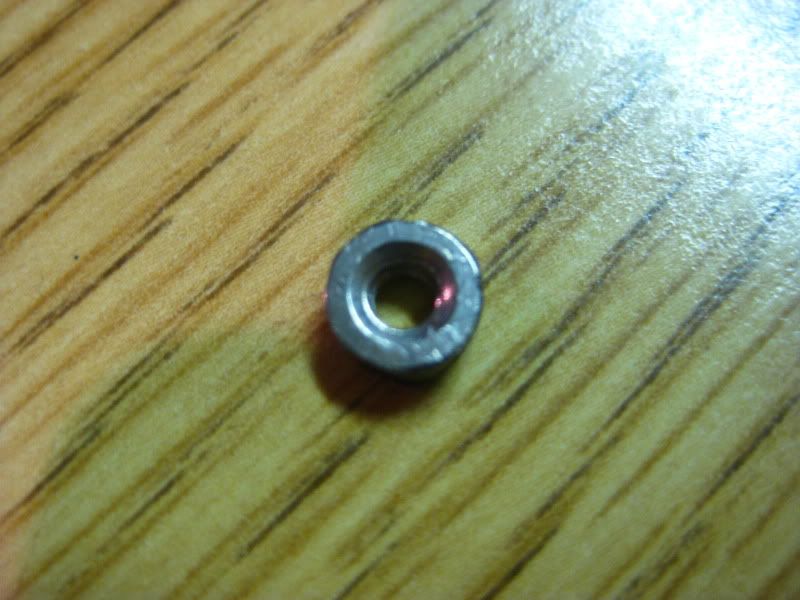
The nut I got (and I assume all other standard 4-40 nuts) didn't fit inside the nipple. I carefully dremeled it into a smoother shape so that it would slide inside of the nipple.

Posted Image

Put one of the nylon spacers in the nipple and run the set screws in from both sides. Next, make an assembly like so:

Posted Image

Insert the assembly into the nipple and insert the 4-40 set screws through the nipple and into the spacer, again.

The final product should look something like this:

Posted Image

I'm really happy with how this turned out. It's very adjustable and modifiable. SNAP triggers often take a lot of tweaking to get optimum performance, and this is perfect for that application. You can adjust how far the screw protrudes from either end by turning it in either direction. The nipple itself can be adjusted in the same manner to change how far it protrudes into the plunger tube. I have yet to install this into a SNAP, but I'm hoping to build a complete SNAP within the next few days to test it. I plan on grinding the end of the long screw, yes. As far as an actual trigger goes, I have some ideas, but they really need to be tested. I can post a video of assembly and basic demonstration of this if necessary, but it's fairly self explanatory.

Edited by venom213, 02 September 2010 - 02:20 PM.

  • 0

#2 TantumBull

TantumBull

    Member

  • Moderators
  • 1,929 posts

Posted 02 September 2010 - 02:23 PM

Excellent work. I think I'll stick with clothespins simply because they're cheaper and don't require tapping sets, but this certainly looks quite a bit sturdier and more reliable. Also, I can't wait to see how this works out on the Snap you're planning on putting it on. Keep us updated!
  • 0

#3 Carbon

Carbon

    Contriberator

  • Moderators
  • 1,894 posts

Posted 02 September 2010 - 02:47 PM

Like I was telling you last night, I really like where this is heading. Sure, it requires some slightly more exotic tools, but you can get a tap set at harbor freight for ten or fifteen bucks. If the rest of the design stands up as far as sturdiness and, most importantly, adjustability, you've got a winner.

That said, there are two things that I'm less than wild about. Having to dremel down the nut to a circular shape sounds like a bloody pain in the ass. Could you find a knurled nut in that size? They're at least already round. Likewise, the threads on the screw need to go away, but you said that. Still, good work, and looking forward to seeing where it goes.

Edited by Carbon, 02 September 2010 - 03:54 PM.

  • 0
Hello. I am Indigo of the Rainbow Clan. You Nerfed my father. Prepare to die.

#4 Fome

Fome

    Member

  • Banned
  • 312 posts

Posted 02 September 2010 - 09:33 PM

I really appreciate the work you've put into this. It's an excellent step in the right direction.

However. In it's current iteration, I would never opt to use this over a clothespin trigger for several reasons: 1.) It's much more complicated, 2.) more difficult to construct and install, 3.) it uses more parts, and 4.) it's more expensive. Further, you'd have to build another device which interfaces with this so that you could actually distribute the force in a way that would allow you to actuate the device with your finger, adding even further complexity to the issue.

The only advantages this has (durability) is not a problem in a well constructed SNAP. Clothespin triggers are essentially triangles on a pivot point. Aside from being structurally sound, they have very little stress exerted on them since the walls of the PVC actually hold the nail in place. I'm sorry, but a "breakthrough" in SNAPs, this is not.

Believe me, I've had my fits with clothespin triggers on my first few builds, practice really does make perfect and considering the costs involved (ie. next to nothing), you can practice a whole lot.

Good job anyways, I could see this being used very well in other applications.

#5 rork

rork

    Member

  • Members
  • 1,008 posts

Posted 02 September 2010 - 09:37 PM

I've mentioned this before, but for those who are allergic to traditional clothespin triggers, go to Wal-Mart and buy a bag of the big, plastic ones. They're labeled "industrial clothespins." They're made of strong, flexible plastic, and they will not snap on you. You'll just have to fill in the hollow tips with some epoxy putty prior to drilling them. They look better than the wooden ones, are chunky and easy to assemble, and maintain the best thing about a SNAP trigger: it's made in 5 minutes from 3 major parts.

All that being said, this is an interesting idea.
  • 0
<a href="http://nerfhaven.com...howtopic=20296" target="_blank">SNAPbow Mk. V</a>
<a href="http://nerfhaven.com...howtopic=20409" target="_blank">Make it pump-action</a>

#6 snakerbot

snakerbot

    Maker of Things

  • Members
  • 310 posts

Posted 03 September 2010 - 10:30 PM

Maybe I'm just being thick, but I don't really get it. Is it just the catch mech? If so, how do you plan on converting the backward motion of the trigger into downward motion on the catch?
  • 0

#7 Carbon

Carbon

    Contriberator

  • Moderators
  • 1,894 posts

Posted 03 September 2010 - 10:41 PM

For ways to convert the back and forth motion to up and down, look at some of Boltsniper's work. The SCAR and the GNS triggersystem would work with some modification (they're both pretty much the same thing).
  • 0
Hello. I am Indigo of the Rainbow Clan. You Nerfed my father. Prepare to die.

#8 TantumBull

TantumBull

    Member

  • Moderators
  • 1,929 posts

Posted 03 September 2010 - 11:11 PM

All you'd really need is an angle bracket of sorts on a pivot with a slot for the catch plunger pin end
  • 0

#9 Fome

Fome

    Member

  • Banned
  • 312 posts

Posted 03 September 2010 - 11:23 PM

All you'd really need is an angle bracket of sorts on a pivot with a slot for the catch plunger pin end


You might as well attach a nail and a spring instead and have a much simpler system. Or you could just use a clothespin.

One idea I have would be to incorporate a triangle into the trigger that the catch face could slide up and over. Basically, the trigger would provide the ramp instead of the plunger. This would cut down on the mass and complexity of the plunger. I'll draw a picture if that seems confusing.

#10 TantumBull

TantumBull

    Member

  • Moderators
  • 1,929 posts

Posted 03 September 2010 - 11:30 PM

One idea I have would be to incorporate a triangle into the trigger that the catch face could slide up and over. Basically, the trigger would provide the ramp instead of the plunger. This would cut down on the mass and complexity of the plunger. I'll draw a picture if that seems confusing.

I always heavily grind and smooth the forward facing side of the nail to an angle which seems to help quite a bit with what you're saying. Unfortunately, going much farther than that would almost require the use of something other than a roofing nail for the catch.
  • 0

#11 BustaNinja

BustaNinja

    Member

  • Members
  • 1,916 posts

Posted 03 September 2010 - 11:40 PM

For the cost of an over complicated trigger that involves lots of moving parts, I can take a hammer to my current clothes pin trigger, and make 4 new ones to replace it.

Let alone in the time it takes you to make one of these things, I could have 4 more clothes pin triggers made and ready to be attached to the gun.
  • 0
Me: Yeah. he beat a hooker
Venom: Haven't we all?

#12 Lucian

Lucian

    Member

  • Members
  • 446 posts

Posted 03 September 2010 - 11:44 PM

Posted Image

Use the back of the trigger as a ramp to pull the pin down, and there ya go! Simple sliding trigger.
  • 0

Contact me for design consultation relating to 3D Printing, CNC Machining, and Laser Cutting. I am always happy to collaborate on viable Open Source projects and/or business ventures. 


#13 venom213

venom213

    Member

  • Validating
  • 1,294 posts

Posted 04 September 2010 - 12:48 AM

Thanks to you all so much for your feedback. I couldn't have asked for a better group of people to give feedback.

In response to the first four replies:

Tantum: Thanks very much. I don't see what the big deal is about taps, though. My Ace sells individual tapping bits, and I can get the smaller ones (like 4-40) for about $1, with my employee discount that is. The full price is around $4, but I'm sure it's much cheaper somewhere else.

Carbon: I'll ask around at Ace for that nut. I'll admit that grinding down the nut was in fact a bit of a pain, but nothing compared to the problems I've had with clothespin triggers.

Fome: I'll keep all of that in mind, thanks for the input.

Rork: That is one way to improve the clothespin trigger, but I was opting for something entirely different.


I didn't want to update this thread until I had done more work, which I have. I built a SNAP body tonight to test this on. I made a Video
It's not quite perfect yet, but I know what I need to do now! There's a jump in the video because I took out a lot of pointless babbling. Keep in mind the SNAP body was hastily built and the plunger head assembly is no exception. I have to pull it back a little to unprime it because my fingers don't provide leverage to release it. I tested it using pliers/wrenches as a lever and those worked great.

Edited by venom213, 04 September 2010 - 12:58 AM.

  • 0

#14 KitAdrian

KitAdrian

    Member

  • Members
  • 39 posts

Posted 09 September 2010 - 11:40 AM

It might make it easier to release the trigger if you dremel/file/grind the last section of the threads on the bolt. Right now you are essentially pulling against a series of sharp metal teeth, which are biting into whatever you are using for your catchface. Smooth the end of your pin off and I think you'll have much better results.
  • 0


0 user(s) are reading this topic

0 members, 0 guests, 0 anonymous users