Jump to content


Photo

Super Soaker Iron Man Overhaul

Super Soak That Ho!

8 replies to this topic

#1 Zack the Mack

Zack the Mack

    Member

  • Members
  • 360 posts

Posted 12 August 2010 - 01:17 PM

I've received a ton of interest in my Apoc 2010 primary, a heavily-modified Iron Man Super Soaker with integrated AT3K tank. I didn't document the mod as I built the blaster, so I'll add better photos as soon as I can deconstruct the blaster.

Posted Image

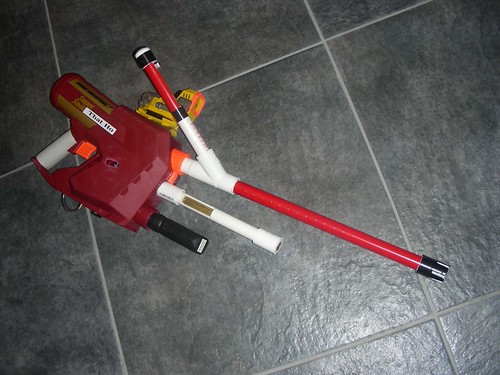
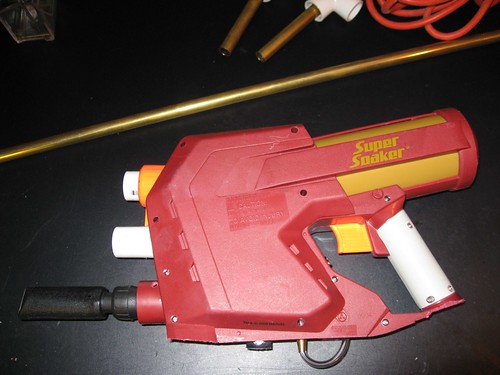
The core of this mod is the Iron Man Super Soaker, aka the Arctic Blast. Internal shots are located on iSoaker's page. This is a CPS derivative, meaning that it uses a Magstrike-like bladder, sealed in a solvent-welded cylinder, to store pressure. Basic mods to this blaster are easy - Jerm did it years ago - but some TLC is necessary to make it war-ready.

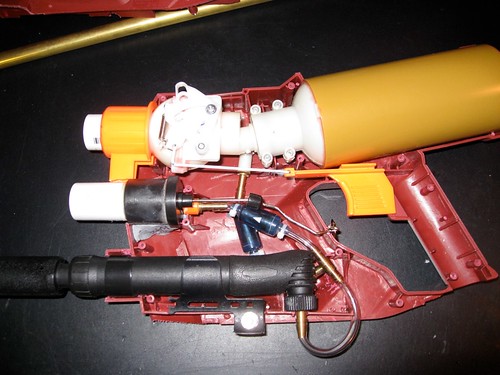
Below are my blaster's internals. The water tank's not necessary, so I removed it immediately.
Posted Image

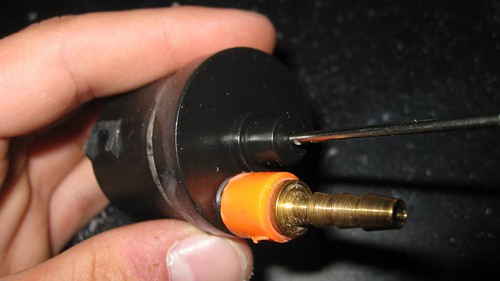
Mod 1: Link the Top Valve

The bread and butter of this mod is linking the massive top valve to the trigger. If you're ballsy and/or want an integration, you can saw off that useless bottom valve altogether. Cut it off where it meets the top valve and securely attach a hose barb to the pipe. I embedded a brass mender with Goop and reinforced it with Zap-a-Gap, but solvent-welding a plastic barb would be a superior option.
Posted Image

Remove the spring from the bottom valve, then deconstruct the top valve's "snapping" mechanism. Glue a small bit of plastic to the valve to limit the lever's range of motion so it won't be open at rest. I don't have a pic of that yet. Replace the white bit over the lever, but don't include the black wire or the top handle. Use the bottom valve's extension spring instead of the original one for an easier trigger pull. Expand the hole on the top valve's lever and reinforce it with some scrap plastic or aluminum.
Posted Image

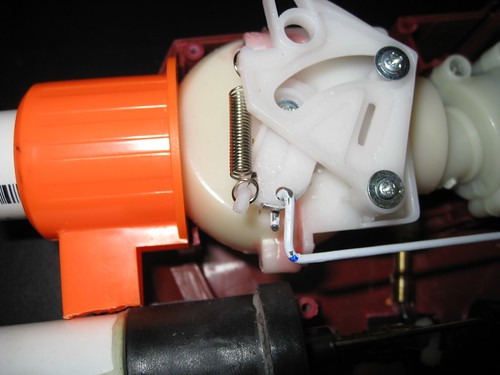
Connect the valve arm to the trigger using coat hanger or music wire. Note the 90-degree bend in the wire I used, which gets around the valve's screw posts. To make sure your trigger is stable, use pliers to make sharp bends and don't leave any wiggle room on the trigger.
Posted Image

Now, add a coupler on the top valve. If you're as neurotic as I am, fire up a Dremel or hole saw and expand the orange nozzle protector to fit. If you left the bottom nozzle intact, add a coupler and a new spring, and rig up a keyring trigger.

Mod 2: Pump Replacement

The stock pump takes 30 strokes to fill the bladder to a usable level, so replace that shit! You'll have an easier time getting everything in the shell if your pump valve is at a right angle. I used a Schwinn bike frame pump from K-mart with a Slime hose barb from Ace.
Posted Image

If you remove the tank and put a nice, big nut and bolt through the clip that comes with the pump, you can hold it in place without adhesives. I drilled a hole in the bottom of the blaster to lead the hose through. This locks the pump in place and makes setting up the internals easier.
Posted Image

Mod 3: Integration

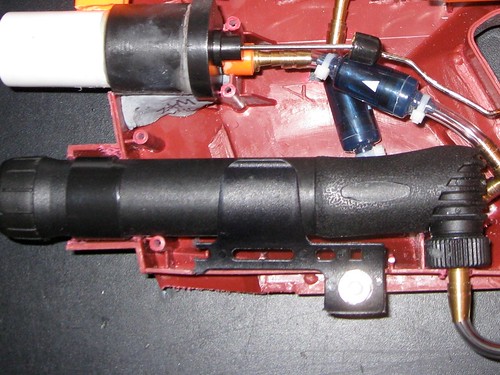
Even with that bitchin' new pump, it still takes a while to pressurize a shot. Why not use that shell space for an integration and save your ass from rushing? An AT3K tank is perfect integration material for this blaster. Add a coupler and hose barb…
Posted Image

...then bend the firing pin, add a keyring trigger, and connect it all together.
Posted Image

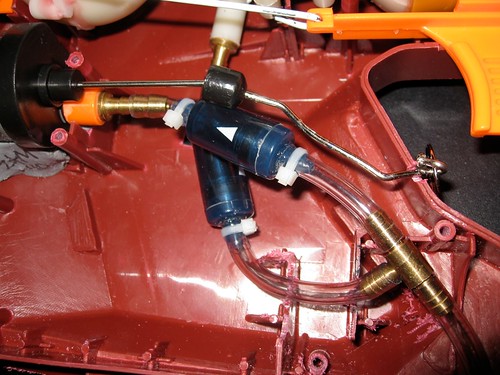
The tee and check valves were bought at Petco. Lucian says the check valves are only rated to 5psi, so use them at your own risk. Jamming this all in is a little tricky, so cut notches in the ribs to hold the tubing in place.

Make sure everything fits, then use epoxy putty or hot glue to attach your integration. I put 2' PVC dummy barrels in both couplers to help line them up - this is much easier when someone helps you!

Finally, reassemble the blaster, let the glue dry, and test-fire.
Posted Image

Mod 4: Uber-1337 Tactical Rails!!

There's another problem left to fix - that weirdly-angled tank prevents you from aiming down the barrel. An easy fix*: Attach an N-Strike rail on top so you can use optics! Tacticool! You'll need to support one end of the rail with hot glue or epoxy putty, since none of the top panels are parallel with the barrels.
Posted Image

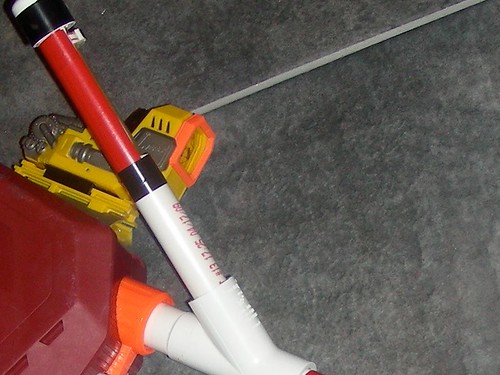
Why not add another rail on the side?

Appendix: Using the Blaster, Barrels, and the Risk of Personal Injury

Posted Image

The tank holds a LOT of air, and moves it quickly, so long barrels are a must. I use an 8" hopper and a 14" brass barrel. The top barrel fires Slugs 120', their maximum range. This blaster is unsafe when loaded with heavyweight Stefans - don't use them!

I pump the bladder 9-13 times, and the 3K gets two strokes. 10 strokes is enough for normal use, and 12 will make up for the extra dead-space if the hopper is almost empty. The bladder can probably withstand 20 or more pumps, but I doubt that the integration and tubing can.

A word about safety: This blaster is REALLY POWERFUL. It can fire Titan missiles. When using any strong blaster in a war, you need to be considerate and responsible. Limit your range by using an RSCB or hopper, and always use Slugs or stock darts. This blaster will fire on as little as 5 pumps, so under-pump when you can.


*OK, so the easiest way to aim down the barrel is to use a tall Chopper or RSCB. However, N-Strike accessories are more awesome. Your choice.

Edited by Zack the Mack, 12 August 2010 - 01:26 PM.

  • 0
Ask me questions about electronics, Arduino, and 3D printing

#2 taerKitty

taerKitty

    Member

  • Members
  • 883 posts

Posted 12 August 2010 - 01:32 PM

Very nice. I was not a fan of water-gun conversions because of the trouble, etc, but I may try one after seeing this.

A few questions, just so it's not empty adulation:
  • To what do you attribute this blaster's extraordinary power? Higher pressure or larger reservoir + longer barrel?

  • Would adding some 'filler' in the tank reduce the number of pumps w/o costing (too much) range/speed/danger/damage?

  • How is the barrel supported? I've found that long PVC barrels tend to put a lot of strain at the coupler.

  • 0
Fugly is a feature.

#3 Broderick

Broderick

    Member

  • Members
  • 279 posts

Posted 12 August 2010 - 01:44 PM

Very nice. I was not a fan of water-gun conversions because of the trouble, etc, but I may try one after seeing this.

A few questions, just so it's not empty adulation:

  • To what do you attribute this blaster's extraordinary power? Higher pressure or larger reservoir + longer barrel?

  • Would adding some 'filler' in the tank reduce the number of pumps w/o costing (too much) range/speed/danger/damage?

  • How is the barrel supported? I've found that long PVC barrels tend to put a lot of strain at the coupler.


The bladder is designed to release a steady stream of water through what was the bottom nozzle (I used to have one of these like 3 or 4 years ago when they came out as a water gun, and used it as such), while releasing all the air at once to fire the burst of "arctic" water through a much wider, mesh nozzle on top. There used to be a rail you pulled back to do so.

So, where'd you find one? I've been trying to find an Arctic Shock since Jerm posted on his blog a while back, but all the stores I've been to don't have them. Even the Iron Man versions when the movie was still out! Awesome mod by the way. I really like the way you went about doing the pump replacement, it looks super-extra clean.

One question I have: Maybe I just read the write-up wrong, but can the bladder actually fill the 3K tank after you shoot it, if you aren't firing out of the main barrel at all? I know they're on the same pump, but I'm not sure if the check valves prevent that.

Edited by Broderick, 12 August 2010 - 01:45 PM.

  • 0

#4 Zack the Mack

Zack the Mack

    Member

  • Members
  • 360 posts

Posted 12 August 2010 - 02:27 PM

  • To what do you attribute this blaster's extraordinary power? Higher pressure or larger reservoir + longer barrel?
  • Would adding some 'filler' in the tank reduce the number of pumps w/o costing (too much) range/speed/danger/damage?
  • How is the barrel supported? I've found that long PVC barrels tend to put a lot of strain at the coupler.

It's got a big bladder made of thick rubber, so it stores a lot of air and releases it quickly. I vaguely remember hearing that bladders release air more evenly than hard tanks, which might help as well.

The bladder is solvent-welded into the tank-like cylinder. I'm not planning on cracking it open. I don't think reducing the capacity would help.

The barrel's just held in the coupler by friction. The valve's face is nice and flat, plenty of surface area for Zap-a-Gapping. Combined with the nozzle protector, it's pretty solid. The barrel sometimes loosens after a lot of vigorous pumping.

So, where'd you find one?

One question I have: Maybe I just read the write-up wrong, but can the bladder actually fill the 3K tank after you shoot it, if you aren't firing out of the main barrel at all? I know they're on the same pump, but I'm not sure if the check valves prevent that.

I bought it at Toys r Us. I still see them all over the place. Now's the time to get them, when they're being discounted.

The check valves keep air from flowing between the tank and bladder. I've never trusted the bladder-to-tank "semi-auto" thing...
  • 0
Ask me questions about electronics, Arduino, and 3D printing

#5 Broderick

Broderick

    Member

  • Members
  • 279 posts

Posted 12 August 2010 - 03:12 PM

So, where'd you find one?

One question I have: Maybe I just read the write-up wrong, but can the bladder actually fill the 3K tank after you shoot it, if you aren't firing out of the main barrel at all? I know they're on the same pump, but I'm not sure if the check valves prevent that.

I bought it at Toys r Us. I still see them all over the place. Now's the time to get them, when they're being discounted.

The check valves keep air from flowing between the tank and bladder. I've never trusted the bladder-to-tank "semi-auto" thing...

Yeah, I was reading the same thread over on NRev and it said that people found them at TRU and Wally world. I'll check TRU while I'm over there today. Thanks!
  • 0

#6 jerm78

jerm78

    Member

  • Members
  • 243 posts

Posted 12 August 2010 - 10:30 PM

Nice! I like how you did yours. I will have to try a 3k tank in mine when I mod another. It really is a fun blaster and easy to mod.
  • 0

#7 cheyner

cheyner

    Member

  • Members
  • 240 posts

Posted 13 August 2010 - 01:29 AM

Would this work on the Tru off-brand (possibly Buzz-Bee) version?
They are currently on clearance in my area for $7
Great mod, I am sure I will be refrencing this in the future.
  • 0

Beaver's post claiming Kane's post claiming Demon Lord's post is correct is correct is correct.


Canadian Nerfers-R.I.P.

#8 Dude13

Dude13

    Member

  • Members
  • 122 posts

Posted 13 August 2010 - 10:07 AM

This mod should also work on the Super Soaker Flash Flood as it has the same "empty the entire tank" feature.
  • 0

#9 nerf mafia

nerf mafia

    Member

  • Members
  • 333 posts

Posted 13 August 2010 - 03:57 PM

For anyone looking for these, to do this mod my walmart was clearancing them out for 13 dollars each today. They had quite afew so it may be worth checking your local walmart soon before they are gone.
  • 0
THE OHIO PLAYDATE. WE PLAY WITH FORKS.


1 user(s) are reading this topic

0 members, 1 guests, 0 anonymous users