Jump to content


Photo

Community Snap Thread

An open source project

157 replies to this topic

#1 TantumBull

TantumBull

    Member

  • Moderators
  • 1,929 posts

Posted 03 August 2010 - 01:38 PM

Snaps are great blasters for a variety of reasons, but probably mostly because of their relative inexpensiveness and ease of construction for the performance that they get. While usually not as pretty, they are fairly comparable to plusbows in function and performance, but are much more accessible to the community as a whole: no huge power tools or piles of bills are necessary.

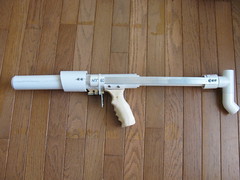
Because all that really defines a Snap is the use of PVC and a clothespin trigger, many people have made personal innovations that can really benefit the community as a whole. I and others consider the Snap to be somewhat of an open source project for this reason, similar to the plusbow. Carbon planted the seed and from that sprouted a wealth of ideas and refinements that have sometimes become pretty standard for Snaps.

What I'm hoping this thread will turn into is something extremely similar to the DIY +Bow thread that's currently stickied in this (the Homemades) subforum. People should feel free to post information on refinements they've made to the Snap project, personal tips for construction/materials, questions about any aspect of the blaster, pictures of their completed Snaps, and anything else relevant. Pictures are great but obviously not required when posting something like a question.

One last thing, feel free to post anything in here that isn't necessarily new or developed after this thread. As long as its not outdated or replaced by a muh better alternative, you should feel more than welcome to post it.

-----------------------------------------------------------------------

--Snap-Related Links--
(sorted by member name)


A side of nerf
L.I.D. [sheathed in black tape, fore-grip, strange plunger head, o-ring seal]
L.I.D. cosmetic +bow mod [same as original L.I.D. but with foam "+bow shell" replacing e-tape]

Anders
The El Snapo V2 [plunger rod sheathed in PVC, slot in PVC with bolt for priming]

BustaNinja
CrossSNAP [cosmetically modified to look like a Nerf Crossbow]

Carbon
Big SNAP [larger diameter plunger tube resulting in much more volume]
SNAP-1 [2 PVC endcaps make the seal (eww)]
SNAP-1 MK2 Writeup [first rubber washer seal, 1 endcap holds washer, other provides catch ramp and catch face]
SNAP-1 Stinger [ball shooter attachment]
SNAP 1.5 [stock sheathes plunger rod, key ring bolt comes through 2 slots in the stock]
SNAP-1s [pistol sized]
SNAP-2 [fore-grip slides to operate breech fitted with gravity clip, pvc stock, slot in 1.25" PVC main body with priming bolt sticking out]
SNAP-3 [PVC wye stock butt, plunger rod housed in stock, slot for priming bolt]
SNAP-3m [pistol sized, cut down endcaps form compact plunger head, washer seal, slide action priming]
SNAP-4bp [bullpup configuration (backwards facing plunger tube), "reverse pump action" (think BBB), scroll down for spring-loaded breech]
SNAP-5 [no exposed plunger rod, primed by pushing the barrel forward (think LS bolt operation)]
SNAP-Duo [manta style SNAP configuration]
SNAP-m [tiny, no handle, brass plunger rod]
SNAP-Turret [turret attachment, utilizes PVC parts and fittings]
SNAP-7 Microbow [emulates the function of a bow, CPVC bow arm power source, integrated elbow conducive to RSCB]
SNAP Crossbow [CPVC bow arm power source, crossbow emulation, standard catch and pullback system]
Clothespin Trigger Explanation [clothespin triggers for dummies]
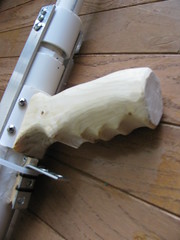
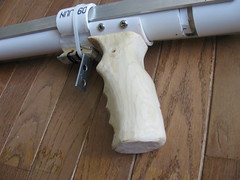
Wood Handle [an easy and comfortable alternative to the PVC SNAP handle, modular and easily removable]
Clothespin Trigger Mk2 [inspired by Stark's rainbow catch, but designed to be easier to build with more readily available parts and materials]
Snap 7.5 Pump Crossbow [Snap version of Ryan's]

Cennipe
Ccs [handle literally is plunger tube, 45 degree elbow transfers from plunger tube to barrel, nice looking sight]

Davidbowie
The Bull [pistol sized, disconcertingly realistic look, spackle used liberally to smooth out appearance]

DTReaper
The M.P.BAR (Mass Producable Bolt Action Rifle) [stock, fore-grip, bolt action with breech, priming bolt also opens breech, slot in body exposes bolt]
The M.P.S.P. (Mass Producable Spring Pistol) [plunger head with metal catchface, pistol sized, PVC pipe hides clothespin, aesthetically pleasing]
The M.P.C.BAR (Mass Producable Clipped Bolt Acton Rifle) [metal catchface on plunger head, clip fed, extremely sexy clip port integrated into PVC tee, clip release switch, balsa wood magazines, PVC stock, fore-grip, bolt action, be sure to browse entire thread]

Foam_Shooter
My Bigbow [fatty 2" PVC plunger tube, PVC stock]
The Cheapatizer [reverse plunger, barrel housed in plunger tube, pull barrel out to prime, barrel/plunger shoot back into blaster upon firing, emulation of Nerf Minimizer]
The SNAPfinder [pistol sized]

Fome
Supa SNAP [wooden handle and trigger sheath, wire plunger rod, metal catchface]
Pump Coversion [a unique method of converting pullback SNAP's to be pump-action]

Galaxy613
SNAP K200 [bullpup configuration, fat stock]

idk59
SNAP Pistol [tiny snap, no handle, some pictures broken]
SNAPpy [pistol sized, ball pump tube and plunger configuration]

jwasko
PANTS [o-ring seal, handle-less]

Kaiman299
N.A.T. Needs a Title [o-ring seal, bolt operated breech that also primes blaster, fugly stock]

louiec3
SNAP Rifle - wooden stock [wooden stock and plunger tube housing, aesthetically pleasing bolt action breech, primed from back]
SNAP X-Bow [aluminum priming handle guide, reminiscent of Nerf Crossbow, RSCB integrated into wooden housing, wooden stock and handle]

MercenaryXero
SNAP with Titan Integration [titan integrated below, air output from titan fed to barrel mounted on top, titan pump beautifully integrated into stock, titan barrel = brass breech, rail system]

minsc
The RSCBbow [Carbon's wood handle design, 1.5" PVC plunger tube, RSCB mounted on top, RSCB dart reservoir doubles as stock]

MoonMaster
Homemade Bolt Action Rifle (Incomplete) [clothspin catch at back of stock, metal rod extends forward so handle and trigger are farther forward, bolt operated breech that also primes blaster]

Mr BadWrench
The B.S.R. (Buzzbee SNAP Rifle) [bullpup configuration, shelled in Buzzbee "Halo rifle", something that appears to be an RSCB]

Qui'lan Fett
MORG [PVC fore-grip, pump action, gravity clip fed, breech linked to priming pump, clothespin catch extended forward with pen]
SNAP Shotgun (not really a shotgun) [pump action, pullling pump forward primes blaster and exposes and opens brass breech through slot in plunger tube]

rork
The SNAPbow [top mounted stock, washer seal, washer impact padding, PVC trigger cover]
SNAP-1 Compact (sidearm) [pistol-sized, PVC trigger cover]
The SNAPbow Mk4 [PEX plunger rod, rubber grommet impact padding, PVC trigger sheath]
The New Firm [inverted bobafan turret, bullpup SNAP pistol mounted underneath, PVC trigger covers for both blasters]
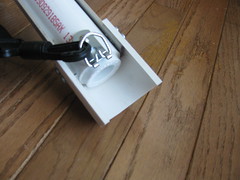
"Superlative" SNAP plunger head [first widely recognized plunger head with metal catchface, e-putty ramp for roofing nail catch pin]
SNAPbow MK. V [very clean and sexy, CPVC over angle, Carbon style wood handle, clean dowel stock, "superlative" plunger head]
Pumpsnap [rork's take on the pumpsnap, lots of wood]

Shadow92
Pump Action SNAP [pump action priming, PETG breech}

Stark
PumpSNAP [wire plunger rod, pump encompasses most of snap body, bolt on back of pump pulls back on wire, wire plunger "rod" is a big loop -- loop slides over priming bolt upon firing, designed for use with hopper]

stuck by stefan
The Struck Bow [stock, complete and utter clusterfuck, air tanks and tubing slapped on willy nilly]
My SNAP Bow [standard rork style SNAP, 4 shot turret]

TatumBull

Plunger Rod-less SNAP [SNAP emulation of Split's +pistol, wire plunger "rod", key winder reels in priming handle to prevent face diddle, airsoft handle]
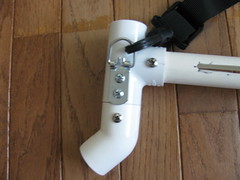
"Preeminent" SNAP plunger head [metal catchface, PVC endcap catch ramp]

Upperhand
The RPS-1 Pistol [reverse plunger, pull out barrel to prime, barrel retracts upon firing]
The SCR-6 Rifle

venom213
Alternate SNAP trigger [homemade spring plunger, much sturdier than clothespin, easily adjustable in several ways]

Vistagecko
SNAPBow variant [standard rork style SNAP modified with PVC angle handle]

.Z4.
PACFAR-1 [pump action, PVC stock}


Edited by TantumBull, 12 January 2011 - 09:44 PM.

  • 0

#2 VACC

VACC

    Vacc is Legend

  • Founders
  • 3,265 posts

Posted 03 August 2010 - 02:26 PM

I'll sticky this, but I feel like it's a little self defeating when you apply titles like "superlative", or "pre-eminant" to innovations for this homemade.

If open source is the goal naming conventions that describe the benefits or nature of the innovation make more sense. Just my opinion.
  • 0

#3 TantumBull

TantumBull

    Member

  • Moderators
  • 1,929 posts

Posted 03 August 2010 - 02:34 PM

I'll sticky this, but I feel like it's a little self defeating when you apply titles like "superlative", or "pre-eminant" to innovations for this homemade.

If open source is the goal naming conventions that describe the benefits or nature of the innovation make more sense. Just my opinion.

This is true, I definitely agree. I and others should probably stick to names (if even at all necessary) that describe function rather than perceived superiority in the future.


(moved from first post for cleanliness)
The nature of having a metal catch and any plastic on the plunger head means that the plastic will be subject wear. A good way to negate this as much as possible is to use a metal catch face (superlative or preeminent plunger head) in combination with a rounded roofing nail.

Below is a picture of my previous roofing nail.
Posted Image
As you can imagine, it completely diddled my endcap. It also didn't help that the sharpest edge would be resting on the [formerly] plastic catchface.

Here's a new roofing nail that I fixed up this morning. Notice the rounded tip that I attained through the use of a carbon sanding bit on my dremel and also just a conventional metal file.
Posted Image

Edited by TantumBull, 26 August 2010 - 11:08 PM.

  • 0

#4 Fome

Fome

    Member

  • Banned
  • 312 posts

Posted 03 August 2010 - 05:01 PM

This forum really needed a thread like this. Thanks TB.
It's no secret that I love the hell out of SNAPs. They're cheap, quick to construct (not necessarily easy), powerful, and the design is highly modifiable. However, SNAPs aren't known to be particularly comfortable or good-looking, which are two actually pretty important things, even if you think you're not the superficial type.

Personally, I hate the handles that most people put on their SNAPs, they look uncomfortable and make the rest of the gun look shitty. I asked Split once why he didn't like SNAPs, and he replied with only two words: "low class". It's easy to see why he (and many others) have that opinion when you have a jagged piece of wood or pipe in the place of what should be an ergonomic, comfortable, and (most importantly) durable handle.

One easy way to make a strong, comfortable and unique handle is with wood. Here's some examples of a few projects I'm working on:

Posted Image

Lengthen the body of the gun to about 14-14.5" instead of the standard 12. Keep your trigger the same distance from the front and simply add a length of 3/4" CPVC between the back of your spring and the 1"-1/2" Reducing bushing to get your desired amount of spring compression. You can also drill through the wood, directly into the PT, solving the issue of breaking SNAP handles.

Also, paint your SNAPs:
Posted Image

PVC degrades in sunlight, and for that reason alone you should at least cover it with something.

And while we're at it, does anyone know the magic length that your roofing nail should be? It seems like I have to make 2-3 triggers for each SNAP before it actually works and I'm too stupid to measure it when it does.

#5 Carbon

Carbon

    Contriberator

  • Moderators
  • 1,894 posts

Posted 03 August 2010 - 05:31 PM

Thanks for setting up this thread, Tantum. I've had thoughts of a thread like this before, but didn't quite know how to get the whole idea. I think your description of an open source nerf gun sums it up nicely.

I've always thought of the SNAP as a group project. It's become a far, far better blaster than if I had been the only one to work on it, that's for sure. It's why I always like to post blasters before I'm completely done with them: I know I'll get a suggestion or two that'll make the whole thing better.

On to some Q&A:

Fome: Unfortunately, the nail length can vary from maker to maker, depending on the clothespin. However, it's an easy thing to refine: if the nail is too long, just put a layer of cardboard in between the jaws of the clothespin. Repeat until it works properly. Bonus points for measuring the thickness of cardboard and trimming the nail. The measurement should hold, though. I'm pretty sure that mine come out to 9/16", and then tune nicely from there.

Another nail point which seems to be an issue with a lot of SNAPs: the hole for the nail needs to be as small as possible. The nail should be able to move up and down relatively freely, but not wobble at all. The nail needs the thickness of the PVC in order to wedge against the plunger. Otherwise, it'll tilt and not hold nearly as well.

Edited by Carbon, 03 August 2010 - 11:23 PM.

  • 0
Hello. I am Indigo of the Rainbow Clan. You Nerfed my father. Prepare to die.

#6 TantumBull

TantumBull

    Member

  • Moderators
  • 1,929 posts

Posted 03 August 2010 - 11:02 PM

To add to Fome's point about comfort, the handle is one of the most crucial parts of the blaster in terms of comfort. I use an old handle from a broken, cheapo LPEG MP5 airsoft gun. The picture below is of a much older set-up I was using, but shows the handle clearly.
Posted Image
It works wonders, I highly recommend one. If you don't have broken airsoft guns laying around, they can also be ordered online.

One grip that looks particularly promising from the above link is this one.
Posted Image
It looks like it could easily be bolted onto a wooden Carbon-style handle for added comfort. The price isn't that bad at 14 bucks either.

Here's another site I found that sells handles.

Edited by TantumBull, 03 August 2010 - 11:03 PM.

  • 0

#7 Daniel Beaver

Daniel Beaver

    HQRSE CQCK

  • Moderators
  • 2,096 posts

Posted 04 August 2010 - 11:07 AM

Another method for handle construction is to use the handles off of regular blasters, which has been used by a lot of people. My SNAP, for example, uses a nitefinder handle, my favorite among nerf blasters. It is secured using Carbon's modular SNAP handle method (Carbon's pictures are not working, unfortunately). A key requirement, however, is to drive some screws through the handle and into the PVC half-pipe which snaps onto the SNAP. You should also use some, space-filling adhesive (epoxy putty, regular epoxy), in addition to the screws to ensure that the handle will be rock-solid. Being modular, I can easily attach this handle to a new SNAP when I get around to building one, or even switch it in the middle of a war.


Posted Image
  • 0

#8 Daniel Beaver

Daniel Beaver

    HQRSE CQCK

  • Moderators
  • 2,096 posts

Posted 04 August 2010 - 11:17 AM

I have some specific questions for the more experienced builders:


Q: 1-1/4" PVC is the current standard plunger tube for SNAPs. What are the advantages and disadvantages of using larger or smaller diameter tubing?

Q: What is the recommended lubrication for standard plunger heads, which use a rubber washer? (I personally use ACE brand silicon grease, which seems to work wonderfully)

Q: Is it standard to use the front screw as an impact surface for the plunger head? My own SNAP doesn't do that - rather, the priming handle impacts the rear bushing on the blaster.

Q: SNAPs need vent holes near the rear in order to draw in air behind the plunger head. Is there a specific placement that is ideal? How much total area should the holes take up? Is it better to drill one big hole, or a bunch of little holes?
  • 0

#9 louiec3

louiec3

    Member

  • Members
  • 316 posts

Posted 04 August 2010 - 11:42 AM

I never needed vent holes on my snaps, and when I took two head to head one with holes the other without; they both preformed the same.

If you use epoxy putty for the ramp on your plungerhead, I suggest using some brush on superglue and coat the epoxy putty. I find it adds a lot of durability to the plungerhead.
  • 0

#10 jakejagan

jakejagan

    Member

  • Members
  • 209 posts

Posted 04 August 2010 - 12:11 PM

Beaver, an idea that was used with my snap was to put an o-ring on the end of the cpvc tee handle. It should a little bit fatter than the normal o-ring. I'll get a picture of it today. It will help protect the tee from smashing into the rear bushing

I love snaps as well and this thread is a great idea because even though there are great write-ups, somethings aren't explained (which is totally fine, people should be able to solves the problem) well.
  • 0
00:38 jakejagan I hear you guys still bring up the "gangsta shot"
00:38 Bags it is legend now

17:45 *** MrPzowned was kicked by Zorn (MrPzowned)
17:45 Zorn moral of the story: don't pick on idle mods yo

#11 Carbon

Carbon

    Contriberator

  • Moderators
  • 1,894 posts

Posted 04 August 2010 - 12:39 PM

Q: 1-1/4" PVC is the current standard plunger tube for SNAPs. What are the advantages and disadvantages of using larger or smaller diameter tubing?


With my previous experiments, the disadvantage of other sizes has been that fewer off the shelf parts "just fit", or fit as well as 1.25" and 3/4" fittings. 2" pipe and 1.25" fittings work well, but the weight disadvantage seems to nearly negate the airflow advantage. That said, my experiments were done before the newer plunger head methods came about, so it may be more feasible to construct a better-fitting plunger head now.

Q: Is it standard to use the front screw as an impact surface for the plunger head? My own SNAP doesn't do that - rather, the priming handle impacts the rear bushing on the blaster.


I've always built them where the plunger head impacts the bushing. Unless the screw is huge, it should fit inside the barrel, and the rubber washer should be making the impact.

Q: SNAPs need vent holes near the rear in order to draw in air behind the plunger head. Is there a specific placement that is ideal? How much total area should the holes take up? Is it better to drill one big hole, or a bunch of little holes?


I think additional venting depends on how tight the plunger rod is with the rear of the blaster. If I drill a snug hole in an endcap, I seem to need venting. Using another bushing in the rear, not so much. Anyway, placement and size doesn't seem to be vital, so long as the total area vents enough behind the plunger.
  • 0
Hello. I am Indigo of the Rainbow Clan. You Nerfed my father. Prepare to die.

#12 TantumBull

TantumBull

    Member

  • Moderators
  • 1,929 posts

Posted 04 August 2010 - 01:28 PM

One area that Snaps are still lagging a bit farther behind in then +bows is sealing method. Most Snap's I've seen or read about use rubber washers for sealing, which are fairly outdated as far as +bows go. I've scoured both my local Ace and Mcmaster.com for a skirt or grommet that will fit the ID of 1-1/4" PVC (1.36"). Just to give you a feel for this dimensions in 64ths of an inch, its 1 - 23.04/64". Anyone had any luck with finding a skirt or grommet that fits well?

Edited by TantumBull, 04 August 2010 - 01:28 PM.

  • 0

#13 Ryan201821

Ryan201821

    Prince Edward

  • Contributors
  • 1,892 posts

Posted 04 August 2010 - 01:44 PM

9562K46

Split's skirt seal. Works beautifully in 1 1/4" PVC. I used it in my bow (haven't posted), and gets as good a seal as any Plusbow.
  • 0

#14 TantumBull

TantumBull

    Member

  • Moderators
  • 1,929 posts

Posted 04 August 2010 - 01:48 PM

9562K46

Split's skirt seal. Works beautifully in 1 1/4" PVC. I used it in my bow (haven't posted), and gets as good a seal as any Plusbow.

Awesome, thanks. I was a little hesitant about buying one before I knew if it worked as the listed dimensions are a bit bigger than the ID of 1-1/4" PVC.

Edit: Oh wow, must not of been looking very closely when I first researched this. There's also one (9562K45) with an OD of 1-23/64", which is pretty much exactly the ID of said PVC. Hmm, maybe I'll order both and see which works best, though I'll probably just end up ordering the one you listed as its actually been tested and does work.

Edited by TantumBull, 04 August 2010 - 01:53 PM.

  • 0

#15 Ryan201821

Ryan201821

    Prince Edward

  • Contributors
  • 1,892 posts

Posted 04 August 2010 - 02:08 PM

Probably won't work. Those sizes they list don't actually match up with anything. I'm not sure what they're even for. The part number I listed will probably be your best bet.

If I recall correctly, 1 1/4" is about 1.360", which is slightly smaller than a Plusbow (1.375"). Although usually on a plusbow, two plates are smashing against the skirt seal causing it to flare a bit to make the perfect seal. Just don't do that on your SNAP, and you'll be golden.
  • 0

#16 Carbon

Carbon

    Contriberator

  • Moderators
  • 1,894 posts

Posted 04 August 2010 - 02:57 PM

One area that Snaps are still lagging a bit farther behind in then +bows is sealing method. Most Snap's I've seen or read about use rubber washers for sealing, which are fairly outdated as far as +bows go.


Nothing wrong with being outdated, if it works...I still get a near perfect seal with them, for 50 cents. I also believe this is where I tell people to get off my lawn, because back in my day we didn't have these fancy SKIRT SEALS. /grin

Anyway, the question got me thinking, not about skirt seals, but about SNAPs in general. Pardon me while I get philosophical.

TantumBull initially said that the only thing really common to all SNAPs are clothespins and PVC. I think there’s another ingredient, and that’s simplicity, both of construction and operation.

If at all possible, I want to use cheap, readily available parts that require a minimum of shaping. My philosophy of SNAP design is that someone should be able to build one with a drill and a hacksaw, after walking back from the hardware store. SNAP is an acronym, after all, and the S is for “simplified”. They can get complex, with more difficult to source parts, but I think the essence is simplicity...and that shouldn’t get lost.
  • 0
Hello. I am Indigo of the Rainbow Clan. You Nerfed my father. Prepare to die.

#17 Zorns Lemma

Zorns Lemma

    Sir Scrt

  • Moderators
  • 1,277 posts

Posted 05 August 2010 - 01:43 AM

Back when I used sink drain for PT replacements, and before skirts were around, the easiest way to get a perfect seal is to use two thin rubber washers. Use one < ID of the tube and one > ID of the tube. Then before any final constructions, make your plunger head and rod, lube up the seal, and pull it backwards into your tube. It'll cup naturally and seal perfectly going forwards while venting air going backwards.

Build your spring rest and front bushing around that and just make sure to let everything sit for a while before you disassemble (if you immediately take it apart the cup will unform and you'll have to pull it through backwards again, but after a few days the rubber reforms to its new shape. Yay for elastomers!).
  • 0
"In short, the same knowledge that underlies the ability to produce correct judgement is also the knowledge that underlies the ability to recognize correct judgement. To lack the former is to be deficient in the latter."
Kruger and Dunning (1999)

#18 nate the great

nate the great

    Member

  • Members
  • 219 posts

Posted 11 August 2010 - 08:42 PM

People should feel free to post information on...... pictures of their completed Snaps, and anything else relevant.


Okey dokey!
Here's my PA-SNAP (pump action SNAP)
Posted Image

Posted Image
Primed

Posted Image
Posted Image
WOOO!!! Wood handles FTW!

Any comments, questions, or flames?

EDIT: I decided to cut down the grip and add a strap.
Posted Image
Posted Image
Posted Image

Edited by nate the great, 12 August 2010 - 09:56 AM.

  • 0
QUOTE
PRI you are a fucking idiot.

2 slingshot weights is basically a steel bullet with a foam sabot
-Mr BadWrench

QUOTE

You have a tampon on your gun. There's your problem.
-Hi Yah!

Join the Revolution!

#19 boisie

boisie

    Member

  • Members
  • 303 posts

Posted 12 August 2010 - 01:47 AM

I've always thought that any sort of pump or slide priming should be done in a two part assembly. The priming rod, and the pump. The pump would push back the priming rod, then be able to return to the starting position, not unlike a recon slide. I just think it would be more aesthetically pleasing, and also save on possible minor injury when the grip comes flying forward.
  • 0
QUOTE(One Man Clan) View Post
You understand what you just did posting a picture of 4 girls on a message board chock full of nerdy virgins, right?
QUOTE(Foamfoot) View Post
Maybe if we download Ubuntu Christian edition, God will help us install it.

#20 nate the great

nate the great

    Member

  • Members
  • 219 posts

Posted 12 August 2010 - 09:43 AM

I've always thought that any sort of pump or slide priming should be done in a two part assembly. The priming rod, and the pump. The pump would push back the priming rod, then be able to return to the starting position, not unlike a recon slide. I just think it would be more aesthetically pleasing, and also save on possible minor injury when the grip comes flying forward.


There is a slot in the cpvc plunger rod so the grip can return to it's original position before firing. I'll put up a firing video hopefully later today.

EDIT: My video camera needs charging but I got the ranges until I can put up a firing video.
Dart 1: 137'
Dart 2: 140'
Dart 3: 142'
Dart 4: 149'
Dart 5: 150'
Dart 6: 152'
Dart 7: 158'
Dart 8: 160'

Average: 148.5'

Edited by nate the great, 12 August 2010 - 12:28 PM.

  • 0
QUOTE
PRI you are a fucking idiot.

2 slingshot weights is basically a steel bullet with a foam sabot
-Mr BadWrench

QUOTE

You have a tampon on your gun. There's your problem.
-Hi Yah!

Join the Revolution!

#21 taerKitty

taerKitty

    Member

  • Members
  • 883 posts

Posted 13 August 2010 - 07:50 PM

Sorry, I'm too late to get into the whole pump-action game. To make up for it, here's a SNAP-in-a-shell:

Posted Image


PT is 1" thinwall. It has a full [k25] in it. Plunger head is a finishing washer, 1-1/4" neoprene washer, a fender washer, a slice of 1/2 PVC and hot glue as a separator, a second fender washer, and a 1/2" endcap with a 1/4" screw-eye bolt holding the mess together.

Therer's a shroud of 1-1/4" thickwall PVC to give the nail some thing solid to grab to. I tried PVC cement, but there wasn't an easy way to spread it evenly, so I resorted to #6 screws.

The clothespin had some quality time with a file to add in the notches for its current location. It was originally seated back one divot, which sucked from the leverage perspective. Tne 'angle iron' is some 1/8" aluminum that I had lying around. It extends over the head of the nail to keep that thing from riding up. No amount of glue seemed to keep it in place.

The 1" PVC endcap has five 1/4" holes drilled in it - one for the 1/16" plunger cable, and four for preventing vacuum-drag on the plungerhead.

The aluminum cable ended up being a little less than 2' with allowances for the thimble and ferrules. The handle is a 1/4" bolt and four 1/4" nuts: one at the bolt head, two at the middle holding the wire and thimble in place, and one at the end of the bolt. CPVC ID will mate with 1/4" nuts, with a little tender loving percussive coercion.

There's a badge retractor to keep the handle from whipping about.

The muzzle is a 1/2" CPVC coupler nested in some 3/4" PVC, and some e-tape to make up the difference. Yes, it's airtight.

The EaB shell took very little surgery to accept the PT. 1-1/4" PVC was too thick to go the whole length, but 1" thinwall doesn't have that much a smaller ID than 1-1/4" thickwall. The piece of orange duct tape is to "show the colours" in the 'window' that the EaB has.

===

This is my first SNAP. They're fun to envision, but trying to get the nail right is maddening.

I didn't ramp the plunger head enough. I'll need to take care of that later, if I ever have need to take the thing apart.

I need to hold down the trigger when priming the blaster, otherwise the nail gets in the way of the spring. This will still be the case even if I ramp the plunger head.

The EaB still has a lot of dead space in the 'scope'. I'll integrate something into it later.

I need to get some more e-putty so I can reinforce the old spring rest. It currently holds the blaster in place when its' being primed, so it can't be very happy.

The trigger is a placeholder. Ideally, I still have the EaB original trigger around somewhere, and I'd love to have something 'stock' as the trigger.

Comments/questions/opinions?
  • 0
Fugly is a feature.

#22 KaneTheMediocre

KaneTheMediocre

    Belligerent Asshole

  • Members
  • 613 posts

Posted 16 August 2010 - 06:21 PM

I just wanted to note that although I turned down a 1.36" wooden cylinder on a lathe for the Aabow, 1.36" is remarkably close to 1.375" = 1 3/8". So, if someone had a source for 1 3/8" dowels, it would not be too difficult to sand it down to 1.36". Sure it wouldn't be terribly round, but neither is the PVC in most cases. You can get away with a surprising amount of leakage with a powerful spring / bow, which most SNAPs have anyways.
  • 0
RAINBOW CLAN FTW
I'm Purple

My Half-Baked MHA Site

#23 TantumBull

TantumBull

    Member

  • Moderators
  • 1,929 posts

Posted 20 August 2010 - 12:21 AM

I just finished my variation on the PumpSnap this evening that I've been working on the past couple of days for taerkitty.

First off, here's my version of Carbon's wood handle set-up:
Posted Image
Posted Image
Posted Image

I hot glued on neoprene rubber on the back, wrapped everything in duct tape and then grip tape, and then secured the end of the grip tape with duct tape again to prevent unraveling. Much less un-consensual sex to the hands.

Now here's an overview of the whole thing:
Posted Image
Colored duct tape wins, btw.

I put some foam over the trigger braket and then wound it tightly in duct tape.
Posted Image

It's hard to see, but I actually used two segments of 3/32 aircraft cable with two ferrules at each end. Much more sturdy.
Posted Image

Nut was loctite blue'd.
Posted Image

Stock has an endcap for added comfort.
Posted Image

And I don't have a pic of the most important part because apparently I was cluckin when I took these. The stock is all held on by a coupler that connects the halves right over the 3/4" endcap that acts as the spring rest.

And a vid! Yay!
Posted Image
  • 0

#24 Fome

Fome

    Member

  • Banned
  • 312 posts

Posted 20 August 2010 - 01:25 AM

2 SNAPS I've been working on lately. The blue one is full sized and still a WIP, the green one has been reduced in size (still packs a wallop) and is mostly finished. I'll see if I can update this thread with some better pictures tomorrow.

Posted Image

Posted Image

Posted Image

The green one may be going for sale soon

#25 PVC Arsenal 17

PVC Arsenal 17

    Member

  • Members
  • 115 posts

Posted 22 August 2010 - 02:36 PM

As mentioned in the original post, one of the features which identifies a homemade spring Nerf gun as a SNAP is the use of PVC. In my experience, though, PVC is brittle and has poor impact resistance. In a similar application, I had PVC break apart after a single impact from a plunger. Of course I should note that the metal plunger was extremely heavy and the plunger spring was very strong.

Has anyone here experienced failures after repeated use of their SNAPs? Is it common or necessary to cushion the impact between the plunger and the front bushing? I will be attempting my own spring gun and I want to know if there's any reason I should avoid using PVC.

Edit: For those interested, I plan to use 2" sch80 PVC as the plunger tube. 1.5" pipe and fittings fit nicely into the 2". I also plan to incorporate McMaster Part#8487A18 into the trigger system. Has anyone come across properly sized seals for 2" sch80 PVC? The ID is 1.913".

Edited by PVC Arsenal 17, 22 August 2010 - 02:49 PM.

  • 0


0 user(s) are reading this topic

0 members, 0 guests, 0 anonymous users