Jump to content


Photo

Superlative Plunger Head Problem

Fixed.

23 replies to this topic

#1 Broderick

Broderick

    Member

  • Members
  • 279 posts

Posted 29 June 2010 - 07:13 PM

Alright, so this last week I've been gathering parts and everything to make my SNAPbow. It's been going pretty well, I got the body made in just a few minutes, but then after testing to see what length I needed to cut the trigger nail to, I encountered a problem. This is the basic rundown:

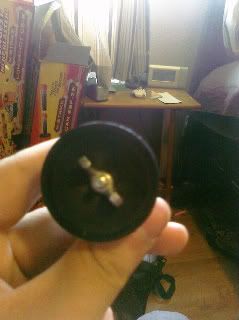
The plunger head normally:

Posted Image

The only differences here are that I have a slightly wider Nylon spacer since there was no exact sizing in the thread, but whatever. That shouldn't affect anything negatively on the seal.

After pulling it into the plunger tube (from the back, like you would prime it, not pushing it in)

Posted Image

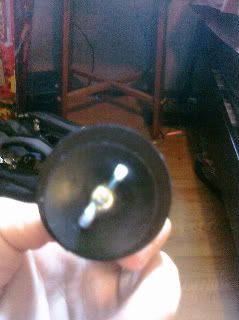
Yeah, what the hell. Obviously it just slides over, but this is a big problem, since half the time it creates a much larger cup on one side than the other, causing me to have a shitty seal, or none at all. I thought it was just that I didn't have the wing nut tight enough, so I tightened that a little bit more, but that didn't help. Then I thought it may just be the larger washer just sliding around a little bit on the steel washer underneath, so I added a second 1 1/4" washer under that to make a "sandwich". This off-centering happens even when pulling it into the tube I make sure it's even on all sides, and I'm not sure why. It may be a slight pull from one side more than the other, but that's going to happen at least a little bit in a war situation, so this concerns me.
Any thoughts / remedies to this situation?

Edited by Broderick, 01 July 2010 - 10:03 PM.

  • 0

#2 nate the great

nate the great

    Member

  • Members
  • 219 posts

Posted 29 June 2010 - 07:27 PM

Your not using a 6-32 finishing washer. It digs into the rubber and stops the rubber washer from moving around.

Edited by nate the great, 29 June 2010 - 07:27 PM.

  • 0
QUOTE
PRI you are a fucking idiot.

2 slingshot weights is basically a steel bullet with a foam sabot
-Mr BadWrench

QUOTE

You have a tampon on your gun. There's your problem.
-Hi Yah!

Join the Revolution!

#3 Broderick

Broderick

    Member

  • Members
  • 279 posts

Posted 29 June 2010 - 07:55 PM

Your not using a 6-32 finishing washer. It digs into the rubber and stops the rubber washer from moving around.

Oh, I see. I read finishing washer in the parts list, but didn't see it in a picture or anything, it just said to finish with a wingnut. Thanks.
EDIT: So I went to Lowe's a couple hours ago and got the finishing washers. I put it on, and wa-la! I couldn't pull the washers around, so naturally I thought problem solved. Then I went to assemble the rest of the blaster, but it still happens, except the "cupping on one side more than the other" is much more extreme due to the added tension from the finishing washer... I can get pics up if needed, but the ones in the OP should be enough to tell you what's wrong.

Edited by Broderick, 29 June 2010 - 10:50 PM.

  • 0

#4 ficksterkid

ficksterkid

    Member

  • Members
  • 66 posts

Posted 30 June 2010 - 09:04 AM

Your not using a 6-32 finishing washer. It digs into the rubber and stops the rubber washer from moving around.

And you could glue the washers together with plumbers goop.

EDIT: So I went to Lowe's a couple hours ago and got the finishing washers. I put it on, and wa-la! I couldn't pull the washers around, so naturally I thought problem solved. Then I went to assemble the rest of the blaster, but it still happens, except the "cupping on one side more than the other" is much more extreme due to the added tension from the finishing washer... I can get pics up if needed, but the ones in the OP should be enough to tell you what's wrong.

EDIT: your nut could be comming loser when you shoot it.

Edited by ficksterkid, 30 June 2010 - 09:07 AM.

  • 0

#5 Broderick

Broderick

    Member

  • Members
  • 279 posts

Posted 30 June 2010 - 11:50 AM

Your not using a 6-32 finishing washer. It digs into the rubber and stops the rubber washer from moving around.

And you could glue the washers together with plumbers goop.

EDIT: So I went to Lowe's a couple hours ago and got the finishing washers. I put it on, and wa-la! I couldn't pull the washers around, so naturally I thought problem solved. Then I went to assemble the rest of the blaster, but it still happens, except the "cupping on one side more than the other" is much more extreme due to the added tension from the finishing washer... I can get pics up if needed, but the ones in the OP should be enough to tell you what's wrong.

EDIT: your nut could be comming loser when you shoot it.

It shouldn't be, considering its screwed on there by a wingnut. I don't really want to glue the bottom washer to the steel washer underneath, but I guess I'll give it a shot. They're cheap, so whatever.
  • 0

#6 Carbon

Carbon

    Contriberator

  • Moderators
  • 1,894 posts

Posted 01 July 2010 - 08:02 AM

What's the ID of the rubber washer you're using? It should be small enough that it can't slide around.
  • 0
Hello. I am Indigo of the Rainbow Clan. You Nerfed my father. Prepare to die.

#7 Broderick

Broderick

    Member

  • Members
  • 279 posts

Posted 01 July 2010 - 01:35 PM

What's the ID of the rubber washer you're using? It should be small enough that it can't slide around.

I'm using the same as rork, 1 1/4" steel fender washer with a 1 1/2" rubber washer on top, and then a 1 1/4" rubber washer on that. All tightened with a #6 finishing washer and a wingnut.
  • 0

#8 Carbon

Carbon

    Contriberator

  • Moderators
  • 1,894 posts

Posted 01 July 2010 - 01:41 PM

What's the ID of the rubber washer you're using? It should be small enough that it can't slide around.

I'm using the same as rork, 1 1/4" steel fender washer with a 1 1/2" rubber washer on top, and then a 1 1/4" rubber washer on that. All tightened with a #6 finishing washer and a wingnut.

No, the ID. The hole in the middle.
  • 0
Hello. I am Indigo of the Rainbow Clan. You Nerfed my father. Prepare to die.

#9 Broderick

Broderick

    Member

  • Members
  • 279 posts

Posted 01 July 2010 - 07:42 PM

What's the ID of the rubber washer you're using? It should be small enough that it can't slide around.

I'm using the same as rork, 1 1/4" steel fender washer with a 1 1/2" rubber washer on top, and then a 1 1/4" rubber washer on that. All tightened with a #6 finishing washer and a wingnut.

No, the ID. The hole in the middle.

Oh, I read that wrong. 1/4". That's the ID for all the washers, steel and rubber. It's larger than the bolt I ran through the CPVC endcap, so without tightening the wingnut they can move about freely. Do I just need a larger bolt?
  • 0

#10 nate the great

nate the great

    Member

  • Members
  • 219 posts

Posted 01 July 2010 - 09:27 PM

You might have over tightened the wingnut. That can cause the rubber washers to cup too much and mess up your seal.
  • 0
QUOTE
PRI you are a fucking idiot.

2 slingshot weights is basically a steel bullet with a foam sabot
-Mr BadWrench

QUOTE

You have a tampon on your gun. There's your problem.
-Hi Yah!

Join the Revolution!

#11 Carbon

Carbon

    Contriberator

  • Moderators
  • 1,894 posts

Posted 01 July 2010 - 09:52 PM

What's the ID of the rubber washer you're using? It should be small enough that it can't slide around.

I'm using the same as rork, 1 1/4" steel fender washer with a 1 1/2" rubber washer on top, and then a 1 1/4" rubber washer on that. All tightened with a #6 finishing washer and a wingnut.

No, the ID. The hole in the middle.

Oh, I read that wrong. 1/4". That's the ID for all the washers, steel and rubber. It's larger than the bolt I ran through the CPVC endcap, so without tightening the wingnut they can move about freely. Do I just need a larger bolt?

Well, there's your problem right there. The ID should be just large enough to allow the bolt to pass. If the washers can shift when loose, then the stresses of firing will cause them to shift, as you've seen.

A larger bolt would work, but isn't the best solution. Bigger bolt = more mass = slower plunger. Just get smaller ID washers.
  • 0
Hello. I am Indigo of the Rainbow Clan. You Nerfed my father. Prepare to die.

#12 Broderick

Broderick

    Member

  • Members
  • 279 posts

Posted 01 July 2010 - 10:01 PM

What's the ID of the rubber washer you're using? It should be small enough that it can't slide around.

I'm using the same as rork, 1 1/4" steel fender washer with a 1 1/2" rubber washer on top, and then a 1 1/4" rubber washer on that. All tightened with a #6 finishing washer and a wingnut.

No, the ID. The hole in the middle.

Oh, I read that wrong. 1/4". That's the ID for all the washers, steel and rubber. It's larger than the bolt I ran through the CPVC endcap, so without tightening the wingnut they can move about freely. Do I just need a larger bolt?

Well, there's your problem right there. The ID should be just large enough to allow the bolt to pass. If the washers can shift when loose, then the stresses of firing will cause them to shift, as you've seen.

A larger bolt would work, but isn't the best solution. Bigger bolt = more mass = slower plunger. Just get smaller ID washers.

Sweet, thanks. I did however fix my problem by changing the setup. Rather than having a steel washer on the bottom, and two washers tightened together, I just sandwiched the 1 1/2" OD rubber washer in between 2 of the steel fender washers. It actually has a better seal than I thought it would, and it doesn't move around because I can tighten it a bit more than I could with the rubber washers.
I'll remember your advice when I build my next Snap, so thank you for your input Carbon. It's always good to get advice from someone who's built so many of these.
  • 0

#13 Fome

Fome

    Member

  • Banned
  • 312 posts

Posted 02 July 2010 - 05:05 PM

I suppose this is a little late, but I had the same problem.

You need rubber washers with a small internal diameter. My seal was crappy and deformed before I bought new washers, and now it's nearly perfect.

I am having a problem, however with my superlative plunger head. The epoxy putty ramp simply isn't working out. It's almost too soft, snagging and deforming on the trigger pin. Has anyone had any problems with this? Is it unusual for epoxy putty to take more than 16 hours to fully harden?

(sorry to hijack, but it seems that your issue is mostly solved)

#14 TantumBull

TantumBull

    Member

  • Moderators
  • 1,929 posts

Posted 02 July 2010 - 05:17 PM

I suppose this is a little late, but I had the same problem.

You need rubber washers with a small internal diameter. My seal was crappy and deformed before I bought new washers, and now it's nearly perfect.

I am having a problem, however with my superlative plunger head. The epoxy putty ramp simply isn't working out. It's almost too soft, snagging and deforming on the trigger pin. Has anyone had any problems with this? Is it unusual for epoxy putty to take more than 16 hours to fully harden?

(sorry to hijack, but it seems that your issue is mostly solved)

I'll be making a superlative head shortly, but haven't until now because of doubts about the epoxy putty ramp. For all the putties I've used, scratching it with even a screw driver will cause hardened putty to flake off in sand-like particles. I imagine clothespin triggers do hell to the ramp. I've been looking into a suitable plastic funnel of sorts that I can use for the ramp. No luck yet.

Edit: Just read your post a little slower. If its actually getting deformed and not flat out breaking, you probably are using plumber's putty, not epoxy putty. Plumber's putty never does fully cure, its just a quick fix for a leaky pipe.

Edited by TantumBull, 02 July 2010 - 05:20 PM.

  • 0

#15 nate the great

nate the great

    Member

  • Members
  • 219 posts

Posted 02 July 2010 - 05:19 PM

I am having a problem, however with my superlative plunger head. The epoxy putty ramp simply isn't working out. It's almost too soft, snagging and deforming on the trigger pin. Has anyone had any problems with this? Is it unusual for epoxy putty to take more than 16 hours to fully harden?


The same thing is happening to me even with really good epoxy so it's not your brand of epoxy that's causing the problem.
  • 0
QUOTE
PRI you are a fucking idiot.

2 slingshot weights is basically a steel bullet with a foam sabot
-Mr BadWrench

QUOTE

You have a tampon on your gun. There's your problem.
-Hi Yah!

Join the Revolution!

#16 Broderick

Broderick

    Member

  • Members
  • 279 posts

Posted 02 July 2010 - 05:23 PM

I suppose this is a little late, but I had the same problem.

You need rubber washers with a small internal diameter. My seal was crappy and deformed before I bought new washers, and now it's nearly perfect.

I am having a problem, however with my superlative plunger head. The epoxy putty ramp simply isn't working out. It's almost too soft, snagging and deforming on the trigger pin. Has anyone had any problems with this? Is it unusual for epoxy putty to take more than 16 hours to fully harden?

(sorry to hijack, but it seems that your issue is mostly solved)

I actually went to assemble it earlier today, and am having trouble with the putty ramp. Unless you can get it absolutely perfect (which I was attempting to do with the sanding drum on my dremel, until the E-putty warmed, uncured, and cured onto my sanding drum. Blah.), you have to turn it around a bit to catch, and even then it's a bit unstable. I'm really not sure how everybody else who uses these has such success.
I may try and go back to the old PVC catchface, but this style of plunger head is nice because the endcap allows you to just stick in the plunger rod and bolt it in. That's another thing, in bolting the endcap to the PVC, the nail often hits the heads of the bolts and needs to be turned. It's kind of annoying.
  • 0

#17 Fome

Fome

    Member

  • Banned
  • 312 posts

Posted 02 July 2010 - 11:49 PM

Another problem:

How far are y'all drilling your hole for the roofing nail? I've taken about 2.5" off my plusbow spring and it still won't catch.

#18 Broderick

Broderick

    Member

  • Members
  • 279 posts

Posted 03 July 2010 - 12:10 AM

Another problem:

How far are y'all drilling your hole for the roofing nail? I've taken about 2.5" off my plusbow spring and it still won't catch.

I'm using the full spring. What do you mean, how far are we drilling the hole? Do you mean how far it goes into the PC?
  • 0

#19 Fome

Fome

    Member

  • Banned
  • 312 posts

Posted 03 July 2010 - 02:14 AM

Another problem:

How far are y'all drilling your hole for the roofing nail? I've taken about 2.5" off my plusbow spring and it still won't catch.

I'm using the full spring. What do you mean, how far are we drilling the hole? Do you mean how far it goes into the PC?


ie. How far are you drilling your "catch" hole from the back end of the PC... I think I have it figured out though, no biggie. My problem is that my "catch" hole was too close (I was originally going with a [k25], but later switched to a [k26]) and also that I used a 1"-1/2" reducing bushing (like in the front) on the back too. It's way easier than drilling out a 3/4" endcap, but doesn't offer as much space. My design and measurements simply needs an adjustment.

Also, I'd like to add: Fuck superlative plunger heads* -or- more specifically, the shitty putty ramp. I let mine cure a full 48 hours (4x what was "needed") and although the top layer was seemingly cured, after 4 firings, it wouldn't catch anymore. Upon disassembling, the hard layer of epoxy putty had been torn apart, revealing a soft, squishy, layer of uncured putty that could be easily gouged with a fingernail. It seems that a couple solutions exist:

1.) Use a magical epoxy putty that will actually cure underneath the thick layers required to build a ramp.

2.) Use thin layers spread over a long period of time. When one thin layer is done curing, apply another. This would take a while, however.

3.) New design. Any ideas? Would a finishing washer that has a 1 1/4" OD work? pre-fabricated parts are always nice. I have something in mind that's somewhere in between the oldschool PVC catch faces and the superlative stuff, but it might be a tad heavy.


*rork, you rock. The putty shit is just frustrating.

#20 MindWarrior

MindWarrior

    Member

  • Members
  • 152 posts

Posted 03 July 2010 - 02:26 AM

Heres an Idea. you can add two small metal rods( probably cut from nails) and add it to the epoxy ramp, this makes a nice little well within the plunger head on the epoxy ramp and since its metal, will not wear. Since the plunger rod is attached to a t-coupler and by the way you prime the blaster, it'll always face the two metal rods, just my two cents on the problem.
  • 0
QUOTE(Ryan201821 @ Jan 2 2010, 03:20 PM) View Post

Seriously, no penis pumps or dildos on your Nerf blasters.

REVOLUTION BABY!

#21 TantumBull

TantumBull

    Member

  • Moderators
  • 1,929 posts

Posted 03 July 2010 - 08:50 PM

Fome: That's interesting, I've never heard of that happening. Epoxy cures through a chemical reaction between the resin and hardener. Atmospheric gasses don't play apart, which means that the insides should be just as cured as the outsides. Are you positive this is epoxy putty and not plumber's putty?

Edited by TantumBull, 03 July 2010 - 08:50 PM.

  • 0

#22 Broderick

Broderick

    Member

  • Members
  • 279 posts

Posted 03 July 2010 - 09:03 PM

Fome: That's interesting, I've never heard of that happening. Epoxy cures through a chemical reaction between the resin and hardener. Atmospheric gasses don't play apart, which means that the insides should be just as cured as the outsides. Are you positive this is epoxy putty and not plumber's putty?

^ this. I use this stuff that I found at Lowe's that actually says "specifically for plumbing repairs". I think you may not have activated it enough; you have to knead and roll it around in your hand for like a minute or two. If there's any discoloration where the curing portion in the middle is still visible, it won't work worth shit.
The only other thing I could think of would be to find a sort of beveled piece of the correct measurement. I think they make sink plugs like that, I remember seeing someone use it in a homemade airtank... Lt. Stefan's P-VAT maybe? I don't know. I'm not very knowledgeable on subjects like this, you'd probably want to talk via PM with Tantum about it.

Edited by Broderick, 03 July 2010 - 09:04 PM.

  • 0

#23 rork

rork

    Member

  • Members
  • 1,008 posts

Posted 12 July 2010 - 01:10 PM

My experience: steel is harder than epoxy putty. If pressure/angle tells it to dig rather than to slip, it'll dig. Either your catch pin is too long, or you are using too much putty. Maybe both. A whole lot of putty isn't required--just enough to "bump" the pin. Getting the catch pin the exact right length will solve the abrasion issues, but it's a pain, and the differences between "too long" and "too short" can be pretty small. But nails are cheap. I daresay Tantum's new head will make these problems go right away.
  • 0
<a href="http://nerfhaven.com...howtopic=20296" target="_blank">SNAPbow Mk. V</a>
<a href="http://nerfhaven.com...howtopic=20409" target="_blank">Make it pump-action</a>

#24 Fome

Fome

    Member

  • Banned
  • 312 posts

Posted 12 July 2010 - 04:26 PM

I appreciate the reply rork.

It's been a while since my last frustrations. I've made a couple superlative heads since then with quite a bit of success. It literally took 3-4 days for the epoxy putty to fully cure to an acceptable hardness, however, it still does erode (although at a superfluously minor rate), filling the plunger tube with super fine granules.

I've found that by giving the E-putty a little overhang, so that it actually "grips" the first fender washer, it creates a more reliable catch motion too. There's plenty of room in the plunger tube for those 1 1/4" fender washers.

Another plunger head I made that didn't have the overhang actually broke where the fender washer separated from the cpvc endcap and E-putty ramp. Quick fix, (the glue is drying as I post this) but still fairly obnoxious since it takes a while to figure out why the fuck your gun isn't cocking as smoothly as it should.

I'm actually working on a writeup for a revised SNAPbow for louiec3's homemade contest. It contains some construction improvements, ergonomic niceties, as well as some new ideas. Should be up in a couple of days.


0 user(s) are reading this topic

0 members, 0 guests, 0 anonymous users