Jump to content


Photo

Tape Masking


14 replies to this topic

#1 popatachi

popatachi

    Member

  • Members
  • 206 posts

Posted 27 June 2010 - 07:31 PM

Here's a cheap way to add designs onto your blaster. This specific example is on my PAS.

Materials and ToolsPainters Tape
Wax Paper (From Zorn: subway wrappers, cookie tin liners, etc will also work, just make sure to gently wipe off any grease or oil)
X-acto Knife
Printed design
Step 1: Design Creation

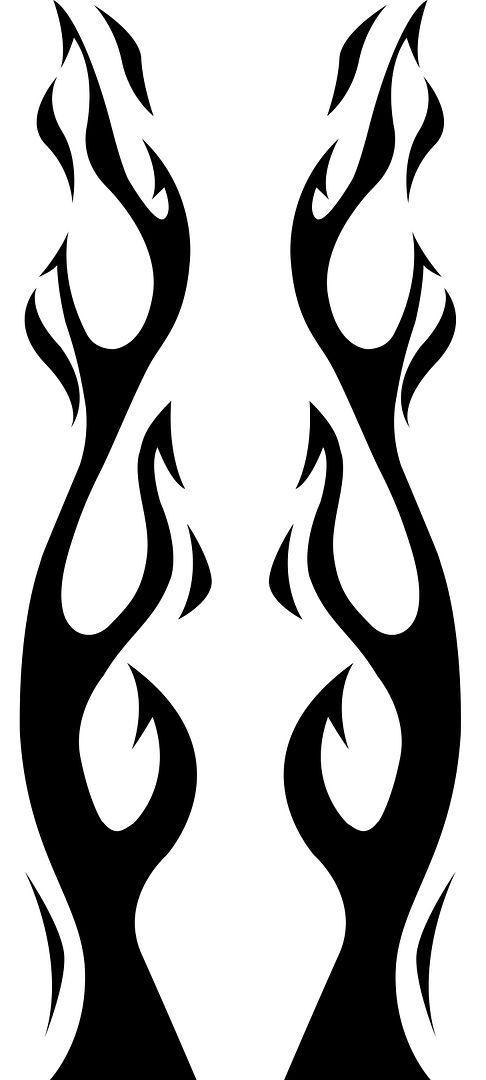
Create or "borrow" the design that you want and using Photoshop or another program, get the design to the correct scale to fit your blaster. You may have to print it out a couple times to get the correct size and position if you want to duplicate it to be the same on both sides of the blaster. Once you have the design printed out put that aside.

You can download this specific design by right-clicking the link below and selecting the "Save link As..." option.
PAS Flames

Step 2: Create the mask

Take your wax paper and layout it down on a flat, smooth surface. Take a strip of painters take and put it across the wax paper. Then apply the painters tape lengthwise down the wax paper overlapping the previous strip. Take the time to flatten out each strip of tape to ensure there are no air bubbles or bumps. Use your design to make sure that you have the correct amount of space needed.

When you have enough space for the design, tape it down around the edges to the top of the mask.
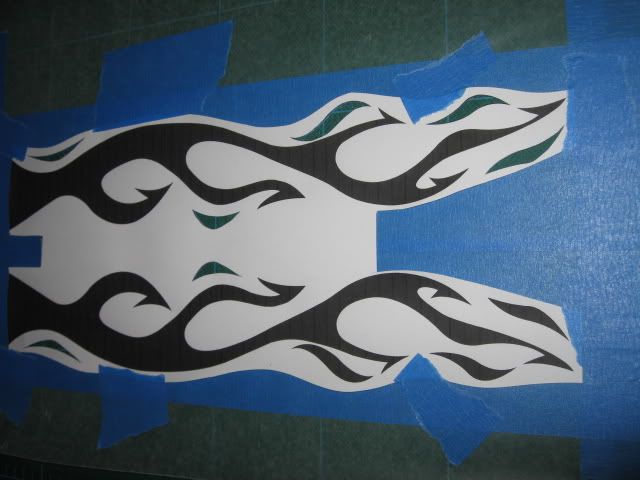
Posted Image

Step 3: Cut it out

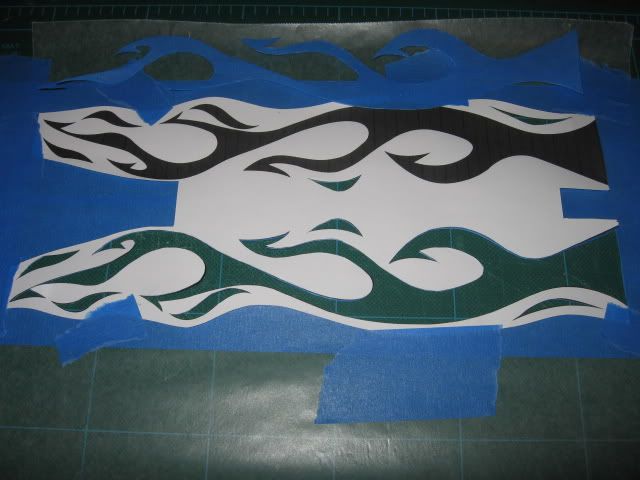
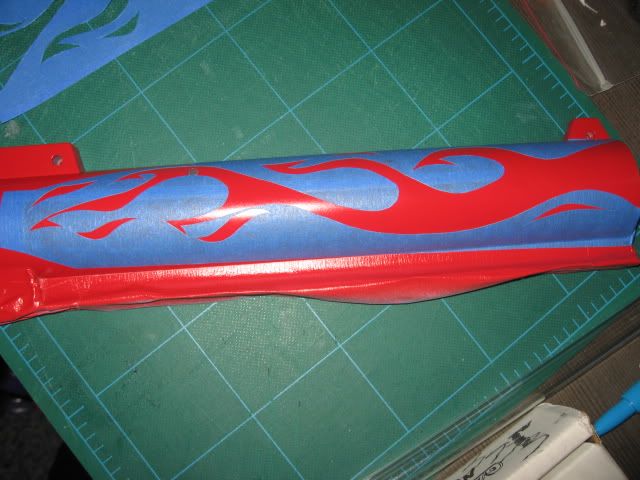
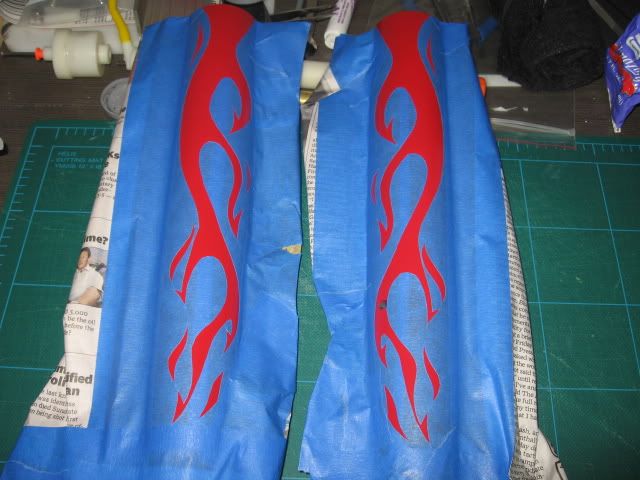
Using a very sharp blade, begin to cut the design out from the mask. Take your time when cutting to make sure that you get a clean cut and aren't ripping the wax paper or tape. When you are done, you should have a positive and negative cut of your design. You can use these as two masks or in conjunction if you want.

When the design is cut, trim the outer edges so that it will fit onto your blaster.

Posted Image

Posted Image
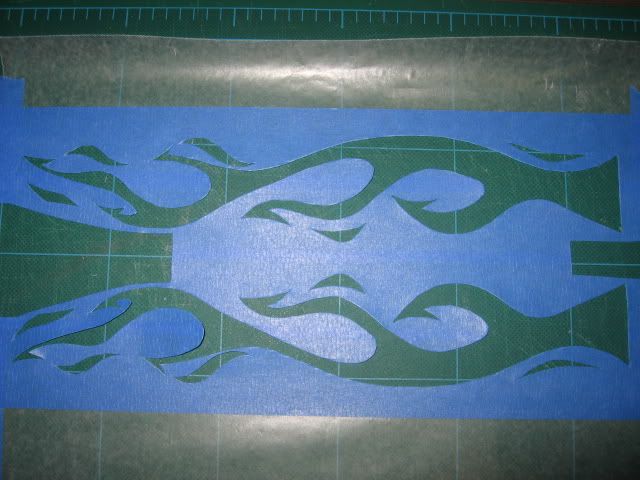
The finished negative cut

Step 4: Apply the mask

Using the positive cut: The positive cut is the actual design that you cut out. You will want to first paint the color of the design on the blaster, apply the mask, then apply the color of the blaster. You would want to use this if the design is a single color and you want the blaster to be multiple colors and shades.

Using the negative cut: The negative cut is the outer portion of the design that is left from the cut. You will want to first paint the color of the blaster, apply the mask, then apply the color of the design. You would want to use this if the design is multiple colors or shades and want the blaster to be a single color.

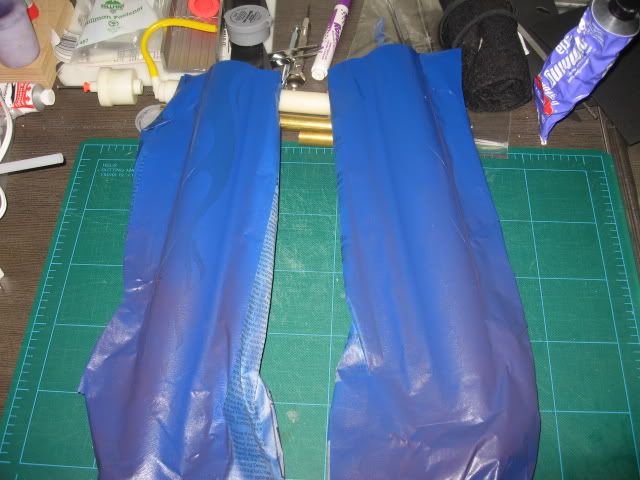
To apply the mask, carefully peel the wax paper away from the tape using your knife. Apply the tape of the blaster and slowly peel the wax paper away with one hand while carefully applying pressure with the other hand to ensure that the design is probably placed. Work in small areas and make sure to put pressure on the edges of the tape.

Once the entire design has been applied, use a roller to go over the tape again to flatten it to the blaster.
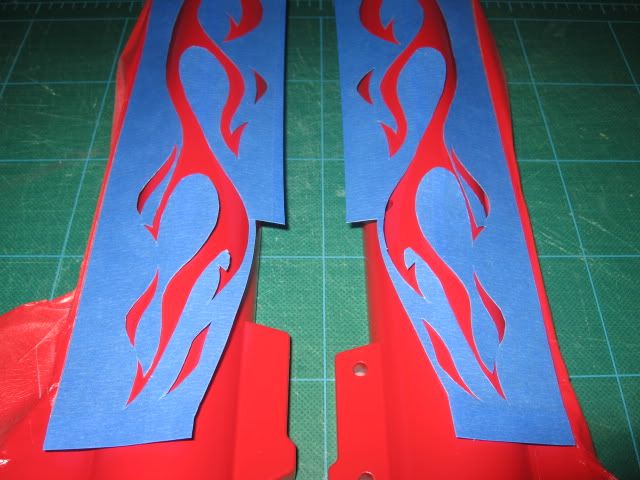
Posted Image
Test fit

Posted Image

Posted Image

Step 5: Paint and peel

Great tip from hoshiadam (paraphrased): Before applying the color of the design, if you're able to apply the base coat color first. This should help to seal any missed leaks and keep the edges sharp.

Paint the blaster as normal with as many colors and coats as needed.

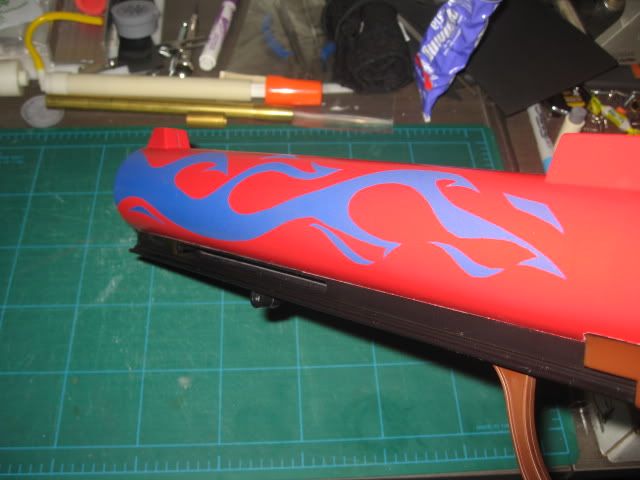
When the paint as dried, slowly peel the tape off the blaster. I suggest peeling the tape back and parallel to the blaster rather than up and away from the blaster. Go very, very slowly. If you find that some paint is lifting, flatten it down and take your knife to carefully cut the edge back down and keep going.

If you are lucky enough to have the same color paint as your design, you can go in and clean up any edges as needed.

Posted Image

Posted Image

Posted Image

Step 6: Clear Coat

As with any paint, use a clear coat of your choice to protect the paint.
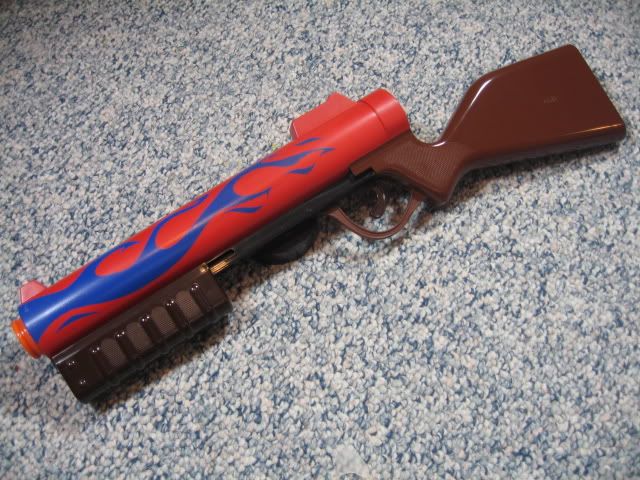
All Done

Enjoy your hard work and shoot something.

Posted Image

Let me know if there's anything that should be included.

Edited by popatachi, 29 June 2010 - 07:19 AM.

  • 0

#2 Niteshot

Niteshot

    Member

  • Members
  • 80 posts

Posted 27 June 2010 - 07:50 PM

Sweet tutorial.
To all with doubts;
Its a tried and true method that I've used too.
  • 0
QUOTE(VACC @ Dec 7 2010, 10:31 AM) View Post

For the love of fuck. The next person who announces that they are using something in their signature, ever, is banned. I fucking hate you.

#3 melbourneSTORM4eva

melbourneSTORM4eva

    Member

  • Members
  • 30 posts

Posted 27 June 2010 - 08:37 PM

I just tried this the other night, looks like I need wax paper though, i couldn't get my design off of what I was using.This should help ALOT! of people.
Great tutorial, good on ya mate!


-MS4E
  • 0
Looking for a 2k tank & pump, to ship to Australia please.

Youtube

#4 hoshiadam

hoshiadam

    Member

  • Members
  • 43 posts

Posted 27 June 2010 - 09:08 PM

One thing that can help - after you put the mask on, after rolling it, do a coat of the base color before doing a coat of the design color. That way any leaks at the edge will already match the base color.

Edited by hoshiadam, 27 June 2010 - 09:32 PM.

  • 0

#5 Zorns Lemma

Zorns Lemma

    Sir Scrt

  • Moderators
  • 1,277 posts

Posted 28 June 2010 - 12:52 AM

I just tried this the other night, looks like I need wax paper though, i couldn't get my design off of what I was using.This should help ALOT! of people.
Great tutorial, good on ya mate!


-MS4E


You can find wax paper "around" in a lot of various consumer products. Cookie tin liners, subway wrappers, etc will do in a pinch if you can't buy a roll of it for some reason.
  • 0
"In short, the same knowledge that underlies the ability to produce correct judgement is also the knowledge that underlies the ability to recognize correct judgement. To lack the former is to be deficient in the latter."
Kruger and Dunning (1999)

#6 popatachi

popatachi

    Member

  • Members
  • 206 posts

Posted 28 June 2010 - 06:49 AM

Thanks for the tips hoshiadam and zorn. Post has been updated!
  • 0

#7 melbourneSTORM4eva

melbourneSTORM4eva

    Member

  • Members
  • 30 posts

Posted 28 June 2010 - 07:31 AM

I just tried this the other night, looks like I need wax paper though, i couldn't get my design off of what I was using.This should help ALOT! of people.
Great tutorial, good on ya mate!


-MS4E


You can find wax paper "around" in a lot of various consumer products. Cookie tin liners, subway wrappers, etc will do in a pinch if you can't buy a roll of it for some reason.


"Cookie tin liner" Is that the same as " Baking paper"?

And if you get an A4 sticker sheet...that comes with a whole lot of brand name stickers on it, if you peel all the stickers off, and then the remaining, that stuff will work too eh?

-MS4E
  • 0
Looking for a 2k tank & pump, to ship to Australia please.

Youtube

#8 sharvil06

sharvil06

    Member

  • Members
  • 225 posts

Posted 28 June 2010 - 07:57 AM

I just tried this the other night, looks like I need wax paper though, i couldn't get my design off of what I was using.This should help ALOT! of people.
Great tutorial, good on ya mate!


-MS4E


You can find wax paper "around" in a lot of various consumer products. Cookie tin liners, subway wrappers, etc will do in a pinch if you can't buy a roll of it for some reason.


"Cookie tin liner" Is that the same as " Baking paper"?

And if you get an A4 sticker sheet...that comes with a whole lot of brand name stickers on it, if you peel all the stickers off, and then the remaining, that stuff will work too eh?

-MS4E


Yes thats the stuff, also if you have a page full of stickers you can peel of all of the stickers and you get left with wax paper as MS4E said. Also if you ordered felt pads from McMaster for slugs, the roll is make out of wax paper also.
  • 0

#9 nerf22

nerf22

    Member

  • Members
  • 31 posts

Posted 28 June 2010 - 08:03 AM

Cool. I use the same process but follow these directions with slight modifications.
----->http://www.freewebs....aintyourgun.htm


Sorry. The link doesn't work, but I will leave it there any way. :(

Edited by nerf22, 28 June 2010 - 08:05 AM.

  • 0
It's Nerf or Nothin'

Oh and Three Days Grace rocks!!

#10 melbourneSTORM4eva

melbourneSTORM4eva

    Member

  • Members
  • 30 posts

Posted 28 June 2010 - 08:37 AM

@sharvil06
About Mc-Master, I have tried e-mailing them this but I have had no response, so does anybody know if they ship to Australia?

Back on topic, I've just tried out this Baking paper method and it seems to work great, thank-you very much.

-MS4E

Edited by melbourneSTORM4eva, 28 June 2010 - 08:38 AM.

  • 0
Looking for a 2k tank & pump, to ship to Australia please.

Youtube

#11 HOTH

HOTH

    Member

  • DO NOT TRADE
  • 557 posts

Posted 28 June 2010 - 12:06 PM

Awesome. Not much of a painter myself but that method looks great. Love the PAS, by the way.
  • 0
My YouTube

Solved the Rubik's Cube in 46 seconds

"Nobody understands quantum mechanics" - Richard Feynman

#12 nerfer9

nerfer9

    Member

  • Members
  • 680 posts

Posted 29 June 2010 - 03:19 PM

I've actually found that if you want to spend the time making the piece of wax paper the size of a piece of printer paper, that once you put the masking tape on that you can put it in your printer, and print your design directly on the tape.
  • 0

#13 BoneRiot

BoneRiot

    Member

  • Members
  • 76 posts

Posted 30 June 2010 - 12:22 AM

i've been doing a tweak on this for years. you can take cover the gun with a layer of painters tape, then tape down the paper stencil and cut it out right there. very quickly you get accustomed to the level of pressure to cut through the tape and not dig into the plastic. this drasticaly cuts time and gives a very fluid adaptation of the size/layout of your stencil
  • 0
They call me Afro Thunder
QUOTE(CaptainSlug)

Your member account at NerfHaven has been temporarily suspended for 9,999 days.

#14 popatachi

popatachi

    Member

  • Members
  • 206 posts

Posted 30 June 2010 - 06:50 AM

@BoneRiot: The only caution I would add to doing the method of tape first and then cut is that if the base coat of paint has been put down, you would need to be sure to not cut through the paint and not tear the tape.

On one of my earlier tests I tried this method, but didn't like the results as in places the cut went too deep and near the end of the design it had ripped just enough for the paint to leak through.

Edited by popatachi, 02 July 2010 - 07:50 AM.

  • 0

#15 ModSquad

ModSquad

    Member

  • Members
  • 102 posts

Posted 01 July 2010 - 09:15 PM

This video covers the printing out your stencils that someone made reference too. Even though they are digicam stencils the method could be used for nerf.
  • 0
QUOTE
"Roger Ten Niner, we got a rainbow four klicks out. I'm casting the rod."
"Roger Squad Leader. Sending in back up."
"Roger Ten Niner. We have a confirmed bite. I repeat, a confirmed bite"
"Good job boys, lets real it in and go home"


0 user(s) are reading this topic

0 members, 0 guests, 0 anonymous users